The name Unicorn was given to the method because it had no name and a few forum users were attaching my last name to it. It’s “just buffing chisels” in general, so trying to brand it seemed inappropriate. After all, Randall Rosenthal (world class carver and wood sculptor and artist) said a long time ago on a forum that he only used buffers to keep his chisels in shape.
The actual reason for choosing unicorns is because the combination for most people will seem like things that are never seen together. If you do it right, it should last longer than two flat planes meeting at an apex (it does). It should get through wood more easily – especially into the sharpening cycle (it does). It should be easy to get right and fast (it is, it’s as fast as anything). It should be inexpensive to tool up for (it is. the equipment costs the same or less than high quality fine stone and the result can be made better). And it should be able to accommodate more variations of tool hardness, taking the load off of novices to learn now to manage the burr on varying types of chisel hardness/alloys (it does).
So, it seemed like a standardized test should be able to prove this, and specifically in the test, that an edge finished with the buffer won’t be more effort to hammer through even a moderate amount of wood. And that it will also close the gap to some extent between really cheap chisels and expensive chisels. Perhaps to the point that properly setting up a cheap chisel can outperform expensive chisels just sharpened to 30 degrees or some other rule of thumb (it does).
I chose for my cheap chisel, a Sorby bench chisel. Sorby’s bench chisels aren’t actually that cheap, but their edge quality is no better than a lot of hardware store chisels. Too bad that’s true, but it makes them a candidate for this. They’re shockingly bad in hardwood, but hard enough to do work in softer woods.
Next up from there is an Ashley Iles MkII bench chisel, followed by a Veritas V11 bench chisel, and then a run of the mill used Japanese chisel. They are listed in this order because I assumed that the results would be ranked as such. V11 is a little bit of a wild card here because it’s a highly alloyed (chromium carbide in this case, like D2 plus more carbon and in powder metal form). Powder metals aren’t really great for chisels, they typically have high carbide volume or need to be powder because the ingot type is totally unsuitable.
The Japanese chisel is one that cost me all of about $220 for a set of ten used from Japan, but it’s a better chisel than the others even though it’s middle of the road for Japanese chisels. It’s a shape that I like and sometimes that’s more important than perfect edges.
Nature of the Test
I tested before this to find out where most chisels hold up with a flat bevel in cherry and maple. Maple is something most people won’t do too much of by hand -this is hard maple – but cherry seems to damage the same chisels, just sometimes not as quickly. That is, something like the Sorby will hold up in soft pine, but lose its mind quickly in cherry. If a chisel holds up in various cherry samples, it will hold up in beech and maple. There’s no reason to make this a patsy test, so I didn’t just test in fine mahogany, and there’s also no reason to make it something stupid, so I didn’t choose Gombeira or some other wood that seems suitable for cannon balls and car axles.
I am pretty consistent, so I figured I would mallet the chisels. The reason for this instead of setting up some machine that drops a weight is you have no reason to believe that a machine test will duplicate what people do, but you can probably recreate something an intermediate or advanced woodworker would do, and I’m long past the point of being inconsistent when chiseling or malleting. I chose to mallet a standard sized section of maple on the same board for all chisels. I’d prefer a chisel to last much longer than this test section, but the test has to accommodate Sorby and a short volume of about 1.25 cubic inches of malleting represents cutting several half blinds, and it’s enough to expose edge damage and make a point.
For each iteration, I marked the volume to be cut and then marked the slice size to be cut so that everything would be fair. I malleted by twisting my wrist rather than swinging. This makes even force very easy.
In the end, the test leaves us with pictures of edges, a count of the number of strikes in each test and I can attest the following that goes beyond strikes: If a chisel takes edge damage, you can’t stay in rhythm. It will bounce out of the cut, so you should assume that the differences in strikes increase effort by double the numerical amount for starting and stopping, and this – if you’re experienced in hand tools – miserable nonsense when you can do something easily one way, but it’s constantly interrupted because a tool isn’t working right. Working only by hand is about rhythm, not outright speed and not swinging sledges instead of mallets. Uninterrupted rhythm gets things done and allows you to observe something else. It’s very important.
The Chisels Tested
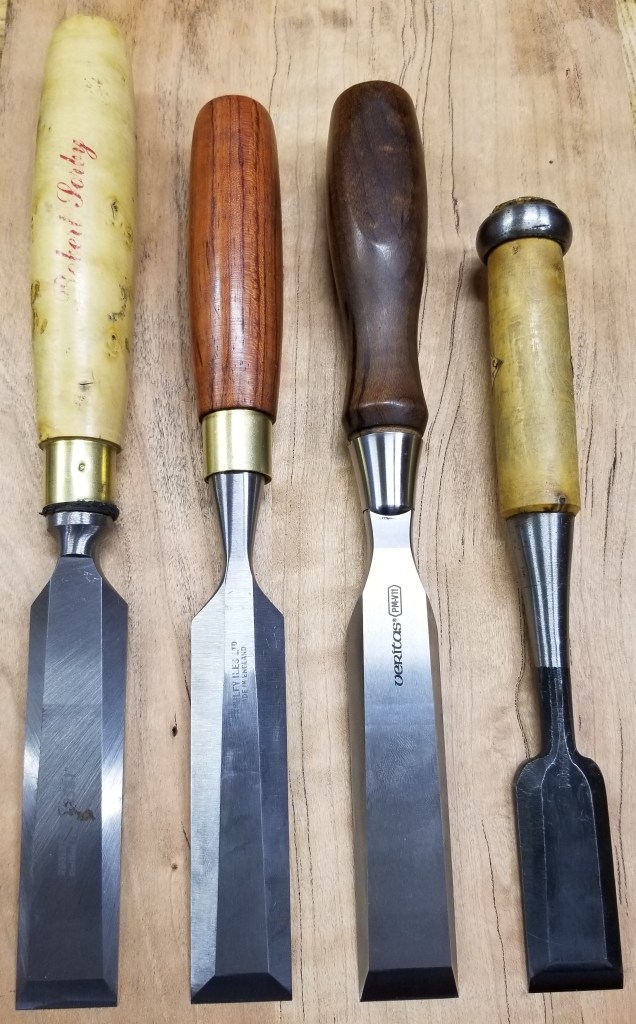
R to L: Sorby Bench Chisel, Ashley Iles MK II, Veritas PM-V11, Japanese Chisel of thinner profile purchased off of Buyee/Yahoo (proxy service/auction site in japan).
Chisel tests in general seem to favor hardness. I would estimate the sorby is 58/59. There really are no good chisels below 60 for bench work. The next two are spec’d at 61 and 61-63, but the Iles is harder than it says it is and I’ve seen hardness test results pointing that out. It’s a point or two harder. The V11 chisel is probably at the top of its spec or maybe even a little above it, and the Japanese chisel is the only one I still have now that I have a hardness tester, and it’s about 63. Interestingly, few good Japanese chisels are the 65/66 claimed. That’s rare air for hardwood work – chipping is the result. Maybe a topic for another day as some matrix steel chisels hold up well, but they have other quirks. You don’t need a steel invented in the last 25 years for a chisel. In fact, the market for pros never went to various alloys even though they existed – until it was pretty much defunct, and then the path went to “can be made with cheap labor” to now, where we have “can be made with CNC and then won’t move much in heat treatment”.
A Data Table from the Actual Test
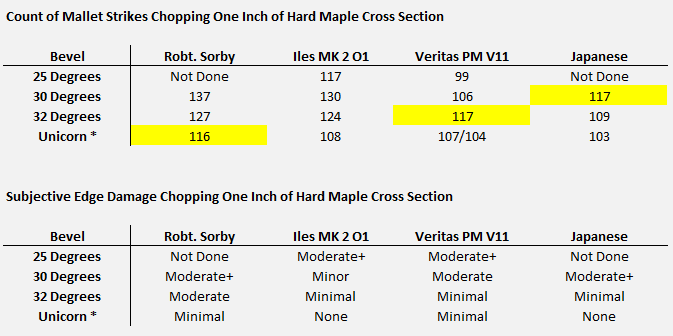
This table has common bevel angle suggestions, and one I added. 25 and 30 are often suggested at an apex. I’ve never had a chisel that holds up at 30 in hardwoods – I doubt anyone reading this has. I’ve made the comment in the past, unrelated to the test, that sometimes a cheap chisel needs 2 degrees more than an expensive one, and since it’s semi-related, I just added 2 degrees, which does help. 34+ starts to hold up really well in a cut, but it also begins to bounce out of hardwoods and it’s not suitable as a general setup because it’ll crush softwoods or soft hardwoods. You can try it – make a 1/2mm 35 degree bevel and compare, you’ll see what I mean. But you can note that any decent chisel starts to stand up far better a few degrees beyond 32 degrees.
At the top of the table, the number of strikes are recorded. As I mentioned, this isn’t really a 20% difference or something for the Sorby, it’s more like double that in feel. Strikes measure the effort, though, and they also give a decent indicator of damage present at the end. More on how much work you create for yourself if you pretend you’re a tycoon and can just hone off 4 thousandths of an inch over and over, after the pictures.
The yellow line tracks something mentioned earlier -is there a setup where a cheap chisel will match an expensive chisel set up by a rule of thumb that doesn’t fit. If that’s true, then if you don’t want to buy expensive chisels, you can give yourself a break and solve the problem by understanding what’s happening rather than memorizing your credit card verification code.
The V11 chisel was an outlier here – at low angles, it will slip through wood and take damage. So the numbers look really good, but you will be left with hellish subsequent grinding and honing and if this test were extended, the low figures at low angles wouldn’t seem like they were so great. You’ll also have lines all over your work. It breaks differently – that is, it seems to be low toughness (it is) and the edge chipping is less like bending metal and more like tapping the corner of a brick and seeing the powdery damage fly off. I think that’s due to a combination of high hardness and a steel that’s lower toughness plus it’s a powder steel and probably doesn’t have the same directional bias for strength that regular ingot steel does. You can probably look this up and find it for CTS-XHP. The answer for V11 will be the same or almost indistinguishable.
I think this is important to mention because you will run afoul of reality if you read this chart and assume you should buy a V11 chisel and set it to 25 because it’s the best.
I never could get the unicorned version of Sorby or V11 to show no damage. I assumed something was amiss with the V11 test, so I did it a second time. I suppose this is an unfair bias for the Veritas chisel, but if you think you have an anomaly, it’s good to confirm. For Sorby, it’s no anomaly. The Japanese chisel was the sweetest to use once set up well – no big surprise. This behavior isn’t only available in Japanese chisels – but also in harder samples of 1800s to early 1900s English chisels. You may have to buy a few iterations to find the good ones, though. That’s life.
Pictures of the Edges
The rest of the story – the actual edge pictures with a line so you can see how much of the edge is damaged from where it started. If you do a brisk sharpening of a tool, you remove about 1 thousandth. You may think you sharpen a lot more and you’re billy big-rigger, just like the folks who say they use 12 pound planes because they’re pretty big. Those comments typically come from newbies who haven’t used a plane for 2 hours on a given day. Just the same as that, nobody typically hones out 4 thousandths of an inch, which means when you see damage much deeper than a thousandth here, it becomes a huge waste of time. Huge.
Damage progression for the Sorby:

Notice the deflection on the sorby – this is punishing when you’re malleting something and is generally the sign of a chisel softer than it should be. Some of the damage goes 5 thousandths deep or so – at least soft chisels grind and hone easily. Obviously, the unicorned edge holds up OK, leaves relatively little to fix and could go a good bit longer.
Picture of the Iles
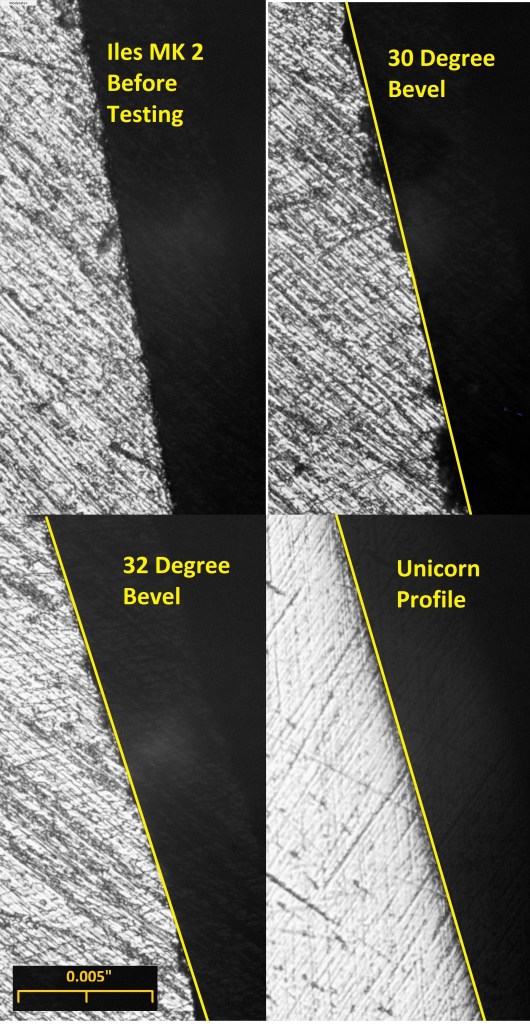
The Iles chisel held up pretty well at 62. It’s an ingot steel and has directional strength in line with the length of the chisel. The last picture shows that when I was running the burr off the chisel back, I accidentally buffed the tip a little, which is actually a bit unfair, but I didn’t bother rerunning because the 32 degree damage was minimal. I would expect from this picture that the last pane would maybe correspond with more effort in the cut, but it wasn’t so. So, the LV chisel got the benefit of being tested twice to confirm, and I was asleep at the switch on Mk2’s last run. It happens. I no longer have these chisels to re-do the test.
Pictures of the V11 Edge
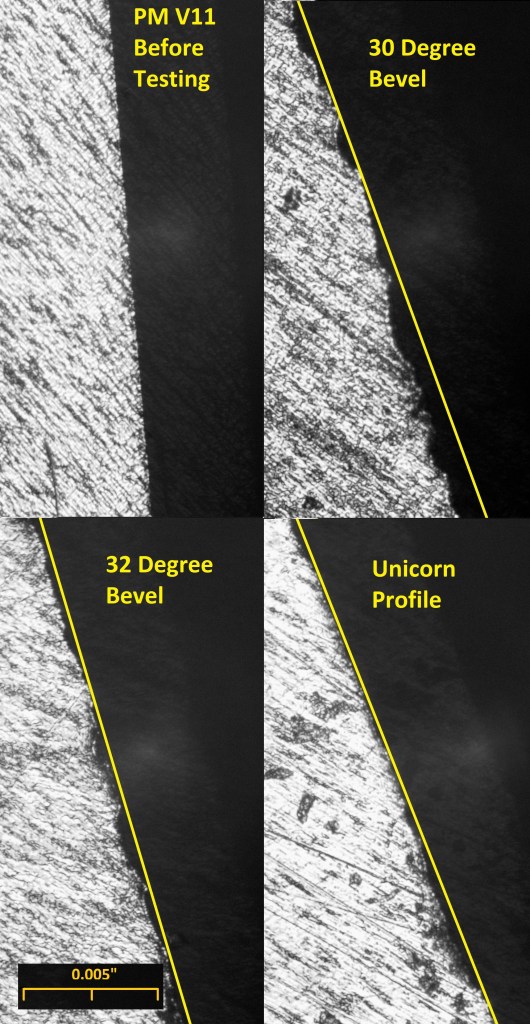
I expected to show the Sorby could reach into usable territory, but that it would always be behind the V11 chisel. And the same for the Mk2. However, the inability to buff the edge over on the bevel side and stop damage was a surprise. It’s just the nature of the steel. If you look closely, you can see a little white dot in the last picture at the edge. Those are carbides. V11 gets its wear resistance from chromium carbides (carbon mixed with chromium). They’re generally about 5 microns, but can team together in touching lumps when volume is high. By my math, 5 microns is about .0002″ – you can see things that size on the visible light spectrum. The other steels here have no carbides that large, at least not in volume.
The lesson here, too, is these carbides give V11 twice the wear resistance that O1 has, so in theory, if you had perfect wood and no edge damage, you can plane twice as far. I’ve actually tested this and found it true in practice, but it doesn’t hold up in actual regular work or end grain planing. However, you will grind V11 half as fast because this edge life figure is abrasion resistance, and grinding wheels abrade. I suspect a lot of people never grind and hone all of the damage out of A2 and V11 on a regular basis, as I had to actually do it for this test and grinding the damage out was a real pain because the steel sparks less, there’s more friction because of that and the chisels bevel gets hot easily, even on CBN. This is an obnoxious combination if you’re actually doing real work where the work is pulling you back already just when you’re starting to sharpen or grind. We like to be at the work. And, yes, I’ve had a Tormek in the past -there’s no simple work around for this, and you hone it at half the pace, too. Kees Heiden made a machine early on and actually measured how much length was honed. These side comments are a curiosity to me that was unexpected learning from the test. I sold the chisel soon after being done as even at price neutral, I would not care to have it at all if the second and fourth chisels are available.
Lee Valley is a highly ethical company, though. It’s just the breaks, and if we’re being honest, the typical customer rarely uses the chisel or does little enough with chisels that having the chisel arrive nearly prepared will be more important to them. For the veritas chisels, accurate manufacturing makes this the case. I think their machine tests just didn’t expose these issues. The fact that the powder metal stock is actually very expensive to produce or acquire just complicates things further. And it is expensive – they’re not tricking anyone by charging more for it. I wish they’d drop forge a plain steel chisel and harden it to 62/63, but it’s not in the cards. All of these effort quirks are magnified when you test a bunch of things at the same time. You really notice relative feel and effort differences that make a real difference in day to day work, but you may not be able to judge.
The Japanese Chisel Pictures
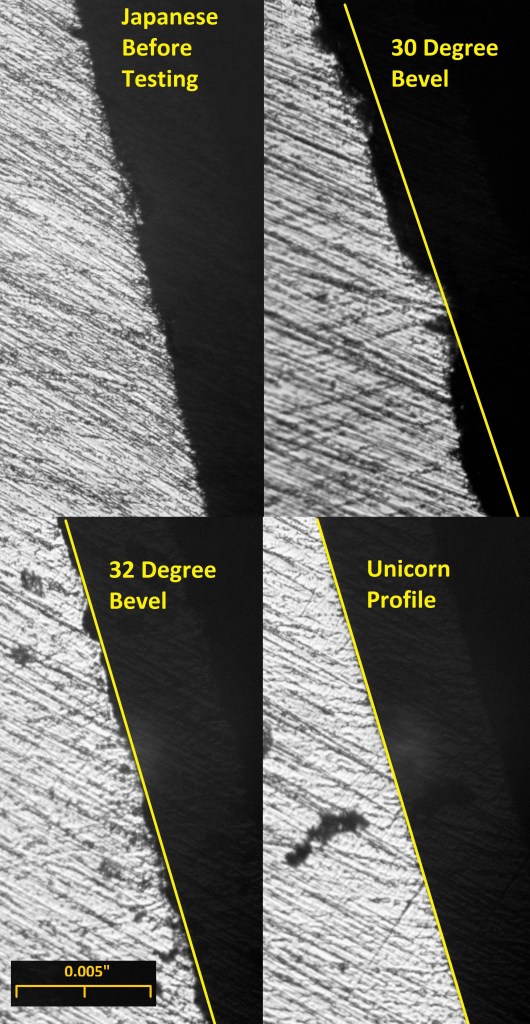
This chisel fared well. Not a surprise. Later hardness testing showed it to be only 63 hardness. The picture look is small in difference. The reality is the unicorn profile gets through the wood in less effort and would chisel several multiples as long (it does). Damage is a funny thing – it’s not linear. A little starts and then it propagates.
It’s very clear, though, at somewhat higher hardness, this chisel doesn’t care for a 30 degree edge. This chisel is probably White II. None of the white steels are particularly tough (bending strength until breaking), but they are very strong in a straight line. This bias is why tests by YT gurus with a machine setup aren’t that great. The dropped weight type tests should never introduce lateral forces, so higher hardness to a degree will always win the test. It will in mine, too, but this is how we actually work, so things like this huge 30-32 degree difference will materialize. This chisel doesn’t tolerate hard prying, though, but none here do, either. Letting the chisel flop around and be misstruck and prying things are two serious productivity reducers, anyway.
With the little nits in favoring things and mishoning, etc, this test is still reliable. You could reproduce it. The sample variation is probably small, and you can see the second V11 test gave a result that was little different – less variation than even I would’ve expected.
The suppositions are proven, though – the edge is generally more efficient through work, especially when considering time spent honing. You can’t outlast the unicorn edge on a good chisel, neither can I. I’ve since malleted something more like 10 cubic inches of wood with later chisels of my own make to make sure I could match a Ward and Payne bench chisel, and to do that all in a row is absolute torture. My comment about damage not being linear comes from those tests.
Also, the pictures show you can get by with Sorby or equivalent chisels, but I think if you are going to do a lot of woodworking, spending for decent chisels is worth the trouble. It’s not always easy to tell just by price. I also think buying “premium” chisels at $100 or more really has no merit or benefit in terms of actual woodworking. If you like them and they please you, though, that’s different and you can make your own decisions.
