Sort of like a blog roll, but only stuff being made and only about the making..
1/29/2022 – A couple of Chisels and a Guitar
Still making chisels, albeit fewer, and I probably won’t make that many this year. Maybe three or four sets. I don’t love the style of handle (visually) that seems nicest to use, so here’s a set of three parers that I countered that the cheap way – flashy wood. Oops on the three, though – the middle size in this group warped like crazy and will need to be remade. The warp is in the last inch and half, which means I’ll put the hardened chisel aside and keep it for myself – it’ll be shorter or narrower, haven’t decided which yet. I guess this is sort of like eating burnt food at a restaurant.

I got the sense that the bottom chisel might be slightly soft as I continue to experiment with ways to cut the bevels after the chisel is hardened. Two out of three being no good is annoying, but I realized when setting the handle that I was setting it in rosewood with very hard mallet strikes and the edge took no damage. So, sometimes I guess you perceive things that may not be material. Maybe the chisel is a point or two softer, maybe it isn’t. But it’s a relief to see it smash blindly into rosewood and take no damage. Which reminds me again of the paring chisels made to “never be malleted”. I just can’t get on with that idea. The lack of spring in the tang and top part of this chisel is what allows the thin 2/3rds of the blade to be thin – it’d be a shame to replace this design with a thin piece of flat stock, but this is just what’s happened with “paring chisels” since the English stopped making good ones. What’s the result? They’re either fat over their entire length (Narex), or shorter and with construction that is – just my opinion – really missing something for the price (Blue Spruce – flat stock, shorter chisels – still very expensive).
What would I guess the price for the chisels above would need to be to make them professionally? Probably about $150 each. If I had to make these during the week to eat, I could do it without issue, but I don’t have to. I don’t think the market is deep for things fully handmade, either, and I can say the last thing I want to do is deal with customers who complain that the chisels have hand marks on them somewhere or that are 2 hundredths off of target width and get narrower as you move toward the tang. Or who ask “why are these more expensive than a blue spruce parer”. They are a joy to use, and I’m glad I’ve learned to make them. It sounds arrogant to talk about them being good, but I’ve also taken my lumps experimenting with each part to make the demonstrably better without making them technically complicated to do by hand.
On to the guitars – why make guitars? It’s kind of like chisels – I don’t have a good answer. I want to make some carved top guitars, and then some hollow bodies (this will probably be over a period of years), but I don’t want to make them with machines and jigs except where necessary. A good (very good) les paul style guitar can be had from japan for about $1100 used with great quality wood, great workmanship, shell inlays, etc. If the point is just having guitars, there’s not much need to make them. Just like chisels.
I’m in the experimentation phase making the first of this type. You hope it will turn out great, but the reality is when you crash through the first of anything, you’ll find out what things aren’t that great to do by hand, and what you’d do in another order, so I’m not going to blog this guitar. I hope it plays well when it’s done. It’s got its nits and at close look will definitely look like it was made by hand.
The hope is that later guitars will be made by hand but not actually look immediately like they are. I do use a ridgid OSS when making guitars for certain things, as well as a belt sander platen for bulk removal of material and initial dimensioning (and a drill press, and a trim router, etc). it’s starting to sound like little is made by hand, but most of it actually is – even the binding channel was cut entirely by hand on the body (this isn’t a great idea, but it was worth trying – it leads to too much follow up after the binding is installed.
the top is just planed/scraped and hand sanded into an arch, fingerboard cut by hand, neck laminations cut by hand, etc.

Two things are the case with making something new, but specifically, a guitar that was designed to be made with power tools at jigged, patterned stations:
- some of the things don’t make sense to do by hand in terms of quality, all the way down to just marking and sawing fret slots with a dovetail saw (I can make something to cut the fret slots without as much concentration, not a problem)
- While it would make sense if making a bunch of guitars to jig certain operations and define standard sizes (and have something like a drum sander), I don’t want the jigs or the specific tools and don’t have any interest in owning a drum sander (and also no interest in buying any premade parts outside of the pots, pickups, tuners and hardware. I’ll take my lumps, but won’t be blogging about crashing through this guitar at least as the first is always a test to see what you’ll do differently on the rest.
- I guess there’s a third – rather than buy inlays, I bought celluloid sheet so that I could cut the inlays out. It doesn’t save much, but I don’t get stuck buying inlay pieces and being bound to them. I assumed at the outset that cutting these and then fitting with the OSS was a good idea. It’s actually easier to size the inlays (since the sides are curved) with incannel gouges.
Not everything is easier with power tools.
(if anyone is asking, neck is laminated curly hard maple with walnut strips to separate the varying figure, body is quartersawn limba and the top is quartersawn rosewood – the top carve leaves a bit to be desired but that will help #2 be better than #1).
12/5/2021 – All Handles Fitted
This set of chisels is functionally finished. I will touch up the shellac on the handles. So, why do the shellac first and then have to touch up? First, if there are pores, then I need to fill them and I’d rather do that similar to the way a french polish is done than use some designed pore filler. Second, and just as important, they get handled a bunch while fitting. If you don’t finish them before handing, they will be black with dirt and oil. That’s a no go.
So, what looks like uneven handles in the pictures is actually uneven blade length – I slid one forward to hide that. It’s no big deal to grind all of these last and make them identical lengths or some progression, but I’m hoping they’ll get used and there are plenty of hardware store chisels that are identical lengths if someone cares.


12/3/2021 – Making and Fitting Handles
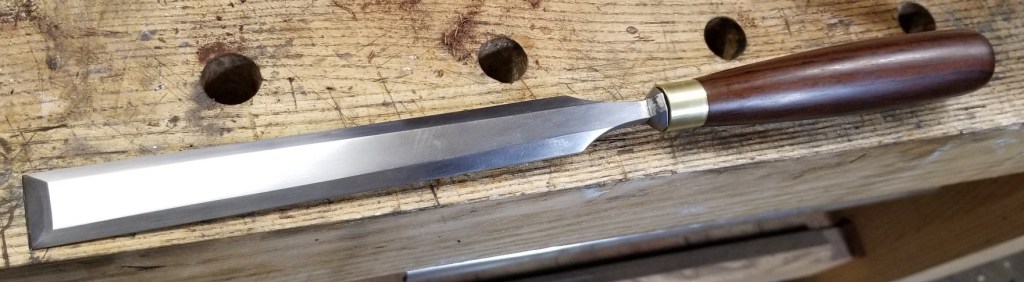
These chisels could get some kind of really fancy handles, but I’ve never felt that they’re more comfortable to use with anything other than the plain marples carver’s style handle, just with a slight amount more bulk. There may be a case where someone is leaning into these chisels, hand in their side, and in that case, a little bit of bulk in the center of the hand is nice.
Pore free wood is my preference, so I keep a bunch of light and dark woods on hand. On paring chisels, weight isn’t an issue in the handle.
What size? To get an idea of a good handle length, measure across your knuckles (3.5-4″ for most men, but I’ve made planes for people with knuckle widths as big as 4 7/8″) and add about 1 1/2 to 2 inches. For me, this is a handle about 5 1/2 inches long, and for parers on the large side, I like a little bit more. These are big handles and a lot of older chisels come with something a little shorter.
The ferrule (brass) matches the bolster, and the handles themselves generally are 1.2″ at the top of the barrel down to 1.1″ for the narrower chisels. It doesn’t sound like much difference, but it’s a lot in feel. Narrower chisels will get shorter handles. I don’t have a great deal of excitement to tell you about handles, you just turn them. If you’re not sure what to turn, always start with a professional/commercial type that you like and preferably from an older chisel.
For bench chisels, the handle measurements above apply, but generally mine are about 1/4-1/2″ shorter- that still seems long, but I like to grasp the handle and not chance striking the web of my thumb. If you make handles too short, you’ll become familiar with what I’m saying. If you like to pinch the chisel blade on a bench chisel, then you’re already not going to like cabinetmaker’s chisels.
I turn the handles with a skew and a parting tool, no matter what’s on them, and try to do as little sanding as possible. The stub tenon for the ferrule is dead on (as in dead on measurement) the inside diameter of the brass tube that I buy (McMaster Carr…suck it up and get something nice if you’ve gotten this far – .025-.03″ thickness brass stock is nice). It takes malleting to get the handle onto the ferrule and I like that. should it ever get a little loose, a tiny bead of thin CA would be fine, but that shouldn’t happen as driving the handle onto the tang will really apply pressure.

The person getting these chisels (remember, I don’t sell these – I get requests from people I know well fairly regularly and either trade or just ask them to cover the material cost) chose rosewood. Rosewood does have some small pores, so I mix shellac and oil and lightly sand these handles after turning at 400 grit to allow the pores to partially fill, and then when that’s a little dry, I start a quick french polish process (but only a very light covering, not a full high gloss polish). This is done alternating shellac, oil and alcohol on a small rubber and it only takes a couple of minutes. The result looks a little bland, but note that you don’t see the pores and I didn’t have to sand much (I hate sanding). There will be some finish shrinkage, but the handles should feel silky, which is why they don’t just get dipped. A heavier shellac coat would be very durable, but thin is refreshable by anyone.
On light handles, thin shellac. You can leave handles unfinished, but they will become really dirty and grimy very quickly. If there’s a thin base of shellac, you can always rub the dirt off and refresh the shellac (no matter how old the handle gets). If you use a permanent curing finish here (or CA or something else), you’re going to end up with a handle that looks less natural.
Fitting the handle – this is something that is a regular ask. I file or grind the tang to a pyramid with sharp corners, then drill a two step hole and put the chisel itself in a vise. The tang will drill a taper for the hole, and when it’s close to size, just drive the handle on it.
How do you drill the hole? I do it with a hand drill after the handle is done. Drill a half inch, then allow the handle to spin around the drill bit at slow speed, and adjust until the handle rotates without runout. Continue to do this until you’re to depth. If you have trouble with this, consider just drilling the handle oversize and bedding the chisel with epoxy – it’ll be fine.
The tang will bend a little for adjustment, but not much, so don’t do a terrible job and hope to make it up with a big bend.

I don’t remember what I said earlier – I always intend to grind the side lands down to almost nothing for the full length of the chisel, but I don’t have the heart – this is a more aesthetically pleasing look. You can see from the side profile that the chisel has some heft at the tang and then it flattens out quickly.
I drove this handle on hard with a steel hammer – as mentioned previously, there’s no reason to mallet these chisels, but there’s no reason to consider that they shouldn’t be able to tolerate it. You might be able to break these chisels prying a locked door, but they’re not going to break with heavy malleting.
After refreshing the grind and resharpening, it’s nice to see if you can take a handful of shavings (even on the first edge off of the grind) and see good results.

I want to take heavy shavings and see little damage, none is better. There’s no guarantee that the first edge is perfect (it’s just quickly set up, honed india/washita and then buffed).
I do the handles one at a time. I’m sure lots of folks could advocate going through them quickly. If the finish is applied as shellac on a less nice handle, it takes me about 25 minutes per handle for everything, including finish, fitting and ferrule. These take closer to 45 due to the pore filling. If you asked me to, I could make a very quick set of regular hardwood handles with a couple of coats of shellac in 45 minutes, but there’s no reason to rush here. We’ve done a good job and made a chisel with nice proportions, and finely, and better than we could buy (and maybe better than all but the very best vintage parers).
The feel and experience of all of this is what hand making is about. If you want to make a more decorative handle, then by all means. My tip to you if you may want to do this in the future is to start looking at the designs of older handles, and when you see something you like, save it or buy the chisel. There’s an ergonomic, productive (phsyically), tactile, and design/visual aspect to all of this. It’s a combination of sensory things along with function that should be better than just making something quick.
One last comment – if you’re like me, you get a handle done and you just want to handle it – but beware if you have what you think is dry shellac on your hands and you’ve french polished a handle or applied shellac on it. It will react with what’s on your hand. That’s a pain. You can redo it, as the lathe doesn’t really need to have anything to do with the handles other than burnishing the wood first and then hand rotating while you apply shellac.
12/2/2021 – Ready for Handles
Near the end of the 11/25 post, you can see that the chisels look kind of like chisels, and what’s really left with each is just checking final width, a bunch of filing and finish work, cleaning up the tangs to be sharp and square in cross section, and getting ready for handles.
The first five are complete. This doesn’t take hours per chisel, but it can take some time to clean up the tangs, the backs, reflatten the final back near the edge, file the bolster, and so on. I don’t know how much time, it varies based on how much needs to be done. The last of the finish work and the filing around the tang is always done by hand – it gives you a while to look at things and the result doesn’t look like a computer did it.
Grinding the bevels on these on a 36 grit fresh ceramic belt is sort of an afterthought. you can grind the entire bevel from square without water in a matter of a minute or so, maybe slightly more for larger chisels, and never see tempering colors (these chisels are tempered right around light straw, so no tempering colors, no issues).
A dip bucket allows you to have an even heavier hand.
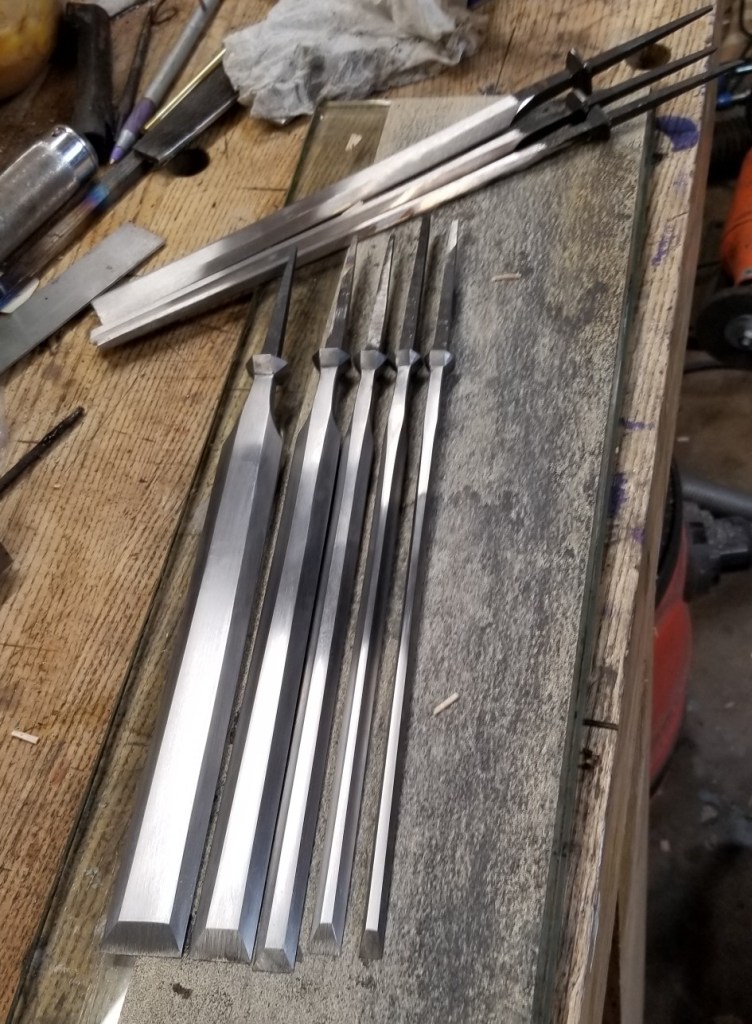
They vary a little bit in length (I cut the two narrowest chisels down slightly, but the 1/2 inch chisel does look a little bit like a middle finger.
The last two sizes are left a bit taller in cross section since they are narrow. A little bit of tang grinding is left, but sometimes it’s nice to do that stuff one at a time when you’re fitting handles so that you don’t get in a rush through a bunch of chisels.
The last three chisels are for me, so they may get a slightly lower finish standard and completed more quickly than these five.
What’s the standard worked to here? They’re not perfect. I don’t intend them to be and none of the older chisels were perfect (they will take marks or scuffs in use, anyway).
11/25/2021 – Grinding – Post Heat Treat
Happy Thanksgiving! Next up is grinding and finishing and filing the bolster. I do most of the bevel grinding on a “multitool” attachment with an 8″ contact wheel. For someone using a jig and wanting something like a burr king, this tool is crude to say the least, but I like to use a contact point and do the work by eye and I don’t want limitations of jigs or specific straight lines.
To make this cheap and reliable, the whole setup is attached to a single speed high amperage grinder (something like 11 1/2 amps), and to get the most out of ceramic belts, you need speed. The setup works at about 4800 feet per minute. There are faster grinders, but this setup is fast and strong, and at the time I got all of it last year, was about $650. I still go over the backs again with the 4×36″ belt sander if they’re not still really straight, but with more care than heavy grinding so as not to round over the back. Now that the steel is hard, it grinds a lot cooler, too, so everything with bare hands.
This is the contact wheel, and a fresh 36 grit ceramic belt is retrieved when grinding bevels on hardened steel – only two belts are needed in this process – a 220 grit ceramic belt follows this well and doesn’t leave deep marks to work out by hand.
Before I start grinding bevels, though, I look at the chisel to be ground. This one is relatively flat on the back but with a small side warp. It’s a 1/2″ chisel, but I accidentally dinged it when forging – too deeply, and it’s now 0.47″ left at the tip. An error that large isn’t common, but it’ll still work as a chisel. The idea of extreme accuracy in chisels, called “tool slaving” on the forums, is an idea that doesn’t have much usefulness in actual hand work and these chisels are intended for hand work, not matching to a router bit.

The side warp shown in the picture is what you’d expect with water hardening steel – it’s no big deal – you’d take every one like this if you could get it with a flat back and a tiny bit of bulge to one side.

I implement “the count” in the terminology here. There’s a water bucket above the grinder and I make three passes and then dip, and so on. A fresh belt will actually cut all bevels and thickness this chisel without dipping and without burning it in about 15 minutes total, but it’s nice to add dipping as a habit to stop and look each time – we’re past the point where we want to make this chisel twice. The count is valuable both for physical fatigue, but also to plan to keep fresh eyes on the tool. This does still only take about 15 minutes to do – because I’m dipping, I can use a slightly heavier hand, but I don’t want the chisel to be too hot to touch.

At this point, it’s nice to stop for a second and look over the chisel. You become the grinding robot (but with a lot of flexibility here) and you want to learn to introduce the chisel to the wheel right on the bevel or biased left or right to move lines. You don’t want to be far off target and grind a chunk out of the middle of a line. It’s pleasant work, and it trains your eyes, and feel/touch to be able to work to angles and lines accurately without jigs.
The one key to mention here is that wherever I’m grinding the chisel, it is moving across the contact point on the belt so that no spot is just building heat. Could this kind of thing be jigged? I think it wouldn’t be that difficult if you want to manufacture something, but I want something made by hand where I’m the maker, and not just an attendant feeding jigs, let alone a machine programmed to do several functions.
The bevels on the side of this chisel are relatively fine, but no sharp edges are made – I work progressively grinding to make them both look almost identical, the tip thickness is .115 and the center is .135. That’s right about where I want them. Aesthetically, I like a side land that increases with the sides of the chisel, but toward the tang, but for parers, i’ve begun to make the lands even thickness for most of the length of the chisel as I guess someone could use these inside something like a sliding dovetail. The reason there are still visible lands (probably 1/2mm or a little more) is that without lands, the corners of the chisel become very weak on the bevel and chip off. I don’t like this and I’ve never seen it done on vintage chisels (zero lands) – I can think of several reasons why. These will not get in the way, but the corners of the bevel will hold up well paring.
Next is the bolster filing, and then some iterative work hand finishing the chisel. A picture below will show why (the hand work). At this point, the chisel is functional and a bevel could just be added and the chisel would be fine to use.

After filing the top end of the chisel, the tips of the shoulders and the tang can be filed. Things quickly get harder cleaning up the lines at the top side of the chisel and full hardness will kill a file, so I use an old file here that’s already a bit dull. Pinning would be toxic (look up file pinning if that term is foreign), so the file is used both pushing and pulling – don’t believe everyone about “oh, you can only push a file!”. The file is already dull and saving a dollar on a file and fighting pinning all day is a waste of time. Pulling the file every stroke or every several will pull the pinning right back out of the file before it gets serious.
This is the file used – a simonds mill file (brand doesn’t matter, just has to be decent) – it’s both safe edged and safe cornered. If you grind the teeth off of the side only, the corner will cut into the tang below the bolster, so the corner also needs to be ground off. A little bit of trial and error is needed to find out how much of the corner to remove, but it doesn’t have to be perfect to be really good.

See the side of the file – ground off. Corner, too. If the corner is allowed to cut into the tang in front of the bolster, you cannot work freely and a deep groove filed in a couple of strokes is something that you’ll never remove.
Some back and forth with a fine belt on the grinder and then a simple block with WD-40 lubricated al-ox paper designed for wood (it works well – we want the opposite of the ceramic belt – we want a strong large particle abrasive that will continue to work whereas speed grinding relies on friability and a sharp surface. I don’t use silicon carbide because the abrasive fractures right away and that can be used well to get a finer surface, but not here – there’s too much work left).
Why not just leave the grind as-is off of the grinder? It’s lumpy – it’s finished to 220 grit and could easily be stepped up another level, but I’m not going for a highly polished surface – I want a surface that can be refreshed by someone easily if scratched, and I want the chisel to be used, not pampered. We’ll end up with a surface finish a lot finer than most machine ground chisels, but it will be hand done so that it can be hand refreshed easily, too, if desired.
At this point, when we go to the block, we’re getting rid of the wavy/lumpy look below, but we’re also moving lines visually a little bit on the metal if they are not reasonably symmetrical. Whether that’s done on the grinder or by hand is a matter of experience – final correction is always done by hand.

So, what’s the point of doing all of this by hand? One of the things that I found annoying on forums was the constant drone of “it’s not better just because you made it by hand”. The point is only half for making the item and half is making the maker. Someone working by hand as much as possible will generally make something of better proportion than someone trying to figure out how to eliminate the hand making. When I was a beginner, I could judge finish level – it looks like quality. Proportion and design are elusive and you have to train your eye to see them later, and then things quickly tip. But to go with grinding this chisel by hand, as I get freehand control, then grinding knives becomes easy, and it all adds to the ability to see and do things efficiently and making is engaging instead of taxing or boring.
I’ve filed enough chisel bolsters that what you see is just a matter of exercise. The pleasure in hand making comes about when the act of movement combines with developing proportion while making. It’s hard to explain that, but the first time you file a bolster, it’ll be difficult to figure out all of the little bits. How to hold the chisel, what to hold it in, how to set up the file, which side of the cut to bias so that you don’t cut the sharp point of the facet out or cut the lines over into another facet. But with some making, you just file and craftsman’s sense (adjustment without conscious analysis) takes over, and then getting good at filing these bolsters will make you better at filing or cutting something else later that’s got nothing to do with the bolsters at all.
11/23/2021 – Hardening and Tempering
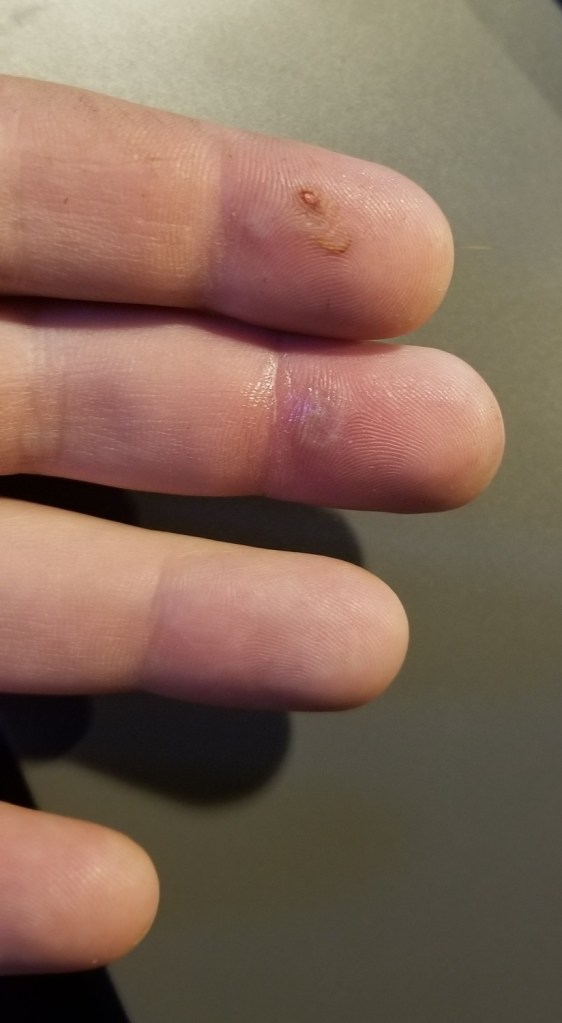
After the last picture in the 11/22 post below, I went back before hardening and on the expected back side of the tool, flattened the backs. You can do it after a tool is hardened, but it takes a lot longer and I have to do the last part of it by hand (which is a good thing). I use an inexpensive 4×36 belt sander by some name “bucktool” to do most of the back work. It’s not a burr king or a rotary lapper, but for what it costs (about $200), it’s 50 times better than the loose and sloppy over under type sanders sold at home stores (it’s direct drive, a little more power and more belt speed, but importantly, good belt tension and more belt speed). At any rate, it leaves just a little at the edges to lap out. That’s where I burned my fingers in the picture below, which is another reason I like to do that work before hardening – if you get overzealous after hardening, you can actually draw temper by hand.
The hardening is done in a few steps (I’ll keep it more brief here, but I do intend to post the full hardening schedule – it’s hand and eye only and doesn’t take long, but it shrinks the grain a little bit). The steps are as follows (this sounds more involved than it is, and the plates are used only to keep the chisels as straight as possible).
- heat three heats as close to nonmagnetic as I can get. Each heat is terminated by partial quench in parks 50, and then back into the heat. Quenching can warp tools and knives, but if they are not changed in phase completely, it should be less or none, and they’re hot here so you can tap them straight. This is slightly different than some other thermal schedules where tools are heated past the nonmagnetic point and then descended. I always get slightly larger grain with that process, and with “sub-critical” quenches, the grain gets visually smaller.
- In a fourth heat, heat the tool as evenly and quickly as possible to nonmagnetic plus one full color change (so instead of being a mid red, they’re a mid orange). We’re not soaking or normalizing in heat, so the results are a little better if the tool is heated just a little too hot (don’t get carried away and don’t leave it hot for any time duration) and then quenched.
- Quench immediately in parks 50 to get most of the heat out of the tool
- transfer the last four or five inches to a bucket of cold water and briskly move the tool in the water (never do this in the parks or you’ll have horrible warp!)
- Move the tool (if it’s a knife or really long chisel) to two heavy aluminum plates, put it between them, and stand on them to encourage the last bit of cooling (the tip is already cool). This is probably 10-15 seconds but greatly improves the final straightness
- re-dip the entire tool in water to ensure it’s completely cool everywhere, and then wipe it off and put it in a freezer immediately to finish cooling to as low of a temp as possible
The point of all of this is first to ensure the grain is as small as you can make it (Within reason), the second is to get a good complete quick heat and then quench and take the heat out of the tool as fast as possible. Parks 50 is essential with water hardening steels – this process will come up a little or a lot short with vegetable oils, and water used at the head of the quench will lead to more warping and cracking will be a problem.
If you’re just starting off, the first thing you should try is good quality O1 steel (the length of the tool needs to match the rolled direction or the long direction of the bar) and you can just do the final heat and check success. After that, it’s more or less working backwards.
And recall, there are three heats before all of this when the chisel is shaped. Do they do anything with good stock like Bohler? Probably not, I don’t know. The subcritical cycles do visually shrink grain and in use tests with chisels, the edge is matching in hardness but harder to chip.
A side comment here – my quench stops at the shoulder of the chisel and just a tiny bit of the tang – the heat is full heat only to the shoulder and the tang isn’t completely quenched and neither is the bolster – I have a feeling that a weak weld could be broken by the differential in shrinking between the bolster and the tang – it’s preferable if that part of the tool can be adjusted slightly, anyway, and that’s not going to be possible at full hardness.
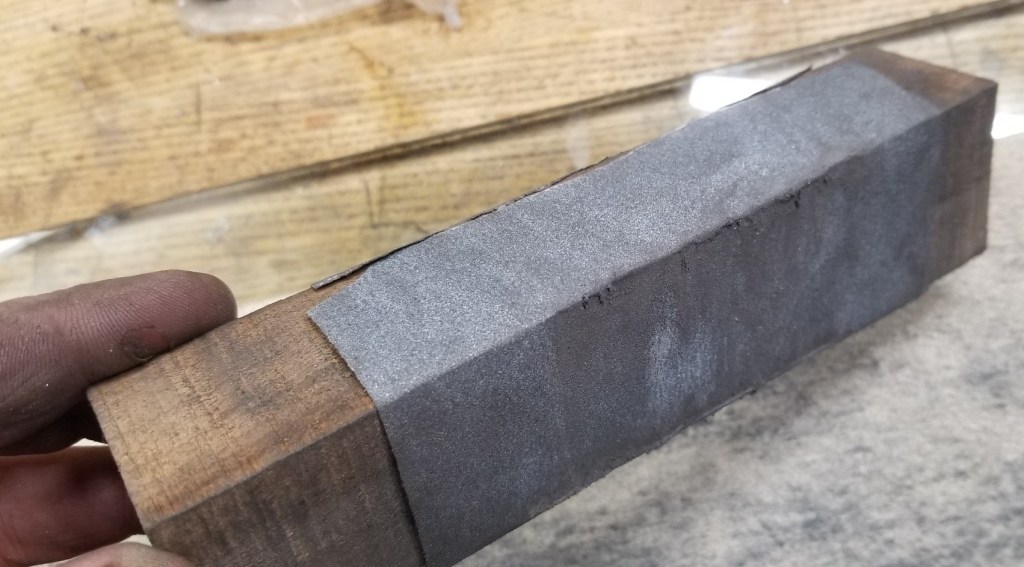
So, we end up here. Visually, I want to see the slightest amount of color after tempering, and that’s what’s next. The bar that yielded the plates that I mentioned above yielded four. Interestingly, it was an idea from a friend – a precisely milled jointer fence to edge joint wood on a router table. I no longer have a large router table to use something like that, so the fence sawed into pieces finally has a purpose.
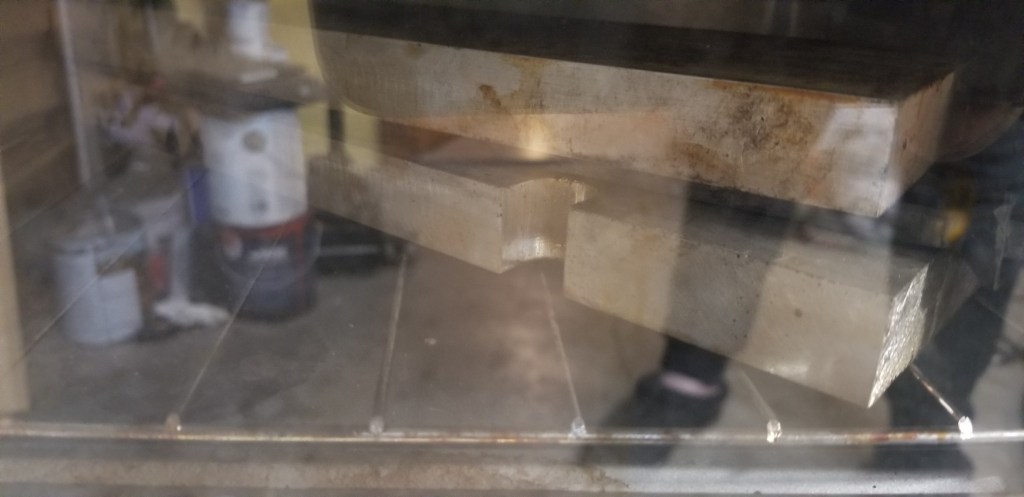
Not so easy to discern, but this is two aluminum plates in a toaster oven. Tempering should be precise, and shield above and below these plates with two trays – whatever it takes to make the chisels experience a very even heat. Not seen in here is a simple analog oven thermometer – it takes a long time for this setup to change temp, so I turn it on as soon as the chisels go in the freezer. You can just barely see the chisel bolster at the very right, the rest is just reflection off of the glass. A couple of old plane irons also do well for something like this, as would simple flat plates of mild steel.
Two tempering sessions somewhere between 375 and 400. Once up to temp, an hour is plenty for each with a simple steel like this. I have a feeling the back corner is about 25 degrees higher than the front corner based on non-contact thermometer readings, but those seem to have difficulty getting an accurate temp of metal items sometimes.
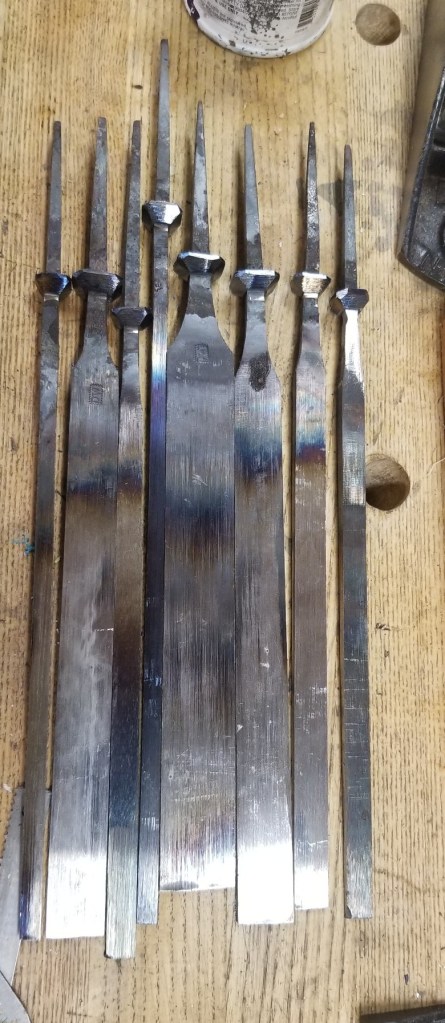
The chisels out of the toaster oven look like this (the two most narrow are still in the toaster oven at the time of this picture):
After the tempering oven – the bottom chisel is turned over with the bottom facing up. You can see the color of the temper on the chisel.
I’m looking for a very light straw color if anything, and there’s just barely that on these. If it’s hard to see, you can clean grind a spot along the length of a chisel (you’re going to grind them, anyway) that’s free of oil. Leaving oil is an invite to see cooked oil and think it’s straw temper steel. The tempering colors are only on the surface, so you can’t sand the oil off and hope that the steel will still have tempering colors.
These are now ready for finish grinding and then hand surface finishing and bolster filing. These tools have their final temper, so it’s important not to overheat them from here on – and this is one of the few situations where I go modern – ceramic belts, which excel at stock removal without creating much heat. In the old days, someone would’ve done this on a large high speed wet wheel (like human height large) and then later on a silicon carbide wheel a few feet in diameter. These are things I won’t have. Just by handling the chisels directly while grinding (no gloves), we can tell where their temperature is.
11/22/2021 – Paring Chisels
One of the things that I can make reasonably well is chisels. Everything is more or less freehand on a belt sander, belt grinder, and hand hammering for initial taper and cutting blanks out of flat stock (Voestalpine 26c3 steel in this case, which is very similar to Japanese White – #1 B (white steels are divided into two ranges beyond just #1, so there’s #1A/B and then #2 – I never checked the range for #2, but presumably it’s split). 1B has a little bit less carbon than 1A.
26c3 might be overkill for chisels, but there are no real hard and fast rules other than what works. What’s the virtue of 26c3? When you give it a reasonable thermal cycle – I’ll post my heat treat regimen at some point – it involves no soak and works in the open atmosphere because it shrinks grain rather than enlarging it, and the heat treat work isn’t done at a temperature that would cause carbon to leave the matrix. That translates into results at are (at this point) slightly better than commercial figures and if a tool warps, you can reheat it. The other benefit is that the thermal cycling only takes about 10 minutes total including the quench – so there aren’t long wait times with a commercial oven.
I suspected it was good, but for knife folks – we don’t really put much value on toughness in woodworking tools. Our aim is to avoid edge damage, not to have a tool that will bend and allow edge deflection. What we value is a lot of edge strength and enough toughness. So, things like car leaf springs and mid to high 50s hardened goods with high toughness don’t actually work that well for woodworking compared to high strength tools with adequate toughness.
To my surprise, when I had 26c3 samples tested by a metallurgist, this is what I got. If you look at this chart, these are O-1 samples using the same heat treat cycle. Tempering is double tempered at 390F in a toaster oven 2 hours per temper between large aluminum blocks. Accuracy is important. I found the test samples a bit hard to work with compared to chisels (easy to overheat), so the one flyer may have been the coupon that got away from me. These are all done by eye with equipment that in the world of metal work costs near nothing. The skill is the eye, and the only check tool is a magnet (but i don’t use that regularly and didn’t for these samples – it’s needed only to train your eye).
So, O-1 comes in around the same as commercial samples for hardness and toughness in combination. If you do a bad job and grow the grain, you may get this hardness, but you won’t come close in toughness (the figures shown are the energy that a sample takes out of a swinging test hammer from a machine called “Charpy” – the tougher the steel is, the more the hammer is slowed to break the small test sample).
26c3, you can see, just simply offers higher hardness *and* higher toughness, but it’s referred to as a water hardening steel. It warps more than O-1 does, and O-1 is already considerably less dimensionally stable in hardening than A-2 or V11. But, I don’t like what V11 and A-2 feel like in a chisel, and in testing chisels, the premium chisels bring hardness, but that’s really their pitch. For example, when you look at LV’s O1 chisels and compare them to V11, the hardness range for V11 is a lot larger. V11 can’t attain the hardness that 26c3 can attain, and it’s less tough at the same time and much more expensive. The trade here is it takes some skill to harden 26c3 and deal with the warping, and that’s probably not something well tolerated in manufacturing. But 26c3 makes a better chisel – the edge holding is better, the sharpenability is better, and it grinds twice as fast and much cooler.
So, it’s like white steel, then, and you can’t grind it? No. If I’d have tempered 26c3 at 325-350F, I’d end up with a chisel 65/66 hardness, but in my experience, you trade hardness for some very light chipping – I don’t like chipping. Most steels seem to like it better if they’re tempered 350-400F rather than a lower range (and closer to 400F). The idea that white steel can’t be ground is an old wives tale. Hitachi lists tempering ranges starting around 325F and at that, white 1 would be 65/66. Tales of tempering chisels at boiling water temperatures may be true, but chisels are far better if they’re tempered at least to 325F, and a white 1 chisel is probably better yet for use tempered around 375-400F. So, that’s probably about the same tempering temperature as V11 (I have hardened and tempered XHP plenty, which is very similar or the same based on XRF tests posted by someone a blue background forum in the US) and A2 and O1. The idea that you couldn’t grind white steel, but you can grind hotter grinding steels that need to temper around the same temperature is just lore. If a japanese chisel is that fragile when it comes to sharpening or hand grinding, it’s defective and needs to be tempered a little bit. I’ve done it to old professional used chisels from Japan and suspect the maker wanted to leave it up to the user to determine where they’d temper, if at all.
At any rate, that’s the background on the 26c3 – it gives higher hardness and though I never thought much about the toughness, the reason it works well is shown here (A2 and V11 probably have equivalent toughness to O1 at the same hardness as O1 shown here). I don’t know of anything else that hardens as easily that puts up these kinds of numbers . The cost of heat treating in my shop for five chisels is about 25 cents worth of propane and probably another 25 cents of electricity, and then the post-hardening grinding (bevels, etc) is pleasant and the chisel is one that’s probably not matched by anything offered commercially.
If a lot of that didn’t make sense, that’s OK. The TL-DR is that we can find a relatively inexpensive super clean steel that’s easy to work by hand and heat treat – and end up with high hardness, easy sharpening and grinding and toughness to spare.

So, I start with bar stock. I do hammer taper into the chisels after cutting blanks because I prefer that to just grinding away. I don’t know that it improves anything, but it’s not full forging, it’s just shaping. Why no full forging? I don’t want to lose the carbon and the quality of the steel in bar is superb. The test coupons above are just from .1″ bar as rolled from the mill. The rolling and annealing set you up as a user with something in good condition with fine grain, and it’s probably a case that if you get a round bar, you’ll end up with something less good and not more. So the shaping heats are beyond quench temperature, but not much, and I do three of them with partial air cooling between the first two and then the last heat cools completely.
Then, the grinding begins – we can create the chisels up to a point before hardening, but you can’t have large bevels on a steel that warps, so they have to be ground into the tool after it’s hardened and tempered. With ceramic belts, that’s no big deal – the only time I’ve overheated chisels isn’t grinding them, but actually getting overzealous on a hand lap. They can get hot enough to give you burns/blisters on your fingertips, which suggests the tip and bottom side is overheated, so I try to do most of the work with ceramic belts. This is a concession to hand work that I just don’t know any way around, and would guess cutlers did the same on wet wheels – plenty of post heat treat grinding.
Don’t believe the blisters from hand lapping? I implemented “the count” yesterday hand lapping the annealed chisel backs getting them ready for heat treat, and still managed to blister my fingers. It’s easy to not notice as the backs of the chisels will already have edges that don’t necessarily hurt, but they can mask the feeling of your fingers getting burned. The count is something you may learn as you do more hand work, and that is to intentionally split work into counts – so like 5 counts for lapping and then 3 to look at the tool – you’ll get done just as fast and do less unnecessary work, and then checking what you do is part of the process.
Back to the chisels- after I grind them flat on both sides (keeping the taper from the tang), I grind the rough shape of the tangs out. There are five year for a set – and then 3 for me. I already have two (and tend to keep tools that I think come up short of giving to someone else). I made a set for a toolmaker friend of mine and he has high standards, so while I was fighting the heat treatment setup to get good full length temperature control up to the tang, I figured the two I kept may not have gotten accurate temp cycling and kept them.
The set of 5 in the group being made for someone else – a set – if three duplicates come up short somewhere, I’ll keep the ones less good. They’ll still be great chisels, and better than anything offered as paring chisels at this point in western style. To my knowledge, what’s out there in paring chisels is either fat and soft (narex), looks like (well finished) legos with a short blade (blue spruce) in a steel that i don’t care for (A2), or is Japanese. Blue spruce and good Japanese parers are also expensive. The cost of materials in this case is about $20 per chisel including belts and propane and handle wood, maybe $25 if I have a couple of throwaways.
Wait, legos? Yes – but first, the Narex. Narex chisels are overly fat (the parers) and spring is lost -having the right spring in a parer is important. The spring in good parers aids feel and a level cut, but I don’t think stock can be ground to a taper in CNC if it’s really thin at the business end. Then you also have to deal with the fact that they’re austempered, which is high toughness with a concession to hardness. Austempering leads to less distortion and a different microstructure in steel – it’d make a great beater knife, and it keeps the cost of the Narex tools down (but I think you can still make proper chisels that cost less – we don’t count our time as amateur makers).
Now, the legos. I mention the Blue Spruce chisels now that they’re sold as they look to me like what’s standard practice in modern tools – very highly finished components stuck together. The blades are flat stock, they’re neatly machined, but they’re stuck in a handle with no bolster. A2 is the blade stock, which makes making easy (it doesn’t distort much in heat treatment and doesn’t need a fast quench), but isn’t a great steel for chisels, the stock has no taper, and it has no bolster. My guess (I’ve never talked to Woodpeckers, who is dealing with a business reality to make the chisels – one that we don’t have to content with) is that the design is engineered to be easy to make and make to a high finish – and that’s what most people want now. Proportion and other design aspects come first, and finish is the tail end – it’s the last thing we demand because it’s aesthetic and in a way that is below design and proportion. But a modern novice doesn’t understand the former and can easily judge whether or not they could sand a spot that’s not ground to the same finish as the rest of a tool – so that’s what’s treasured – finish first, everything else later.
I can say all of the above, and I know some won’t agree, but because I am a hobbyist maker who doesn’t sell tools. My advice is already in the chisel article – if you want really good parers, haunt English tool dealers and get chisels with fine bevels in full length and put in a little time to freshen them up. But, if you really love Blue Spruce chisels, you shouldn’t care what I say about them – support the makers you want to support and form your own opinions.
There are other English companies still making parers, but the parers I’ve seen don’t measure up to the old ones (they’re often soft or chunky in the grinding details). The older tools look like they were ground and glazed (higher finish than grinding, but same idea – spinning finer grit wheel with abrasive) by hand and thus they could be thick at the tang but thin in their cross section for the last half of length creating great strength but nice spring. The older chisels are a bit harder in my experience than the newer English tools, too, with only Iles coming to mind as still making chisels in cabinetmaker’s hardness (They spec c61. Iles does a nice job and isn’t included in my blanket statements).
Phew – there’s a load of stuff there that you may not care about, but embedded in this is understanding what makes the older parers good and then trying to do it.
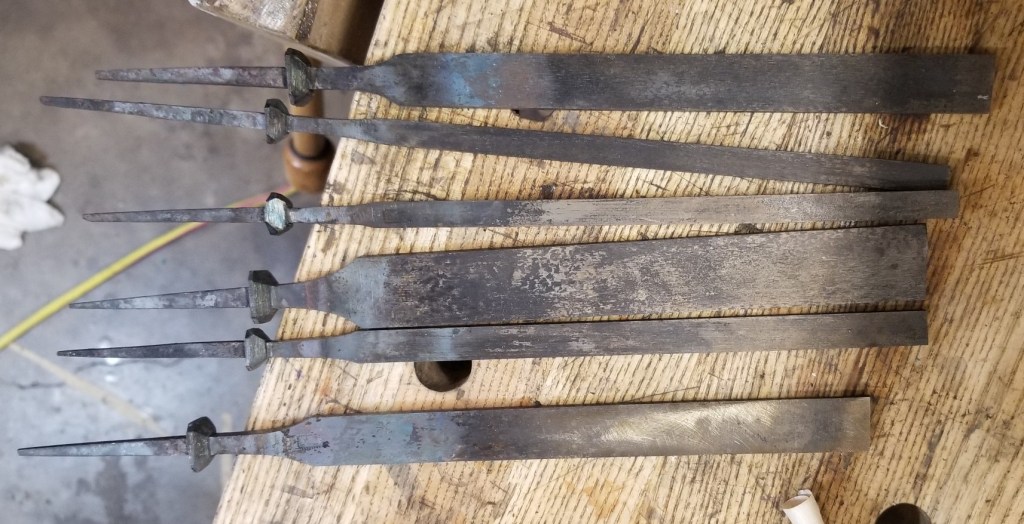
The blanks at this point after initial basic grinding are here (before the start of the tangs are roughed out – they’re marked here so that the length of blade will be about 8 1/2″ from bolster to bevel):
The brown handled chisels is one of the prior rejects – i think it’s slightly short, but it’s my reject, so it doesn’t matter.

I mark with magic marker and nothing too heat sensitive as the tangs will get hot when grinding this off (it could also be sawn, but an old used belt costs less than bimetal blades over time – by a lot). I like to saw and file the tangs out, but doing so consumes a lot of both of those and it makes more economic sense to use a worn ceramic belt to do the wasting. Too bad. At any rate, the marker leaves a nice fat line that’s still easy to judge by – we’re eyeballing the work outside of just the lines as we go along here and that’s what a maker does – we’re not just working to the lines – they’re on the initial blanks to make it so that the sets do look like they’re relatively similar in proportion when done.
After grinding the tangs rough, I take the chisels back to the forge and draw out the tangs (hammering) and then heat the back of the chisel and hammer in my maker’s mark (which is also shop made out of old file stock and then tempered back to be tough enough to not break – the stamp edges are just made with a checkering file that came from gunsmith supply).
You can see the top three chisels below haven’t yet been ground and filed to create the shoulders, but the bottoms have been. Everything kind of rough almost to the very end (remember, they’ll warp, and I still have to affix bolsters, which can distort the tangs a little bit and require correction).

These are generally left a couple of hundredths over width to deal with warping and clean up, but I don’t always aim right and some are slightly oversize and some under. The tang end of the chisel shoulder is slightly less wide than the bevel end – it’s a bias in our favor and was common when chisels were hand made (some more drastically so). It’ll also make them nicer to use inside joints as the back side of the chisel won’t bind. You would have to use two inches off of one of these to get a hundredth of width or two off, and nobody will ever do that.
Next is affixing the bolsters. Those are just 3/16ths mild steel with a hole drilled, and they’re heated and hammered onto the tang and then formed (hammering) to the tang so that the joint doesn’t have any gaps. At this point, we could stop, but I like to go a step further forge welding them to the tangs, so I do that with a brazing torch – careless work here can lead to you cutting steel rather than heating it, and one of my rejects did get a little tinge of melting on the tang. I’ll fix that with an aesthetic work around, but the set of five is unharmed so far. If we mess two of the same size up, another chisel can be made.
After forge welding the bolsters in place, I grind them and then go back and clean up the filing at the shoulder and any remaining coarse distortion before heat treatment. The chisels are slightly oversize in width, and the bolsters will be finish filed to octagonal later. If you look closely at the chisel on the right, you can see I filed the tang bright to see how much I accidentally burned when heating the bolster to forge weld. Flux can make for visual anomalies when heating a small spot – and sparking that occurs with cutting looks a lot the same. I got “too quick” in the terms of my relatives. These little feedbacks where you make small mistakes lead you to be a better maker – if you play it safe with everything, you’ll burden yourself with unneeded prissiness over time, and a lack of precise judgement). Not that it’s too important here, but color is very valuable when working by hand. I like to heat the junction to yellow but absolutely don’t want to heat much of the chisel to that as nothing good happens at high heat for a long time. The heat is quick, but it’s also damaging to the eyes, so I wear inexpensive UV glasses designed to protect eyes when doing metalwork. The fact that they protect my eyes comes along with some limitation in seeing colors. “too quick” in this case is continuing to heat without dipping my head (looking over the protective lenses) a fraction of a second to check color.
If you’re going to forge at high temp or do a lot of grinding, spend $15 and get safety glasses designed to protect your eyes from the UV, though, or you can do permanent damage over time.
When all is said and done, the tangs will be ground to a point. When you’re hammering the tips to get the bolster blank off to reheat and form a few times, you don’t want the tips of the tangs to be like needles – the tangs remain unhardened above the bolster so that they can be adjusted when fitting the handle, but they’ll be long thin pyramids to allow cutting of the actual handle hole to near full size before tapping to final seating. That is, the crisp sides of the tang help you drill a perfect hole. The chisels will be full hardness up to the shoulders or close and the tang below the bolster partially hard, but fileable. The bolsters themselves are mild steel, so they won’t harden and can be finish filed. There’s no reason for them to be hardened that I can think of.
The goal at the end here is to have chisels that are delicate feeling to pare, but you can hammer them as hard as you’d like (prying, no, but malleting – you won’t need to do it, but any decent chisel can handle it). the top side of the chisel will be just under .25″ thick at the tang, the middle of the blade will be about .14″ and the bevel end will be about .1-.12″ thick. The tapering will have curvature to allow for most of the taper to be taken out by the middle of the chisel – there’s no reason for it to be fat in the middle and the curvature looks far better than two flat planes meeting. We’re working freehand, so there’s no great reason to not add nice touches such as this.
