I made two other blog posts about rehardening stanley irons. First, a laminated iron that was very high carbon water hardening steel and rehardened to a very high level (but stability is an issue). And then yesterday, a type 20 iron that doesn’t have the same potential, but did turn out to be a nicer iron for the bench after rehardening and by no means low quality steel or too soft. Just a more modern lower carbon fine grained steel that doesn’t show anything that threatens uniformity. That post is here:
Referencing that relieves some of the need to repeat a lot of the details.
The third iron in this case is a replacement iron for a stanley 18 (it probably fits other planes, but I don’t use block planes much). I’ve since lost the box that a group of these came in, but they’re a little soft. Enough so that a beginner comparing them to a boutique plane would probably complain, but the steel is uniform. Buffing the cutting edge (they’re bevel up, so no concern about clearance) eliminates any edge holding issues they’d have due to softness, and you can then use them stock to plane anything. Your hands will hurt before they’re dull (anything includes cocobolo with silica or bubinga, something you’re not likely to read on forums or in ad copy – I’ll save geometry at the edge for another time. Safe to say, you can plane anything with an iron like this until your hands are sore if you modify just the very tip of the iron (not even enough to make it feel dull).
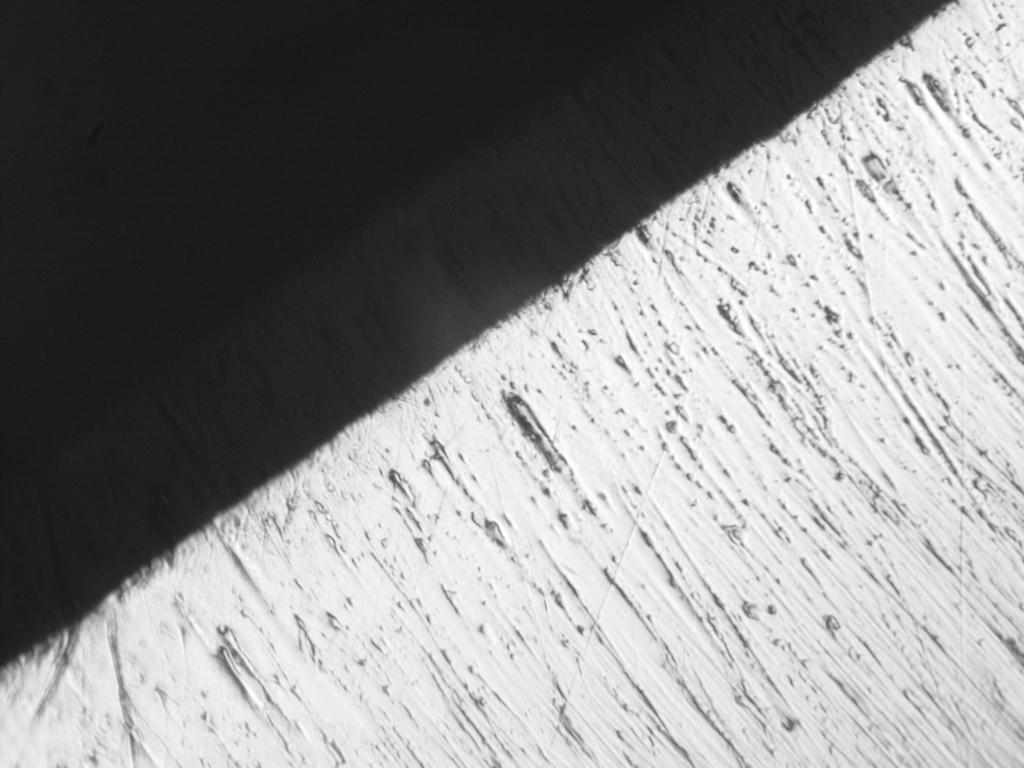
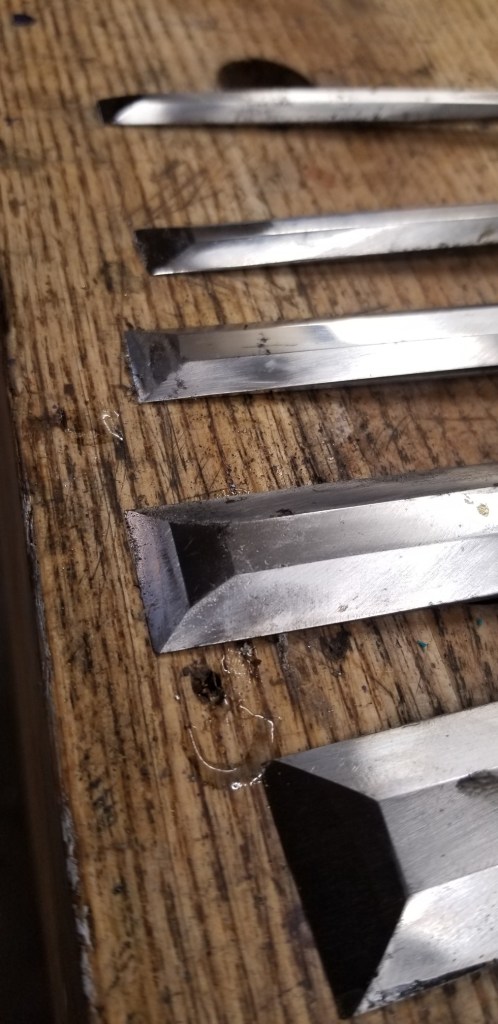
At any rate, a picture of the iron (it’s filthy from being rehardened – when you buy a new iron, the iron is ground post heat-treat all of the hardening and tempering colors are erased).
I’ll leave guessing the age to the tool collectors.
Rehardening Results
This iron is solid, and it’s a different steel than the type 20 stanley iron and definitely not the same water hardening steel that’s laminated in on the sweetheart iron.
Hardness is also between the two. It cuts freely, but not fast, on the india stone and cuts little on the back side on the washita and lets go of its wire edge pretty easily. Hardness is probably a point harder (maybe two is more likely) than the type 20 bench plane iron after rehardening and a point softer than the laminated iron after rehardening (same 400F double temper, same hardening process). (Adding as an edit – a second session trying this iron with some stones shows that the washita is struggling in a fair fight with this one – it’s fairly hard. Any harder, and it may be impractical for use with the washita stone).
Behavior in the quench was good (as in, it’s entirely reasonable to reharden these if you can swallow the cost of setting up a small forge and buying fast oil to get full hardness). You can temper in your kitchen oven if you use a thermometer to find an area where temperature is steady.
The feel is different – more like water hardening steel (the feel on the stones that is), and less like oil hardening, but it’s difficult to know for sure without having XRF analysis done to tell the composition – that’s not something I have easy access too. The carbides might tell us something.
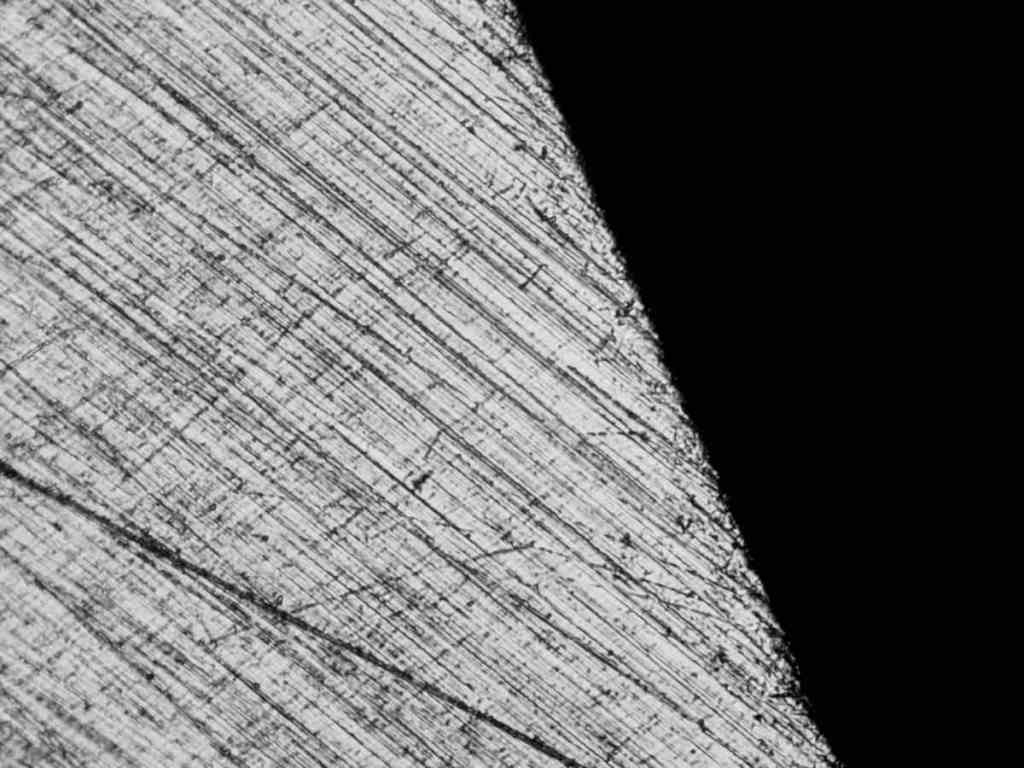
The finished iron (without any type of stropping at all) after teasing off the bulk of the wire edge is here (straight off of the washita). The buffer does a nice job of making the edge very straight after this, but it would plane fine with this tiny burr left on the iron.
A very nice even fine edge straight off of the washita. The fragment of a burr that’s left after the wire leaves as part of the honing process is a fraction of a thousandth of an inch long. 150X magnification. Strop this on your pants or palm and the light remnants are gone instantly.
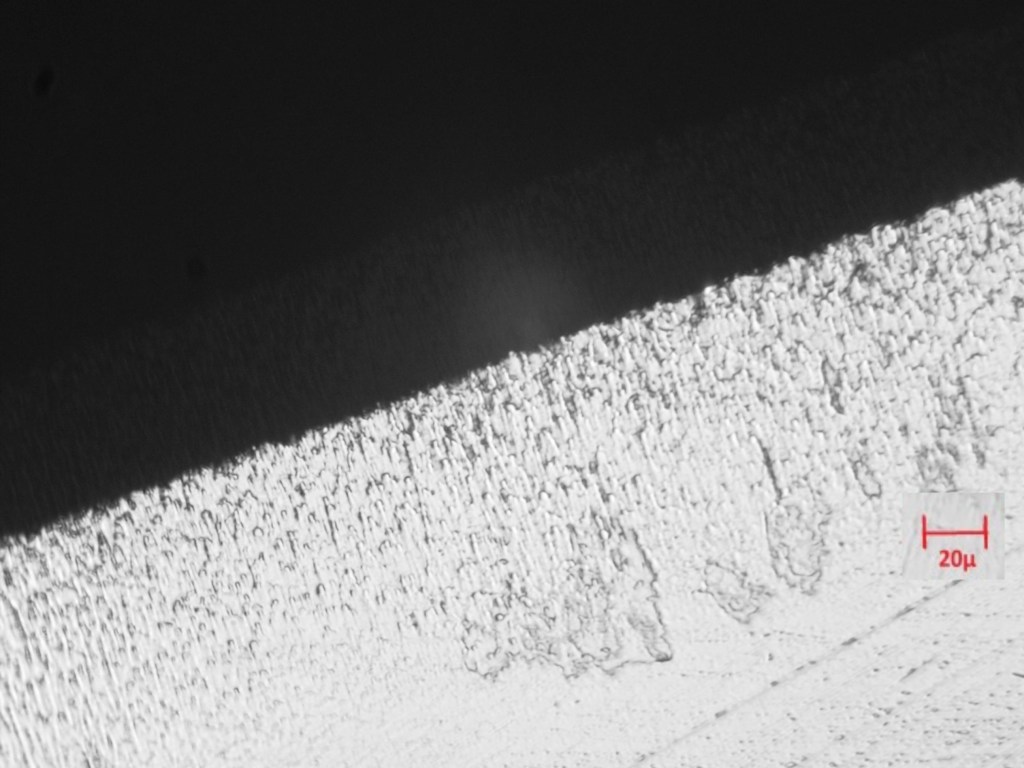
Picture of the Carbides
Carbides do stand proud of the steel matrix in this iron. I think they’re probably round and the steel tail behind them is matrix that is protected by the grooves they cut in wood. These grooves are only about 1-3 microns, though – you’ll never see them. Picture is 300X optical and slightly under a hundredth if an inch from top to bottom.
So, as I’d suspect from the feel and the hardness, there’s a little more of something here than there was in the perfectly uniform later iron in yesterday’s post. It’s not as subtle and even as iron carbides in 1095, which makes me wonder if there is some tungsten in the iron. That wondering will have to live on (but the comment is based on the fact that tungsten in quantity will make the odd large carbide here or there, and they’re not consistent in size).
I can make the statement, though, that this is a very good iron, and again like the laminated iron, stanley left it softer by choice. This iron has (and shows by results) a little more potential in rehardening than the later irons, though by feel on the stones, there’s nothing in it that would make it highly wear resistant for boutique edge chasers. It’s just honest, wears very evenly, lets go of its burr in sharpening without any effort and is quick and very practical without being soft.
I don’t know Stanley’s motivation for making irons softer than they needed to be based on the compositions they chose, but that speculation is in prior posts to some extent, but it may also be a case of steels like this being more forgiving to fast or cheaper processes. There’s nothing difficult about my hardening routine, but it does take a little bit of time. I think for practical purposes, just making the iron really hot and requenching it would be 90% as good, and still nicer for a bench user vs. a site user (carpenter). Carpenters were probably the target market, anyway – quick here and there use. Planing any significant amount of time with a block plane is a good way to know why you don’t want to use them for serious work.
(would I honestly tell you that I’d pick this iron over a replacement V11 or A2 iron as a matter of both use and productivity? Definitely. I think if you stray from those alloys or something from hock and get into lower cost sources of irons, you chance ending up with an iron that’s not much harder – or any harder – than the original. I would choose this iron over a boutique iron because it’s far nicer to sharpen and grind and the difference in edge life of a boutique iron wouldn’t be proportional to the additional sharpening time. This equation may be different for a beginner who sharpens everything the same way with a guide).
Yesterday, I posted about a laminated Stanley iron and my surprise at just how high carbon the iron is. It was not well behaved in rehardening, but the ultimate finding was that with routine 400F tempering and a fast oil (and good technique), the iron yielded very high hardness and it’s closer to a Japanese white steel than anything else (albeit, the carbide density looks more like a white II type steel).
So, looking for a solid iron from a “good” era of stanley tools, I found that all of the good-shape irons that I have are laminated except for a type 20 iron from a later 6. This irons are notoriously bad, but in my experience, they feel like they are slightly lower carbon and just tempered soft. I don’t know what Stanley’s market was in 1960, as in, who they were aiming for – but I can imagine that few planes were being sold for fine bench work. Regardless, I have a soft spot for types 20 and have three of them. Once they’re flattened, they work wonderfully. I’ll post a flattening process at a later date – it’s useful if you’re going to work entirely by hand as it speeds dimensioning and you can rely on the plane to communicate when something is flat.
The Conclusion for the Type 20 Iron
Since my posts go long, I’ll tell the findings first, and then the details. The type 20 iron (in this case, one with sharp corners and not rounded corners) is solid and not laminated (no surprise), it does not have surplus carbides appearing in the wear matrix (so it’s likely something around 0.9% carbon or below – I would guess a little below that based on resulting hardness), and when it’s given the standard routine and double tempered at 400F, the resulting hardness is good, but well below the old laminated iron. I would estimate it at 60 on the C scale as the india stone hones it readily but it hones finely on a washita and has excellent behavior.
It won’t be a long-wearing iron compared to anything with abrasion resistance, but it hones well, takes a fine edge, holds it and would probably be a better iron for someone working entirely by hand than something like A2 or V11 (because in heavier work, just the course of regular honing should keep the edge free of damage). In nearly all cases, a modern iron with chromium in it in significant amounts should outlast this iron all other things being equal.
Now, the Details
You may wonder why I’m rehardening these. It’s really a matter of three reasons. I use the same rehardening process for simple steels every time. The process should improve anything that doesn’t have surplus non-iron carbides, and where the iron lands in terms of hardness after a 400F temper is a good indicator of how much carbon is in it. Plan irons are thin, and with fast oil (Parks 50 in this case), it’s not hard to get good full hardness results with them.
Irons that end up with lower hardness (testing with an india and a washita stone – two stones that will give good feedback of how hard a simple steel is), generally do so due to lower carbon. There are often other things in smaller irons, but not in large amounts (perhaps a small amount of vanadium, some small amount of chromium, and in older irons, sometimes tungsten). These change the feel on a well used sharpening stone.
So, anyway – reason 1 is to see what the hardness will be after a standard process. Reason 2 is that I’ll probably like the actual iron better after rehardening (if I don’t, there’s no real hope for it). And Reason 3 is to see how practical it is to reharden.
I would estimate the hardness of the iron in this case to be around 60 on the C scale. I doubt i’m off by more than 1 in any hardness guess with plain steels. I expect off of the stone that we’re not going to see excess carbides unless they look like chromium carbides. The one plain steel that would have excess chromium is a bearing steel, but this doesn’t feel like a bearing steel. So I really don’t know.
The iron is improved for bench work – which is pleasant since it’s such a poorly regarded era – and would now make a really wonderful day-to-day iron. It’d be great if it hit high hardness like the old laminated iron to have a biting sharpness off of natural stones, but it still attains a nice edge and is practical. Why did stanley leave it softer than this? I don’t know. The demands of the market, perhaps, a nod to sharpenability (a softer iron will always sharpen faster and easier, no matter what it is), and maybe margin of error as a chippy iron will yield complaints while one that’s slightly too soft may result only in a few groans. I’m convinced the world of consumer knives is filled with underhardened knives to prevent damage that results in returns from low-experience users as it seems fairly easy to better commercial knives with shop made knives. Even marking knives.
The Initial Edge and Carbides
After rehardening, the initial edge comes off of the washita stone relatively fine. Use of this stone is a preference because it’s got such a wide range as long as steel isn’t too soft or far too hard for it (it’s a great tip finisher for japanese chisels, though). A picture of the initial edge is here (you can see a tiny burr left – that burr is probably about a thousandth of an inch long).
A fine edge off of a washita stone – with a minimal burr left. The height of this picture is 1.9 hundredths of an inch, so this burr will depart with first use, but it’s better to remove stropping.
This edge looks a little strange, but it’s safe to say it’s at least as good as an 8k waterstone. Looking at the other anomalies, I flattened this iron quickly after rehardening – the back is near polish but some of those marks are probably dirt or oil.
A comparison of washita to an 8k waterstone will be shown at the end of this as you can’t tell how fine this edge is without a reference.
The thinness of shaving possible from the edge shown above is in the next picture. I didn’t strop the edge, but it’s a good idea to – and doing it very lightly with a very fine oxide on wood or hard leather (or a buffer) is even better.
This is a reasonably fine edge and can be recreated in less than a minute once the iron is dull (which is the advantage of an iron that’s not that abrasion resistant). The steel is fine, there aren’t edge anomalies, overall very pleasant.
Confirmation of Carbides
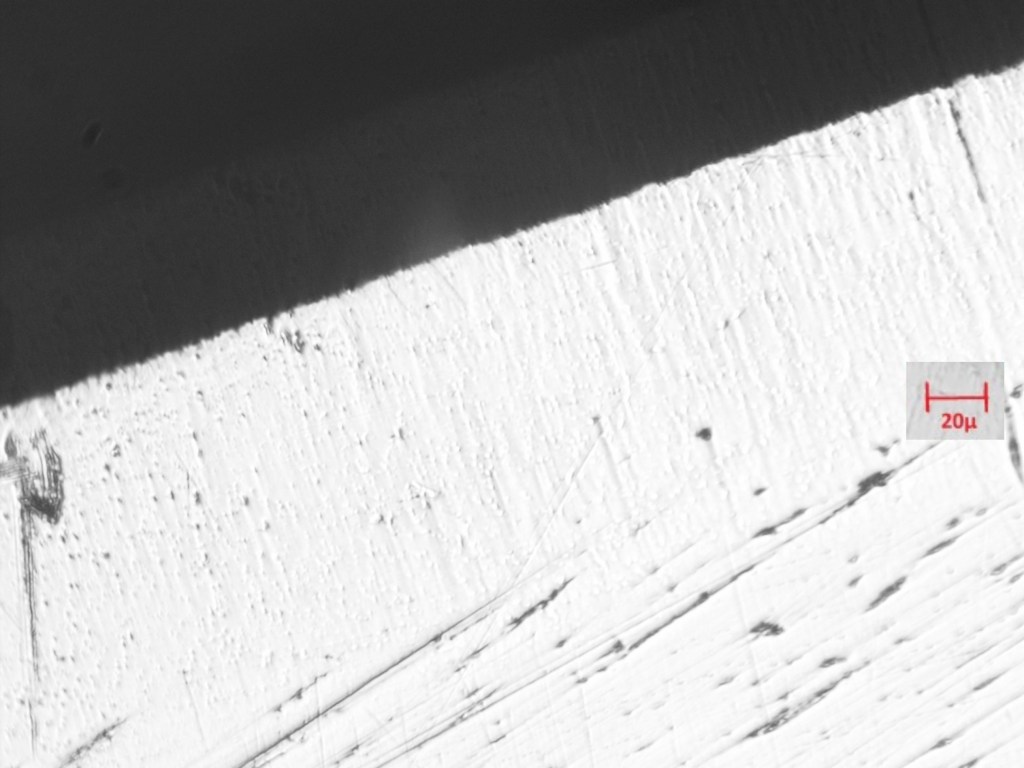
The stones don’t communicate any significant abrasion resistance or slickness, and the hardness suggests we won’t see any carbides emerging in the matrix. A picture of the matrix after planing 300 feet of cherry edge follows (and shows no significant free carbides).
The matrix shows no free carbides, suggesting the carbon content isn’t well above 0.8%. We start to see free iron carbides in steel that’s got 0.9-0.95% carbon, but not below that level.
All in all, a pleasantly good iron, but safe to say, it’s not a flawless diamond just waiting to be rehardened. That said, if you look at the edge wear (the wear picture is at twice the magnification of the original edge, so the picture’s height is less than a hundredth of an inch top to bottom), you see wonderful uniform wear. This leaves little for you to do resharpening other than remove wear. Nicking in irons generally goes about .001″ to .004″ deep (any number of nicks greater than .004″ deep makes it difficult for an iron to start a cut, thus you’ll have to do something catastrophic to see that). Minerals, silica, dirt, knots, etc, can create the typical depths mentioned. It takes a while to hone them out, and in the picture above, they would pass through the wear strip in some cases. That wear strip does not need to be honed off to refresh the iron – at least not its length. Flattening the back and honing off somewhere around .001″ of length on a completely dull iron will do the job.
Overall, nothing groundbreaking – but the iron above is a good iron and holds up its end of the bargain in sharpening vs. edge life (which is to wear uniformly in proportion to sharpening time). If I have to make a guess at carbon content, I’d say 0.8%, though I don’t think it’s 1084 – it feels as though there are a few additives – probably to make it easier to harden and temper fully. Behavior in rehardening was fine and post-heat treatment re-flattening only took a couple of minutes. Less than 5 minutes total to get to the edge shown above.
I also rehardened a block plane iron (the only iron that I may have that’s solid and between the later-make stanley and earlier laminated iron) and a “Made in USA” 750 style chisel. I’ll post those in the next several days.
A Comparison of Washita to Waterstones
It’s difficult to make a blanket statement about washita stones. I love them (the real ones – and the real ones are no longer mined and won’t come with a label like “CASE” or “SMITHS”, etc, though old enough smiths may have slipped a few in, it’s not a great bet.
A washita stone can be slurried to cut fast, it can be used with heavy pressure or it can be used with light pressure and in combination with steel hardness, you can end up with an extremely fast sharpening routine that is pretty much zero maintenance. Less than a minute for chisels and about a minute for a plane iron that’s very dull. The touch sensitivity and wide range makes it an ideal stone for an experienced user.
Over the years, I’ve had several hundred sharpening stones (probably a hundred synthetic and 300 or more natural stones). At one point, I brought in and resold (generally at cost) japanese natural stones – I just like sharpening things, but not for no reason, and I don’t like jigs or finicky things – I like methods that save time and get results.
To get on with it, I never read about using washita stones other than that a lot of people like them (and then move on to something else, but these folks are always moving on to the next thing a retailer says is great – we’re not looking for that here). It didn’t take long to find the dimension of these stones and see how fine they are. A slurried waterstone has much less dimension (synthetic types) and one of the reasons beginners like really hard irons and waterstones is they have no feel, no sharpening sense.
Next is a picture of an edge gotten off of an 8k grit waterstone (one marketed as “kitayama”). Notice not so much what’s on the back of the iron, but at the very edge and how straight the edge line is, and how many scratches interrupt it. You can see from the edge wear photo above that scratches on the edge don’t matter much – on a good iron, the wood just wears them off, and you’ll never see their effect – the edge itself is leaving the finished surface.
Kitayama stone edge – picture height is 0.019″. Note the scratches are uniform, but wrap around the edge. Not an unpleasant edge, but the stone does one thing and this is it (unless you let it dry and burnish and cease cutting – that works, but the stone needs to be abraded to refresh the surface after that)
Shapton Cream (12,000 Professional):
The shapton cream is a stone that claims to be 12k, but I think particle size variation makes it more like an 8k waterstone. A quote of 1.12 or 1.2 microns is given, but many of these scratches are much larger. The variance gives speed, though – it’s otherwise a fair trade off. Again, note the torn nature of the edge.
Washita on Stanley ‘Made in USA” chisel:
First edge on the rehardened stanley chisel on a washita. Scratches don’t look much different than the stones above (which should be a surprise based on grit charts. Finishing the edge for ten second with a light touch shows an edge even-ness little different from finish waterstones, but the scratches are shallower.
Sharpening fineness vs. claimed fineness is really interesting once you get a microscope. There are stones that are closely graded and very fine (like sigma power 13k and shapton 30k), but those stones give up speed for fineness and end up being less practical in use.
A picture of a sigma power 13k edge is below – this stone claims about 0.72 microns, and does appear to be closely graded.
Sigma Power’s 13K stone does look to be closely graded, but it pays a price – it takes a long time to get this finish to the edge of a tool replacing all prior scratches unless you come from another coarser finish stone first. It’s about 1/3rd to 1/2 as fast as the shapton 12k professional, and is a bit soft and easy to gouge, so you can’t just use a really heavy hand.
If you need a fine edge following something like the washita (finer than shown), 10 seconds on MDF or hardwood with autosol yields this:
Autosol after Washita. Inexpensive, just as effective as the very fine grit sharpening stones and at least as fast (faster in this case). The polish is so bright that I should’ve turned the exposure down when taking the picture. Black spots at the edge are dirt. It’s actually pretty difficult to get all of the oil (and then clothing fibers) off of an edge to get a good clear picture.
One of the things that I see often (and I believed when starting woodworking) was that Stanley original irons weren’t very good. On one of the US forums, there was constant drumming of “good” steels like A2 and how poor old steels were because they were made with little control, and then later not that well compared to the “modern” steels we have now.
This kind of statement is generally nonsense, but it’s hard to tell when you’re first starting out. It is true from what I’ve seen that stanley didn’t chase abrasion resistant steels with the exception of some M2 (or similar alloy) plane irons in Tasmania. The reason they probably didn’t (And older makers didn’t adopt alloy steels) is because an experienced user doesn’t gain anything with them, and quite often, the balance of sharpening and use goes south as grain size increases. With few exceptions, adding carbides increases grain size (Those exceptions are steels like AEB-L, CPM 3V and matrix steels like YXR-7 in japanese tools. Even YXR-7 is often wrongly referred to as HAP40). Matrix steels are generally fine grained steels that are lower in carbon but tolerate very high hardness for their carbon content. They’re out of our scope here, as I don’t know of a way to harden them in the open atmosphere, and they will proportionally match wear and sharpening.
But, for a while, I’ve suspected that Stanley chisels and planes are probably softer than a lot of modern steels by choice. The hobbyist crowd and misleading ad copy come along and refer to stanley irons without having a clue what the professional market would’ve wanted. Site sharpenability without a grinder was almost certainly a need. If you took 61 hardness 3V or 67 hardness YXR-7 to a site with no grinder, you’d end up regretting it.
I’ve also seen plenty of references to Stanley steel as O1. I doubt any of it was. The laminated irons were almost certainly water hardening steel (otherwise they’d be a problem to forge weld to the soft iron).
A Discovery – Carbides
In making 26c3 chisels, I figured it might be a good idea to make some knives and plane irons. It turns out that the plane irons are wonderful, but they offer no increase in edge life over something like 1095 (for some reason, the irons are harder, but as is the case with japanese steels – the edge life doesn’t improve). Below are pictures of a few irons – take a look at the edge. These are generally 300x optical and the carbides are just a few microns each.
Hock O-1 – Just a few Carbides and Very Small (probably 0.9 or 0.95% carbon)
This Hock iron shows the same carbide pattern that my own made starrett O1 irons show – as in, very little. Starrett is 0.9% carbon and I can imitate hock’s irons or give them a slightly better temper (and take a point or so off of hardness where they seem to work better in general use).
1095 – Also likely 0.9-1% carbon – Almost No Free Carbides
wear resistance is just baseline, but look at the uniformity of the edge as it wears. In my experience, this generally leads to less chipping in use and fewer lines on work
26c3 – 1.25% Carbon – Plenty of Free Carbides
See the carbides remaining near the edge after planing with the iron to wear away the steel matrix around them?
Stanley Sweetheart – Laminated – A Surprise – Carbon Unknown
Fairly significant carbides appear after some edge wear!Unexpected!
And- XHP (the same or similar to V11 – high carbide volume, but lots of surplus Chromium)
Notice how the carbide volume increases substantially with the significant amount of Chromium and very high carbon. It does lead to abrasion resistance, but reduces toughness and increases particle size. The particle size itself isn’t a big problem, but increased abrasion resistance with poor toughness isn’t a great trade for experienced woodworkers. It may be a good trade for beginners who could nick a rubber hammer with a feather.
When we examine the pictures above, the carbides appearing suggest whether or not there is surplus alloying. For high carbon steel with little in terms of additives, the free carbides are carbon. They’re not that wear resistant, but the matrix remains reasonably fine and toughness can be kept. As carbon increases, peak hardness also increases and there is some loss of toughness.
These terms and the results are not well described in the woodworking community. Claims of increased hardness, toughness and longer edge life are combined constantly, and they’re rarely accurate. Maybe never. What beginners generally think is “difference in steels” is the chosen temper. So, stanley plane irons are described as substandard (perhaps some in the 1970s or so are lower carbon – I will test that later as I’m sure I have some – the laminated iron above has a pretty strong surplus of carbon)
An Opportunity Comes from This
If my suspicions are correct, the stanley iron is fine grained – there’s little toothiness to the edge in wear – and it has peak hardness in reserve and will make a great iron for bench work at higher hardness (it was already a great iron, but I’ll temper it like modern irons are tempered).
I suspect at 400F temper, it will be harder than a comparable A2 or O1 iron (V11 is more or less around the same hardness at 400F temper).
So, I ran it through the heat treat cycle that I generally use for anything water or oil hardening and, in fact, it does come out very high hardness. I would guess it’s 63 hardness or so, and the feel on the stones is water hardening steel, not 52100 or anything of the like (definitely not O1). The pictures suggest and the performance in hardening also suggest that it’s a plain steel with surplus carbon – maybe something like 1.1%, give or take.
Now, for the rotten part – this iron is laminated. I didn’t know it was. The behavior it had in heat treat was worse than any I’ve seen by a factor of 10 when dealing with solid steel irons (even vs. 1095, which is warpy). The lamination is probably not constant thickness and I didn’t know why it was so poorly behaved, so after hardening and tempering, I hammered it on the anvil – this is risky, but at this point, I still didn’t know it was laminated and I was ready to write it off, so it got abused a little. I would suspect stanley has rollers or something that these irons run through right out of the quench, just as files are straightened quickly – I don’t have any such setup and didn’t want to concede hardness by hammering when it was still warm. There *is* a short window after quench where you can bend or straighten things (it’s very short) if you don’t get too rough – I hammered a little then and a lot more after tempering. Point of this is that there’s probably an industrial process to deal with the warping just as there is with files, so these laminated irons may not be the best candidate for rehardening.
I generally use an india stone and a washita stone to sharpen, and if needed, buffer or compound on wood – why? It’s far faster than modern stones. It’s faster still even on V11 – as long as someone is freehanding, and on everything, the thin film of mineral oil has translated to no rust on any chisel or plane iron in eons (it was a constant problem in my garage shop when I used waterstones, and flattening stones, wiping irons with oil -that’s a farce).
At any rate, plain (mostly iron and carbon with other additives not floating free in the matrix) high hardness irons will take a finished edge off of a washita and leave no perceptible burr, but without having toothiness. Here’s what this iron looked like straight off of india and washita at 150x.
When you sharpen further, or spend more time, the little nits at the edge there will be gone. I didn’t bother to push things further – this is easily an equal of an 8k waterstone. I used the buffing wheel to lightly strop, and this is the resulting shaving thickness.
There’s a lot left in the tank for this iron at its new hardness (sans crack!) – as in, 20 seconds with a honing compound on medium hardwood would make a much finer shaving than the one above. I finally figured out that this iron was laminated when cutting its new bevel – and I have two more sweetheart irons. Sadly, most of my original stanley irons went out loaded on bench planes when selling to save the “good” modern ones. I wish I hadn’t done that, but who knew?
This test is worth repeating with an iron that is solid and that will behave better. I suspect we’ll see the same and I’ll post those results. That is, that the irons themselves have much higher hardness potential and Stanley didn’t skimp on carbon (higher carbon generally does result in a more crisp fine edge – if that doesn’t seem like it could be true, find a 5160 knife at some point and see how good the edge taking is. A little surplus carbon over 0.75% (which is about the most you’ll get in solution so there is no free carbon) leads to lower toughness which to a point, actually leads to better edge behavior. If you’re going to have small damage, the last thing you want is an iron that has a burr that will tear the edge or propagate more deflection – so clean departure of damage is a *good* thing.
How good is the surface left on a cherry edge by this initial “utility edge?”. Note the reflection -the wood is, of course, unfinished. As mentioned, there’s more in the tank than this – but for practical purposes?
So, what did we learn?
There’s no lack of quality in the steel that stanley used in this laminated iron, though it’s probably not practical to reharden them without developing a process to remove flatness issues out of the quench VERY quickly.
the hard bit in the laminated stanley irons is *not* O1 (which isn’t a surprise – why would they have spent the money for diemaking steel in thin strips back then?)
These irons have surplus carbon, leading to the potential for very high hardness when quenched and tempered in the “sweet spot” (375-400F temper for most plain steels). That sweet spot being for woodworking, not for lawn mower blades.
You can hammer laminated irons to flatten them somewhat, but not as much as I did – you’ll risk cracking
Follow-up with a solid iron is worthwhile – I’ll locate one, give it an initial wear test to see if there are surplus carbides in the matrix and then reharden
Is there really a practical gain here? I don’t think so, we’re just trying to get truths instead of rumors or suppositions. For the average person starting out making tools, dealing with O1 will be much easier and you can get good results in vegetable oil with it and less warping. You can ignore most of the pundits who tell you that you can’t make an iron as good as a commercial iron – it’s nonsense. You can compare the picture below of the “house iron” to the hock O1 iron above. Notice the carbide volume and overall look – not much different. If you achieve good high hardness and temper to 350F, the iron will be completely indistinguishable, but you will also appreciate in “real work”, tempering around 375-400F – the iron will resist chipping better and sharpen easier without giving up functional ege life.
“Later That Day”
I went through my pile of irons to see if I had any earlier stanley solid irons. I think I probably don’t. That’s OK (I have two more laminated irons, but not interested in cracking them at this point or figuring out how to get them to stay flat through temperature changes).
So, I took the iron that I had in the plane and noticed that the way the crack and another small crack were oriented, they’d do nothing to prevent me from making left and right marking knives. I refer to these as “dump” knives – knives made of things you’d throw in the dump otherwise. It occurs to me that there’s plenty of times that I’d love to have a wharncliffe-ish (like chip carving style tip) knife laminated with a very hard layer.
See the “dump knives” at the bottom. These can be cleaned up further later, but they’re a good opportunity to learn about geometry. I want them to hold their edge well but not have too much wedging force when cutting, and the tip of these will do marking against a rule or square (perhaps even cutting with something like leather). Most carving knives (chip carving, marking, etc) will not be close to the quality of these as far as cutting, fineness and strength. I don’t know why – you can beat most cheap little knives on the market (about $25 or so) with just a scrap of O1 steel. These irons at high hardness should make a marking knife at least as good as the best of the O1 irons and the high hardness will make them crisp. The fine grain makes them relatively tough for their high hardness.
This is the last of three honest discussions about what really makes for efficiency when working in the shop, though it could carry on into marking tools, rules, squares, etc. Almost nothing that’s marketed now really improves making with the possible exception of the convenience of some japanese saws when you want to saw from any direction and have work elevated where it may not be convenient with a western saw. Even those are annoyingly marked up (for example, you may find a Z-saw replacement blade in the US for $20 and then spot one sold by a dealer on Japan’s version of ebay for $7.50 including shipping, or $5 per in a group of five). But, let’s put that aside (you can explore yahoo-Japan proxy shippers if you’d like and view saws there. If you’re not sure what that is, that’s eBay in Japan, functionally. They seem to prefer Yahoo).
Not Advice for a Mostly Power Tool User
There are some things that go into using saws and being the filer and noticing what’s efficient and what’s not. Someone who cuts dovetails and the odd M&T joint isn’t going to follow this. If you’re working entirely by hand, you may be filing a saw once a week, or more if you’re in the shop a lot. You’ll also physically benefit a whole lot from a long saw with good tension and that shines in the Cycle of Work when it comes to sawing vs. filing. Filing is essential. It’s also not very difficult if you can do it a few times in a row. You don’t need to be great at it, but you need to be able to get the tips of the teeth refreshed without them being too far out of line, and then once you’re there, keep a level set of teeth relatively level without jointing. It’s not hard.
What’s important in long saws is reasonable tension, no broken teeth, the ability to be filed well and length. Why gentleman’s saws and toolbox saws became a thing for someone working in a fixed location, I don’t know.
As far as 1935 goes, that’s about the time that the circular saw appeared and the end of good saws was almost immediate. I can’t see a reason to buy any long saws made now, and there’s no great reason to buy any of the short ones if you have the skill to file. If you do a lot of rough work with rip and crosscut saws, you’ll soon saw very accurately and the discussion of plate thickness on small saws (within reason – again, toss out the saws made in the 1970s or whatever, those are to be avoided – even if you start looking at scandinavia, there’s nothing that’s close to an early 1900s Disston saw when the whole saw is considered).
The good news is that there really isn’t a better saw than a Disston long saw, and the various patterns are overblown (as in, a #12 really isn’t much better, or functionally any better than a same-era D8). The only other maker that I can think of that’s floating around that’s the equal of Disston’s relatively common long saws is Woodrough and McParlin, and I recently found and old catalogue that showed that W&McP’s saws were actually more expensive – I’m not surprised. I wouldn’t say they’re better in function, but they can be a bit harder and stiffer. They’re nice, but what they gain in stiffness and hardness is probably offset by the fact that they can be a little hard on files.
What about new boutique saws? I don’t get it in the large ones. How many will have very strong double tapering and tensioning that matches the stones or wheels that tensioned disston’s saws while leaving the overall saw fileable? The idea of a $400-$500 boutique long saw just doesn’t make a great deal of sense. But if you like them because they’re pretty and they’re new and filed well, that’s up to you. Just don’t let anyone convince you that there is something special about saws made for a limited market vs. saws made in a golden era and sold to professionals.
What about the Small Ones?
I’ve made a few saws (mostly from purchased parts) – joinery saws – and one large frame saw from 1095 coil and scraps. If you’re working entirely by hand and you have the filing skill, you don’t need a new saw. I can’t actually see the advantage over an old saw. Don’t get fascinate by super thin plates (if you look at the older English saws, lots of them had thin plates – it’s not something that’s never been done before) – if you have sawing skill, whether a plate is. .016″ or .022″ isn’t going to make any difference to you.
But as with not getting floppy long saws, don’t get something that’s absurdly thin or absurdly fat (again, 1970s – some of those have really soft fat plates).
If it’s hard to find decent older back saws, then some newer saws start to make sense. I haven’t noticed it, but I’m not afraid to order saws from England to get something that looks a little more human and a little less pin router in terms of aesthetics, and that will have a folded back and not a kind of tacky slotted back with the blade fixed permanently in it.
In terms of dovetail saws rising into mid three figures in price – you’ll never find utility in it (beyond having something pretty – if that’s what you like). It will come down to your filing, and if a saw is really that bad, you may want to replate one at some point. It’s not a bad learning experience. Over time, my Things Made forum will show chisels, planes, and who knows what else – I’ve made a few saws, as mentioned, but the urge to make them for leisure just isn’t there. If I had additional space, I would raid the UK and ebay of older more elegant saws, but that has nothing to do with making.
A theme will develop here. For the average person who wouldn’t replate a saw, or file their own saw, or who is afraid of older tools – I don’t really have great advice for that crowd. I think it becomes very limiting when it comes to working by hand if you can’t manipulate your own tools to be what you want. And it should be little time before you’d prefer a $50 saw filed the way you want it over a $500 saw that’s not quite filed the way you like.
May make it seem like I’m anti-boutique tools. That’s not really the case. I started with mostly boutique tools because they work out of the box, but unfortunately, due too to the reiterated repetition that “they’re better”. Most of the things that they’re better at have nothing to do with you being better with tools in the long term. For example, a LV or LN plane is flatter on average than an older stanley plane (and if you’re dimensioning wood, flatness at the jointer and smoother level will save you a whole lot of work), but it’s also true that you can generally flatten a stanley plane sole to less than LN or LV’s spec and bias it in your favor for about $2 in materials and an hour of time. When you’re a beginner, that kind of thing is out of your reach. But, it shouldn’t be for long.
Supporting the Makers
I could make chisels and sell them, but I don’t (I don’t want to). The idea that if I did, someone might see additional value in supporting a current maker is something I can’t sit with. It would be my job as a maker to make the tools better than or at least as good as anything you could buy, and my bent is in favor of making tools that experienced users would like. I don’t think there’s anything sold at this point that is the equal of a 26c3 chisel made in an English pattern. But, there are boutique makers who do make very nice tools and some make them in classic proportion and usability, and if you like them and they give you pleasure, that’s something you should decide. It’s not always about whether or not they’re better or if you can justify utility, it should be what you like.
You have no obligation, though. The maker is selling you something. You are the buyer. This isn’t a relationship that goes both ways, and the magazines and some publishers will push the idea that you have some kind of obligation to support current makers. You don’t – you have an obligation to yourself to do whatever you like. And for a lot of people, that’s going to be less in terms of heavy thinking or learning to work by hand and more along the lines of taking a test shaving once in a while and being a Tool Preserver.
It’s not Just Boutique Tools
I can’t tell you what’s virtuous about infill planes other than that they’re pretty. Well, there’s one thing – if you get a shoulder plane from England and it’s not Norris or Holland, you can often find such a thing for about $100 in very large format. Though, even when you do that, you may find that what you’re really looking for is a rabbet plane, as there’s not much in woodworking that a shoulder plane does better than a rabbet plane, and in most of the cases where you can think of something (like endgrain), there’s probably another way to make a joint that is better and would avoid planing anything at all (for example, malleting the shoulders of a tenon with a strong marked line and a simple bench chisel – if you mark well, there’s little else to do).
But I still have a bunch of infill planes, anyway. I like them. I like the older planes that have proportions that do seem to lend themselves better to longer duration work. For example, a Norris 2 or a Spiers handled smoother will generally be near the weight and proportions of a Stanly smoother, but not all – even some of the old ones are nose heavy and overweight. On my shelf is a Norris 15 1/2 inch long #13 panel plane -8 1/2 pounds and really tolerable only for a few minutes if you’re doing more than Wood Show planing. There’s no virtue to the weight, even if you are doing the odd bit of work on rosewood sticking. This may also help explain why there are so few of them.
I couldn’t tell you a sane reason that I have the infills except for the chance that I may make more infills (they’re not difficult to make and the barrier to entry in making them accurately is low as far as tooling goes).
But, I’m comfortable with being able to say that it doesn’t make great sense that I still have those planes. If you read far on internet forums, you’ll see all kinds of descriptions about “difficult wood” or whatever else there may be in terms of intangibles, but it has nothing to do with doing a volume of work or doing accurate work, and I have yet to see an infill plane that can out-plane a properly set stanley plane, and it’s no contest when efficiency is involved
So, it’s Something Else, I Guess
Maybe for folks, it’s the connection with something current. But we should all be honest enough that we’re not telling the next person who comes along that it’s got something to do with making.
Working mostly by hand will lead to some quirky terminology. If you’re working mostly by hand, you can’t really communicate a lot of what you do or feel or conclude with someone who doesn’t. There’s no solution for it that I’m aware of – you can’t speak to people who don’t have experience figuring out the things you’ll figure out – there’s just too much nuance in becoming skilled at something and the trap in discussing is running into a lot of “can’t” terms.
So, I’ve set up a Terminology page to avoid things that I often explain over and over outside of this (now new) page. If you know me, you’ll be aware that I don’t seem to mind saying the same thing over and over at length. That’s true.
But to the extent that it’s not that great to limit the audible or visible white space by making a continuous repetitive stream, I figure adding a terminology page is a good idea. It will convey some of the things you’ll come to know working by hand.
The TL-DR of this very long post is that it’s a long discussion about what chisels were like when they were designed for work at the bench, how to find chisels like that, and some supposing about how we got to where we are now with chisels made from air-hardening steel alloys that are cleanly finished but proportionally odd. Remember, this entire blog is intended to discuss working by hand or entirely by hand. Choice of hand tools deserves more consideration and time in acquiring, and while it might be interesting to read through much of this otherwise, if all you want to do is cut some dovetails, just about anything reasonably hard and shaped like a chisel is fine. You don’t need to delve into the weeds that grow below.
1960 is just a choice of year. That appears to be about the time Sheffield, England was switching over to really automating production of bench chisels, and around the same time, tools made in lower volume started to disappear.
I’ve got a set of incannel and firmer gouges made by Marples likely made in the 1950s. They have what good chisels have:
Wonderful proportions – everything just fits when you hold them, and the bits from the bolster down are not overly fat. As time went on and costs were cut, the finish may have shown a little bit more hustle, but the proportions didn’t change. It’s hard to duplicate these proportions with jigs or CNC – inevitably, chisels get fatter if they’re forged or if they’re thin, they’re just cut out of flat stock.
Some semblance of hand work around the bolsters, even if they look relatively quickly ground. Once you see a round bolster that looks like it was turned on an automated machine, the odds of the chisel being a great one go down. However, as I’ve seen thus far, the market for used tools prices both the same.
Plain steel, but not lacking in carbon. Alloying above that needed for hardenability does nothing for you using a chisel. Once the grinder (the person, not the machine) and the glazer (terminology in England for finer grinding or finishing after initial grinding) are out of the equation, focus starts to shift from easy to grind to easy to keep flat and not have to grind much. Steels like A2 or V11 can make good chisels, but they can’t make a chisel as good as a plain high carbon steel that will achieve the same hardness.
In the world of internet guruism, it’s popular to focus on specs. Especially steel. “What’s your woodworking steel?”. This is not necessarily asking the right question as most of the differences that bloggers perceive in “steel” is really differences in hardness. It is true that you’ll have much difficulty getting a barely-high-carbon steel to be harder than oilstones will handle (or above Rockwell 62 or so), but it isn’t the case that something like A2 at 61 hardness will yield anything above and beyond a plain steel at 61 hardness. A2 definitely costs more than something like 1.1% carbon drill rod, but the real reason A2 is being used is because it’s stable in heat treatment.
What do you as a user care about stability in heat treatment? The answer to that should be nothing. That’s the business of the maker, and the stable steels generally have some carbide volume and carbide volume isn’t what you want in chisels. You want fine grain, little to resist abrasion (you’re abrading a chisel when you sharpen it) and hardenability in a range that you can sharpen quickly. Abrasion resistance will never yield anything practical in chisels.
My thoughts are that you as a maker, if you’re going to use chisels, will want to look at how chisels were made when people were making with them, vs. putting them in a tool belt to go to a work site, or later, collecting as beginners. By making, I mean making the things you want to make – likely work at the bench. Not wet wood, not door mortises, not opening paint cans, but working wood at a bench.
I Have an Admittedly Narrow View
This narrow view ends up leading to English chisels with square or octagonal bolsters, a tang rather than a socket, some length greater than you may like if you like “butt chisels” (that’s yet again, something pitched to beginners to make it easier to pinch the chisel blade instead of holding the handle – an unproductive dead-end habit).
There’s a clue here, and there’s a clue in a lot of older tools. That clue is, if you get something that was widely used and prefer what you’re using (for example, a short fat bladed socket chisel), you may have habits that aren’t serving you well. Efficiency in using a chisel comes from striking a chisel in rhythm with predictable use and not a whole lot else. Place and strike, and from time to time, turn the chisel around and relieve something in a corner or pare. If you’re pinching chisel blades or switching hands a lot to cut simple joints, you’re making things unnecessarily difficult and holding a chisel by the handle and putting it in a mark is probably less than one project away.
What has Progress Looked Like?
Having had hundreds (maybe still have hundreds) of chisels, it seems that chisels in the US went to site chisels relatively early. Somewhere around 1900? That led to shorter bits, sockets and softer steel fairly early. A set of stanley 750s will generally be softer than they could be. It’s not that the steel was too low quality to be harder, it’s that stanley chose to make the chisels that hardness. One can only guess that’s what the market wanted. Stanley irons of the same era show no lack of carbon (based on looking at the carbides under a microscope – low carbon steel wears smoothly, but as carbon or other hardenability alloys increase, you can see carbides remaining proud of the worn edge. A stanley sweetheart iron shows plenty of them. My 0.9% carbon O1 irons show almost none. Irons that I’ve made of 1.25% carbon steel show a large crowd of carbides.
So, for this (getting long!) discussion, we probably have a cutoff from US made chisels in 1900 that parallel 1960 in England. Cabinetmaking work simply lasted longer in England. You’ll find if you expose yourself to a lot of chisels before those dates, there isn’t a universal lack of hardness and chisels generally feel like they’re about 61 hardness to me (you don’t have to trust my sense in judging hardness, I’ll prove that at a later date – safe to say, novaculite will tell you a lot about hardness of plain steel tools if they’re anywhere close to the same hardness of the stones). Some are harder than that, and some are slightly softer. With lots of exposure, you can name the tools that are generally softer (buck brothers chisels tend to be softer, and if you go *way* back to the early 1800s, butcher tools will often be a bit softer – I would guess because the stones common in England were slower cutting even than arkansas stones).
After 1960, things were hit and miss and by the 1970s, anything that suited hobbyists as good quality sold new kind of suffered. Interestingly, footprint seemed to have continued making chisels around 61 hardness, and though they moved to socket format, the sheffield made wood-handled chisels have proportions like older tools and with reasonable hardness.
The era that follows the doldrums in the 1970s went to japanese tool enthusiasm in the 1980s (this was likely a function of a hugely advantageous exchange rate and a market that had no clue about the markup being added to sell good quality tools in the US – this was paralleled in the guitar market where japanese guitars selling for $350 in japan retailed for $1,000 in the US). In the late 1980s, the exchange rate declined in the US to the tune of about 1/2 or 40% of the previous purchasing power – and japanese electric guitars nearly disappeared. Someone around at the time may confirm the same with tools – I wasn’t woodworking then – the craze for japanese tools seems to have encountered a gap (exclude retailers in the US who sent glossy catalogues as they have always managed to double the price of the tools in japan and continue to sell them) until most of the public had email and internet access. I do have and like japanese tools – I may post separately the direction I’ve gone when I get them – used high quality tools in japan are no big thing. Most of what has changed in 60 years is the same as the US, which brings us to…
We’ve Traded Proportion and Fineness in Geometry for Surface Finish
…though, to be fair, you can get Japanese chisels now that are as good as any that have ever been made. But the notion that there is something to a $600 chisels performance-wise that isn’t available if you sort through $15 used and under-loved chisels on Japan’s version of ebay isn’t correct. There is (and should be) some care in the expensive chisels in heat treatment, but makers of choice in Japan become somewhat of a fad and as the fad buyers become particularly, the price increases and the surface finishing of the chisels moves to art. You or I can harden plain steels about as well as you’ll find in any chisel, it just takes some testing and understanding to get what you want. We may not be able to press or forge laminated chisels together easily, but that’s generally tradition. You can purchase something like 26c3 and make a chisel that is a match for anything from japan, and that will overmatch anything offered in the United States.
The parallel in the US is chisels that have little hand work in them and are sanded/ground to a fine finish, cut from flat stock, or made in tubby profiles with CNC machinery. They are nice chisels. But there is something lacking when you compare them to older English chisels. The proportions are off a little bit, the cross section is overly thick making them bit heavy, or in the case of some of the popular paring chisels, they’re just flat stock stuck in a handle, but surface finished finely. For some reason, finding them in the sweet spot with a steel that isn’t abrasion resistant is difficult. What’s the sweet spot? It varies by alloy. I’ll cover it better on a metallurgical post in the future, but figure 1095 and O1 steel like something around 61/62 hardness. A2 likes the same, but it offers nothing that makes it a better chisel and will resist you sharpening it, and V11 probably likes to be somewhere around 62 (based on someone on sawmill creek having a chisel XRF’ed (google it) and posting the composition and naming the same or very similar alloy. White 2 steel will like something around 63, and white 1 and 26c3 will like 63 to 65. All of these can be made harder, but behavior changes.
Notice – I didn’t mention blue steel and I only posted A2 just as an example. I’m not even that sure about 1095 at this point as I don’t really see any advantage over O1 with it – especially to you as a maker. Just as I don’t see any reason why O1 in chisels isn’t closer to Footprint and Iles’ spec than softer.
So, we’ve gotten way into the weeds and the above will all seem hypothetical at this point. Where does that leave you?
The Checklist of Aspects to Put the Odds in Your Favor
Let’s flatly state what’s usually found in older good English chisels as they’re probably not equaled for bench work:
Tang construction (though Ashley Iles and Footprint both have mock sockets and are close in proportion to older chisels – just with a different look)
Blades that taper along the length-in thickness, and that aren’t too fat at the cutting end.
Reasonably fine lands, but not zero lands. If you’re looking at older English chisels with a square or octagonal bolster, you’re not going to have an issue here – there just weren’t many fat sided, fat bladed chisels – the market of professionals didn’t accept that. The reason zero lands aren’t practical actually has to do with the corners. The lands provide some support in the corners and zero lands offer little functional benefit and lead to corner failure. Even if it’s small, what’s the point of having a super fine corner if the edge doesn’t stay on?
A handle with a brass ferrule (and not thin brass, but substantial)
A maker’s mark stamped into the metal, not printed on it. It’s a fairly simple thing to find, but the stamping of the name into the chisel disappeared partly due to cost and the need for someone to stamp it into the blanks, but also because the act of stamping a chisel actually causes distortion. This is worked out by skill and follow-up grinding on older tools, but it’s not really practical on newer tools when the objective has become hands-off making. It’s useful that this seems to coincide with about the same time that hardness dropped off and chisels were delivered at “site hardness” more often than bench hardness.
This sounds like a great list and you’ll get instant success, right? Well, I like buck brothers chisels -but I’d put them off even though you’ll find many. They are very fine grained if they’re made as mentioned above, but for some reason, generally tempered soft.
These aspects put the odds in your favor, but you may still have to buy a couple and then resell the ones you don’t want. That’s not bad advice in general when the old ones cost about 25% of the new ones. The hand-wringing over “wasting the money” to try a couple of different older sets of chisels is nonsense when two to six sets can be bought for the same price as a new set.
And..you’ll probably have to do some minor work to good chisels to get them in order – like initial preparation of the back and re-establishing the primary bevel.
Beware of Gurus who Specialize in Teaching Beginners
Please keep in mind, I don’t have enemies in the hand tool world. This isn’t a whole big attempt to bend opinion toward some aspects with a grand plan to release chisels that look like the ones I prefer above. I make chisels, but I don’t make chisels for sale – I want to be a maker, but not limited to marketing something. Making things and making them well gives you an understanding of what’s out there and when you finish grind a few dozen warped chisels, you get the sense why manufacturers may not love water hardening steel, or even to a lesser extent, O1 steel. O1 is more stable, and hardens more easily, but it still requires more follow-up grinding than air hardening steels like A2 or V11.
So, on to the issues with gurus. Imagine you’re teaching a class of beginners and you have two hours to get through the first part of the class. Suddenly, three students show up with some old chisels that are pitted on the backs – what will you do? Your objective may be to charge the beginners several hundred dollars each (or more) to get into the first steps of beginner-land and now you’ve got folks who are starting to count minutes and calculate dollars while you’re attending to someone who wouldn’t buy the new tools you suggested. I get that. Once you’re not a beginner, those gurus don’t have anything to tell you, though. If you’re reading this, you may already have chisels that work fine, or you may have 10 sets.
We’re not in beginner-land. This is a foray into making things out of wood, and we will end up discussing making things that we may used to make wood. And when we do, we will do so with the goal of making things that are at least as good as anything we could buy without any real limitations. Further, you’ll find that most of those gurus will want you to have instant success across the board, but we want to work by hand, with skill, comfort (even pleasure) relying as much as possible on our sense and eyes and less on tedious prescriptive methods or unneeded work. In short, when the gurus make blog posts telling you that buying older tools is false economy, they’re living in an alternate reality. I have had A2 chisels, I’ve tried V11 chisels, and blue steel, and HAP 40 and YXR-7, and M2 and probably a dozen other steels. I cannot imagine trading a good set of vintage English octagonal bolstered chisels for anything made now.
Why?
Because they just work in the cycle of work. That cycle is in the context of actual working, at the bench, in wood, where you sharpen periodically and relatively often. The chisels of the proportion used when makers were doing more making and less magazine and blog reading tend to do almost everything very well, don’t require special hammers to strike them (or instructions not to), special abrasives to “cut through the carbides” and generally do everything they don’t do superbly well enough that you will rarely feel the need to look away from your work and find an alternate tool to do something special. No dovetail chisels, no push chisels that can’t be struck or striking chisels that are awkward to push.
George Wilson used to post on one of the blue background forums. I have since come to learn a lot from George, and I know that George is (and has publicly said) that he’s just a tool fanatic. He is a lifetime maker – a maker’s maker who at times has made some of the finest tools I’ve ever seen, all the way down to making a wonderful infill panel plane that was flaked and scraped (and subsequently bought by someone, relieving George of his plane). When I first began to talk to George, I asked what chisels he liked. He said he had made almost everything with a set of Marples chisels that he bought new around 1960 or so (it may have been a year earlier or later). At the time, coked up with magazine articles about socket chisels and Japanese chisels, I was puzzled as to how someone with so much access to have or make *anything* could be satisfied with a name that I equated to soft plastic handled chisels. I’ve since found some older Marples chisels. I get it. I get that they may be used and require someone to tune them up. As George relayed to me, those last-of-the-good-ones Marples were perhaps a little bit overhard if anything. But they are good enough at anything that they leave a maker wanting for little. I’m sure the steel in them (as I’ve got similar era tools now) is very plain, inexpensive and with little more than carbon, iron and just enough other stuff to making hardening them successful.
If you’ve hung on this long, I’ll show you what the English pattern chisels look like, as well as what some of the “dead era” chisels look like
A Marples Parer– the Key Bits
Note, the name is stamped into the chisel (not printed on it), the lands are finely done, and the bolster isn’t round/turned on an automated machine. As much as I love parers and like to make them, even a wonderful chisel like this will find little use if you have a good set of bevel edge chisels of similar style.
Newer Marples – Deceivingly Pretty, But…
Note the boxwood handled Marples chisels at the top. These are so close to being good, but so far away. These are a set of ten – the name is stamped only in the wood and printed on the backs of the blades with ink, and the boster is rounded. You can see the lip at the bottom of the tang where the jigged grinding setup finished its work and left an abrupt stop. But the real problem with these (I can look past the rest – easily) is that 7 of the ten chisels are unhardened. I don’t know what happened, but since no job grinder (a person!) was grinding the bevels on to question why they ground so easily, out they went. Even when they are good, they are a step off of the hardness. An Aside – the chisels in the drawer bottom are of my own make – with a side note that they are .08″ thick at the business end, high hardness and you can still strike them hard enough to break the handles if you wish without any consideration for the metal at all. The style is much older English, the steel is 26c3 (very plain 1.25% carbon steel still made now), and you know from the article above why I would copy English tools in the first place. When expensive chisels are marketed to not be struck, I’m baffled. The marples parer in the prior picture would suffer nothing if it was malleted, even though it’s long enough to swat flies.
Well Loved Set of Tyzack / Hall
This set of five chisels (there’s six – where the 6th went escapes me) was $55 including a roll and shipping. They’ve been well used, but have a lot left. Unfortunately, they landed in the shop of a pig who will probably do little more than admire them, and possibly replace the one over-loved handle. I did use them briefly before continuing on the making. They sharpen quickly, suffer no edge holding ills, and have a look at the lands. Four of the six are marked tyzack and two are Hall. I’ve had harder modern chisels but none work better in the cycle of work. The cost of boxwood now would be more than the set (the one on the right is probably hornbeam or a fine grained fruitwood). I cannot convey how pleasurable these are to sharpen – they yield steel to a stone easily and the wire edge disappears effortlessly in the middle of finishing the edge.
But, I still want to Support Modern Makers
By all means, do. I guess I’m a modern maker, but you can’t support me because I’ve got little to offer other than relaying experience. I know some of the modern makers, especially those who work by hand. I would support them first if it’s under the maker’s mentality. As in, you want to support the makers who are chasing this kind of craftsmanship? Steve Voigt is an example with planes – Steve is making planes that have the spirit of the chisels I’m recommending.
If you’re more of the engineering type who sees surface finish and admires the idea of automated process, by all means. Support the makers who make things you like and can relate to.
But, please -don’t become a parrot bad information telling everyone new to the hobby that advancements have made better tools with better steel since some arbitrary date, and don’t repeat stories from gurus who started in the 1970s and whose view of old tools is whatever was available new when they started.
Where do You Find the Old Ones?
I’ve found most of my older chisels (many have passed through) on the UK ebay site, and some from dealers who will ship to the US. I’m an amateur woodworker and toolmaker. The fact that I’ll buy just about anything to see close up isn’t really relevant if you’re just looking for one good set and then you’ll stick with it. It does, though, give me the experience without relying on statements of others – the experience to tell what works best at the point of this post.
Some dealers won’t ship to the US, and sometimes you’ll find a reasonable set in the US already. Look just a little before you leap. I’ve never had to pay more than about $30 per chisel for a nice vintage chisel, nor more than about $60 for the finest parer that I’ve come across ($30-$50 is more typical). What sent me looking directly from England rather than through dealers in the US is the markup is just too much, though it may be narrowing. Before you could easily find UK dealers or proxy shipping from UK ebay, it wasn’t uncommon to see a parer like the one pictured above for $100 or more. That’s the business of dealers – to find something that’s $30 in the UK, get the good ones and sell them in the US to a captive market.
You’re not captive at this point except to your patience and a little bit of diligence – and the understanding that you may need to do some rough work on the back of an older set of chisels with coarse PSA paper- this isn’t the territory of 2000 grit waterstones.
Be wary of two things – newer chisels that look like older (e.g., the round tang and bolster) and basket cases. There are enough good tools out there that you don’t need to buy a chisel that is broken, overly short or pitted.
One last do if you’re on Ebay – log in to the UK site, not the US site, so you can see sellers who don’t specify whether or not they’re posting to the US. If you see a wonderful set of chisels with every important part photographed and looking fine, and with an auction price that’s really attractive – take advantage of that by asking the seller if they’ll consider shipping to the US. Some will. Chisels don’t weigh that much and it should never be more than $50. Oh ….and never have someone send tools with handles that are rosewood or could be considered rosewood by an drowsy proxy shipper in Ebay’s global shipping program. They’ll be seized – and you’ll probably get a refund – but you want the chisels, not the assurance that Ebay made you whole.
This is the first in a series of posts where I’ll address what makes you productive if you’re working by hand. This often draws people who use mostly power tools and cut joints and smooth plane some wanting to discount this advice. It may also conflict with what you will hear from the gurus who never really work by hand in the first place and who may run classes where using something that’s not ready to go would be catastrophic. Those classes are fine for starting out, but you don’t want to be a beginner forever, and at some point, you’ll realize that most of the older tools are more appropriate if you’re working entirely or mostly by hand. If you’re one of the minority who wants to have the physical satisfaction and the same feeling you’d get from a brisk walk – the mental and physical pick-you-up, as well as the skill development that comes from actually roughing wood (no kidding, getting good at the rough work makes the fine work intuitive), then you have to tune out the self-appointed experts. Those experts will usually tell you about edge retention based on the tool (you are the key to edge efficiency in the cycle of work, not the types of stones you use and not the alloy of the steel), and perhaps include their comment that you are wasting your time working by hand. If you take their advice, you’re really wasting your time.
The Case for Tools that Will Be More Efficient
Planes that get you instant success and plans that get you to be physically efficient (where work is predictable and your energy is spent on removing wood vs. making friction or lifting heavy tools) aren’t really the same. The first wooden plane that I purchased had an ill fitting wedge – very ill fitting. I incorrectly assumed that wooden planes were probably always a bit loose and difficult to use and maybe they came from an era where wood was soft, very straight and easy to work. I was wrong about that – fitting the wedge properly and understanding the use of the cap iron were key, but so, too was getting some familiarity with lots of little nuances. It’s almost impossible to hand-work wood efficiently with metal planes doing the rough and middle work. No matter how much of it you do, if you experiment in measuring your output over a set period of time, the slight increase in inclination needed to use wooden tools for the rough and middle work is the only direction to go. How big is the difference in your output (not to mention, your fatigue). Somewhere around 1.5 or 2 to 1 in volume of work done with a wooden jack and try plane vs. a metal jack and metal jointer. The more you move toward heavier metal planes, the worse your output will be. Premium metal planes are generally fine for following power tools and doing limited work, and they’re great for giving you a feel for how well a plane can work, but if you’re doing significant work by hand, they’re toxic.
This is a real bummer to me, personally, as I’d built 4 infill planes before finally recognizing that they’re not an upgrade for an experienced user. And even beyond that, if you work backwards to planes used around 1900, you’ll find most infill smoothing planes are closer to a stanley plane in weight than they are to whatever’s being marketed as a super heavy, super flat “improved” plane. I still have a love for infill planes (and still have about a dozen of them), but they’re not on the bench for long in a volume of work. I simply have them because I like them, but they become intolerable if you’re dimensioning wood and any more than a very small amount. Keep the wax handy and bring a canteen!
What then is an efficient set of planes for dimensioning and smoothing?
An English style jack around 15-17 inches with an iron 2 1/8 -2 1/4 inches (continental style is fine, too, if you like that – avoid adjusters, though).
An English style try plane around 20-24 inches (I’ve seen 24 inches referred to as a “long” plane) with a 2 1/2″ iron (or perhaps a quarter narrower if you find that too hard to work – but persist before you decide you can’t handle a 7 pound wooden plane with a 2 1/2″ iron). Continental is fine here, too – avoid the adjuster again.
A Stanley 4 (or 3 if you like) smoother (in comes one metal plane – if the try plane does its job, smoothing is spectacularly quick and this is the one case where you’ll find the adjuster useful). Common pitch, stock iron and chipbreaker – you can replace those but if the stock versions in your plane are good, thicker/harder/more carbides – none of those equate to more work done, but may equate to less. If you feel they do, you need to work on your sharpening cycle time. More on this in another post – but safe to say, an experienced user won’t find any benefit with increased abrasion resistance in steel.
Stanley 7 or 8 – For the occasional poorly selected wood or prissy jointing work where you want a very fine joint, a sized bailey pattern plane is nice. You don’t need a 10 or 11 pound jointer, and in the case of wooden planes, I don’t think a 28″ jointer is favorable. They generally have a long nose and you won’t use them much, so the efficiency of the wood contact is lost. Interrupted cut trashy wood will also hammer your wedge loose. You’ll find in general that once you’re good with the try plane, you’ll be able to make unseen glue joints without resorting to tissue shavings (which can be a waste of time when they’re not needed), and stock large enough to need a longer plane will be uncommon. If you have a little trouble at first, the metal jointer can be helpful, just as it’s helpful in wood that really won’t tolerate a jack plane at all (such as knotty wood or wood dominated by grain runout in every direction).
Do I have a lack of exposure to tools? No, I’m sure my total take from LN and LV in the last 15 years is five figures or nearly touching it. At one point, I had an LN 8 and LN 7, and bevel up LV planes at the same time. I’ve had at least fifteen planes between the two, but I no longer have any. They’re more effort to use in work, and the seeming advantage of “modern steel” in them really doesn’t hold water in anything other than ideal conditions. Again, more on that elsewhere.
This advice isn’t an oppositional viewpoint, it’s what constructive laziness will get you. Constructive laziness is an odd thing. is it more effort to dimension wood by hand? I guess that depends on what you like to do. I would find taking a lot of my shop’s footprint with stationary tools agonizing, as I would dealing with sanding dust, saw dust and a reasonable dust collection setup. I’ve skipped those. I find hand dimensioning pleasant (though it took a while to figure that out) and much like a brisk walk. If you’re fighting friction or woodworking like you’re pushing a tackling dummy or handsawing leaning over a sawbench holding your entire body up while you slash saws around, then you’re working against yourself and you’ll need a nap. Constructive laziness is about figuring out what keeps you in that brisk walk territory, using more subtle movement to create smooth constant output, and doing so in a way that’s rarely uncomfortable.
This entire idea, doing something efficient, predictable, in rhythm is why you can’t rely on advice from anyone telling you that you can’t make anything entirely by hand.
There is an Obligation, Though
You’re going to need to understand how tools work. Everything is incremental in life – anything you learn to do well. You understand little bits at a time and then they become trivial. The cliquish recommendations that you find online (though to be fair, with an equally cliquish “old tools only” counterpoint from experts who sell a lot of woo) leave you wanting to know one trivial fact after another, but those bits of advice don’t often connect and help you understand much.
The obligation is that you’ll need to understand how tools work, how you get them set up if they don’t come as nicely set up as you’d like, and how you maintain them in the cycle of work. It’s a little bit different than what you’ve read from writers who write articles for a living or teach beginners.
You are working toward the point, instead, where feel, judgement, work are intuitive and you’re going to be more influence. A simple example is the almost certain fact that when you first start, if you buy a Lie-Nielsen bronze smoother (A lovely plane, and a great idea if you’re looking for one tool that will show you what to expect from your own), it will almost certainly be easier for you to start on the near ends of boards, the plane will have a great chance of being dead flat, and fine adjustment will be easy. But you’ll eventually find it nose heavy, with lots of friction and once you learn to manipulate the Stanley at the start of a cut and it’ll be less work to use. I kept a bronze 4 for a very long time just because I admired the tool and the effort LN made to make it work so well out of the box. But in the end, it was just more effort to use than a good stanley example, and I appreciate the faster adjuster on the stanley. You might, too. The issue of being harder to start just goes away on its own – when it does, you probably won’t remember that.
Your obligation is putting in the time to get there, knowing it will become pleasant and trivial, and the skill and control and contribution to your own constructive laziness will find utility everywhere. Your obligation is to understand that you can learn every aspect of something like a stanley 4 or a wooden try plane relatively easily and then learn to manipulate them, and your familiarity with this smaller set will allow you to plane anything that can reasonably be planed (or scraped) without feeling the itch to buy a large scraper plane, or some other quick fix like that. You can go down that route (I did – curiosity and experimentation led me to have both premium large scraper planes, a stanley #112, a bunch of very steep rosewood planes – they just don’t do much for getting anything done, even though they’re fun to plane with). Doing everything by hand will quickly give you the ability to do all of those “difficult wood” tasks with your core set of tools just as a matter of trivial moderate exercise. No steep frogs, no scrapers, no specialty alloys need, and no double weight planes.