Coarse and Fine Coticules

Coticules are a relatively popular finishing stone from the Ardennes region in Belgium. Historically, they’ve been more popular as a multi-use stone in continental Europe (finishing tools, razors, knives, etc), but most of the references that I see in catalogs in the US are for branded razor hones. That is, those sold here before hobbyists became the main buyers of everything were sold as fine graded razor hones, often fairly small. Pike and Carborundum come to mind – I’m not a huge collector of them and only have a couple, so the list of US distributors branding coticule razor hones is probably pretty long.

The advent of shaving forums brought interest back for these stones. They’re overpriced for what they are in my opinion, but so is just about everything used for shaving. Despite the nostalgic mention here and there of someone recalling a Dutch woodworker they knew, I’d also put coticules at the bottom of any list of natural stones to try for woodworking. At one point, there were at least 7 different mines bringing out coticule material, and generally at the seam where the cream colored abrasive meets a blue stone layer. The blue stone also hones, but it’s generally not present on modern-mined hones. The tell for a stone you’re looking at is whether or not you can see a layer of glue, even if the dark backing is scuffed or dusty and not discernible. The natural blue stone when wet and smooth often has a bluish or purplish tone and markings that look like peacock feathers.

There are also glued stones older in age with a blue stone (abrasive natural) backing instead of slate. The reason the stones are cut at the seam is probably two-fold, but at least one is that the yellow abrasive layer by itself is unstable and can crack, and age isn’t a guarantee that the stone won’t crack as I had a natural combination “Old Rock” labeled that hadn’t been used, and over the 6 or 8 years I had it, visible cracks started to form. Cracking makes the stones harder to resell.

To my knowledge, only Ardennes is mining and cutting coticule hones, and the stones vary a lot in cutting speed, feel and fineness. A relatively small glued hone is generally about $100, and the sky is the limit above that. Anyone buying an 8×3 glued stone for $400 or more will be disappointed unless their objective is to use a coticule no matter what. Unless there is a secret somewhere, the typical customer for an ardennes hone is a straight razor user.

That said, it’s possible to get one that is very good and that creates a comfortable shaving razor, and it’s also the case that an experienced shaver is rarely going to hone (the linen and leather will stretch an edge for a year without much degradation – a good linen and leather, that is – and an experienced shaver will not do much honing, and certainly not the heavy handed honing we do for woodworking tools to remove wear. A properly maintained razor doesn’t wear much and the honing just keeps the bevel and apex from getting fat).

The abrasive in coticules is apparently garnet or something similar, and the abrasive is sort of tubby and round as opposed to disc shaped or more pointed like alumina will often be. That means that you can’t judge much by particle size (coticule abrasive particles are generally fairly large and not the more typical 3 microns or so that most fine natural abrasives land near).

Long story short, if you go out and buy 10 coticules hoping for 8 wonderful users, you’ve been warned. If you buy large older stones, there’s a fair chance you’ll get sandstone that looks like coticule, or a hard coarse actual coticule that was never intended for finishing (these are no longer marketed).

Typical use honing with a coticule is like a slurried arkansas stone. With slurry, the stones will be faster, but there will be something referred to as slurry dulling (the rolling particles will round the edge somewhat and leave it a little bit uneven).

While I’ve probably had more than 10 coticules, I have two right now, and that brings to mind a third very thin yellow layer stone, so I guess that makes three (thin yellow layer meaning someone used most of the preferred yellow side – it’s an older stone with a blue stone backing, and only a very very thin layer is left – it was cheap).

Of the large group of stones, I had one natural combination stone that was large and that did a nice job polishing an edge and had good cutting power. Every single stone I’ve had is markedly different in feel and speed, though. That stone was expensive and when I leveled with myself about it not really being better than any other typical stone (for example, a black arkansas still results in a sharper razor), I resold it fearing the fad would go away if the razor forums lost traffic.

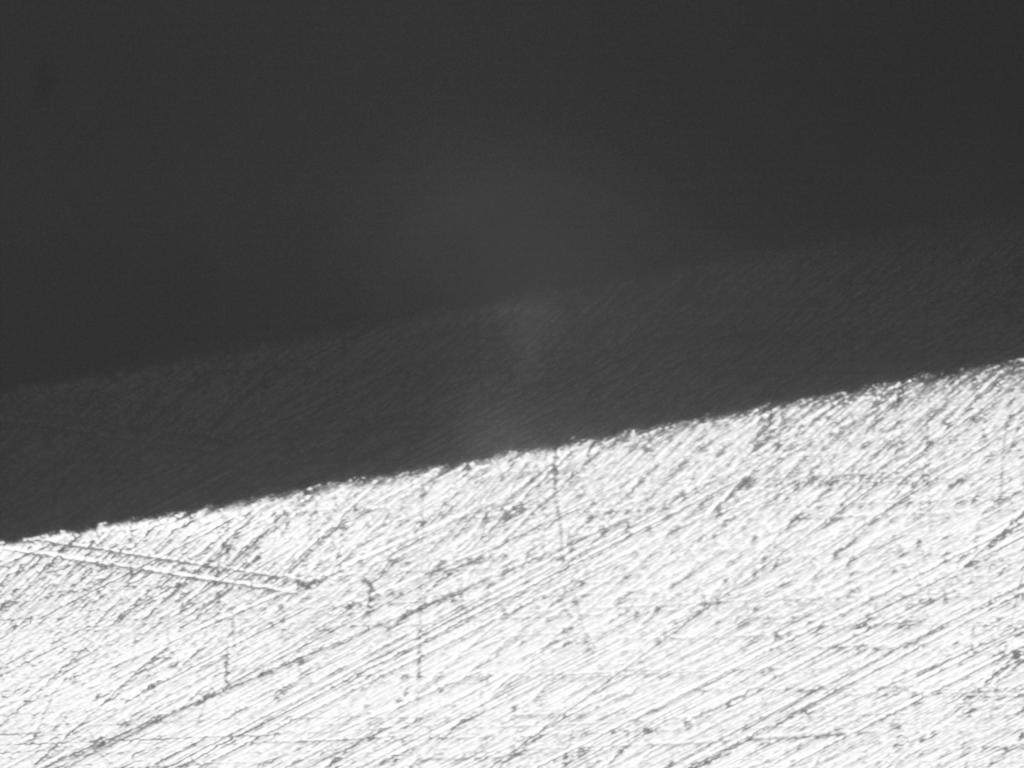
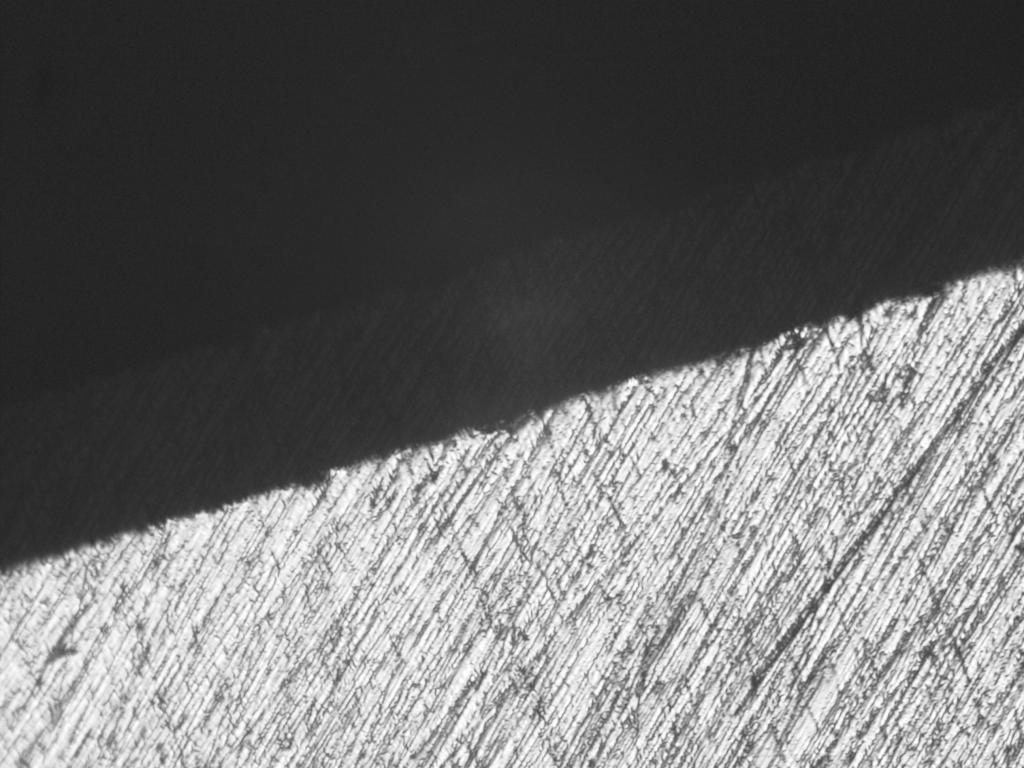
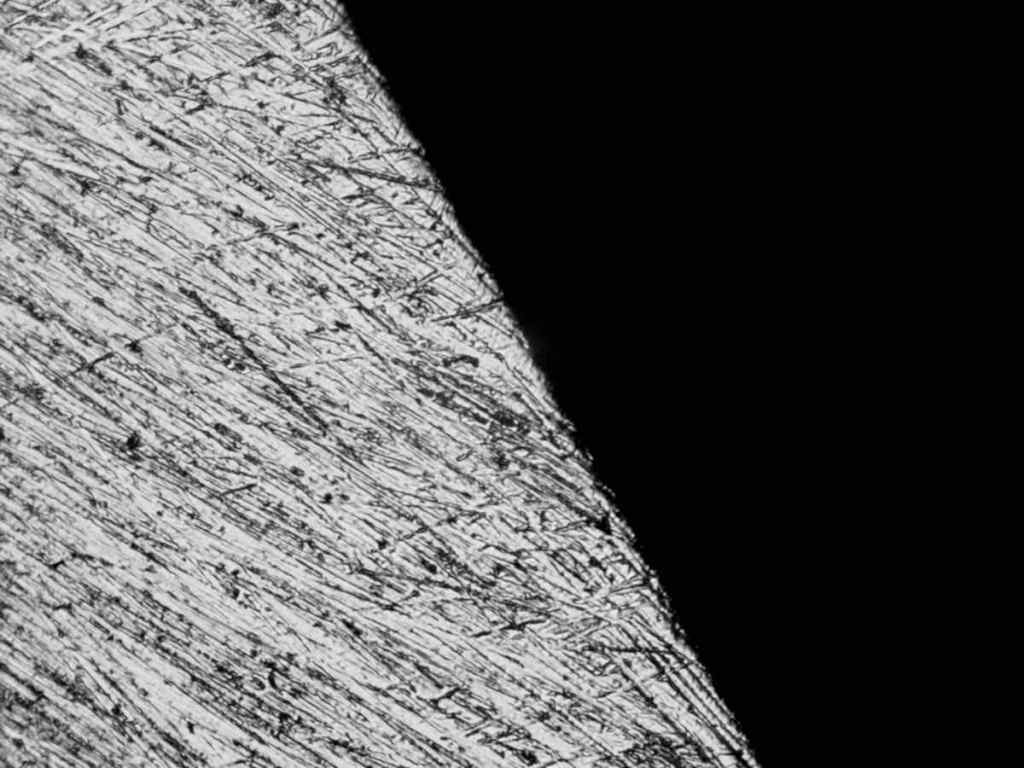
I’ve kept one bout #10 (an odd shaped stone about double the area of a deck of playing cards) and then a really fine slow coticule that hardly cuts. The pictures below are from these two.

Compare this Picture to the 8,000 Grit Waterstone

First, the coarse coticule

Finishing coticule on the mid to strong side of cutting of the Ardennes stones I’ve tried. Note the grooves appear to be wide, but not that deep. There’s some turbulence at the edge, but it’s good enough for woodworking. Refinement of the edge further than this would require a lot of slow light pressure work – not something tolerable when other stones don’t require it.

And the edge of the same iron off of the finer of the two

The edge off of a very fine coticule. Reasonably nice looking, though the pattern of abrasion matches what you see with both loose abrasive and slower cutting stones. That is, the bevel is relatively fine looking, but the apex shows some rounding and lack of crispness. This rounding is probably protective, but you can feel the difference between this and a more crisp edge that otherwise looks the same. The slow speed of this particular stone makes it good for finishing razors, but not for woodworking.

At this point, there may be a person or two who mostly shaves or maybe someone who uses coticules as a finisher for woodworking. As with all stones, of course, you can use them for woodworking, and of course they’re suitable for straight razors. Part of the interest in sharpening stones is all of them work. If I chanced across a large coticule at a flea market for a reasonable price, I’d probably buy it and plan to just unload it when the thrill wore off. The lukewarm thoughts about this type of stone aren’t whether or not it can be made to work just fine, but rather whether or not it makes sense when there are better options that cost less.

Looking elsewhere will also save you from the strange fascination with giving different layers names, much like the “in the club” kind of thing with japanese natural stones where the true users of the stones don’t care that much what the name of the stone is, they care how it feels and works. If you are on a woodworking forum or a shaving forum, someone extremely enthusiastic about arbitrary titles will be correcting you when you’re trying to convey from a sense of doing. They’ll tell you that “you have to learn what you’re talking about” with the various layers and labels before you can talk about your own stones or ask questions – you can ignore that stuff.

The one thing these stones do have in their favor, especially if you manage to find an older natural combination with a label on – and you manage to luck into such a thing where it’s being sold for a song. They’re pretty, both the yellow layer and the natural blue layer when the blue has a lot of birdseye-ish pattern.

“Smith’s Hard” (relatively fine soft arkansas) Before and After 2.5 Micron Diamond Charge

Same idea as the prior posts examining whether 1 micron diamonds improve the sharpening (for the user, not the tool) and resulting edge on a black arkansas stone. In that case, I think 1 micron diamonds do improve the outcome, and though I didn’t go up the ladder in more complex steels, but the diamonds probably make the oilstones more capable of dealing with those (where complex means microstructure full of carbides that are harder than the oilstone). It does seem to be the case, though, that on wood or well machined cast iron, the resulting edge with 1 micron diamonds is still better, so maybe it boils down to whether or not you like the feel of the stone better than either of those. I do.

But, what about more coarse stones? First, if you need to go very coarse with oilstones, or even to something similar to a 1k water or broken in diamond stone, a well-used india stone is a good idea. A stone like a soft arkansas or washita will easily follow and set up an edge that is short work on the finish step.

So, that leaves me to define more coarse as something like a washita or a “smith’s hard” which looks kind of like and feels kind of like a washita, but doesn’t seem to have the same cutting power. I have one of these that came in a box for $10 on ebay. If they climb too much past that in price, they’re forgettable. I found the same with 2.5 micron diamonds on cast iron -the edge isn’t that great for the fineness and I can’t think of a reason to use them unless they’re dropped on wood until the fun of that wears off (autosol is easier to use in that situation).

So, figuring I had two forgettable sharpening media, I put the 2.5 micron diamonds on the smiths hard and charged right in. Which negates the ability to take “before”. Luckily, I have some on file from prior tests – so this isn’t a great comparison in terms of same item, same time, but it’ll do.

Here’s the result of the “Smith’s Hard” on a plain carbon steel iron that’s not terribly hard.

Smith’s Hard – No diamonds charging the stone – Carbon Steel Plane Iron and a stropped edge. Notice after stropping, there’s not a whole lot of burr/noise left at the edge.

You may start to notice a theme – the visual differences between finishing stones aren’t that great. In this case, the edge is very even, and the result is better than one would expect. I think this is helped (this positive result) by the fact that the stone is a bit slow. If you have harder steel, the result is finer yet, but it’s also the case that this middle stone needs help before it on harder steel. As in, if you have much work to do with the stone, the slow speed gets annoying and it goes back in a drawer, replaced by a washita which does the same thing but cuts faster.

Following that with a perhaps-too-generous charge yeseterday while using a paring chisel (for real work, no less – paring the back side of a guitar neck heel), this is what the microscope reveals.

Paring Chisel Honed on Smith’s Hard Charged with 2.5 micron diamonds

Once again, we have two unlike pictures and it’s difficult to look at the two and know which edge is better. Well, just from using the tools, the edge shown in the second picture is a lot sharper. Paring hard maple to fit a neck heel to a guitar body was extremely pleasant (paring hard maple in some thickness beyond that, not always so pleasant).

Is it an improvement? Definitely. Is it better than anything else? I don’t know – what stands out to me for ease is still autosol on wood. It’s difficult to beat in terms of creating a sharp and durable edge.

From sharpening, the diamonds do create sort of a rolling slurry/sludge on the stone even though they’re just dry diamonds. I don’t know if this is all metal swarf mixed with WD-40 or if it’s also stone particles. But it’s fairly obvious from the picture, the cutting mechanism isn’t the same – the matte type finish is more indicative of some rolling/moving particles vs. abrasive staying in place. If the sludge gets to be a bit much, then a drop or two of WD40 allows it to move again. It’s not, by any means, fast compared to diamonds in cast but the edge is surprisingly excellent from two bits of sharpening material that don’t seem that great on their own.

Since I have them on hand – here are two pictures of the stone box and the stone. Note that it looks relatively fine (it is, and so are some other soft arkansas stones). This stone is not, however, similar to a Norton or Dan’s Black or Translucent arkansas stone. Smiths is a name that’s still printed on stones. I can’t comment on the stones beyond saying that they appear to be a little bit less fine now and I have no clue whether the company has been bought and sold or doesn’t exist and it’s just the brand name.

Smith’s Hard – Not an 1800s stone, but not a new stone, either. Finishes about as finely as a good washita stone, but is only half as fast or less.

Finish vs. Tool Area – Larger area, Same Pressure, Finer Finish

In yesterday’s blog post, I used 1 micron diamond on a stone and then on cast. The results remind me of something I’d forgotten to some extent thanks to the buffer and thanks to not doing only finish work with planes – the abrasives at really small size cut slowly (they won’t fix any mistakes you’ve left behind) and getting photo perfect finishes off of the scopes is difficult.

But, beyond that, comparing older photos of plane irons honed on 1 micron diamonds, it just looked like the finish was really coarse. I’ve had to change cameras on the microscope – could that be the cause? It’s possible that has something to do with it – the new camera is more crisp and will interpret detail that I think the software in the prior camera would smooth over.

I was puzzled – maybe it’s just dirty surfaces on sharpening supplies that I haven’t used for a long time, but it’s inconvenient when you’re posting blog pictures of 1 micron diamonds on cast and one looks like a sheet of paper with no marks, and a more recent attempt looks stringy and striated. To see what I mean, I’ll show two pictures.

First – the 1 micron diamond finish pictures that I captured doing a plane iron test in 2019:

Older picture of plane iron honed on diamond – either hardwood or cast plate, I can’t recall (at the time, both produced very clear pictures with few defects at or near the edge). At the time, the cast plate was fresh and hadn’t collected any ambient dust or dirt, either)

And second, yesterday’s picture on cast (albeit, sitting mostly in disuse since the picture taken above).

Chisel honed – 1 micron diamonds on a finely blanchard ground cast plate.

The top picture is a plane iron, the second a chisel just under an inch. Both of these are blindingly tools with a thin starting edge. Both pictures are the same size top to bottom, and the diamonds used at the bottom are from the same supplier with the same size mark (I lost the original vial). 1 micron.

Later in the day yesterday, I decided that I’d still like to test a plane iron on the black stone with diamonds – recall from the prior blog post or assume based on my comment here, the second picture above is *finer* appearing with a straighter edge than the chisel was on the black stone, so you may expect a picture of the back of a plane iron to appear less fine.

Maybe it would just be better to repost that picture here – the chisel honed on a black arkansas stone with 1 micron diamonds. I realize that these start to all look the same after a while, but notice the crispness of the actual edge. It’s possible to get the edge itself thinner on cast as far as I can tell, and you can feel that in initial sharpness on a plane. The edge off of the black stone is a little less perfect (there’s a slurry of diamonds on it, and probably some stone particles) :

Chisel honed – 1 micron diamonds sprinkled on a black arkansas stone.

And finally, the plane iron honed last night (just a newer surprisingly decent and appropriately hard stanley plane iron that came on a mex-made stanley 4). This honed on the black arkansas stone both bevel and back side (all of these are bevel and back side).

Smoothing Plane Iron – honed on 1 micron diamonds sprinkled on a black arkansas stone

The very first picture had an edge that was lightly stropped on bare leather. Lightly is important because the finer your edge is, the lighter your touch should be stropping – you can deflect the edge with brisk stropping.

The remaining edges are unstropped – they would be slightly straighter looking and the last two, especially, a bit closer to a straight perfect line at the edge.

But notice how fine the surface is on the plane iron vs. the chisel thanks to the benefit of distributing sharpening pressure over a much wider area. I took a picture of this plane iron edge not for the purpose of making this article, but because I was thinking it’d be a good idea to show the difference in sharpness on the black stone with and without diamonds. In my wisdom at the time, I didn’t pay attention and spread the diamond powder all over the stone (the iron is definitely sharper than it would ever be off of only a black stone, an I know that’s hard for some people to handle, but that’s just the way it is).

This also takes away some of the annoyance I had seeing the old pictures and the newer ones done here with a narrower tool. It’s just another illustration of not changing anything if you want to make comparisons, with a sprinkle of “you can vary pressure even with the same tool” and do your last 10 seconds of edge finishing with lighter pressure (presuming the prior work was complete) and get a finer edge.

I think with some further use of the cast plate to remove any filth or light scratching that may have occurred jostling in the drawer, the last plane iron can get a little closer to the first picture, too. If I were reading the blog and comparing 1 micron diamond honed pictures, I would certainly wonder how reliable visuals are if the visuals of the same abrasive don’t make a similar picture.

Honing with Diamonds on a Black Arkansas Stone – An Improvement?

Some years ago, I heard about Garrett Hack charging oilstones with fine diamonds. But, I didn’t hear it from Garrett. I heard it from someone who disapproved of it and was sure that it would result in less fine edges.

When doing the “sharpening omnibus” the first time, I found that lightly abrading a broken in translucent arkansas stone didn’t result in the decline in edge quality that I expected. As in “making a slurry”. So, I’d forgotten about diamonds in fine natural stones (not friable ones, but hard ones -why bother putting diamonds on a stone that self slurries – they’ll be gone quickly) until then. Previous tests (for me) of diamond grit found that there’s no real benefit to using diamonds to finish something unless they’re really fine. As in, I tried 5 micron and 3 micron diamonds to see if there would be a fast but fine medium where someone (including me) could grind and use one honing grit and that’s it. It didn’t work out well – a 3 or 5 micron diamond edge is coarse unless the diamond is on a soft substrate. I never tried it on pine, but maybe it would work. The reason that I didn’t try it is simple – 1 micron diamond doesn’t cost any more and it works finely on anything.

How finely? it outlasts any natural stone that I have (and I’ve had hundreds) in planing edge life. Not enormous amounts, but measurable, and the initial sharpness is greater. You can be as good as you want to be with natural stones, but you cannot practically make them match smaller oxides and diamonds if you’re just chasing the limit.

After doing the slurry test mentioned above, I lost my vial of 1 micron diamonds and until this week, never got another one.

Now that I have 1 micron loose diamond (which costs all of $8 shipped on ebay), I figured I’d give them a whirl on arkansas stones – knowing that I have zero interest in using coarser diamonds.

The test subject in this case is a Buck Brothers socket chisel – but an old one and one that’s harder than Buck Bros Cast steel tools typically were. Subjectively, it’s about like better old English tools, and comparable to the best O1 tools you’ll find (like iles bench chisels).

First picture – Dan’s Black and 20 seconds of work and then hone the bevel. No stropping is done in this case, and no buffing (the buffer would run enough off of the edge of this that the disturbance at the edge would disappear in favor of a perfect line – it’s good for that, but it makes comparing the stones themselves a little harder). No diamonds are used for this edge.

Dan black Only – 150X – nice uniform bevel

It’s possible to use an oilstone and finish an edge better than this, but the reality is it will take successive sharpening and a lot of care. Since this is a hard chisel, the stria are close together and small, and despite not stropping, there’s little disturbance at the edge. When this is done in the next blog post, I’ll work back around to refinishing this edge with the black stone again just in case the little spots are minor pits (very minor). A black arkansas is a slow stone, so the practical part is you can use a lighter and lighter touch quickly, but to use it to get a much brighter polish would take minutes just on the back of a tool at each sharpening session. Practical is to apply directed pressure and then lighten that pressure.

Second picture – same stone, same edge, but after sprinkling 1 micron diamonds on the stone and adding a drop of WD40. This created a slurry, but the more dry stone (less oil and not a puddle is nice with fine arkansas stones) acted as a brake with the diamonds and literally kept from being able to move it.

I noticed two things after 20 seconds of work – there was no grip on the stone with WD40, so something between nothing and what I had may be nicer. But second to that, no wire edge formed when honing the bevel on the opposite side. A black arkansas stone will form the finest of burrs, but you can still feel it if you don’t work it off of the tool or strop it off. It’s not there with the diamonds.

Same as picture 1, but 20 seconds of work on the back of the tool with 1 micron diamonds on the oilstone. A small improvement

How much of a difference does this make? Visually not enough to conclude anything. Less lubricant would’ve made it a little easier to get the diamonds to bite.

Third picture : so, I went back for another 20 seconds hoping to see if I could hone off any disturbance at the edge.

20 more seconds of back work and more refresh of the bevel – 40 seconds total of polishing on a fine black stone with 1 micron diamonds loose on the surface.

Some actual testing of the edge in something comparable is probably needed to really be able to tell if it’s an improvement beyond just different visually.

Again, no wire edge.

My head is full of thoughts or questions about what’s happening with 3 micron natural particles fixed in place and 1 micron sharp particles moving around. I can’t see any evidence that edges are degraded (no surprise). But before using no diamonds: Fourth Picture – one more shot with the slurry dried off a bit so that it’s stronger cutting.

One more try with the diamonds – but with some of the lubricant removed. The result looks pretty spectacular, but all of these edges have good uniformity.

This suggests that the tip of the tool above just wasn’t yet honed off (either from the back, or more realistically, by shortening of the chisel with successive honing).

The lack of any real burr is kind of a treat. That suggests that if you’re using a two stone regimen, you can eliminate teasing the edge off or stropping. Will that last forever without a fresh slurry of diamonds? I don’t know. That’s maybe beyond my scope here. Next item for me is to see if the diamonds that come from china in 100 carat lots for the same price as 25 from the US ($8 or so) are equal in quality.

While these pictures all look different, I can’t say definitively any of the above differ much – none looks like a laser cut edge, but all are very good quality edges suitable for anything, and super uniformity can be had with very light buffing if needed, or removing any remaining burr with autosol on wood. I will make a note for myself to do this same treatment to a plane iron – ark only, ark and diamond and then ark and autosol – and see if anything creates a drastically finer smoother shaving.

It’s worth going back now and honing this chisel on the arkansas stone only now that any initial anomalies should be honed out (be they lagging minor corrosion or whatever else, so here’s Picture 5 – honing again on a section of the stone that has no diamond (luckily, this is a 3×10 stone so there’s fresh space remaining).

Back to just the oilstone – – if you have a good edge, an oilstone (at least a good one) will generally keep it on hard steel, especially on the flat back of a tool where a polished surface isn’t that easy for the stone to cut. This picture shows that, and also reminds us if you bring a tool to a slow stone and the tool has some bits to work out, you’ll do it over time and not in one honing. I think that’s OK as long as you’re not the one putting bits there to work out each time.

…….

later add: I was interrupted just as I was about to post this blog entry, and the interruption made me think. Maybe I should compare diamonds as I do have a high quality cast plate (recall prior posts that if you just try to turn a plane bottom over and use it, especially if you have to abrade it, you’re not going to get ideal results).

So, Picture 6 – diamonds on cast. In this case, there’s a load of diamonds on the surface and if allowed to embed in the cast, the cutting speed would slow some over time before refreshing is needed, but this cut will also get finer (as in, this should get closer and closer to uniform polish). This plate has been sitting for over two years, so there could be all kinds of things on it that I don’t know about that are leaving deeper scratches (Dirt, little rust particles, etc) – who knows.

Diamonds on cast iron only – but very cleanly ground very flat cast. I think this plate has captured a little bit of dirt and would expect this to be more uniform if use it longer. In my prior tests, I did diamonds on cast or diamonds on wood to be very fine as long as the diamonds were fine – finer than any of my natural stones. Despite the stray scratches here, notice the underlying uniformity of the edge. It’s very uniform and that uniformity leads to edge thinness and very fine initial sharpness and somewhat better longevity potential.

I’m not sure we learned anything I hoped we would, but the pictures do make it clear that if you’re sharpening to this level of fineness, you can’t damage edges and expected the fine abrasives to recover them.

Dursol on Pine Substrate vs. Precision Ground Cast

Long in the past, a vendor of sharpening good sent me a tube of dursol. For purposes of this article, you should consider it the same as autosol. Why? Because, for sharpening, it’s the same other than smell. I didn’t have autosol handy at the time that I did this comparison a couple of years ago, and didn’t consider that many would follow with “how does this compare to autosol?”.

That aside, another thing that I think many fail to grasp is when you’re comparing micron sizes, etc, you’re seeing an incomplete picture – the complete picture is the agressiveness of the abrasive and then how aggressive the substrate allows th abrasive to be. Autosol or Dursol will cut as finely as almost anything else when they’re used on wood or MDF. The substrate is soft enough that the particles stick in it and then they  rub the steel. Quite effectively. The other nice side benefit is that when they do, if there’s a foreign spec of dust, it also gets pushed into the wood and won’t automatically notch an edge (but sometimes it does).

Autosol and Dursol are, to the best of my knowledge, about 3 microns and made of an alumina type that’s more like flat discs, so they’re not 3 micron round balls. But the alumina is hard and I’m not sure it fits the desire to make it out like it works finely because it breaks down (plenty of abrasives that are described as breaking into little pieces don’t actually do that).

When used on wood, the action of Dursol or Autosol is lovely. When used on cast, it’s aggressive, but only a little faster. What’s the virtue of cast iron? It’s not universally useful for honing with things like alumina. It’s wonderful with very fine diamonds (like 1 micron or finer). But it’s not good for finishing edges unless abrasives are very small and strong cutting at the same time. It’s also very unforgiving with settled dust or particles (you’ll hear the noise as those notch edges and cause you to go back a step in your sharpening routine).

If you have an interest in using cast iron with small diamonds, then you’ll want cast that’s ground finely, and not just a spare plane sole, but that’s a different subject. I’ve tried both, and a self-made plane sole will generally have abraded ridges (that prevent uniform fine edge finish) while a blanchard ground piece of cast will be relatively smooth, and in a hone sized piece, likely much flatter.

Back to the subject of this blog – pictures of edges prepared with Dursol on cast iron first, and then Dursol on pine. White pine is a bit soft, but the pictures look the same with medium hardwood and harder softwoods (like dry yellow pine).

Dursol on Cast Iron

Compare this Picture to the 8,000 Grit Waterstone

Dursol used on cast iron: aggressive cutting and some edge nicking. Nicking could be particles settled on the cast, or rough handling. Otherwise, the edge is relatively fine, but getting uniformity requires a gentle touch and care to avoid ambient dirt, stray wire edge fragments, etc.

Dursol on Pine

Dursol used on Pine: The abrasive is still reasonably fast (and to get a finish this could, should follow something finer than a typical 1000 grit stone – like a washita stone or a 4000 grit or finer waterstone)

There’s one use consideration – once your edges are relatively sharp, they’ll cut wood, so you’re using the iron on wood flat or dragging, but you can see there’s no burr left behind on wood. On cast, you can do whatever you want – the risk is damaging the edge with rough handling, not damaging the cast.

If you’re curious about the level of finish from 1 micron diamonds on cast vs. the dursol on pine, i can’t find a functional difference – unless you’re using steel with a lot of vanadium, and then there’s no reason to use media other than diamonds for any part of the honing process.

I made this post because fine sharpening isn’t expensive, and Autosol and Dursol aren’t the only way to get these results. Buffing bars with a drop of oil for lubricant will do the same thing when you scribble their composition onto wood.

What often comes after I make the recommendation of one of these polishes on soft or medium hardwoods, though, is: “Can I do ___ instead?” (use the polishes on leather, brass, aluminum, cast – whatever it may be). Most of us have offcuts of wood, and if we don’t – that’s a little odd. The desire to take a suggestion and do something different immediately is kind of annoying, though, but it’s the internet.

All that said, seeing the difference in results above isn’t just a comment to avoid cast with alumina. That’s probably not universally true, either – it’s understanding that the substrate makes a difference, just as abrasive type and size makes a difference. If you have something fast (like the gold bar that works well with unicorn), maybe it’s not so great on a hard surface, but would provide a great combination of fast and fine on a scrap of wood (in fact, it does).

Bevel Your Card Scraper Edges – Give Yourself a Break and Forget about 90 degree Edges

This blog is short (for me). I constantly look for easier ways to cut time sharpening but get better results as the combination doesn’t just give you an extra 20 seconds sharpening, but it gives you much less time working wood and a better tactile feel working wood. As in, the results on the wood itself are better and the experience is more pleasant.

It’s no secret that at least some very large fraction of amateur woodworkers struggle with card scrapers. When you read opinions, someone encountering the same struggle creating a consistent burr will hear from everyone who gave up and who doesn’t use a burr at all. This isn’t a good compromise, as there are plenty of cases where you’re doing both finishing and sizing with a scraper.

The typical setup suggested is to joint a scraper edge at 90 degrees and then go through a series of steps to get two burrs.

Forget it. Add a bias to the scraper instead and try freehanding the filing with a bevel of around 20 degrees – something you can do by eye without any jigs, and then hone the bevel of the scraper at a lower angle with an oilstone. Oilstones and saw temper steel are a thing of magic compared to using modern abrasives. So, summarizing this – try freehanding the bevel on a file at 20 degrees of lean and then half of that on the stone. With an oilstone, if your file isn’t dead flat, no big deal. When you freehand the honing on the bevel you’re creating a microbevel of sorts, and you can allow the scraper edge to go over the edge of the stone without tearing it up.

When you file, you’ll see something like this:

Note, the card is leaning over about 20 degrees – it’s not vertical. Joint it until any prior honing is long gone. Do this each time the burr no longer is of good quality or has a short life.

The view from behind then on the stone – a smaller angle. It’s not important exactly what it is, just that it’s between vertical and the angle of lean you used filing the scraper.

Notice the lean on the washita stone – a mdidle oilstone is ideal. 15 seconds on the bevel and the bevel side is complete. don’t forget to do an appreciable amount of work on the face.

Once you’ve done good clean honing on both the face side (put some pressure near the edge and bias the work so it’s done where it counts, and not just the entire flat face of the scraper) and the bevel side, you should have no burr at all, but clean undamaged steel.

Lay the scraper over and draw a good smooth burnisher over the edge (since you used an oilstone, you’ve already got a lubricated edge, and now your burnisher will also have a film of oil on it for when you re-draw the burr. Don’t clean the burnisher unless it gets foreign particles on it.

Drawing the edge on the flat side and working it for half a dozen or a dozen strokes is important – you don’t need to mash it with all of your bodyweight – keep it need and undamaged.

At this point, you can easily turn the burr and you can turn the burr with a stroke 90 degrees to the face of the scraper because you’re already working with a final honed bevel biased about 10 degrees. Everything is in your favor, and now you’ve got a little more room to not overturn the burr.

Don’t create a giant first burr – give yourself room to increase the burr side with subsequent drawing and you should be able to re-roll the burr an appreciable number of times before you have to file again. The fresh burr when you start this should feel perfectly smooth – and it should cut perfectly smoothly.

With the angles biased in your favor, and honing over the edge of an oilstone, you shouldn’t fail to complete steps like most people trying to keep everything square. What you have in two potential long edges on a rectangular scraper should take less than half the prep time of a 90 degree edge, and you’ll probably find the two edges will do more work than four mediocre edges.

after removing any saw marks or unevenness, these shavings are well formed and can be unrolled to a continuous length.

Once you get quick with this, a full re-joint of an edge, honing of the bevel and face sides and burr rolling shouldn’t take more than about a minute and a half. Scrapers don’t hold burrs for 800-1000 feet like a plane does, but count your progress in times that you have to joint edges on an actual project. It probably won’t be many, and the clean burr will improve feel and give you fewer skips or lumpy surfaces leaving you little to sand if you wish to sand.

As you get good at this, you’ll also develop another good habit – your tolerance for a poorly set up edge will be little and since you’re sure you’ll get a good clean burr every time you reset things, there will be no barrier to going back for a minute and a half and starting anew.

The scraper set up like this is near magic in working to a line on curved surfaces and leaving a crisp transition, too (think curves surfaces on instruments or tools meeting flat surfaces – it’s easy to scrape them to a finish, but sanding things like that to a finish without sanding the life and crispness out of them isn’t that great, plus, you still have to do the sanding.

(OK, that wasn’t that short).