(Millvale is just a local town here, but maybe one close to the city and burbs where you could actually afford to rent commercial shop space as a serious hobbyist).
A joke, of course. I survived making the second chisel – both are pretty much the same thing.
The first one is ever so slightly harder than the second, so I will keep the second. As a maker, as dumb as it sounds, you generally send the good one out and keep the one that’s not quite so great. In theory, I could have another go at hardening the chisel, but aside from not passing the rosewood endgrain malleting test, these chisels will chisel.
They may also be the ultimate test of identifying people who buy tools they shouldn’t. That is, if you are a hand tool only or mostly woodworker, you’ll find use for these. I get why Bill Pavlak likes them – they’re kind of half hatch, half paring gouge. But if you were a power tool woodworker, these chisels would rust before they saw oilstones again.
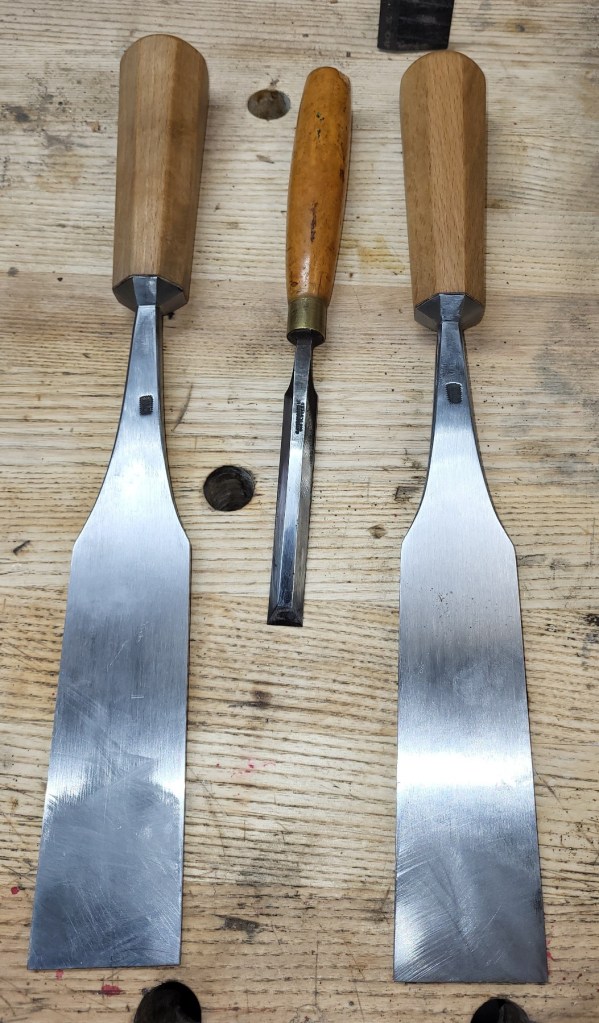
Shown with an English cabinetmaker’s chisel for scale.
I did mark the back of them, but probably wouldn’t have marked them had I made them first. the maker’s mark has to go on before something is finished, anyway – no clue what they did in the old days when they made a tool or four that were the toolmaker’s version of X-out golf balls.
I’ll live.
Coincidentally, the chisel in the center comes from Tyzack, and the set is quite soft but pleasant to use. it wouldn’t be so great in rosewood, but that’s for me to worry about. As a toolmaker, I want to make a tool that will do everything.
Among forums, it’s a disease – people who will never work rosewood, or leadwood or whatever else they want to dream up – demanding that their favorite tools that they often imagine using should allow them to imagine working exotic woods.
W2 arrives today, and after some oddball reading, I found that NJSB (steel supplier) now carries a steel called 125cr1 up to 3/8ths thick. It is almost the same as 26c3 (about a 1.25% plain steel that would be suitable for razors if clean). So maybe I will eventually have made four more of these.
Haunting me a little bit is a a 19th century long flat gouge of about the same size (less weight) that holds an edge a little better. I can’t let that go.
And maybe it’s a spontaneous unrelated thought, but as I was heating the bolsters on both of these to forge welding heat, which is doable with oxy/mapp on top of the already capped out forge heat level – I realized that perhaps a better method of heating the bolster would be an induction forge. That doesn’t sound like a tool for amateurs, but it’s also not a particularly expensive tool, at least in relative terms, and it would allow me to expedite some thermal processes in smaller steel items – like chisels.
Below are pictures of one of the two chisels – sans the really final aesthetic work around the tang and up.
So, what are the pluses? The 80crv2 isn’t underhard. And the chisel (which is nearly 15″ long – and by itself weighs as much as a set of bench chisels with handles) is more useful as a paring chisel or sizer than I expected.
That’s fine. But, I expected the chisel to be better overall.
Why? First, this is the third forge welded bolster. I usually use mild steel with 26c3 chisels, and the bolster is smaller. I don’t like to overheat a whole lot and distort things, so a small part of the tang and the bolster blank are brought up to forge welding heat and then the business happens.
But, 80crv2 doesn’t seem to be amenable at the same temperatures, and what I probably would really love to have – pipe dream – is a high current induction heater to just turn the whole area yellow in a short period of time. I use an oxymapp brazing torch near the junction, which is a bit of an art as it could easily melt the steel and cut it. This after the whole joint is already as hot as it can get with two ts4000 torches. As often as I see advertisements that propane torches or forges can get to welding temperature, I’d hate to have any of my steels at that temperature long enough for them to get there – and in my experience, they don’t, anyway.
So, imagine, if you will, spending three hours or so on a chisel, putting the handle on, setting it and having the bolster move.
No bueno.
That brings up a gaggle of other questions afterward, because the area at the forge weld needs to be resurfaced and another go at it is needed. Each time, the tang gets a little smaller. Fortunately, it’s big.
If the weld is good, nothing should move it – not even smashing at it with a steel hammer. The first few times I learned to weld (smaller) bolsters on 26c3 chisels, I could tell if the weld was good by taking a chisel that maybe I’d keep for myself and hitting the bolster to see if I could seesaw it. If I could hit it long enough to bend over the tang and no separation or movement came in the weld, it’d be good for the long haul in a chisel.
So far, that’s been true. The weld is either deceiving and it moves quickly, or it never has after that.
The solution in this case was to find bar stock of something plain that’s higher carbon. this is harder to form and the whole process is a pain in the ass, but I think in this case, the steel that I used is forge welded. This chisel is for me, so maybe it will never matter. What I used, because I couldn’t locate 1095 that I thought I had on hand (did I actually throw it away? I may have – different story for a different day) in 1/4″ – was W2 steel. Which is only a slightly more modern water hardening steel than “cast steel”.
Two things became apparent. One – I have no interest in something that hard to forge weld. Two – if and when I make more than the first pair, they will be a different steel.
And then I finished the thing and tested it.
Mediocrity
80crv2 has some claims to fame. It is very tough, meaning your attempt to lean on this chisel and break it would be futile. If you could get it to do anything, it would bend instead.
It has ultra fine grain, and compared to lower carbon steels, it can get reasonably hard.
After setting up the chisel and paring beech and then malleting cherry, it seemed fine, but without iron carbides that are in something like files or 26c3 steel, you can feel that it’s a greasy smooth feeling very fine steel and it doesn’t have the bite that you’d recognize in something like Japanese chisels or really good older English chisels.
And so, trying to figure out where it just wasn’t right, I malleted end grain rosewood.
And without a lot of accommodation, it just doesn’t have the edge strength or stability. Is it on par with harbor freight chisels? No, it’s better than that. But it takes some effort to make something like this – just physically and time wise, so I cannot live with the idea that it won’t match the better vintage chisels, let alone the ones that I’ve made out of 26c3.
And because you can always double check a double check, I chased down an earlier chisel that I made out of a file (which is strikingly similar to 26c3 steel) and that chisel tolerated malleting the rosewood test stick that I use. One that is a little bit more dense than usual.
So, what now?
These are difficult to make due to the size based on what I have at hand, but I could get better at them and cut the time in half and probably not care.
There just isn’t enough upside with the 26c3 – something is missing vs. steels that have a surplus of iron carbides. I could tell when making plane irons that 80crv2 and 1084 both have this property – this greasy ultra fine feel, and when you make a comparable 1095 plane iron, you can instantly feel it has a crispness that 80crv2 and 1084 don’t have.
If I could get 26c3 stock in 3/8″, the fix would be simple. I could make them out of O1, but I just don’t love O1 long term for chisels – it’s also a bit greasy feeling and its got problems with toughness. Would anyone find them? I doubt it, but toolmaking to me is an ideal. It’s about trying to make something that people would prefer without having to think about it or be lobbied or convinced. O1 is OK. I want to get closer to 26c3. So I found W2 bar in 3/8″ and we’ll have another go at this pair of chisels and I’ll figure out what to do with the first two.
I kind of expected the chisel to be a little better technically and more awkward and useless feeling shape wise.
The good part of this is I’ve learned a few things that will help down the road, making forge welding a little bit easier. And I’ve got a couple of ideas of things to try when doing the bigger forge welds.
I’m aware that on bigger chisels like this, that I could create a physical step as a barrier for the bolster, but I don’t want compromises if they aren’t required.
I guess that means that instead of a final post when these are done (one is, the other will be the same), I’ll have a later post to see if W2 solves the problem.
What is W2?
W2 is just a water hardening steel – at least that which I’m buying – that is like 1095 with a little bit of vanadium added.
That itself is a funny thing. I got banned from bladeforums for talking about heat treating in a forge and refusing to agree that it was stupid, but rather wanted to talk about it further and get some other folks to try it with more of an eye on doing and testing (snapping samples, etc).
What led to that? I asked if there was a 1095 steel or a 1% carbon steel that was like drill rod but with some vanadium.
All of the answers were no. 80crv2 was one of the suggestions. Carbon V was another (the old sharon steel that was used in the many decades old camillus type knives that always seem to be so crisp and easy to sharpen). Nobody mentioned W2.
That place is just another forum, though, and I’m done with forums. You get stuck dealing with too many other peoples’ baggage, and ultimately create nothing positive in return – which is what I’d gotten to.
A little over a year ago now, someone asked if I could make them Seaton chest style chisels. The answer to that was yes. Last year wasn’t a great year, and to be honest, I also got sidetracked experimenting with various steels for plane irons to make sure I wasn’t missing anything. And I started making knives with more intent.
Demands on personal time and some other incidents (getting hit on the turnpike and having a car totaled in an area where rentals were non-existent, rental car places were struggling for staff and then trying to find a decent used car before insurance ceased covering my rental – $300 a day over the counter rate at the time once the negotiated rate expired). I just didn’t get much done other than making a few discoveries.
At the time of this post, I still have only delivered four of the 6 chisels requested. Bad form.
But I’m finally on the last two.
One of the requests was for a large 18th century style chisel, and a picture of one to use as an example (you can google Pavlak’s favorite chisel and land at Fine Woodworking). I think this pattern is likely not historically relevant or correct, though the Seaton book has large firmers, they’re not as long and as bulky as this. This chisel will be in the neighborhood of 1 7/8″ wide, and 9″ below the bolster. And, by the way, I make the historical comment because history often leads us to what was economically useful. But, I am no re-enactor, and not part of the “correct police” bureau.
That said, the size leads to a list of problems – first, I can’t get my favorite chisel steel in 3/8″ thickness, which is what is needed to not have a flat wide tang. would that be the end all? No, but it would look stupid and I would always resent it. Second, I prefer water hardening steels for chisels. O1 (oil-hardening) would be OK, but would have half the toughness of what I chose at same hardness. I doubt anyone would break these, but as a maker, the appeal of a better steel than O1 for chisel fitness is desirable. What did I choose? 80crv2, which is just a plain steel of 0.8% carbon (starrett O1 is 0.9%, and I think Bohler may be 0.95%) with a small amount of chromium and vanadium. This is a “chrome vanadium” steel, which I climb the wall about a little bit when hearing that these aren’t tool steels or they are highly alloyed. In general, there is less alloying in these types of steels than there is in any boutique tools made of O1, let alone A2.
Going back to the toughness comment. Higher toughness allows me to leave this harder and have the same breaking force needed to actually break a tool, or to use a same hardness and have higher toughness. I’ll test edges with a dummy handle, but expect to push hardness to be 62+ so that sharpening is crisp and edge strength is also crisp.
While 80crv2 is popular as a solid choice for knives, I’m not aware of any maker who discloses that they use 80crv2 steel in tools. But, Larrin Thomas states in one of his blogs that it’s often used in tools. I’m guessing those tools would be die forged or European tools, like Pfeil chisels. Someone is using this steel in quantity, though, as it’s far easier for me to find than my beloved 26c3.
Scale – Big
This is a steel that can be forged easily, but I haven’t got a great need to forge it because the information that I can find to refine the grain is based on thermal treatments, and they would all be required after forging. In knife terms, the making is material removal – sawing and abrading. Material removal isn’t trivial because of the size of these. The volume of steel in one is probably more than the volume of steel in a full set of bench chisels. I find it worthwhile to try to get steel a little warm when abrading, but the size thing is there again – the initial work tapering the business end is slow, and it’s smoky and would be a no go in a basement shop no matter what. Fortunately, i have an open door.
If I had a power hammer, I’d forge it to shape just to cut down on the material removal, which was substantial. But I don’t, and it’s not reasonable to put a power hammer in my shop given the floor is shared through the basement. So, I spent about an hour just belt grinding things to size, which stimulates only in the ability to experiment on speeding up material removal process. And wouldn’t day in and day out.
You can see by the scale that compared to a 7/8″ English bench chisel, these are huge. What you can’t see his how thick they are around the shoulder and up. They are over a quarter inch at the shoulder (where the curvature starts) and full stock thickness (3/8″ plus a little) at the tang. The tang will be cleaned up and they’ll be slightly smaller than that when welding a bolster to them and after that. To prevent warp in heat treatment, they need to be relatively flat planes even though the thickness tapers (down to 1/8″ or so at the ends, and the finished version closer to 0.1″).
Further refinement in shape can be done once the steel is fully hard (more grinding, that is), to remove material and add a pleasing curvature to the top.
The steel comes in a micro structure that makes it easier to machine – I’d prefer it didn’t. That structure is coarse spheroidized. This can present a challenge for furnace schedules and oils that are a step too slow quenching steel. I don’t have either of those, so without experimenting, I suspect that it’s not that big of an issue. But, I’m making these once, so they went through another 45 minutes of hand time moving them to a finer spheroidized or pearlite structure. That should result in finer grain, and finer carbides.
The offcuts present a chance to test this theory much faster than the chisels, as the chisels themselves take a long time to heat. They each get 6 heats to do this thermal transformation, and if the terminology is confusing, it’s not that important. Safe to say, the objective is not to make a chisel that’s 2 points softer than it could potentially be. Making things by hand, if you can add something differentiable about the tools, something that a user or you will notice as the user, it’s worth the trouble. In this case, vs. a shorter process, it’s actually a better result, too, and not just akin to sanding to a finer grit on the surface.
I’m interested in seeing how these turn out. O1 would’ve been safe, of course. it would’ve cost more for the steel, but that doesn’t really matter.
I think a wide 19th century style parer would be more sensible in this size and length, but sometimes experimenting is fun.
Interwoven in this discussion is also a matter of details. Rolled annealed material that’s not spheroidized is probably available somewhere. 80crv2 isn’t hard to find, but without experience, I don’t know if I would trust the specs enough to just heat the material a couple of times and quench.
The question of forged or not is probably for another day. For smaller chisels, I always hammer some taper into the steel in three initial heats. It serves two purposes. First, cutting down on grinding, but second, to make sure that if material is offered in a coarse spheroidized condition, that I can get rid of that just as a matter of regular process. If this stuff is done properly, forging doesn’t offer a benefit as none of the steel that I buy comes from unknown mills. These bars are Buderus. To get something of unknown origin would save about $5 per chisel – it’s not worth it.
I’ll report back how they turned out once the job is finished and they have handles on them.
This isn’t going to be what you think. I could give you a method to get an aesthetic and a result, but I think you need some background based in reality, and my reality is having bought probably 200 chisels from japan, and viewed thousands or tends of thousands for sale.
Myth vs. Reality
There are two myths that I can think of, and they don’t present themselves often in well used tools. First, the myth that everyone in japan sharpens chisels over a great long period of time with extreme care and with perfect bevels.
They don’t. I have received a single set of used chisels that were actually being used that were perfectly prepared. Someone was carefully using them and the very tips were perhaps ever so slightly rounded. I mean the last couple of thousandths, but the bevels were flat and cosmetically nice, and the backs were flat.
I have never received another single set of chisels that were in use that were in such a condition.
The second myth – that the genuine tools are tempered extremely hard at some level that doesn’t make any sense. By this, I mean that Japanese chisels typically are harder than western chisels. It’s the nature of the steels, white 2 and 1, or other similar surplus carbon steels. Hitachi’s tempering range starts around 325 degrees F, which will result in hardness around 66 with the right choice of steels. Such a chisel will still behave as a hard tempered tool (chippy, etc) in hardwoods. I have seen accounts of people claiming their favorite maker tempers chisels at 100 degrees C. Or the boiling point of fresh water at sea level.
It’s possible that a maker would do that, but it will not result in a good-to-use chisel. It will provide someone who wants to temper their own chisels with a starting point.
To pretend that a chisel that chips easily even in sharpening is somehow a good chisel is nonsense.
When I receive chisels from tool lots in Japan, I always try to find chisels that have been some-used , and sometimes that means getting 20 when you’re looking for 10 of the group, or perhaps in combination with blades.
When a chisel or three is undertempered, it is almost always erratically sharpened or hardly used. Neither is a good thing. A trip to a tempering oven sans handle at about 350 degrees will still result in a very hard chisel (guesstimate, 65 hardness, could be still toward 66) that can suddenly hold its edge in hardwood.
Back to the perfectly prepared set of chisels that I had – what was the key? I don’t know for sure, but they were one of the softest sets of well made chisels I’ve ever found. I would imagine that an experienced user got his or her hands on them and realized how compliant they were on good quality stones and realized they were just the ticket. I have a very developed sense of estimating hardness of plain steels on stones, and would estimate that set of chisels to be about 62 hardness. White steel has nothing in it to resist wear, so a set of chisels with a good soft lamination at that hardness will sharpen with little effort.
If they Weren’t Flat, How were they Sharpened?
Most of the chisels I’ve come across have a little bit of convexity on the primary bevel, sometimes with a primary that wasn’t that neat, and then some steepening near the edge.
Why? Because you can remove the bulk of the bevel that way and then focus the fine sharpening on the tip of the tool and zero in to the tool being durable. that’s my assessment, at least. That method also takes some of the pressure off of a natural stone being able to finish tools quickly. Most tools are factory finished on a very large diameter wheel, even the expensive ones, and you get to establish a flat bevel if you like that.
I would like to show you an array of pictures, but I never thought much other than using the new sets as a place to experiment on expediting setup/prep. so I have hollow ground and then honed out the hollow or flat ground almost every chisel I’ve ever received experimenting with ways to get that nice aesthetic bevel and finish it without getting bogged down in the idea that what’s touching the edge should touch the whole bevel.
Too, the finest stones, even the natural ones, won’t leave a very subtle but crisp defined soft to hard line. Anything other than wrought, and even wrought iron to some extent (usually found on plane irons, but sometimes on chisels) will become bright. it’s nicer to keep the bevel maintained with a fast synthetic stone followed by a relatively fast natural stone (guess what- a slurried washita leaves a divine finish), and then use something exceedingly fine on the tip of a chisel.
So, How Should You Do It? The Sharpening?
First, understand what allows the edge of the tool to be held without chipping. That means you can’t look at a piece of paper, and say “oh, two flat planes meeting at 30 degrees” and expect success. You have to find it. Obviously, I have a bias toward things that round the last several thousandths of an edge because the durability is outrageous and the sharpness is pretty divine, too. but you can use very small bevels – I think a very slow stone and doing this freehand is good. You’ll learn touch and maybe get better results than a jig -not to mention faster.
Notice also that when you read Odate’s book and see other pictures of actual users of chisels, you will find the silicon carbide stone is in the set to deal with damage. If you have a chip and you’re using a 1500 grit stone, there’s no virtue in that. It’s got nothing to do with using the tools.
Don’t deprive yourself of learning what works by experimenting. Get on ebay and find tools that look like they’re reasonably well finished but not prissy. There’s no great difference between the better tools I’ve gotten for $15-$20 per, maybe from time to time with an adjustment to temper, and any of the three Kiyotada chisels that I have and have used. If I’m honest, those chisels are like the three bears. Two are parers – one is too hard tempered and needs to be adjusted – it will not hold up in use, and it’s so hard that it will crumble on a coarse sharpening stone. The second is a little softer than expected, and a more recent mortise chisel is excellent – just in the middle. More recent meaning that Stan C. got it for me as new old stock from a dealer’s back room in Tokyo. An excellent chisel, very subtly finished, but it’s still a chisel, and it will still chip if you pry with it and it will not work for three weeks of continuous use or anything like that.
So, lesson? other than not overheating a chisel, use stones that are efficient and that are fast enough that you will sharpen often enough that you’re not wasting time avoiding sharpening and using dull tools.
Lastly – Who is Telling You How Tools are Prepared in Japan?
A lot of the information told to western buyers is woo. That a routine white steel chisel would be $300 per is woo. That a typical user has some $3k natural stone in a shroud to finish their chisels is woo.
It’s not difficult to get on a proxy link to yahoo auctions in Japan (Buyee, for example) and look at tools that have been used. You’ll be able to find everything from the same kind of “made for westerners” $4k chisel sets to well made used chisels made for experienced workers selling for $150 or a little more. Try to find a set of chisels that are significantly shortened but that retain perfect edges and a perfectly flat bevel. I think most professional users were more pragmatic than that.
Maybe another day, I will make a post showing the process of setting up and sharpening a Japanese chisel. It should be quick and intuitive, not punishing.
Like Colombo used to day – just one more thing. Am I trying to make excuses for myself? No – when I used Japanese chisels (sparingly now that I make my own chisels), I would make them tidy for pleasure. As with many things, it wasn’t a matter of just getting the tools neat. It was making them have aesthetic appeal, but learning to do it really quickly. Below is a picture of a chisel that I had sharpened that was in my “user” set. White 2 chisels with a wrought backing. They, too, were just a touch soft. Guess? 63/64 – supple on natural stones. This chisel was serving a second purpose sometimes – demonstrating the finish left by a finishing stone that I was offloading on etsy.
I really like the way this looks. Even the one single set that I found that was prepared nicely still wasn’t done was well as this. The rest, not remotely close. And people still managed to use them enough to get the handle and the blades shorter than they were when new.
(I realize that the point of the commentary below may not be immediately obvious, so to state it briefly before getting into it; it’s critical to learn to like the bad taste that comes along with making something that you realize you don’t like. You may even immediately dislike something you’re making vs. the slow “ah…the more I look at that, the less I like it”. But, understanding how to make what you like and what others will like builds heavily on learning the feel and eye appeal of the things where you come up short. Allow yourself the space to come up short, ponder and discern to make things better.)
Sometime in the last several weeks, I was listening to Don Shipley, a retired Navy Seal who busts fake seals, and several other things. But he’s famous for confronting people who steal valor.
While he was talking about something, he said “that’s about as desirable as dogshit flavored toothpaste”, or something along those lines.
When you’re a beginner, you want success. Success is like eating candy. Whether you’re experimenting making tools, or furniture or cooking, keeping things only easy and refusing to venture out really limits what you can do. Referring to my good friend George Wilson here is perhaps the far end of things – George doesn’t have to brush his teeth with dogshit flavored toothpaste too often, but I’ll bet he’s done his share of it to get where he is.
What do I mean by that? The mindset of someone learning, or perhaps someone curious but destined for some mediocrity in the long term. We are fed a line by people selling gimmicks, or touting quality in their goods that will keep us safe from realizing and then subsequently improving our own shortcomings. Selling you the line that you have enough stuff to make things 95% of the time and what you lack is skill is a very low profit thing. It’s also unsafe for unaccomplished and some accomplished people when it comes to ego and wanting to share something.
I want to share failure and what it can do for you. But willful failure. I bring up George because George is a savant. He is a design savant and a savant in understanding and executing, but he is still human, so it serves us nothing to pretend we can’t learn from him. If George makes one of something, it will probably be better than my 5th try. It may be better than someone else’s 2nd and a third person’s 20th, and of course, there will be a few people who don’t get it at all and should find another hobby. But I know George didn’t shoot out of the tunnel at birth with a quill pen in his hand drawing sailboats freehand. He learned to do it. He spent time doing it and I’m sure he made things he ultimately didn’t like.
Welcome the Flavor, it’ll be Mint Later
When I started, I didn’t have the patience but I wanted to make things. Or at least, I thought I did. It was hard to separate the people who could make things and would share knowledge from everyone else. It was also hard to understand standards at that point and design, whether visual or utility with feel. Some of the fine makers seemed harsh, and as I learned over time, the Facobs asserted some long experience and criticized, but they really have nothing to offer.
I hated mistakes. I hated making something and looking at it and then not liking it. And then sometimes throwing said item away without much feel for what’s next. What’s next should just be more making, but I chose to do tedious things and get sucked into “well, I’ve got a long list of things I need” vs. a long list of making to do. That resulted in things like four hour dovetailed drawers that are now 1 (and better), too much pondering, trying to pretend that I have an organized mind. I don’t – I have a classic attention deficit type mind – lots of planning, but execution has to be something other than that because the execution of a complex plan is agonizing, whereas it’s bliss for someone who is conscientious. The whole attention deficit thing is a weird topic and maybe worth discussing another time – it’s got a branded label, but I think it’s just a better description of how brains work and not which urn you fall in – red balls or blue ones.
Where’s the stinky toothpaste come in? I never really stopped dreading making until i realized that brushing with the dogshit flavored toothpaste is how I find out how to stop doing it. Or put differently, if I try my best or reasonably best at something and expect item one, or maybe even item 5 to have characteristics I don’t like, then at some point, eliminating those as part of the process is a lot easier than trying to avoid them.
Here’s my latest brushing exercise:
This is just a kitchen knife in AEB-L that I offered to make for someone. I really like to put straight handles on knives but I’m thinking that sometimes, the handles that have a slight drop at the back and some registration to the sides are more appropriate for inexperienced users.
If you’re wondering what I mean by that, look up Zwilling Professional S knives. Those are big bulky knives with some kind of polymer handle. The handle is huge, but the knife is heavy to balance it out. I’ve made several knives with a drop on the back but attempting to put them with a lighter blade is leading to a lot of brushing with dogshit flavored toothpaste, so to speak.
The knife above is closer to success than any I’ve made so far save one that looked terrible but was a little more comfortable. I kept that one for myself. This one, I will send along anyway, but a second “free one” (the first one is free, too) will follow so that I can compare.
so, what’s wrong? Well, the knife is very light. The heel is a human finger filleting machine, but that heel is often useful, and the last section of it can be honed a little dull if it’s not desired. I like to have a little cut in at the front of straight handles so that gripping with thumb and finger onto the blade is comfortable. The trouble here is that the handle is kind of blah already *and* the notch is exactly where you don’t want it when you hold the handle without fingers on the blade. If you grip the handle, the notch is just there, teasing your thumb or forefinger forward. I have an idea to improve the next one. Having not made this style of handle as small as this before, I couldn’t have anticipated just how much it would be like brushing with dogshit flavored toothpaste to hold the knife handle for chopping.
If the knife were just for me, I could get used to it. If you were enamored with things made by hand just by the notion of it, you probably could, too. But if you objectively compared this handle to a lot of others that aren’t any harder to make, you’d have to admit that the notch is just wrong in most cases, and at the length of the handle, it would have to be handed and only on one side. Which isn’t great, either. There are left-handed people in the world who have already settled in to playing guitar left handed and so on. I should be able to make a knife that accommodates them.
So, instead of getting a really foul attitude and throwing the knife across the shop, I’ll take that feel (taste?) and how it it immediately felt like “ghee, I just made it worse than doing nothing by a mile putting that notch where it is”, and use it so that the next issue isn’t that. I appreciate what I’ve learned, and looking at the lines of the handle, see other things that could be improved – it’s just a little uglier than it needs to be.
Perhaps a better maker would have to brush with the stinky less often before figuring things out, but who cares – I’m not another maker. The disappointment is short and quick. If it takes five of these in the end to get one good, lots of little things are still occurring to learn from, and finally getting things right puts one in a place to make something better and more thoroughly thought out than any first item – no matter how good – could ever be.
It would take a really unproductive ego to go at this with the idea of entitlement, that everything will be minty fresh from the start.
I’m not one for New Years resolutions. They seem like something that people put off too long and the gimmick of giving them a tag makes them seem novel.
Losing Weight Would be Smart
Lots of people would like to lose weight. This year may be a good year for me to do it, too. Not for any imminent reasons, but 50 is a few years away and I see enough to know that it’s more beneficial to do it earlier in life and not later.
Quitting Forums and Commenting in Pointless Blogs
I also intend to stay off of the forums, or at least mostly do it going forward. For me, forums are always kind of an illusion of potential. There’s potential to push the discussion forward and somehow have that become a collection of useful information. But it never happens. Forums were really created as a medium for advertising, an offshoot to another business (think Woodnet as a forum created by a publisher, or Knots on Fine Woodworking), or whatever else.
The dynamics aren’t there for them to become an organized and efficient discussion of anything other than new beginners, people who have progressed from beginner to beginner over 15 years and the businesses that rely on finding a continuous stream of wide-eyed folks intent settling in to imagining woodworking for a long time.
The potential isn’t there. If you’ve ever frequented the UK forum for example, there’s a group of relatively well adjusted folks, but the discussion goes nowhere. And there are some cracks, and in my opinion, one fraud – in my opinion – who probably never really has done much hand woodworking, but has been there for as long as I can remember. Paul Sellers would win an election for parliament among them if parliament were to be filled only with fine workers. And that’s appalling.
But one has to think a little harder, and many are smarter than me – what’s the conversion rate of someone coming in and getting good advice, and actually intending to use it. It’s just too low to bother, and the minority of really fine posters who used to frequent forums 10+ years ago – they’re gone. Moderation on forums isn’t there to try to boost the level of discussion – it’s counterproductive.
I’d love it if there was some kind of setup where the George Wilsons and Peter Ross’s of the worlds could kind of command and curate an area of expertise, where the questions and fine guidance sort of filtered up into an organized area of information, but it’s not to be. That would be a business nightmare, anyway, as those folks would talk about what to make, not what to buy.
And I wouldn’t get into discussions chiding a retailer for selling a $95 diamond hone with really insulting marketing or ad copy that looks to be a $6-$11 per unit Chinese stone. That would be good. But it’s that enormous margin, and the “everyone wins except the person looking for advice, they just don’t know it yet” that makes them go.
Spending on the Materials – the Making
There’s a point where you get into hobbies of woodworking, instrument making or tool making, where just trying to progress and purchase the things you need is daunting….
……and then you get to the point where you do one of two things, or both:
One is tool upgrades. This is something manufacturers do. Makers get to a point very quickly where this isn’t a limitation.
The other is buying expensive materials.
There’s no way around the fact that if you start making nicer things, you’re going to be buying materials. In some cases, you need to have them on hand for a while before using them. Exotic wood is a good example. Even that which is advertised as dry and aged doesn’t pass the lip test (damp wood is cooler than everything else when you take it out of packaging), or the weight/shrink test.
If you want to make nice things, I think it’s probably more useful to find and source good materials than it is to constantly ponder tools.
I don’t need more tools, and what I do need from time to time, I’ve learned that making is better than buying. Buying is expedient – “ah, I solved the problem”. The result can be mediocrity or just tying up household money for no reason. I don’t really even need more materials right now, but sometimes the consumption of belts and bar stock steel is pretty high.
Without the illusion of continuing to upgrade tools, or the fear of having lots of stuff and not measuring up to its potential, I feel more comfortable just spending the money.
I’ve long thought having a dewar of liquid nitrogen would be nice. I suppose the dewar is a tool, but why i don’t have one is an indication of past habits. They’re not expensive used. However, tou get the dewar, and the consumable that goes in it isn’t free and has a fairly short life span. It is something that would improve my stainless knives by improving terminal hardness, and it would add some crispness to my carbon steel tools. So rather than dream about $3000 belt grinders, electric furnaces, and $2000 anvils, I’m getting the dewar.
And when I want bar stock for a project, no more screwing around trying to save $2 per tool on something a little cheaper.
Reflecting
I’ve done a lot of reflecting on what making will mean going forward. If I can’t get into the shop three or four times a week, I am unhappier even than the forum version of me who wishes that the TOS would allow someone to tell Facob to take a hike, or to just blast the people on the forums who offer nothing in terms of making, but are quick to spend a whole post telling someone they spelled an irrelevant word wrong.
I’m getting older, and I guess over the next several decades, will start the decline – or continue it – of decreasing limberness, eyesight, patience, ability to absorb new things, and who knows – I could lose my parents early or have a spouse who decides she’s had enough of the husband who makes a *whole lot of dirt*.
There’s no grand plan, just refinement to finally break some of the stupid habits that I’ve had that are controllable. and I won’t say I “wanted” to do them earlier. Maybe I’ll make a post about “want” at a future time as one of the permanent tattoos on my brain came from an older female coworker of mine who let me know about using the word want, and how it’s a word for losers unless “want” is paired with what you are doing everything you need to do to …well, do. I haven’t wanted to lose weight, or drop the expedient entertainment of the forums or maybe really adjust my behavior about keeping things I don’t need or not buying things that I could really use (good materials, with discretion). I want to do those now.
Somewhat heavy on my mind is pondering what it is that we owe each other. Absolute honesty and advice with good intentions, not carrying the water for someone else and above all – doing it without regard to whether something will make me look bad or too direct or whatever else. I think we owe that to each other, and I think we owe to each other putting aside concerns about whether or not it may help this business or that business or not make a group of fans of some guru unhappy.