(Take me to the summary version instead)
OK, back to the W2. This time with pictures.
These pictures are the tail end of my testing, after getting a sense for how steel sharpens and grinds. I first want to see if the steel rolls or chips, if so, when, and how, and get an idea of the carbide pattern in the steel. Why? There are published micorgraphs of carbides for most steels. I don’t know that there are any of W2, but W2 is a lot like 1095, and the carbides may be slightly more coarse, but it should look a lot the same.
Translation in this case, I should be able to see them, but they may not be quite as prominent as expected since there’s not so much alloying to keep excess carbon (>0.77%) out of the matrix.
Compare this to 52100 bearing steel (tough, hard to break) where there’s enough chromium to make it less easy to dissolve carbides and free excess carbon. According to Larrin Thomas, this is what’s influencing how the martensite in steel – the stuff that we want to create and then temper – is arranged. With carbon more in the 0.75-0.8% range (my guess), the martensite is formed in laths. As you get closer to 1%, the martensite can form in plates without laths, and I’m guessing some combination between.
What does this do? Subjectively, plates form with excess carbon and the carbides will not be as prominent as expected given the carbon content. Laths would suppose more carbides and maybe bigger in the same or similar steel composition.
Laths are associated with toughness (do they interlock like fingers? I don’t know) and plates, less strength, and a toughness test where steel is broken by striking it in the middle shows at higher hardness, the toughness can differ by a factor of three. Tougher football players are better, right? Tougher shoes, tougher cars, tougher tires, so tougher steel is always better? if you’re bending a knife in a split in a tree or stabbing ice cubes, the toughness will prevent breaking. I haven’t found an ultra tough steel that I like too much in chisels, and only one in plane irons (80crv2, though 1084 is OK – it’s just not as good as many other options).
I haven’t had W2 toughness tested, nor hardness tested (I can guess at the latter accurately). I care more about how the irons or chisels perform in wood than knowing how much energy they absorb when being broken in the middle. it took quite a bit of experimentation to know that just getting more toughness and using it to allow more hardness doesn’t necessarily translate to greatness at the edge.
But I suspect W2 isn’t very tough. Perhaps similar to O1 or only slightly tougher. Anyone have a problem with O1’s toughness in tools? I don’t.
Strength is what most of us think of when we talk about the condition of tool edges – how much can steel tolerate before it begins to deform in a way that it doesn’t “come back” after deforming. Breaking is long after this. We like steels that are “strong”. Toughness is harder to make a generalized statement about.
I have found over time, too, that unlike knives, if a steel is tough – it will retain deformation. you will then push deformation through material (imagine cutting with a knife that has a rain gutter shaped bit curling around the edge instead of an apex). All good chisels, if challenged, let go of the edge instead and what’s left behind is less wide than a rolled/deflected edge.
Soooooooooooooooo……
to get an idea of how all of this works out, I set the cap iron really close so that it pushes the wood into the back of the iron, rubbing some of the matrix away and hopefully leaving carbides standing proud. Getting pictures of carbides is a real trick – not so much getting pictures of them, but comparing them. To see them, we need something to cast a shadow. However, if they are round domes, the microscope looks directly down on them and it prefers light that comes right back up. That means if we see a shadow, we can assume that’s pretty reliable, but the bias of the scope is not to show one in the first place. Higher light level also means less shadow, and lower light level means more, but discerning details becomes difficult as it gets too dim.
Moral of the story? Don’t trust everything you see. At some point, I may screw around with introducing a lateral light source stronger than the top tube light to game the system, but I haven’t yet.
the magnification of these pictures is a true optical 300X. This is beyond the capability of hand held cheap scopes, and for scale, these pictures are a little less than .01″ tall from top to bottom.
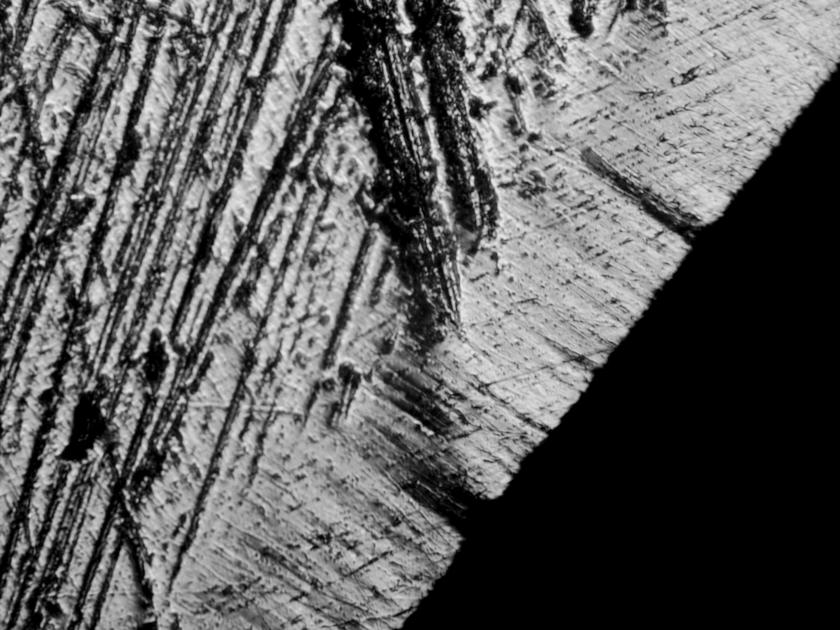
First iron of the pair, this is the first picture that I took:

This picture was disappointing. The halogen bulb in the scope was on its last leg because I left it on for days recently (oops). What we see seems to be a lot of carbides 1-2 microns. good, but I learned the low light is a bit deceiving because most of my other pictures are at a higher light level. also, the edge doesn’t seem to wear very evenly. These are tiny deformations, but other stuff (26c3, O1, 80crv2) seems to wear with almost no interruption in the line). But since this is the first use, it’s possible some damage is left from initial grinding, even though shallow. The grinding and honing of these irons, and flattening is brisk and harsh. I’m sure the same is true of commercially made tools.
Nonetheless, with dense carbides, my thoughts tend toward “well, it might be slightly soft compared to what I’d guess”. it’s easy honing and only the third or fourth hone really gives a good idea of where hardness will be – when all damage is removed and there are no deep scratches in the back that hone away easily.
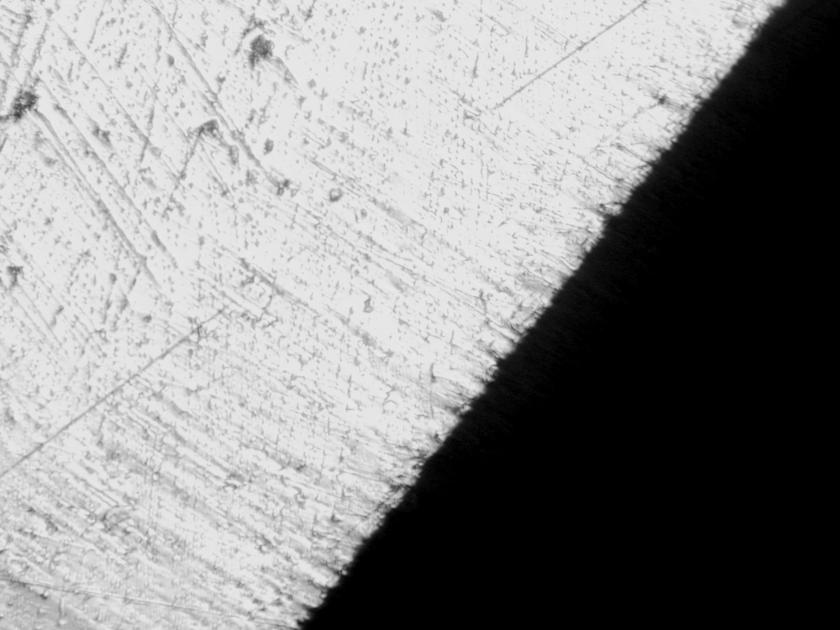
I set up the second iron, but came up short doing it. it still provides interesting information:

What happened here? I changed the bulb in the scope and took a picture. The carbides are harder to find. This reminds more of O1 – at least no big odd carbides at this point – that’s the worst possible outcome.
the edge looks wavy, but if you look closely, you can see large deep scratches remaining above the edge. Those are from a 180 grit diamond disc. the edge still looks a little more ragged than expected. Higher light level does a better job of showing all of it, so the low light ragged edge is probably better than it looks – the lower grooves just can’t reflect enough light back for the camera software to decide to show them.
when I flatten the backs of these irons on the rotary disc, I have a drill in one hand and hold the irons with the other. Once in a while they grab and probably leave some deep scratches in the very tip of the iron even though the iron looks honed otherwise. Translation, these are deep at the edge, but they definitely are gone in the rest of the iron, and i just need to go spend two or three minutes honing more focused at the edge.
But first, I took another picture, as it would be nice to know if those scratches got to the edge. On a good iron, if there is a defect, the iron wears away around it. With steel that’s less stable (bigger particles, like V11), more damage will occur around the groove creating a bigger deeper nick before everything becomes stable.
that’s what I wanted to see. Notice how the deep scratches, at least one of them got to the edge, and then the iron wore a little faster around the scratch, but the shaving direction is perpendicular to the edge, so it wore away some of the edge and then created its own route back from the edge in the direction of the shaving. To see this and not see the remaining divot wider than the original scratch is fabulous. this is what older irons often do that newer irons with large particles don’t.
I bring up V11 because it has high carbide volume. A2 has less volume, but it does have carbides about as big and sometimes unevenly dispersed. Cracks start in carbides, and five microns is about the size of the smaller groove at the top. A five micron round carbide isn’t five times the volume of a 1 micron carbide, off the top of my head, it’s 25 times as large in volume.
The edge looks more even away from the damage. The carbides are hard to find, though. The faint diagonal lines going the other way are oil. A tiny amount of it after wiping off the iron several times – it’s hard to get rid of all of it. that’s oil left after use, not after honing, too. And that’s why your oil stone sharpened tools never seem to rust and waterstone sharpened tools do quickly. You probably never get all of the oil off even when you think it’s gone. The carbides are there, but not big enough to cast a shadow. the shape of the wear is sometimes scooped, but it’s not here. If it’s scooped, from the shaving wear as the cap iron pushes the shaving back down to resist it, we can see the carbides easily. More wear to the edge rounding it would also help, but I didn’t plane enough.
Back to the other iron with the new bulb and a lot of light to try to see if the edge really is uneven…after two more hones. it looks pretty good. Same iron as the first picture, the light washes out carbide shadows.
There’s some relief on my part here – an iron that wears unevenly at the edge is no good because it feels dull sooner. Recall from the revilo high speed steel iron, I’m sure the steel has better abrasion resistance than plain steel, but the lack of uniformity at the edge while it’s wearing eliminates any ability to actually make use of it in wood. Uniformity is good.
One last experiment then, taking a pair of pictures of the two irons in lower light – I sure hope they show carbides and are similar.

Oops, a little too dark. This is the same iron as the last picture – notice the scratches haven’t moved. Round carbides make what look like little comets, though they’re probably not really ideally round. The carbide is at the front and the tail of the comment is the steel matrix that’s protected from wear a little bit longer. You can also see how at low light, some of the edge disappears at the apex, giving a false sense that the edge is uneven. I’m still learning all the time!
then, the other iron at slightly higher light.

Notice how even yet after a few minutes, the almost very edge of this iron still has some scratches. it’s pointless to remove them if they don’t get to the edge. They will be removed by subsequent wear and honing. the same is true for someone getting a new iron and believing they need to have an optical polish for the first inch.
You are better off buying one of the cheap hand held scopes to avoid wasting time on stuff like this. While those scopes won’t do much to show carbides like this, they will show most scratches that are visible. I’d have very very easily seen the stray scratches that bungled the first efforts in two and three. But the blessing of those is they answer how stable the steel will be around a defect. Because scratches aren’t the only thing that propagate damage – nicks do the same thing.
I’m glad to see the carbides again at lower light. When you’re going back and forth with different pictures, you get all kinds of thoughts. “maybe the composition isn’t uniform in the bar stock”. That happens rarely, but it’s possible. The variable in this case was me.
This is a very stable steel, though I can’t see any commercial value to someone like LV or anyone else making plane irons. It takes a different skill set, and it would take a savvy experienced buyer to appreciate it in a plane. It would be appreciated in a chisel pretty easily, though, but not practical in a market where people like lego-like chisels crudely made but with a high level of finish and an optical back.
If I go pro at some point in the future, I’ll offer stuff like this for people who just haven’t tried enough different stuff yet.
