The Continuing Stanley Surprise

As I’ve continued to put anything interesting and clean to the hardness tester, I’ve found a few more recent solid Stanley irons. I still don’t think I’ve found the original round top iron that I used to flatten my bench. I thought the one that I tested the other day was that iron, but I’ve got an affinity for later type Stanley planes and realize that there are at least three round top 2″ irons and the one that I tested is probably a more recent purchase, even if it’s not a more recent iron.

I went through a phase where instead of junking irons, I would hold on to the few that were no good at all until I needed to do something stupid. Like scrape something destructive of whatever else. And then those irons get tossed around all over the place so as not to put them in the “useful” drawer.

Nonetheless, I found yet another later Stanley iron, though probably not T19 or 20 – I don’t know. I can’t get that excited about the whole type thing or official names as I can hardly remember the names of things day to day in general.

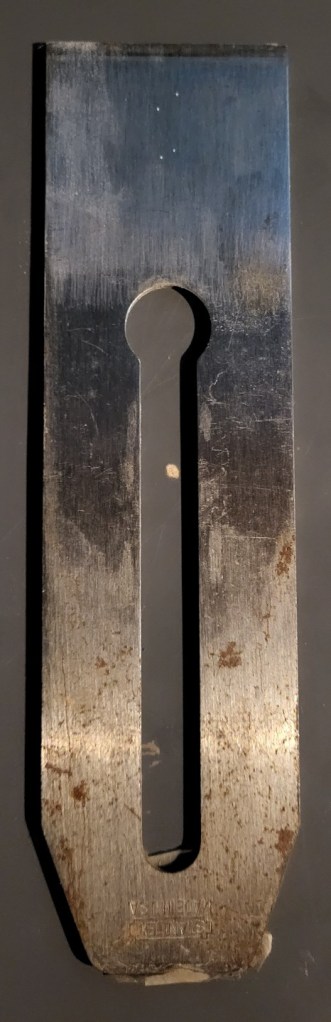
Anyway, I located this iron and tested it:

You can see a couple of little dots. I’m wising up as everything is getting pocked up with little craters, and if the finish on the back of the solid irons is good enough to be tested, I will pock the backs up instead of the fronts. This iron isn’t in hand, but the back is probably just milled and too coarse. Too coarse or dirty or really anything that doesn’t provide both perfect footing on the anvil and a solid continuous clean surface where the diamond goes and the results can be off the mark *and* useless.

Guess the hardness. 61.5

Again.

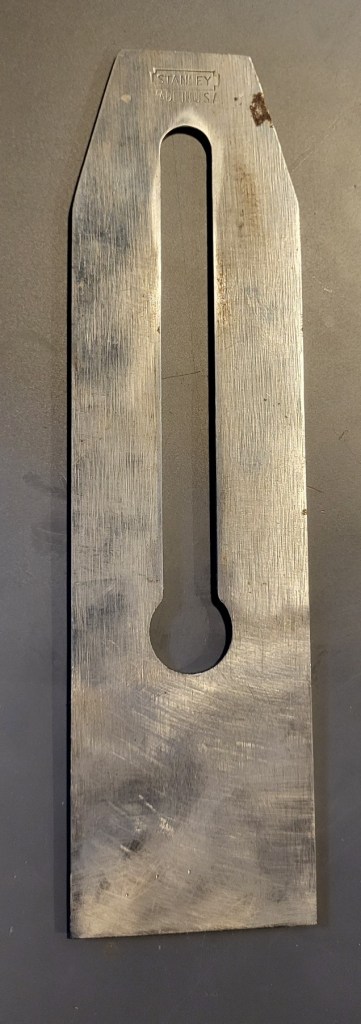
And then in the same pile, I found a recent Stanley Mexico iron. It had an annoying coating on it, but consider the market. I scraped it off of both sides and tested it:

Guess what the hardness was.

61.5

That makes five irons now that have hardness of 61 or 61.5. No solid stanley iron that I didn’t reheat has tested otherwise, though I’m sure changing eras or a much larger pool of irons from the era of these could prove to find something. Could and would are different things.

When I first got the tester, I stuck a couple of laminated irons. Their reading is too high to be believable, and the laminated thickness is below the minimum thickness for the tester, so I’m not going to test any of those or any irons thicker than a stock bench plane iron. There’s no reason to have bad information.

This makes a light bulb go off. First, the reports of the soft irons are false. Not just the recent ones, but in general, Stanley’s irons from 1900 or so at least and beyond that are not soft.

I used to think they were soft, but at some point, learned to use the cap iron and suddenly they seemed to hold up fine. I admit that I attributed it to some “protective” unexplained effect of the cap iron, and there is definitely some, but it’s not an extension of useful hardness as far as I know as irons that get below 60 suddenly have issues denting or forming a burr in hardwoods. Both of those things are obnoxious because they lead to the plane giving up before the iron is actually worn.

The effect of the cap iron, as far as I can tell, is just to take an iron that is thin and maybe not that stable if not used properly, and put it on wood and keep the wood continuous without a bunch of chattering.

I have another iron to test this theory – an IH sorby tapered iron that went into a cocobolo smoother years ago, and I instantly figured out that it sharpens fine, but it doesn’t last long in smoothing work. The solution was easy enough – use the smoother for work more coarse than smoothing, and that’s what I did with it. But I forgot to test the iron.

I’ll bet it’s going to be measurably softer than stanley’s irons.

After figuring out the double iron, using a stock stanley iron to make that cocobolo planes was one of the first things I did. Why? To find out if I wasted my money buying a bunch of high hardness and high speed steel irons before that because they were always the advice given, or almost always, if you were planing something exotic and needed “better than they used to use”.

I dimensioned the cocobolo plane blank and then did all of the planing to rough the coffin shape, and made the wedge with that iron and a stanley #4 and had to stop to sharpen once about 3/4ths of the way through.

Hardness is one thing here, though. Abrasion resistance is another. These Stanley irons are hard enough, but they would be the choice of an experienced user vs. something with a bunch of abrasion resistance. If the user is changed to someone with a honing guide and 6 minutes of sharpening with 6 stones, I think such a user would find the modern irons more pleasing. When you first start, everything is smoothing, and if it’s more than smoothing, it’s a million feet of planing to get to final smoothing. And suddenly when you do a lot more woodworking, the smoothing is after try planing and it’s over in a flash. Try planing doesn’t benefit from ultra hard irons because the shaving is thicker. But the try plane makes the work of the smoother very little. And suddenly everything starts to make sense with why nobody was clamoring for extra hard or extra alloyed steels until recently.

That doesn’t explain the 1920s-1960s or so, but anyone in the US will be honest and admit that there wasn’t a whole lot of fine hand plane use going on during that period. This is the United States and until the antiques craze hit, 99.9% of the population embraced modernity. My thrifty grandparents spent the extra money they had embracing some convenience after a life of wearing themselves out. The only hand tools I saw my grandfather use were axes to split wood and wrenches to fix equipment.

That big lull from the early 1900s until woo woodworking gave us a long time to forget why things were designed the way they are in stanley’s planes. Even in Hasluck’s guide to hand tool use, there’s a maniacal explanation of why hollow ground bevels are far better than complex, but it refers to a comparison vs. a site worker with poorly set saws (at least as far as I can remember). Somewhere between the late 1800s and then, the talk of the cap iron no longer was provided in long form. I think the explanation as to why that would be is simple – a combination of a lot of veneered furniture and the lack of economic value in finish planing when work went to factories.

The seeming insanity of recent posts

OK, it’s not really insanity, but I thought about it after the last couple of posts where we’re actually talking about steel and i’m off of the annoyance with the forums and such. That’s generally in the past and a short dose of posting on forums will remind me about the lack of depth there.

Especially after reading something like Steve Voigt’s excellent blog posts on retracing steps in manually “washing” oils and things of the like for making varnishes. Something I’ve dabbled in only lightly, and is yet another thing we can do by hand, albeit making varnish in a house would be asking to stand and watch the house burn, so be careful if you get into that.

There’s this whole world of little details out there, and if you get away from thinking you need to make this or that joint, you’ll probably also find something you really like and will put the time in to learn and then share. Even if you have TMI as I do, the people who are actually interested in it will sift through what you put out and find the valuable stuff.

I would never have guessed that I would be doing anything outside of heating O1 steel, or guessing at hardness based on alloy, or separately by feel.

But the CR60V question is just general curiosity. There is a weird dynamic of steels that are used in common tools vs. stuff that is sold as precision ground stock for a whole number of purposes (like O1) or specialty knife steels that are used in boutique quantity, and by individuals, but not commonly turned out in 100,000 units a month.

CRV60 – there, I’ll just put the numbers in any order from now on – seems to be everywhere, cost almost nothing and the fact that it turns out well, at least within spec suggests that there’s something that makes it easy to use. Is that valuable to us? Probably not, but it’s part of understanding how things work.

I don’t have the interest in trying to find little bits here and there only to write about so as to build some kind of following – plenty of other people can do that and be smiley all the time and pretend they’re not full of questions.

As time goes on, since I own the site and thus the decorum, I’ll think about putting up some summary things. Such as basic steel discussion. What are carbides – you probably know what they are, but a small definition of them (combinations of carbon and other elements forming a ceramic) could be useful. If someone isn’t interested in carbides, they can just drive their car by.

I don’t expect the pondering to have any long term value other than what shakes out of it. Something might.

Record Player Question – What is Chrome Vanadium Steel?

I realized as I was writing about the stanley irons earlier that I’ve never seen an actual spec sheet for CR60V or CRV-60 or any other iteration of those letters used on tools that come from overseas.

So, I figured that as common as it was, there would be a standard composition, perhaps one of a Chinese spec or a European spec, but I come up empty.

All I can see of it is that it’s anticipated to temper from 58-60 if it’s hardened properly.

Which….is no surprise, because that’s pretty much the exact range that a lot of the low cost imported chisels hit.

I’ve assumed that it is a 0.6% carbon steel with an uptick in manganese and carbon with a little vandium. The middle two make it easier to harden the steal, and the last makes it hard for the steel’s grain to grow. Without anything other than carbon and manganese added to iron, the grain can grow wildly in 15 seconds of moderate to significant overheating. When I’ve subjected 80crv2 steel to even more overheating than that, I see no increase at all in grain size. If the exercise were stretched out further, we would see it.

Vanadium is good at this. Chromium also seems to be protective, but probably not as much. 1084 is the only steel that I can think of where the trusty shop method of thermal cycles and then a quick temperature overshot requires more discretion on the overshot. No problem, you remember it and do it.

But, I can answer that question for 80crv2. I can answer it for SAE6150, which is what folks sometimes think is the “only” chrome vanadium steel. I can answer it even for O1 when there’s an addition of vanadium as is sometimes the case -that is also a steel with chromium and vanadium.

But I guess I’ll have to admit that the low cost tools that come labeled as 60crv or any other similar name, maybe we just won’t know the composition, and I’ll still assume that it’s 0.6% carbon, but won’t know.

Theirs vs. Ours

They being everyone other than the US. SAE 6150 appears to be used in a lot of tools, like sockets and various bits and all manner of things. It’s got a serious increase in manganese and chromium over something like 80crv2. I don’t know why this is, but would guess that it has to do with trading more and more of the content to manganese and chromium in favor of making the steel easier to harden.

I don’t think we see much of it in woodworking tools on the market now, but who knows.

in the “theirs” category is a wider range of steels that have chromium and vanadium, but aren’t pushing a percent of composition for each. I’m sure there are reasons for that and would guess as carbon goes up, increasing alloying would decrease toughness. In a steel like 6150, carbon ranges from a little below to a little above 0.5. Since this stuff is everywhere in wrenches and sockets, it’s obviously useful. I just doubt it would be useful in woodworking tools and wonder if some of the reputation for Chrome Vanadium steels being though of as shiny and gummy is because it was tried in site tools.

Whatever the case is, I guess we’re guessing. 80crv2 is as low as I care for in a steel that’s a little more on the plain side. It’s pushing to get it to temper in the sweet spot around 61.5. It may not sound like much, but hitting that instead of hitting 59 is kind of a big deal. Even then, I’m not sure about its edge stability yet, because it will land around 63 hardness tempered at 350-360F (double tempered even), but the edge won’t be stable for a picky hand tool user. I don’t mean like beginners – I think most of the boutique tool market would be happy with it at high hardness because they are not yet initiated to the fact that harder isn’t better if the edge can’t take advantage of its hardness.

To prove that it’s the hardness and not grain growth, I’ve done a follow up temper to 63 hardness 80crv2 at 400F double tempered. It ends up around 61.5 and the irons are excellent. Whether or not they’re as good or better than O1 would take more follow up and use in actual projects.

That said – if anyone comes across a spec or a cross reference to another spec for “CR-v 60” or anything of the like and it’s more than just a sales listing for screwdriver bits, I’d love to see what the actual composition is.

It could be that like some of the low cost stainless steels, it just isn’t offered for sale to the general public due to lack of interest, and customers for it are more of the “I’ll have a melt of this” rather than “I’ll have two bars”.

A Hardness Testing Surprise – A Round-Top Stanley Iron Tests over 60 Hardness

There are always things to learn or understand. For me as an amateur toolmaker, one of those is the impact of alloy choices. For the most part, you and I can feel things like hardness, and on the stones, you can get a pretty good idea once hardness is known how long the potential edge life may be. Briefly put, the longer it takes to sharpen something of the same hardness -and really fully sharpen it – the longer it would last in a planing test.

How long it lasts in real use when cuts are interrupted in rough work is entirely a different matter, and is why in my work, V11 doesn’t measure up to its hypothetical test results. In my hands, actually, those tests were spectacular – it lasted twice as long as my O1 irons in long grain. In actual work, since smoothing continuous wood is really just the last step and over in a sniff, there isn’t much like the test. As confident as I was in the test results having planed something like 40,000 feet, I realized that I would need to test the irons further in rough work, but this is far less easy to test in a way that’s repeatable by someone else as you’d have to have enough rough work of similar boards, and a plane that you’d like to do it with. I didn’t.

In the end, I learned a lesson – abrasion resistance doesn’t matter if the edge gets damaged instead of abraded. Stability of the edge in actual wok is top dog and an iron with less wear resistance may be less work.

On to the Stanley

In the hardness testing results here and discussed here, I was surprised to find that a later type stanley iron tested just fine. 61.5 hardness. Without going into details, I’d regarded the later types as generally kind of soft, they don’t wear that long, and in a prior post in the blog, I showed pictures of the worn edge. It *feels* like softer steel in planing, but has no carbides in it. Edge life isn’t great, but no professional would care. It’s not that bad, and the somewhat false need for edge life comes from the idea that all shavings are thin.

I hardened another one of those irons with sharp corners at the top and it tested at 63.5. This was a shock, because it still ignores the fact that their edge life is less than O1. The two things together beg a question – is it the lack of iron carbides that create the issue? O1 steel itself isn’t really that plain – it’s got excess tungsten and a little bit of excess chromium and it does last longer in an abrasion test than “plain old carbon steel”. So some of that is involved, but there’s almost certainly some alloying in the stanley irons to make them more hardenable. There isn’t enough of it along with enough carbon to form carbides that cast visible light. Roughly speaking, details about a micron in size begin to show up as visible under my metallurgical scope.

But I still had a Wild Card – a Round Top Stanley Iron

I’ve been advised and generally advised folks that the round top irons in later planes are a little weak. Fine for coarse work, but if you do a lot of fine smoothing, you’ll be doing a lot of sharpening. If you’re planing hardwoods, even more, as the apex of these irons seems to be somewhat intolerant of impact.

I figured this would finally be the iron that proves stanley jumped the shark with hardness.

Pardon the tape or whatever is stuck to the top. These irons aren’t actually round topped, they just have rounded edges/corners at the top. I think I have two of them and I’m still going to find the other one and ensure that one also tests the same before this is all settled, but this iron tested all strikes of 61 and 61.5.

I scraped it, cleaned it off, whatever, same number.

The aldi chisels do the same fooling. I tested one – the first one was 58.5. They feel a little softer than that, but close enough. The other three that I dug up yesterday were just under 60.

This isn’t going to turn into some sellers-esque lifestyle woodworking where I claim they measure up to the better English chisels. They don’t. The differences aren’t unhardened vs. hardened, but a person working in some volume will appreciate how much better a ward chisel is, both in steel and proportion.

I’m fairly sure that what’s being observed with all of these is a combination of wear resistance with very little alloying, but also lower carbon, as well as something described as edge stability by the knife community.

We all know “toughness” and “strength” even though people often use the terms incorrectly. They are measured on a larger scale than just at the apex of a tool, at least the couple of thousandths that we use. Edge stability is a term used by the knife folks. It turns out to be somewhat similar to the whole Unicorn concept, though I knew nothing of it other than an old video of Cliff Stamp talking about managing the angles to dictate where edge failure would occur, and my own experience seeing that edge failure in tools – to the point that we are forced to sharpen, is rarely more than a couple of thousandths deep.

Larrin’s older post discusses this here:

With knives, the discussion is more wide open because there isn’t such a standard use as there is with chisels, and some edge failure is tolerable in the case of a knife with a thinner bevel. Think cutting cloth or boxes or something vs. chiseling. Knives have a much more wide ranging application.

My article about the unicorn is currently not up on Woodcentral. I don’t have any idea why, but I’ll be rewriting it and hopefully in an improved way, and posting it here. Several years of use and a different format necessitates it. Something of its absence could be the redesign by a site administrator who doesn’t know anything about woodworking, or also by the less than flattering results obtained with V11 given that Lee Valley is an advertiser on the site. Who knows, I don’t.

I observed a problem, I solved it. Whoever came up with linen and leather did the same thing. A long stropped comfortable straight razor has a very acute following angle, but the edge worn slightly by the strop and then becomes very stable and probably could be used for years with nothing more than linen and leather.

I think what we’re finding in what’s really just observation of toolmaking experiments is that below about 0.8% carbon, we don’t have the edge stability that we’d like. I wouldn’t be surprised if later stanley irons are a little less than that. That’s below 1084, and typically in the matrix steels (AEB-L and matrix versions of high speed steel), the carbon content is low. For AEB-L, it can be down to about 0.6%.

For lower carbon steels of this type that aren’t also alloyed, heat treatment becomes simplified. No carbides, nothing to dissolve, and nothing is keeping grains from being reset very easily – no carbides or vanadium pinning grain, no chromium of note, etc. That translates to the same hardness as earlier irons, maybe due to tempering being less, but the time the steel needs to spend hot is less, and the temperature that needs to be used is less.

This is by no means a recommendation to seek any of these irons out unless you’re looking to sharpen more often. The perception from actual use still remains – they’re not that great. They can be used, but they will not match even a good O1 iron. Too, there is no guarantee that the other one, if I can locate it, will test the same, as the shape is slightly different.

It’s definitely true that I didn’t notice the same thing with later stanley mexico planes -the iron in them isn’t exactly a thriller, but it does have some carbides in it that show up under magnification.

Hardness Testing

I am emboldened. Much of my thoughts about what I can feel with hardness, and how consistent I can feel it is supported by the hardness tester.

This is a boast, as George Wilson used to say, when you can do something, maybe it’s still boasting, but it’s true.

But this means ultimately, you could do it, too, as I have no real special talent other than curiosity and plenty of people on the forums will confirm that if you ask them.

I will put up a separate post about the hardness results that I’ve found in a bonanza of testing over the last several days, but they also help to confirm other thoughts of mine – that older English tools aren’t any too soft.

Thus far, of the chisels and irons that I’ve liked, and that are well received, only one tested below 60 (a parer that I’ve used little). Everything else has tested 61.5+.

A few other things have solved mysteries that I thought maybe I just wasn’t perceiving correctly, and a pair of boutique irons that I always thought were a bit of a bear compared to their specs (hock O1 france and LN spokeshave iron) tested at 64 hardness. I struck them both over and over to come up with the same thing.

I think it will be an interesting thing for us to look at as I compile test data.

The tester that I purchased is a hand held tester that can be used in a stand, but it is a full strength diamond cone tester, just like the upright stationary types. There are some nuances in handling it, but anyone who can sharpen a plane iron freehand would gather these quickly, and then the device will return a value that differs by well less than a point on the C scale every time.

Lastly, the device has confirmed that the things that I think i can do well (26c3 steel) and consistently are really close. Every single 26c3 item so far has struck at 63.5 except for one, and that remaining item struck a test result of 64. I’m so pleased to see that because I can scarcely perceive any hardness difference between any of those four, except I did perceive the 64 result as being slightly hard. But I could have also been telling myself that because it was heat treated twice and got a little overtemp on the second try. I certainly wouldn’t claim to feel 1/2 point.

At any rate, this tester will help us bust some myths, and it has already helped me clean up two steels I was coming up short on with the induction forge.

What we see in test results and now my addressing those shortcomings, and then confirming that how I get hardness where it should be doesn’t lead to a poor outcome is a good topic for a future post, because it will help you do the same if you’d like to try your hand at heat treating, but you’re reading too many internet articles that tell you that you’ll just find uncontrollable grain growth or lack of hardness.

I will give you some advice on how to get reliable sampling without having to buy $700 chinese hardness testers or induction forges. All you’ll need is a good file and willingness to make test samples with offcuts and look at them under any inexpensive magnification.

Unwanted Shopping for a Hardness Tester

I really don’t know how much stuff I’ll ever make for sale. But entertaining the idea makes it seem like some kind of hardness tester is in order. I’d like to test everything for a while before grinding until or unless I find there’s no reason to.

Why? I can test (in use) every chisel or iron and call it good, but I think that ultimately makes the goods used and it does take a lot of extra time.

Finding a job shop with a hardness tester isn’t feasible – not for cost reasons, but nuisance/time reasons.

I’ve looked off and on at hardness testers listed on craigslist – the bench or table top type, but they never show up without something broken. I think I’ve figured out why. For a lab or shop to use a hardness tester, I guess periodic calibration is customary. I’m not that worried about getting a reading down to 0.3 points, but rather not missing something underhardened or measurably harder than expected, which would be associated with grain growth.

Domestic hardness testers are expensive, and the more capable, the more expensive ($10k isn’t unusual). I haven’t yet seen a working domestic hardness tester of any type that’s under $1000 and they’re usually offered by flippers or as “shop liquidation”.

And here’s where the rub is – if you buy one used, and find that the diamond needs replacing, the diamond cone that indents steel (the machine measures how deep the indent under standard loads) is a minimum of $600 or so, some more.

I don’t get it.

There are three other alternatives: portable american types that are slightly less accurate, but acceptable, like Ames ($3500 new (!) or about $500-$1000 used depending on condition), portable chinese ($650) or bench top chinese ($1500 with shipping in the US or a little under $1000 if ordered directly from china).

The diamond cone indenters sold in china are about $20. the Ames domestic portable versions, a replacement diamond cone if a diamond cracks or the cone gets damaged, $600-$800 (!!!).

A bench top chinese type from china seems suddenly reasonable, but they’re about 200 pounds and I don’t know that I believe freight shipping options will get the machine here without breaking something. And what do you do with a broken hardness tester? it looks like people try to sell them on ebay, but I doubt they have much luck.

Amazon and Grisly sell the same machines – the chinese price is $530 for the machine and about $375 for shipping. Grisly’s cost with shipping and tax is approaching 1600-1700, which again leads you to think “Ok, same tester with a big logo on it, and plenty of accounts of customer service that’s not that great when something is damaged”.

And I ended up at the item that I thought for sure I wouldn’t buy. A new Chinese portable hardness tester, which I still don’t see why is as expensive as it is, but it’s coming from amazon.

Sometimes things turn out to be a not very great feeling purchase, but as a matter of need, I also don’t want to buy something that makes no sense (an Ames tester and then have to turn around and either try to sell it broken or missing parts or get stuck buying a $700 indenter that’s about the size of a pinkie tip).

There are parts of moving on to making more metal tools that I’ve really liked, but navigating around various belt grinding machines (went cheap, glad I did) that are really sold for industry, and dealing with stuff like the hardness tester. I guess it’s just a symptom of slipping off into a hobby where there isn’t a bunch of harvey industries hand tool stuff made on the cheap.

There just aren’t that many places to shop, and industrial supply is out of the question. The chinese hardness tester that I’m waiting on to arrive is private labeled and market at $2800 by grainger (!!). And even at that, with the promise that you could get it in two months because it drop ships from a supplier. Awesome. $2000 mark up to drop ship something that weighs about 5 pounds.

Ultimately, a necessary thing to get but not very pleasant. I’ll know in a couple of days if the cheap one works. There are other things I’d like to know, and this will help (how hard are my stainless knives, how hard is a chisel in the first half inch vs. three inches from the bevel and at the shoulder).

It’s never great to shop for things that aren’t used by hobbyists and have a small market.

Inspiration and Calibration

I can show you tools that I’ve made. I’ll show you the second saw handle that I ever made (I’d made a few plane handles before this, so there’s some cross over).

This saw handle isn’t the inspiration. This is the second saw handle that I made, as mentioned, but why it’s important is because the first one that I made was “good” by first standards, but it was not similar to this. I can see now why that was the case. The horns are better on this saw, curves are natural, the transition lines are stark, the pip is sharp, and I managed to find buttery quartersawn apple (never have been able to since) to make the handle. Notice the curves on the inside of the handle at the front, how the handle isn’t just flat, and the dynamics of the curves aren’t just a round over or routered look.

I learned about this stuff right away when I made this handle. This is the first anything I made after George Wilson saw my first handle online and said “give me your phone number”. I really didn’t want the obligation, but have to admit running around in a jelly diaper (figuratively, as a woodworker) seemed lacking and I knew the first handle would be fine for sawing, but direction after that wasn’t clear. “I’ll get better a little at a time” was comforting, but I didn’t know what combination of execution vs. just not knowing what it should look like existed. it turns out that even though I’m by no means great at anything, it was 10% execution and 90% just not knowing what the outcome should look like and why.

George laid that all on me at once. I feared failure. the handle isn’t perfect – the lamb’s tongue is miles better than the first (which was the same thickness for its entire length – no animal that looks like a lamb has a milled steel parallel thickness tongue from end to end). George also didn’t give me quite the step by step that I mentioned above, but he talked about aspects and what would look better, and I took a risk and did it. The risk was posting saw number two and not knowing george well, having him tell me that it wasn’t very good. I was already 10 years into a white collar career and to find out you’re “not worth a shit” at something else is a big threat.

Except it seemed almost like magic at the time when I was done. Looks like the wood has shrunk a little since then and the screws are proud. Oh well. I needed the saw at the time and it performs that function well.

But this isn’t furniture and only furniture counts

That’s often said. I think it’s limiting, as mentioned, if you want to find something where you’ll go broke – try making a business making fine high skill solid wood furniture.

Someone sent me this picture yesterday – this isn’t my work.

I don’t even know the person who did this work, I just know who sent it to me because they were inspired by it. Look at the fronts, look at the base moulding and the beads and the carving. The carving is crisp and clean and has excellent symmetry and depth.

And though it’s a different skill…look at the side. that looks to me like it’s one board. i asked if it is, and it is indeed a single board of mahogany (!!!).

the drawer fronts will be carved and the piece will get hardware and finish and who knows what else.

I requested a grapevine message be sent to be returned about whether or not I could post this here. Why?

The sender told me that the maker of this desk has only been woodworking for several years.

Think about that.

It reminded me of Wyatt McQueen, who came out of Thaddeus Stevens college east of me able to make furniture like this probably at age 20, and maybe since Wyatt was and is a pro, it’s even beyond this.

I saw Wyatt’s furniture on display with Wyatt presenting them, much younger than me at the time, and it was a real lesson. What I am doing, because I want to build nicer things, and why am I not pushing to do it.

What’s in this piece isn’t some kind of pondering that Paul Sellers could also do it, or how Rob Cosman would tell someone to do the dovetails or whether or not it’s hand planed. What’s in it is a shot of high voltage calibration that should enter the thoughts for all of us – if this is something someone can do within a few years, are we sure we’re leaning from the right places?

And it does, of course, make me wonder if I’m doing the right thing putting off furniture making until retirement in favor of knife, tool and instrument making in most cases for now.

if I could do work to this level, it would be entirely by hand, and I would end up making tools to do it. How would you get to this point?

At the very start of this, you would need to study why it looks good, why it’s executed well so far and understand that. Because if you can’t understand or visualize that, you haven’t got much chance making it. And if you’re looking at your tenth honing guide that Lee Valley or LN is releasing and always letting yourself off the hook – think about whether or not you really want to be there, or if you’d like to do as much as you can, even if that’s getting a tenth of the way to a piece like this.

I guarantee there are people reading this who aren’t close to making something like this piece, but what’s missing is information, not talent. And it goes all the way down to solving the little problems with the big ones and telling yourself you can. You can.

This picture was a nice shot in the arm for me – always think about doing better, figuring out what doing better is, how to do better more accurately and more efficiently at the same time. I can’t help you with the bits and bobs in this furniture. I just really don’t feel like talking about saw handles, but if someone had style questions, i could assist what’s generally good and what’s generally not, and you’ll find yourself 80% of the way to good right away rather than 10% of the way there.

And if you have questions about things like setting up or honing an incannel patternmaker’s gouge so that it has a fine sharp edge that doesn’t just chip off, of course I can help with that. We can probably all be better at something for our own investment in ourselves.

But maybe this kind of self reflection and problem solving, and believing we can solve the little problems of making progressively is never going to survive a forum discussion or cycle of magazine articles that goes round and round and round forever below the level of this. it’s all too superficial. We have more within us.

What About Other Making?

I mention the frustrated furniture makers who aren’t furniture makers all the time. One of them has a last name of a university he could never hope to sniff the doors of. I doubt there’s much furniture making.

What I often say is something like those folks are filing out tax forms for a living, perhaps living off of a spouses income, or maybe doing site work.

There’s no point to this post other than making it clear that when someone does site work, especially well, or interior custom joinery, that’s not to deride those trades. It’s to deride people who dabble in them and then talk as if they are some furniture tycoon.

I work with a lot of good auditors (maybe not tax preparers) and the neighbor over the fence is a contractor who does the work soup to nuts on projects that aren’t more than $50k or so. I had him fit out a room on my house and make it permanent, and all I heard from the neighbors was “did you check around? he’s not the cheapest. I heard they do good work, but their prices are high”.

Yeah, I know what the price is. I paid the guy – cash – so that I would feel the pain of paying for the work and not get suckered into scope creep that comes along when you ask if you can afford the loan vs. afford the project.

My neighbor is a master not just of basic soup to nuts site work, but he fits all of the trimwork air tight, and while I wouldn’t pay anyone to make furniture, I would gladly pay my neighbor to do trimwork at a level that I’d have to do five times to get as tight.

Good work is good work, whether it’s audit, legal, food prep, joiners work or trim or whatever else. It just would get really weird if you hired some guy to do some legal work and found out the guy practiced law one day a week, but had a hobby of going to the internet to criticize bird carvers or something. There seems to be a lot of that. It doesn’t lift the standard of anything for anyone.

We all live outcomes. People who do what they say and are honest about it and do a good job without misleading others generally raise the standard of living for everyone, whether they’re drafting a will or installing a bathroom sink.

Giving Up

When I was younger, like all of us in our teenage years, I thought someone wearing wrap arounds was the sign of them giving up.

It usually coincided with not combing hair, maybe walking around with mouth open sometimes, and those jackets that had sort of the sock texture lining and the nylon outside that looked almost like it was waterproof, but wasn’t. That was before fleece was everywhere and in everything.

Wrap Around Infrared Sun Glasses on Top of an Induction Forge

A couple of days ago, I got my first wrap arounds. I’ll be 50 in a few years. Here in the burbs, a lot of people age 50 these days try to dress and act like they’re 20. 40 years ago, people who were 40 tended to be fine with looking like they were older than they actually work. I wonder what’s caused this difference, but maybe that’s something for another time.

I got my wrap arounds and i’m on my way to walking around with my mouth open catching the unexpected gnat. I have excellent distance eyesight but the close up stuff is going what seems quickly. It’s not really quick, but if you have better than 20/20 eyesight as I did for about 40 years and still do distance, any loss or eye strain is a foreign concept.

The point of the wrap arounds is infrared light. The induction forge has been a godsend for chisel making operations that involve a lot of heat. If you wanted to do so intentionally, you could put a chisel with a bolster blank in the forge and just melt it off. All of it in a shower of bright yellow sparks. But that bright yellow is eye damaging. I never read that it was until after noticing the strain.

I have another pair of IR glasses, and envisioned something much cooler, like those side shield glasses that you see people wearing in the old Hawley videos – the ones that glassworkers and steelworkers wear. However, they have some big mineral sounding name to the glass and all are expensive, and some indications are that they’re more suitable for glass blowing than metalwork. Who knows if that’s true. I eschewed the safety glass style glasses both so I can use my regular glasses, but more because a couple of times, I’ve walked away in a rush with hot metal with regular glasses fallen on the floor and nearly stepped on them.

Forge Welded Blanks on the Anvil

Now, i can just leave my glasses on and leave the wrap arounds at the forge. They only need to be worn when heating steel to the level that it will actually stick to itself. Even without hammering. Though the bolster in this case gets hammered to the tang to form it. One could make this kind of thing a science project, but in short, the blanks are square steel with a round hole drilled in them, and the rest of the shaping is just done by the actual chisel tang.

The chisel on the left, aside from dirt, is just to show what the tang will look like after it’s ground and filed.

This was one of the trickier parts to get down being self taught – getting the bolster and the tang hot enough to stick together and then hammer forming them without distorting the tang itself and making a chisel with a mushroom shaped bolster blank and a tang that looks like a railroad switch route.

The induction forge is the right tool for this job, but it’s not like stepping on a pedal and it’s on – there are still things to screw up. If there weren’t, it wouldn’t be that interesting.

Still, a device that’s ready to go all the time and that can have a chisel hot in 20 seconds, with hot basically being an unlimited term – excellent and I’m sure less detrimental to the health of the forger who sucks in a lot less particulate/smokey stuff than one does with a forge.