Years ago, I was a hunter. I no longer am and at the risk of having my house raided, I turned my guns into plowshares….er rather tools a while ago. This is the burbs, it wasn’t convenient to use them without driving far enough away to waste half a day to shoot groups and come back. So off they went to someone who will use them.
I remember the magazines back then. They’re probably worse now as the magazines go down the ladder to younger and younger writers who have evne more trouble hiding that the point of the articles is just to show off whatever is new and provide a link to where to buy it. I bought a 300WSM rifle back then, and it’s not that important, but it was an oversold not that revolutionary cartridge that may have been a rip off of the only writer that I actually liked in the magazines and still do looking back. A guy who wrote technical bits for reloaders and not just stories about shooting a rock sheep 582 yards away with a steady stick.
There was an upstart publication at the time that did nothing but advertise that they’d tell you when something was actually terrible. I got out of the hobby and don’t know how that worked out, or if they ever sold their souls, but I’d bet they had some difficulty finding traction in the gun world where manufacturers spent their time trying to get someone with a 300 winchester rifle to believe they needed a 300 something else that would make far less difference than just being a better hunter. Either way, everyone was selling something.
I’m not that test magazine – they were trying to make a name for themselves by blasting someone else. I will probably sell tools professionally, but my negative opinions about what’s really rooted in wanting advancement for hobbyists….those opinions aren’t linked as some kind of strategy. I can guarantee fake nice and false compliments is the way to sell more. My attitude will limit business potential. I don’t care, even if I’m making stuff and selling it, I’ll still be a hobbyist. I have a hobbyist mentality. You make what you like and try to learn first if you’re trying to get somewhere, not just go with the flow and see if you can find another quarter under a rock.
The Fallacy of The Pros
There is some sense that my negative attitude comes from asserting some sort of standing. No thanks, I have no standing, I’m not an authority on much and it’s really the hobbyist mentality that makes me crabby. I use Paul Sellers as an example, but it’s not just Paul Sellers. It’s Paul, the folks who will attach a parachute to you as you run, and the resentful furniture builders who claim to be professionals but usually are just trying to make furniture on the side.
With few exceptions, this is a Fallacy. Most of the folks who give me the most grief are self-appointed pros who would starve if they had to make furniture for a living. The false argument comes about that in hand tool talk, there’s a need to include power tools because “you can’t make any money working by hand”. Well, take away installing kitchens, repairing stuff someone else made, or building things in houses as a “furniture builder” and most furniture builders wouldn’t have much to do. They’re not furniture builders. They’re idealists, and often dishonest.
I don’t know if any of them has the potential to build something like Lonnie Bird would’ve taught, or the NBSS type projects. Maybe they do. I don’t think Paul, or Chris or Rob will ever get anyone there, but I have seen with my own eyes, people building fine period furniture as a hobby within a few years.
You just won’t find it on the forums, in the magazines, or anything like that.
I witnessed my mother work in the craft circuit, where people actually do make a decent income. My mother would’ve liked making higher end stuff, but she couldn’t find customers for it. I can’t imagine her going out to forums somewhere assailing hobbyists who were wanting to do fine pencil drawings or oil painting as “not doing it the way pros do”.
The Truth is that Fine work is for Hobbyists
One of the fine professional makers I saw trying to sell superb period furniture was 20 years at the time and just out of a two year program. He already made better furniture than he could sell and gave it a shot for a few years, but the last time I saw what he was making built ins. Except it’s important to note he doesn’t peruse forums and I don’t have any reason to believe he’d be frustrated to find out that an amateur would want to do something by hand that he couldn’t make profitably with half power tools.
I guess SAPFM gives out awards, and relaying what I recall from about a decade ago, the winners would often be physicians or some other hobbyist who was unbound by this nonsense argument that things need to be kept accessible or done “the real way pros do it”. Nothing is done now any better than it was done in 1790 and we don’t need to be stuck adhering to the idea that nothing can really progress further sprinkled with resentful attitudes from self appointed pros who never have really made a living making furniture in the first place.
Trust me on the tool side – I’ve been informed more than once about how I should really make tools, that I should not mess around with forge welding bolsters, but hire this or that thing out and really “do it like pros would do it”. I’m a hobbyist toolmaker. Even if selling something, I’m a hobbyist toolmaker. I’m curious and want to see what’s next, not how can I get into the game of marketing stuff and pushing rah rah.
When I see someone who is only a couple of years into woodworking making fine furniture or fine tools, I want to know what they’re doing. They won’t have to hide any facts.
The internet provides us a unique opportunity to share information at little cost. It’s gone backwards in 23 years as far as I can remember, in terms of woodworking info that’s shared. The folks who made inroads early on, like Lonnie Bird, where you could probably learn basics and get to building fine furniture pretty quickly, they seem to be gone for Numb Stumps, Fakobs and Pall Cellars. The art of reaching beginners and then putting them in a heavy suit to slow them down is here.
The supposed pros failing in what is a hobby now don’t help, either.
But I have no interest in creating a false aura about my accomplishments – you can see some of them on the things made. I’m not claiming to be Leonard Bailey or Cesar Chelor – i’m just a guy trying to punch the bottom of the knowledge flower to see if we can get it to bloom.
If I have to brand my tools “Cranky Brand”, that’s fine. I’m not going to pat Krenov Copy Planeworks on the back just to sell Cranky Brand tools. it’s not nearly as important as the hobby.
For somewhere around 11 or 12 years now, we’ve been hearing about Paul Sellers’ sharpening method and the description of it being traditional.
I would liken Paul to being the Robert Kiyosaki of Woodworking. We have plenty of proof that Paul makes a living teaching students, or at least a large part of his living. I can tell you from the things that I know well, he isn’t accomplished when it comes to understanding tools or making definitive comments about them, but his audience isn’t the discerning type. An example of this is commentary about how someone hardening an iron in the old days would’ve been doing the work willy nilly. I’ve never seen any example of main line high quality tools where hardening is inconsistent.
I have seen cut price tools, like Ohio or Auburn irons that just don’t seem to get their shit together even when you reharden them. If I can’t reharden something fine, thermally cycle it as part of the process to reestablish grain and then get a good result, the stock is no good.
What we don’t know is anything of Paul doing any fine work to make a living. I vaguely recall him talking about moving to the US and scraping by on the craft scene. This is make trinkets during the week and sell them on the weekend. It can be quite profitable – my mother did this for 30 years. This isn’t the same as fine work – it’s kitsch most of the time.
I use Robert Kiyosaki because everything the guy says (he’s far worse than Paul) strikes me as not being credible, and not surprisingly, you will have trouble finding anything about Robert Kiyosaki making money other than selling things to beginners claiming stories that don’t seem to have any real proof. Another example of this is Frank Abagnale. Tells a story that seems less and less likely as it goes on, and if you look into his actual past, you’ll find that his real con is selling the story. Most of it didn’t happen and his criminal record isn’t flattering. He claims to have not ripped off individuals or small businesses, but his actual criminal record shows a history of doing that but none of his taller tale feats. If you ask 50 people about “catch me if you can” do you think a majority of them would say “i don’t know how that guy managed to seed a movie about himself when the real con is that he was able to get people to believe he was an accomplished con artist”.
You have to use your sniff sense with things, and Paul’s schtick in my opinion is a lot more subtle. Look at the “piece in the white house”. Does it look like paul made it or does it look like it was made by someone who does a lot of veneering? Does it look similar to work that Frank Strazza shows on his website? I don’t really know whose fingers did the work, but it looks more Strazza and Sellers to me.
OK – What’s the Rub and Where does it Meet Traditional Sharpening?
The big myth that surrounds Paul is the idea that somehow his sharpening habits are trade tested. I think they are tested by the paint-can opening truck unloading at the jobsites trades.
I think this because I have a lot of hands on experience trying different sharpening methods and what he teaches doesn’t last long if you do more than just beginner level woodworking. You will eventually learn in bench work to separate grinding and honing so that both can be done more quickly, and you will find that if you leave a bevel convex on a plane iron, the sharpening interval shortens *a lot* and you deal with much more trouble due to limited clearance early in the wear cycle. You do more work, get less out of it, and end up sharpening longer.
The Fakobs in the world will advise beginners that this is the traditional method, and that anyone saying otherwise is trying to sell you stones or gadgets or whatever.
This is talk of stupidity. I fought it on the forums for a while, but where proof occurs is actually trying “Paul’s Traditional Way” to what was actually prescribed in literature several hundred years ago. The difference in sharpening accuracy (without as much effort) and interval of use is stark. Paul’s method sucks. I suppose if you get a tool sharpened the first time, and it’s a thrill, that’s OK – look to move on quickly, and look to move on from gurus unless you’re in it because you like the yarn.
I can’t tell you how to avoid the Fakobs, who talk at length without showing anything related to the subject, and mention their age and that they were trained in the 50s. This stuff was dead for at least 50 years by then, and I hear often about the training – especially in the UK – with hand tools, but it migrates into things like drilling a hole in all mortises and using mortise chisels with the flat side toward the wood yet to be removed. These things make no real sense, but they could be pondered either in barn mortising or imitating a machine.
If chisels got rounded over on job sites, it may have been Ok because there was no demand for better.
What the Literature Actually Says
Nicholson carefully describes sharpening for fine work to include grinding a chisel or plane iron on a round wheel and doing it carefully so as not to have a lumpy bevel (that would be convexity or threatening it), and grinding the angle at such acuteness that if the edge were used, it would not hold up. That is, grind at a shallow angle. And then hone with a fine stone or pair of fine stones at a somewhat steeper angle.
We now hear often that this is “modern”.
Maybe it’s a fluke? Except it isn’t.
Holtzapffel has careful instructions for grinding and provides angles. I suspect the angles are somewhat important, but deviating a couple of degrees will make no difference. the concept is very important and it is directly addressed to planes and chisles, there’s no escaping it by suggesting maybe it’s for turning tools. That’s addressed elsewhere.
What does Holtappfel say?
Grind on a wheel at 25 degrees and hone at 30 for softwoods and 35 for hardwoods. This sounds simplistic, but remember, when you’re reading this from my context, I have a whole bunch of microscope pictures. Typical chisels stop taking damage with a flat secondary bevel in hardwoods around 33 degrees. They will not do it at 30 degrees, even with skilled use, unless the apex of a chisel is modified with some stropping or edge conditioning routine (like buffing!). At 30 degrees, agreeable softwoods pose no threats. This advice from Holtzapffel is so good that a modern microscope can’t put a dent in it.
Holtzapffel goes on further to describe the two step routine in their case being a turkish oilstone or something similar. This is the fineness of an 8k waterstone, but slightly different characteristics – and the speed of a 4-6k oilstone but different because you can lean on the stone and do the initial honing and then lighten up, with this sort of idea taking all of about 15 seconds on a bevel, refining the edge and then lightening up a little bit to make sure the fine burr is very weak and won’t pose damage when it’s stropped off.
And then further – Hasluck, maybe Hasluck will describe the “traditional” rounded bevel that can open paint cans, cut straps off of lumber bundles and then chisel wood.
No, it doesn’t. Instead, in a guide discussing sharpening of straight edges, Hasluck goes off on a tirade of the preference for a hollow wheel grind and how detrimental any convexity will be because it steals the craftsman’s time. In Hasluck’s word, it’s similar to a craftsman showing up to the job site for the week with a poorly set and sharpened saw – that sharpening this way (with convexity) is akin to losing several hours of time before even starting the week.
And that Hasluck talks about this agrees with what I see when people send me tools, and my own inability to not grind shallow enough with any convexity to make up for the poor performance of the method. People send me tools that look innocent, but the plane irons will have clearance problems immediately after sharpening. Hasluck talks about how the convexity is fat behind the edge and if the honing angle is appropriate, the amount of metal to be honed is too fat too quickly, leading to too many trips to grind when they shouldn’t be needed, and the habit of workmen to try to evade it by steepening the angle and then costing themselves time a different way.
By my understanding, these excellent editors put together volumes based on things that were relayed to them from experienced workmen.
So, perhaps there were rounded bevels, but the credible information sources feeding the writers would have put them to the side of being crude workers or people who didn’t have the discernment to know better.
Just like the present.
These publications from Nicholson to Hasluck encompass a 100 year period ending around 1910. The first two are laden with discussion about how cap irons work. I didn’t see discussion of the cap iron in Hasluck, which was the latest of these. Maybe it existed in another book – I tend to figure something out and then find later where it was described because when I do something and find out it doesn’t work well and it’s undeniably inferior, it’s suddenly a lot easier to see what the writers are trying to convey.
If you ask someone with little experience, they will attempt to write off these texts as being dilettantes just going on at length. Based on my experience, you can find the things that were novel at the time as they are presented as new. the other stuff, you ignore at your own peril if you want to progress.
We don’t all want to be beginners forever. I learned to sharpen first from David Charlesworth’s DVD. it took 45 minutes to set up my first plane iron. Today, it would take me about 3 minutes or less to do the same thing because I am making tools and have learned to be more nuanced. What I do isn’t for beginners when flattening – some parts of it may be, but the method overall is too nuanced.
Where I see the demonstration of Hasluck’s railing is simple, though. When I cut the initial bevel on an iron, it typically has a little bit of convexity. I try to cut it more like 20 degrees and flat, but even at that, the convexity on the iron will considerably shorten planing intervals within a couple of sharpenings and I will give in and hollow grind the bevel instead and restore planetary alignment.
If you are enjoying convex bevels, by all means, continue to do it. But don’t get sucked into these false scenarios where somehow you can’t do better as you move on. If you don’t feel like moving on and woodworking is just a transient thing, then that’s OK, too. If you want to move up because you’re developing discernment and you think there must be a better way, you’ll eventually back into things like using cap irons and sharpening and you’ll start to find historical concurrence. I am walking proof that you don’t need to read about things things to figure them out – you will figure them out and then you’ll be able to read about them. Having the experience with the way that works less good isn’t entirely a waste – it will keep you from wondering once you level up if you should try ten other things.
A friend of mine likes to say that the Rockefellers and Smiths differ by the fact that the Rockefellers will watch people do something that doesn’t work and they won’t do it. The smart Smiths (or Millers or Bakers, or there has to be a common name that isn’t a trade so it doesn’t seem like I’m talking about tradesmen) will abandon what doesn’t work well, but has to make the mistake on their own to understand it. The less inclined will fail to learn even from their own experience. I’m one of the Smiths and am first, not smart or wise enough to ever be one of the Rockefellers, and too curious, anyway.
I used the Robert Kiyosaki example because I have a morbid curiosity with folks who think they’ll get rich taking on debt and buying properties and becoming “independent”. There’s a “this is the real way, the secret that people have been keeping from me!” hysteria, and somehow, Kiyosaki gets held up even on financial sites with vague predictions. I find this appalling, but following him are probably people with their wallet open and maybe not much discretion – as in, loyal purchasers who advertisers find lucrative. But when you look at the real world of real estate investment (which I have no interest in), the credible stories come from guys like Ben Mallah. And Ben Mallah doesn’t have a get rich advice – I think he says something like “find someone in your area who is able to find deals and start small and learn from them”. The folks criticizing him for not making a business of teaching more directly and promising the quick wealth seem to fail to realize that he’s retiring and moving his real estate business to his kids, but he likes to do real estate and talk about it. Not farm peoples’ wallets.
And his honest showing of what he does day to day makes me realize something I already knew – I have no interest in real estate, but find what Ben shows interesting and entertaining. He provides excellent advice when people ask him questions – it’s just maybe not what they want to hear because it puts the burden on them to learn and own what they’re doing.
You owe it to yourself to become your credible source of experience and information within pretty short time after you just get started. it’s less inclusive than flowery advocation of paint by number listings, but you will be better off in the end. Even if that teaches you that what you want to be good at isn’t woodworking.
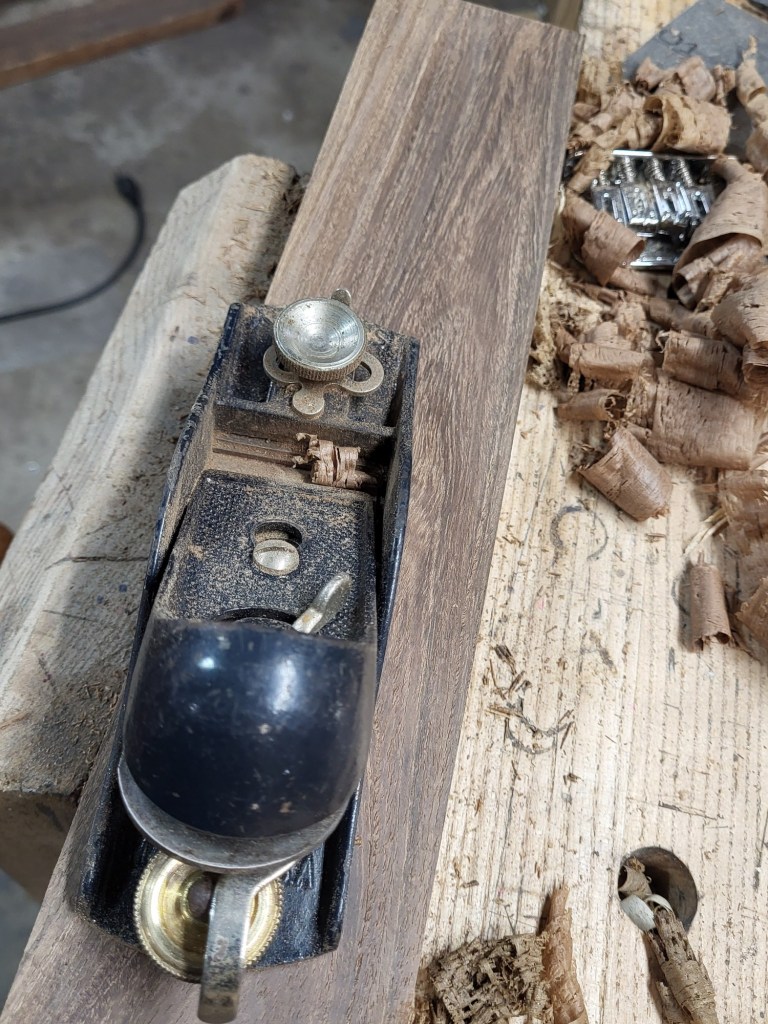
Just by chance, I ordered a Stanley 9 1/2 last week off of Ebay. I had premium block planes in the past. They’re long gone. I like to say that I have only one block plane (Stanley 18), but that’s not strictly the truth because I have some junkers for my son to drop.
The reason I have a Stanley 18 instead of a 9 1/2 is because when I ordered my “one” block plane, there was some kind of trend for hobby fly rod makers to buy a 9 1/2. And they were very expensive for what they are.
While smoothers and jointers seem to have near doubled, I looked the other day for a pre-Mexico 9 1/2 and was able to find one easily for less than the fly-rod-craze prices.
I wouldn’t have known for sure, but the #18 and a later pack of replacement irons for a #18 are just butter soft. One of my group for that plane is laminated and the others were solid steel. In a previous post very early in this blog, I rehardened one of the solid steel irons to find that they have a whole lot of potential to be much harder than they are as delivered. Every one of them is butter, which would vex honing guide users, as they just will not hold the apex.
On a whim while testing a low angle jack to see if the unicorn method was viable on bevel up planes, I decided it might be a lot faster to use the #18 and it’s small soft irons. To my surprise, once they were buffed, they would plane cocobolo with silica in it with no issue, and they would last longer than my hands could tolerate pushing the plane. That sort of put the nail in the coffin – though already known – that you could solve much just keeping honing the same and buying an expensive supersteel iron. You can’t get hardness and toughness in combination in any super steel such that you can plane minerals or silica or even just a lot of the hard woods with varying grain direction.
But you can hone a very very soft block plane iron and then buff the tip off of it and it will outrun just about anything. The rehoning process is should-be-illegal easy.
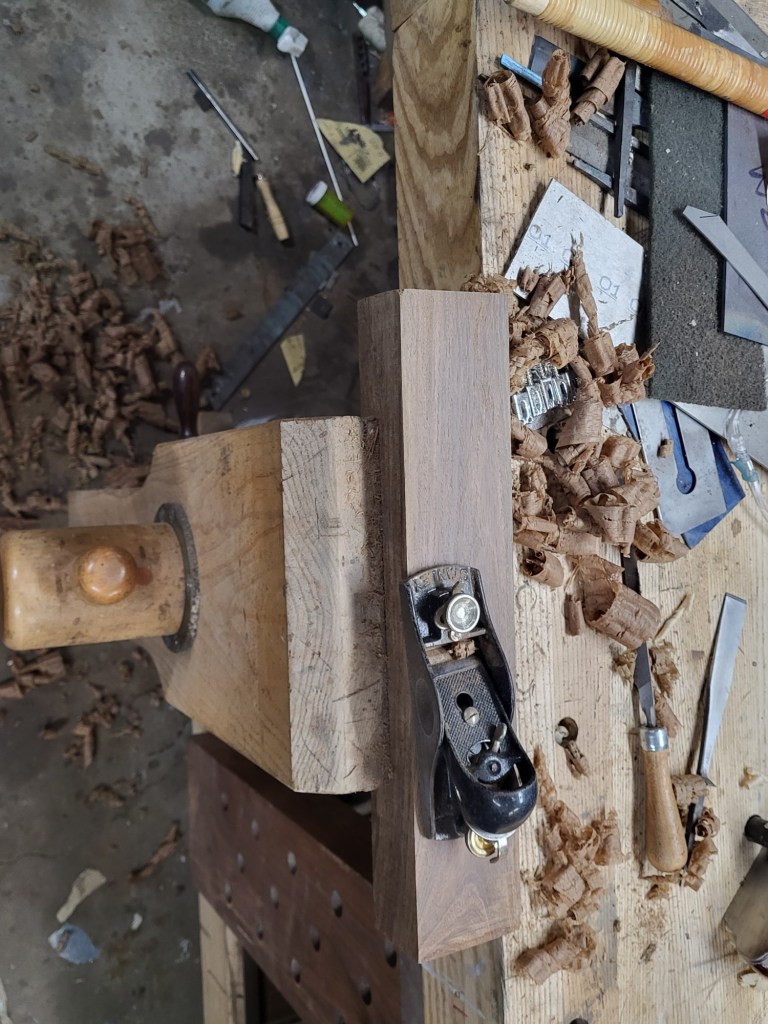
The next two pictures show a piece of *was rough sawn* louro preto. This is a dusty wood that’s a little hard on irons, but the billet had ambient dust from the shop on it.
See any defects or lines? I don’t. Louro Preto isn’t the hardest wood, but it’s far harder than oak or maple or anything we’d work with in great volume. The dust on the plane is just the nature of the wood. You plane nice clean shavings and the dust comes out of the wood at the same time coating your hands with light brown filth. The aroma isn’t unpleasant, but it reminds of aromas in wood that would be associated with sneezing. It’s like a floral version of the rosewood and cocobolo pepper scent.
This picture shows the shavings more closely – these were some of the last to come off of the block plane. No resharpening, no anything like that. The seam down the center of the closest shaving is some kind of artifact from the large grain cathedrals.
I don’t use a block plane for much. I don’t care for low angle block planes because a block plane in my hands is a walking around plane for edges or planing small items. Older texts don’t prescribe low angle planes for this work for a reason – tearout – and I don’t see any virtue in it either. the effective angle on this plane is probably about 60, so the consequence of the high bed is nothing – it’s actually nicer to work with.
And one last thing – I have the metallurgical microscope. When you view a 12 degree bedded low angle block plane iron, the wear on the back of the iron is substantial and long. For some reason, once the iron is bedded at 20 degrees, almost no wear appears on the back at all. It’s bizarre.
Was the rash of low angle block planes and bench planes an improvement over anything? Definitely not. Stanley’s bench planes already do everything better than those planes – all you have to know is how they need to be set up.
The fact that these can easily be hardened to ice hard lets me know that stanley tempered them soft on purpose – probably for ease with site sharpening (carpentry) and chose a higher carbon steel than they would’ve needed to prevent the steel from having gummy edges that would fight your ability to tease off their wire edges while finish honing.
What’s soft stuff – stainless steels that roll without chipping (cheap pocket knives), old irons that are really low on the hardness side almost tending toward saw hardness, and so on.
When I rolled out the unicorn method, it was something to me in terms of value because it created a situation where mediocre or not quite ideally set up tools would hold up well. The first use in my case was incannel patternmaker’s gouges. I’ve since learned to sharpen them quickly, even reprofiling one that’s ragged is not more than a matter of three or four minutes from start to finish, and then they’re in shape forever. They are usually reasonably hard, but it’s not hard to chip them.
The second thing that became obvious was tools that seemed almost unusable could be used, which for me at the same time, was an SG2 pocket knife (Fallknaven) that would absolutely not sharpen on regular stones. You could sharpen it, and feel sort of a grabbing feeling on synthetic stones and it never seemed sharp. That was actually carbides breaking out of the apex and a look at the edge under a microscope would show what looked like pitting where the carbides broke out of. I don’t know the composition of SG2 off of the top of my head, but I’ll bet it has vanadium in it. Whatever the case, it had carbide coarseness.
The buffer made that usable and then proceeded to make every softer knife and tool that I have usable to some degree, and then prove easily that a standard plane iron would far outdo V11 or 65 hardness M2 in knotty or dirty wood or exotic woods with silica. It wasn’t the wear knocking tools out, it was deformation of the apex and the question only becomes after that whether or not a tool is so soft that stopping deformation basically results in a blunt tool. Put differently, if the apex deforms and the steel has great edge stability and hardness, it doesn’t take much. You still have a thin edge. If the steel is tending toward very soft, you have to either steepen or round off the apex more and the worst of the worst will still cut, but feel a little dull.
I don’t have that many soft tools, but a typical mid to high 50s item floating around is inexpensive pocket knives or typical buck 420hc folders. if you sharpen a buck folder 15 degrees per side, and strop off the burr, you’ll never really get the whole burr off and the edge will dent in just about anything, and roll. The steel is super tough, though, and with the apex modified, it’s fast to sharpen, lasts longer than you’d expect and is “sharp enough” for almost anything. With a little extra modification, those buck knives will actually scrape brass without rolling.
Defining the Problem
There are a few things you have to consider before you apply a method if you want a cheap knife to be sharp:
if it’s stainless, it will probably be something fine grained and soft (not coarse, as the rumor will often be). Why? The softer steels are generally lower in carbon and simple to allow for simple heat treatment. No big carbides, no carbides to coarsen. This is usually achieved by keeping the carbon content low, and thus the hardness will be relatively lower.
if you have a soft blade, then abrasives that seemed marginal will suddenly cut very quickly and harshly. Remember that the silica and transformed silica type abrasives like novaculite are about the same hardness as hard tempered martensite. This is why they can have relatively large particles but cut very finely – the abrasive cannot plow a row like diamond would. Drop the hardness from, say, 63 down to 55 and suddenly the cutting action is brash
if you have a knife blade that is drop point in style or something else with a small contact area, the effect is magnified further as the pressure of sharpening is concentrated.
Even if you can sharpen a very fine apex ( you can ) , the apex won’t have the stability to hold up. I envision people with those alien arm thingies with little stones on the end telescoping in and out spending 20 minutes on a blade to create a very fine apex, shaving hair and then finding the edge has rolled 20 seconds into actual use.
Solving the problem
You need to set the edge geometry in a way that it will hold up. I personally still prefer treating the bevel and apex separately. That means even on cheap knives, sharpening at a relatively low angle on a synthetic oilstone (use whatever you want) because it’s quick, and then addressing the apex either with a buffer or with compound on a backer that isn’t any harder than MDF. if you use a really hard substrate, you can actually roll the apex itself while sharpening.
And, of course, the buffer does all kinds of things abrading gently and rounding the apex at once. It takes the skill out of doing this and is really hard to even match. The next time you have to do significant sharpening, you can set the bevel again to remove most or all of the buffed portion and then buff again and have a very strong apex. If you do it right, even very soft blades will shave cleanly and cut paper easily on both sides of the bevel.
Just be careful that with knives, your fingers aren’t below the blade, and anything that looks like a point gets introduced to the buffing wheel pointing somewhat in the direction of rotation. Never bevel up into the wheel and never hands under the blade (this means probably no slipjoint knives unless you can hold them in a way that they won’t snap shut on fingers. I’m not going to say I don’t buff them, because I do, but it’s a little less easy to figure out).
Abrasive vs. Backer
It’s easy to understand why the buffer works gently, even with aggressive abrasive. But maybe less easy to understand just how big of a difference substrate can make with typical alumina compounds – like those in a buffing bar. It’s easy for me to relay what I’ve seen, but maybe easier for you to see for yourself. Put sandpaper in a hard sanding block and sand something with it. Then, put it on a loose rag and try to generate the same volume of dust.
This gives us the ability to use something like soft white pine as a final step, but a relatively aggressive finish abrasive, like a 5 micron yellow bar, and get an edge that’s more like a 1 micron edge. And because the treatment at the very edge is also less of a threat in deflecting the edge itself, there will be less of a burr for two reasons.
Simply put, you have two ways to deal with soft steel – a softer abrasive (or finer), or mitigating the effect of a common abrasive like alumina by finishing the edge on a softer backing. Like finishing a soft pocket knife by drawing it backwards on white pine instead of push sharpening in a stone. And round it over just a bit at the tip.
Almost everything worth doing in woodworking is a matter of touch/feel and developing skill. But as complicated as this is to discuss, if you were in my filthy shop, you’d be surprised how little there is to it, and how easily you can develop that feel and discretion. It is the universal fertilizer of capability to use that to solve problems rather than looking for expensive solutions like a new knife that’s better than your current knife, but worse than your current knife with sharpened properly.
How do you know you’ve got it right? Sharpness – I think box cutting for your recyclables or burn barrel is a good way to find out. A very soft knife with a fine apex will actually roll or deflect in the corners of coarse cardboard. that same exercise will also show you how much better a knife with a thinner bevel and adjusted apex is than just increasing the wedge angle of the whole knife to avoid damage.
If I can use a buck knife to chamfer the inside of a brass ferrule and see no damage to the edge, you can, too.
You don’t have to figure that you’ll nail it on the first try. if the knife seems too dull, less adjustment. If it rolls, more. The better the knife, the more latitude you have to work. I keep saying knives because tools this soft are uncommon and sharpening a pocket knife *well* (which is a treat) is less common. But apply it to tools if you have some one off tool that just won’t hold an edge in your work. Maybe it actually will if it’s accommodated. A truly defective tool is only one that’s so bad that it can’t be accommodated at all.
I’ve been sitting on two long billets of ebony for making guitar necks for a while. A couple of years, I guess. They’re about 40x4x1.25″ and were only something like $95 each – and they’re quartered or rift and straight on the flatsawn face.
Add linseed oil and french polish and they would make a guitar neck that would look like a bowling ball and I could resaw a fingerboard with the neck and make the line invisible. Like a pencil, it would look like one magic piece with a hole in the end for a truss rod.
But, it’s really too heavy for the job. There’s also excess in it and I thin it’s better used for knife handles. So, that’s what it’ll be.
To make sure I don’t totally give up, I trace a guitar neck template on the blank and before I use the whole thing, I’ll cut the waste off and use at. Translation, there’s enough for a gaggle of fingerboards or overlays still, or a neck.
I pulled out a card scraper to scrape the wax off the end and one face (didn’t need to do the latter) to make sure that the neck traced orientation is really dead on with the grain.
And I found this:
I wasn’t very attentive with camera focus, but note you don’t see much on the surface. It wasn’t that easy to see in person, but the card scraper gave up quickly (no problem if you can sharpen one quickly, just tough it out and sharpen more often) and the little tiny lines are tell tale.
If you get something like this, you won’t have to guess. Silica isn’t a mystery confusion, it dulls the edge right away, even on a scraper. But I can’t really see it and if you have something like this happen, just use your phone camera and zoom in and then look at the picture. No need to strain and guess.
Suddenly, you can see the lines are a lot more plentiful, and this board end was waxed, so these aren’t ambient metal dust. These being the little dots and plugged pores – it’s just silica.
And no surprise, all of the lines are about pore size or smaller.
In the unicorn article, I provided a method to modify the tip of an iron so that it would plane through this on long grain without being dented, but in scraping here just to look at the end grain pattern before cutting, it was just more of a curiosity.
Almost like it gets piped through the pores.
No amount of super steel buying will allow you to plane through it or just scrape it with a “normal” edge, but if the edge shape is changed some so that the little dots can’t manage to deflect it, then no problem.
A2 steel would have been a foreign topic to most woodworkers prior to the mid 1990s. The earliest mention I’ve seen of its use is George Wilson mentioning slipping it to coopers at Williamsburg to extend the working interval on their planes. If you haven’t watched a cooper, there’s a lot of white oak planing. I suspect the irons being smithed were not the equivalent of a current W2 or 1095 iron shot out of a quench and tempered back to 62 hardness.
I’ve seen Karl Holtey mention using it early on, as Karl has always introduced something unusual to his planes, or chosen to make unusual older models like the Norris transitionals.
But A2 isn’t really a new steel, and for simple purposes, 1084 steel and some versions of 1095 are about as plain as steel could be. O1 steel as we know it now was introduced with substantial alloying, and especially in regard to alloying that allows it to harden more easily. Water quenches much faster than oil and oil much faster than air. Fast quenches create distortion, or at least can, and won’t through harden very thick items. You’re unlikely to ever see a W2 iron made 1/4″ thick for a boutique plane – it won’t harden properly. O1 will easily.
Given that background, A2 is a steel with molybdenum added, significant increase in chromium (to 5%) and with a small amount of vanadium…..and a lot of manganese. O1 also has a lot of manganese, but only a little bit of chromium. Consequently, A2 can be air or plate hardened (placed between two cold aluminum plates). The result is a steel that tempers to about the same hardness as you’d find in O1 – good O1 probably lands between 61 and 63 hardness for woodworking. Good A2 will land around the same place.
What is air hardening? A2 will definitely harden if you hold it up in the air after heating it, but air hardening is generally prescribed in a pressurized furnace. Why? If you increase the density of air under pressure, it has more ability to transfer heat and it will cool A2 faster. I don’t know for sure, but would guess the bulk of A2 now is heat treated in furnaces in a vacuum under several multiples.
So, basically, what are the trade offs? We get a steel that is very easy for manufacturers to use because it can be quenched relatively slowly, and on top of that, it’s very insensitive to tempering temperatures, unlike higher carbon steels. The difference in hardness for a 100F tempering error is about 1 point. That’s the benefit for the manufacturer, it doesn’t do much for us as users other than make availability simple. It’s also not particularly expensive. What users do get is a steel that has chromium carbides that impart additional wear resistance. In wood in actual tests planing wood, I see a potential at same hardness for 25% more edge life.
The trade off is the chromium carbides are relatively poorly dispersed compared to the much smaller carbides in O1, and they provide more sharpening resistance than they return in edge life, and in poor quality samples, carbides can seed small nicking. If you experience problems with nicking edges in A2, the universal fix in tool and knife steels is to add a couple of degrees to the angle. If you have chipping with an LN iron, for example, just sharpen the final microbevel at 35 degrees. What little you lose in clearance, you’ll more than save in predictability.
That pretty much covers what the steel is – it’s around 1% carbon just like O1 and W2 – with the latter often being more in the 0.9-0.95% range. Not sure about the former, but chromium does tie up iron in carbides, so it would make sense that there is a bit more carbon in A2 to leave a similar amount in the martensite matrix (the part of the steel that we would see as “grains”).
From a practical standpoint, it does seem to be offered in a much narrower hardness range than O1, and I think many who prefer A2 over O1 probably aren’t planing much and may have experience with two things: 1) underhardened O1, and 2) a lot of steels they think are O1 that aren’t anything close.
Vintage plane irons that are laminated aren’t O1, they are something finer with less alloying.
I don’t know too many experienced woodworkers who use hand tools a lot more than just as a follow on to power tools who like to work with A2. There are certainly plenty of amateurs who like it just fine, and if you like it, certainly keep using it.
So, let’s address some things I’ve heard about A2 in some mock back and forth questions.
A2 is OK, but V11 is a much finer steel – it’s powder metal
This statement is false. V11 (XHP) is a higher volume of chromium carbides and the carbides are more uniform, but the larger carbides are similar to the carbides in micrographs of A2. The powder metal comment for V11 is true – look up “CTS-XHP micrograph” if you want to see what it looks like.
A2 is fairly new. They’d have used it in the past for tools if they had it. We have better steel now than they did.
Depends on what you mean. A2 has been around in some form since the 1920s, and probably little different from what we have now since around 1935. It was developed around the same time as D2, which itself was an attempt to make a less expensive high speed steel. But D2 didn’t and doesn’t hold up at high speed. It’s to A2 what A2 is to O1, and V11/XHP is somewhat like D2 with more chromium and carbon and because it would be so coarse in ingot form, it’s made with a powder process. D2 is also.
However, as long as A2 was used industrially (could very well have been used at Stanley!) for dies, it wasn’t really wanted for woodworking until amateurs came along. It’s likely for Lie Nielsen that it replaced a W series steel because Lie Nielsen couldn’t tolerate warping. And the popularity for a while of the A2 and D2 types of steels in knives may have gotten them exposure as blade steels.
But, no, woodworkers didn’t have to suffer without it from the 1920s on, they just didn’t have any interest in it. The amateur market was probably small as the push in the US was for modernity.
A2 steel is really tough
We don’t really test steel hardness, but A2 isn’t exceptionally tough. 80crv2 and 1084 steels that have very small carbides (and AEB-L on the stainless side, and 3V in powder metals) are really tough. Tough means they are hard to break. Not hard to bend, but take a lot of energy to break.
This is said about V11, too, but V11 is also not particularly tough. What A2 and V11 have is the potential to have edge strength with hardness (just like W2, and 1095, and so on). We don’t use S7 and other very tough steels that don’t have good hardness potential. And we don’t see 1095 in blades, though made in good quality, it would make a perfectly serviceable plane iron. It’s too difficult for boutique toolmakers to heat treat accurately.
Cryo treated A2 is better yet, it’s even tougher!
In my opinion, cryogenic (just resting the steel in liquid nitrogen after quench and before temper usually) does improve A2, and most anything we use for woodworking. But it actually makes A2 less tough. It converts remaining unconverted microstructure to martensite better than stopping at a higher temperature. Martensite is hard. The unconverted austenite from heating prior to quenching is not hard, but it’s tough. More martensite, less austenite, and the steel gets harder but more brittle in a break test. How much harder? Generally about a point on the rockwell scale. It does make the steel look slightly different in a micrograph (carbides look smaller, everything looks more dense), but the gain is general gain is in hardness.
Since we typically don’t test the toughness of steels in woodworking (that’s for crowbars), the extra hardness is nice and the loss of toughness is fairly small.
But there’s another benefit to cryo treatment – steels like A2 can begin to suffer when overheated because so much austenite is created at additional heat that much is left unconverted. Liquid nitrogen will convert much of that, creating a much wider acceptable range of heats and even the ability to chase hardness a little bit by creating what would’ve been softer steel due to excess austenite, and convert that to what we know as hardened tool steel – more martensite. Nice trick – too bad liquid nitrogen doesn’t come from a faucet. I’d love to have it on hand!
I do not personally see a reason for it to not be cryo treated and wouldn’t buy A2 that isn’t. So, better? yes in my opinion. Tougher? No. More wear resistance/longer edge life? Only to the extent that the steel is a point harder.
A2 Steel doesn’t get as sharp as other carbon steel
This depends on the sharpening media. But the statements made like that often consider O1 to be “carbon steel” even though it’s fairly highly alloyed to make the oil hardening possible. It can be true that dispersed carbides 5-10 microns in size can end up in the edge of an A2 iron, crack and fall out leaving behind a nick big enough to leave lines that can be felt on wood. But this statement is more commonly made by people who are not completing the sharpening process on A2 (it takes longer than O1), or using oilstones or something else that won’t cut carbides.
Diamonds and other oxides and waterstones will create an edge that is no different as long as any burr is dealt with. That is, it’ll be a little more work to get the fine edge, but there will be no perceptible difference in sharpness.
If I were still using A2 a lot, I would probably just cut a secondary bevel on a fast stone and then use micron diamonds to finish it. Why screw around. A better result than something like shapton glasstones or whatever else is being sold as the upper expense level fine stones, faster and for almost no cost. I’d do the same for V11/XHP.
If you like to use natural oilstones, there’s just no reason to use A2 with it. You won’t get a return for your efforts. And for some reason, the lovely washita stone and A2 don’t get along at all. I don’t have a picture, but I could probably create one (thought at one point I no longer had A2, but I do have lie nielsen’s spokeshave irons). The washita does something to break or tug at the carbides and leave a coarse edge. Under the microscope, the effect is seen easily.
Diamonds, on the other hand, don’t notice any carbide in common steels – not even vanadium. Vanadium provides a little more resistance, but the groove left in steel shows no favoritism – diamond leaves a wake like a plow through soft dirt.
Probably Chosen by Toolmakers, not for Woodworkers
This is my statement, not a question. Why do toolmakers like it vs. the narrative that it was “given to us because it’s better with a longer lasting edge”.
O1 is now seen by toolmakers as a steel that warps a lot. Hock’s irons out of France are tempered hard and it doesn’t seem to be an issue, but it’s a challenge to find high hardness O1 that I’m aware of other than Hock and in Iles chisels.
A2 heated to a proper temperature will land around 61/62 hardness after a 400F degree double temper. If the temper is 500F, an error nobody would ever make, it would drop a point in hardness. O1 would drop 3, which would drastically change the usefulness of an edge.
A2 steel is relatively inexpensive, and widely available
A2 when air quenched moves very little, leaving less follow-up grinding and clean up. The lack of movement makes it very easy to find heat treatment, and the heat treatment routine is uncomplicated (it should be done in an inert environment, though, but in a computerized furnace, this isn’t an issue)
Compared to other steels that have very coarse structures, A2 is coarse compared to O1, but fine compared to D2.
A2’s carbides are chromium, which means any synthetic sharpening media will sharpen them fine. The carbides are significantly harder than natural oilstones and they can be used to sharpen it, but the carbides will not be cut. They will rather be burnished and broken to fall out as you’re sharpening. Bottom line, most people use synthetic stones and won’t be offended sharpening it like oilstone users will.
If something is easier for manufacturers, they will use it. Fortunately, for us, it’s still usable. For someone using a power grinder and a honing guide and synthetic abrasives and having to grind a bevel once every two months, you probably won’t care.
Composition wise – I usually provide the actual listed composition, but in this case, I think mentioning it’s bits and pieces vs. O1 is useful.
Carbon – both about the same, but sometimes .05-0.1% more carbon in A2
Chromium – 10 times more in A2 (5% typically)
Manganese (for hardenability) – about the same. Chromium and molybdenum work beyond just manganese in making the steel harden without fast quenching.
Vanadium – a small amount in A2. Sometimes in O1, sometimes not. The function is to prevent grain growth during heating, which can allow pushing for slightly higher heating and resulting hardness without growing grain.
Molybdenum – none in O1 – as mentioned, A2 has 1% or a little bit more. Larrin mentions that Molybdenum is generally a good way to increase hardness in steels with 3% chromium or more, so it makes sense in A2, D2 and high speed steels.
O1 has a little bit of tungsten, silicon and nickel. A2 has about the same silicon and nickel, but no tungsten.
I think unless you start to gather what composition does, maybe this stuff isn’t that important.
Micrographs
I refer back to some steel supplier’s pages, and have learned a lot from Larrin Thomas’s page.
I mentioned to Larrin how excellent the micrographs were – they are not easy to create and are generally done with contrasting techniques to highlight carbides and an SEM. I won’t be making them. Used SEMs aren’t always that expensive, but having something that I absolutely have no chance to fix is not on the menu. Larrin gave me permission to link to his micrograph images as long as I give him credit and provide a link back to his site. I will *gladly* do that.
I have linked O1, A2 and V11 below, as well as links to the micrograph page in general. I chose these two, because there are probably a few people who think these three encompass all woodworking steels, whereas I doubt any were common 75 years ago (only A2 and O1 existed at that point of the three).
On to the pictures – credited to Knife Steel Nerds, of course. The little light dots are carbides. They are seated between steel grains. You can’t see the grain lines in these micrographs because they need to be etched with an acid to appear, but they are there, and generally the borders show grains larger than carbides. How do we explain this? Imagine a stone patio made with brick-size stones in non-identical shapes and marbles to golf balls filling up little spots at edges and corners.
Notice the disparate carbides here, lots of small ones – some 5-10 microns. D2 steel is made in powder metallurgy version with the chromium well dispersed, and there may be PM A2, but it would be hard to make the case if you’re going to the expense that it would worthwhile vs. D2. D2 in ingot form is pretty terrible – carbides disparate much longer than these leading to edge sections of several thousandths that could break out and worsen. it has a reputation from pre-PM days of being a “steel that can take a terrible edge and then hold it for a long time”. To my knowledge, the Iles tools made in D2 are powder metallurgy – just in case you have those mortise chisels and don’t remember any ragged notchy edges off the stone. That confused me, too. D2 and powder D2, similar composition, very different result.
You can see in XHP, the larger gloms of carbides are less like big ones, but connected small ones. It’s more uniform than A2, but not really finer and the toughness is less.
For reference, the 20 micron scale is just below a thousandth of an inch. what happens when a crack or nick forms due to carbides in the edge is that the carbide cracks and leaves the matrix leaving behind a ragged hole. If the steel has significant carbide volume or uniformity issues, the adjacent steel will also break loose, so a point that breaks out wears to a wider, but not much deeper defect. A fine steel with good stability will not widen much in the scenario that something like silica makes the notch instead. Translation, when carbides come out, the nicking will probably end up being bigger than the carbide void, propagating laterally in some cases because loss of lateral support for the remaining steel.
Check out the whole page at knife steel nerds if you want to review pictures further. I think Larrin is one of the few folks on the internet who provides so much information that he’s worth donating a few bucks to. He is starting to formulate alloys that are actually legitimately new, but he could do that without having done so much providing of information that really doesn’t benefit him.
His excellent page on A2 is here. Knife use with it was more common in the past – the market for knives definitely progresses faster and is more exploratory if not always providing new alternatives that are practical.
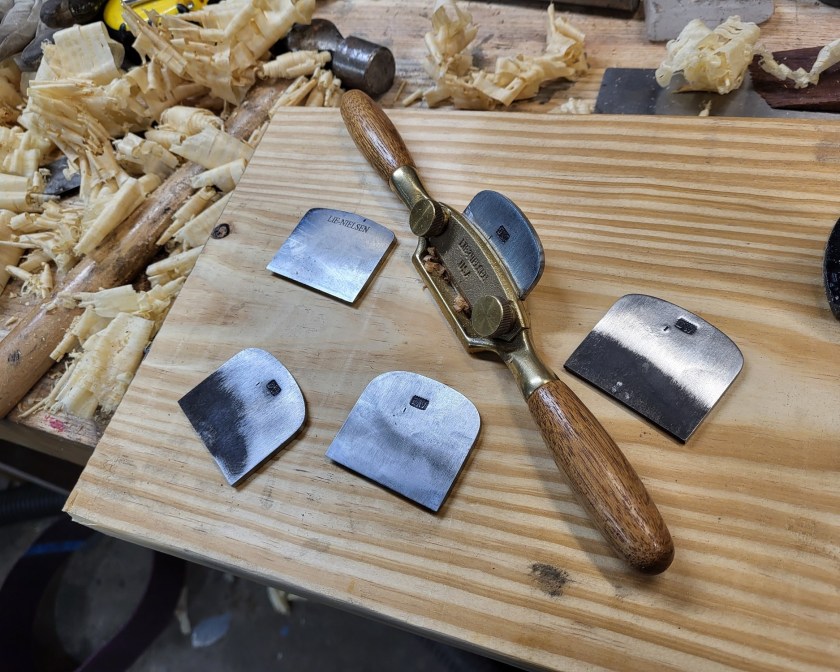
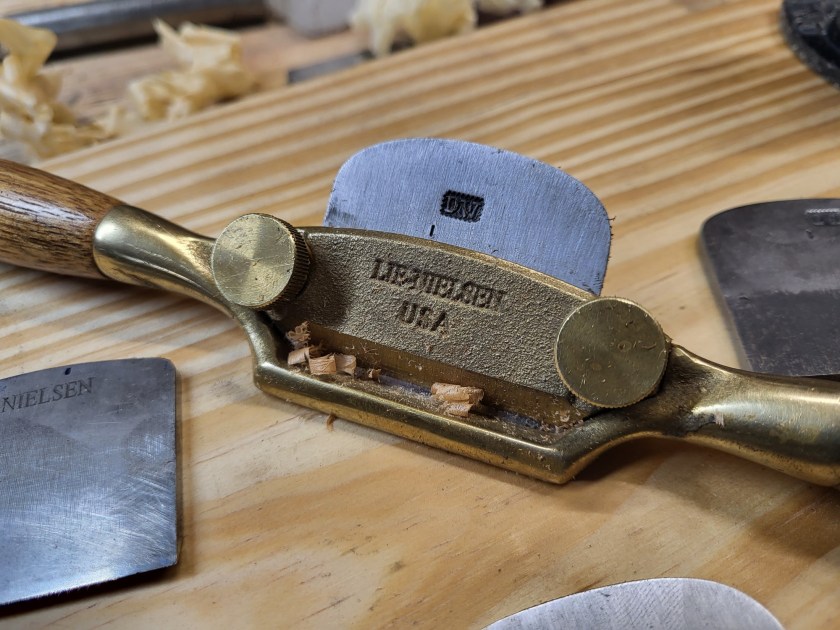
These little blades are a follow-up from the prior thread about “righting a wrong”. I have a distaste for the A2 iron that comes with these, and thanks to some folks mentioning they agree, I know others do, too.
I have intentionally not pushed this blog anywhere or used any form of promotion, because I want the readership to be organic. If I get a couple of comments agreeing, it’s out of a very small group of folks, and that’s a good sign. Maybe not for LN and their A2, but that I’m not off the mark.
What’s the issue with A2? it’s got chromium carbides. Carbides harder than iron cards impart additional wear resistance, but in my opinion if you drop below diamonds, they do not offer a proportional increase in edge life, even if you ignore the fact that damage itself has to be removed as part of routine sharpening and if not, it because extra work.
Considering the damage to not be important is the reasoning of someone who uses a router and thinks about plaining. With a volume of hand work, stopping for anything other than wear is unpredictable and just a straight up pain in the ass.
There was a second incentive in making these – they’re starrett O1. A smarter man would’ve used 2″ precision ground stock, but I only have 3″ and the rest of my stock is oversize. the mouth is so tight on these LN shaves that I don’t think oversize stock would even fit through (about 0.135 for the belt ground .125 stock that I purchased. I probably should’ve asked. I’ll make irons out of it instead – it won’t matter as much.
What was the second incentive?
To use the induction forge and thermal cycle and heat and quench all of these without the use of propane. Everything other than stuff I’ve intentionally overheated has come out well with the forge except for one chisel. One I made for Bill T who used to post on wood central. Bill uses tools and gives me feedback. I value giving people who use tools good ones. For some reason, though bill has gotten about five percent of the tools and knives I’ve made- probably less – he’s gotten about half of the defective tools and knives. At least the price is good ($0).
O1 isn’t what I use for chisels, though I could. It makes a good chisel when done right and is far easier to get right than 26c3, but 26c3 has a crispness and hardness and higher toughness at higher hardness that just is hard to ignore. So, I will trudge on.
For now, these blades are what I wanted for the LN shave. I’ll figure out what to do with the others, but I think it is time that I start selling things. It won’t be on here – that’s not what this is about.
I have one other idea – since I ordered .094″ stock in O1 to make stanley replacement irons, and it arrived also well oversize – .0102-.0105, I will also make some thinner blades so the LN shave can finally “eat like the big dogs” on projects where the tight mouth isn’t needed.
I love the shave, it’s a great tool. At one point, I had the rounded bottom shave, but the rounding is very minimal and I sold it. I wish I still had it, but at the cost of the shaves now, it’s not in the cards.
At any rate, this is the kind of thing I always wished to be able to correct before toolmaking – to get things the way you wanted them. Without much effort or cost.
Twice in the last ten years, I wrote articles that are usable and unique. Not that they are discoveries that didn’t exist, but they are topics that were not taught or discussed in a way that’s usable.
First, was the cap iron article, and second the unicorn article. I’ve taken a lot of crap over the 11 years since the cap iron article went up about it’s not new or everyone knew it, and quite a bit about buffing the tip of a tool. Publicly from people I have shipped things to for them to respond that a basically initial cowboy buffed edge was “really sharp”. You can’t stop losers or nutballs any easier than you can make me a person with verbal brevity.
Those articles are on woodcentral, which has become a somewhat delusional site, at least the ownership is delusional. I thought it would be the right place to publish them because there is no paywall, but the unicorn article is now gone and I can’t refer anyone to it, and the cap iron article is linked as to have been written by “Barb Siddiqui”. I have no idea who this is, but it may be someone who was on the forums when they were transitioning from newsgroups.
I wrote the cap iron article early on in my discovery because after starting with it, I began to get suggestions to go and look at what Chris Schwarz said about it. His and the discussions from other gurus were tending toward trying to make the cap iron paint by number, which itself is a stupid idea. The last thing people need is another jig to try to set some item that has a wedge shape end. In the three months or so that I had been using the cap iron by that article, I was relatively confident that I had a great feel for it, and that was the case. That illustrates its practicality. The only thing I’ve done since then is learn a lot more about various shapes and that just points back to why things were the way they were historically – namely, why a lot of the good quality caps irons are rounded and steep right at the junction with the iron and then become less steep quickly. It makes sense if you work by hand.
To summarize what I’m getting at here – I wrote the article not because I wanted to, but it’s my opinion that the Schwarz types who like to write about something they learned two weeks ago are excited, but they have a great chance of giving such bad advice (that become dogma) that the few who will actually try what they read will be doomed. The cap iron was too good to allow that to happen.
If you prepare taxes all day and run wood through a planer in your spare time and sand it or have retired from housewright work and just like to argue, maybe it’s not as easy to grasp why it’s so useful. Every person I have met who does a lot of work by hand (warren, who had a handle on it long before me, then Brian Holcombe, and then a user named Custard on the UK forums) won’t be confused by what’s valuable and what’s not. You can tell when the cap iron is valuable very quickly unless you’re not actually doing end to end work.
Time has gone on, and all of the forums are in their death throes, in my opinion at least. This includes wood central, which requested I not talk about making tools so that the big number of people just waiting to talk about hand tools could do it and it would become lively again. The owner is an editor, and he shopped a brief article about the unicorn bits and it was picked up by a woodworking magazine. I got a little bit of a clue as he expressed that with a reference to the site, things could turn around again. There was a bit of Uncle Rico flavor in all of it – if they would’ve let him start, his football team would’ve won states and things wouldn’t be the same (in Napoleon Dynamite, of course, it looks like he’s living in a high top van). Saying this a different way, the average age of the user on the site is probably in their mid 70s. I’m in my mid 40s – it’s a struggle for me to even find people my age and I despise facebook, instagram, or other app based intrusions that are really designed to interrupt you and get some kind of revenue from data profiling. I can accept the latter, but the meaningless constant intrusion is just a frontal lobe thinning exercise that someone with attention deficit doesn’t need. But that is where woodworking has ended up.
I thought the pop. wood article for unicorn was a bit campy, but they like that kind of stuff. It was distilled from my long article, and I reviewed it, but even my daughter saw the first sentence and said “you didn’t write that, did you?”. I said “no, I wrote something probably 15 pages long that has a brief but not happy summary and then a whole lot of detail and then proof”. At the time, my daughter was 10. Of course, she had no trouble believing the latter. Artices for magazines pay, at least some of the time. Those of us mentioned allowed the revenue all go to woodcentral. I have some oppositional thought to taking money for what I write in the first place, but I really at this point wish I’d have just taken it and donated it to a charity instead.
I think in the case of both of these topics, I can do something that is more usable. The unicorn article can be rewritten to separate all of the testing from the main article – I control this site now and can lay it out and organize it that way.
And I can do the same for use of the cap iron. The forums have been a waste of my time for a while, and they’re obviously a waste of time for people who are more interested in doing things or joining a group of people doing things vs. just being sort of a social hangout. At least for hand tools. And the latter is fine, it’s just not what I’m looking for online and lends itself to the situation that the UK woodworking forum is in with a couple of dud users responding to everything without providing any good advice. Often intentionally just disagreeing with whatever is said. A terrible way for beginners to get advice, and ultimately nobody hangs around wrong and the few that do, when you see what they attempt, you can tell the odds were against them. That’s a shame.
And I think the quiet courtesy that we’ve given forum owners over the long term is misplaced. As if the efforts were for our benefit – sometimes they may be, but often they’re not.
There is a pleasure working entirely by hand that is not helped by the magazines or the forums, and I aim to go not just from crabby articles like this to actually making this more sort of here’s the concept and details later. For example, it’s probably not intuitive that perhaps the angle used on the try plane doesn’t need to be as steep in effective use as that on the smoother. I would anticipate that this dynamic is probably a 10-20% difference in effort when dimensioning wood after the jack plane. These things should be explained somewhere and I guess nobody else is going to do it.
So lots of articles?
No. I typed my fingers numb for years thinking that I had some ability to convey something to people who were interested, but giving advice is like throwing an unskilled pass to a wide receiver playing football the first day, and against a professional defense. The reality is it’s so rare that someone asking the question actually is looking to seriously parse the information and own it.
I’m done with that and won’t be writing well summarized accessible stuff. I don’t like compliments – it’s a personal flaw – but matter of fact feedback, especially if it proves what I believe (there’s always room for improvement), that’s great.
These two topics are enough of an exception that I will tie the electrodes to my loins (that’s what writing clearly feels like to me) and take the shocks so that they are properly documented.
A treatise on all dimensioning work may also be useful. I do it well and I am lazy. if I can do it well and be lazy, that means it’s not hard. There’s a gaggle of things in hand tool woodworking that are easier to do neatly and quickly – both together, vs. how they’re described.
This is Better than a Niche Area, Though
Before setting up a blog, I was concerned that without some discussion, I would lose the combination of things that make for the fire to press on. That’s turned out to be far off -I’m making more things and posting less. I still like to read forums sometimes as there are just a couple of unique people that I really like. Some maybe for reasons people would find unsuitable, but I’m an oddball and I like people who are unique, too. I think day to day, the world operates based on conscientious folks who follow the rules and do what they learn. But nothing new comes without the oddballs. Compare Jamie Dimon and Elon Musk. Jamie wants to be custody of your assets the same way 9000 other places can do it, and Elon Musk has us doing things almost the way the US used to innovate in the first two and a half quarters of the 1900s. Like him or not, we have boosters landing on end like a broomstick and can get to space cheaper than the Russians and Chinese – which is really saying something. Probably none of us are either Dimon or Musk, but I’d rather be the poor man’s .000001% of Elon Musk than the person who shows you 400 jigs, things to buy and how to clean your shop.
If you like those things, the jigs and the shop cleaning, I also have zero interest in convincing you otherwise. I’m looking to share information with the people who think you first go to the shop to make things and figure things out and then everything else is after that.
As a first aside, this comes from reading comments debating dovetails. I’ve never much cared for the idea that dovetails are somehow great aside from the ability to create them with minimal tooling and hardware. Like everything else, the discussion seems to go from nonchalance to “please-give-me-an-ice-pick-so-I-can-self-lobotomize” discussions about squiggly baselines or whatever else.
What falls out even more obnoxiously is the discussion of what’s good work and what’s not and which craftsman did what and who did something else.
Inevitably, it’s mostly beginners or folks who make their living doing something else getting really excited about something that may not matter that much to any of us.
For me, that’s toolmaking. I’ve learned that toolmaking is an entertainment topic for most people, but not one that will cross beyond laminated tool projects, or anything.
Intense needling away about the quality of work or lack of in the past always lands on how much did a craftsman care. I think it misses a very important point. If you can do things finely to a standard, it’s easier to do the work. It’s a lot easier to cut dovetails that need a minimum number of chisel strokes or strikes, a minimal amount of glue, minimal follow up fitting (that’s toxic, and quickly becomes evident as a waste of time). Of course there are cases where the budget doesn’t even allow that, or where tastes didn’t and you find overcuts and other marks of haste and ease, but even those tend to result in dovetails that are threatened more in the looks department by seasonal movement than lack of fit.
It’s easier to do things well, and to not accept that you should just do them half-OK and then celebrate. When we see that a lot of older work appears to have relatively neat dovetails, rather than assume that it was an effort of self sacrifice and manicured-men attention to pretty detail, maybe it was just a whole lot nicer to cut everything close, add a little glue and push it together predictably.
It takes repetition to get to that point and identifying and solving problems. The online community falls apart because there’s rarely a good discussion of standard outweighing cactus-enema like obnoxious discussions about technique or tools or favorite guru.
But it sure is nicer to work when you allow yourself the repetition to get good at something instead of the burden of guessing and wanting to be a pro by drawer number two.
Still, I can’t help but think that someone that obsessed about dovetails and just exactly what they have to be – to the exclusion of talking about much else – is the kind of person who never goes to the bathroom without looking at themselves in the mirror for an extended period of time before leaving. Or tries to quote literature in conversation to people who are obviously uninterested in it.
Over the weekend, I made three things, but one of them was partially experimental. I guess two were. Strangely, it was the chisel in the middle.
Early this year, I added a smaller radius high speed grinder attachment (belt) to go with the one I already have. The first is a 2×48 multitool attachment with an 8″ contact wheel. It would be nice to have a real platen or something a little closer because the platen on that attachment is not really close to usable for making things straight. It’s just a bad design, and the two attachments work OK but they are not similar to the quality of real belt grinder.
The second is a 4×48 attachment with a platen that actually has the belt tensioned across it instead of suspended above it, but the tracking is terrible. I can live with it. It makes the belt go fast and if it eventually allows the belt to eat parts of it up as it moves back and forth, I’ll replace them.
However, I wanted to us the shorter radius wide belt to make the handled chisel shown, and I got a little lost with it and the tang is somewhat wonky and way too long. I also wanted to heat treat all three things not LN in the picture with the induction forge. The replacement spokeshave blade and the seaton chest style chisel on the left are perfect. The chisel is a little soft. I have no idea why and that pisses me off. The option to do everything before the final heat and then do that in the forge as I’ve always done is still there. The induction forge is far more handy for absolutely everything else, and makes heating the bolster to the temperature of the sun so that it forge welds neatly and easily a snap.
Otherwise, the chisel in the middle is usable, it’s not saw soft or anything, but it’s got to be two or three rockwell c scale points off of what it should be. Maybe the blank of steel that I started with isn’t what I thought it is. If it isn’t, that kind of variance is intolerable.
The other chisel is crisp, hard and snappy once handled, will be great to use.
The Wrong
The obnoxious A2 irons in LN spokeshaves – finally replaced by O1.
The faster I get at working by hand and the quicker the sharpening regimen gets, the more I’ve grown to really hate A2. But in a spokeshave, it’s especially dumb. You have a little blade to hold on to, and I really have no interest in creating fixtures. It should be sharpenable one-handed like an afterthought. However, A2 seems to grind and hone much less well than it’s abrasion advantage over O1. That is, it can last about 25% longer in wood than O1 in theory, but the grinding and honing on something small like this leaves me with finger aches.
And A2 still doesn’t solve the real life issue that most long-interval edges can’t be used without accumulating damage. This spokeshave blade and another (round) were the last two A2 irons I have of any type.
I’d imagine there are two things that drive people to like A2, aside from being told that it’s great. Lack of exposure, and inability to compare alloys at like hardness. O1 is frequently offered softer than A2, with the exception of hock irons. When O1 is soft, it can lose 20% of its edge life, but if the softness allows denting or edge damage other than abrasion, it can be shorter than that. I tested a bunch of irons almost four years ago now and LN A2 lasted 25% longer than a similar hardness O1 iron that I made. The condition of the iron in the last 25% was terrible. I don’t know why-I suspect it’s just the condition of an edge with carbides that are more proud than another. Actually, I do have pictures of this from the same scope that I use, but with the original older camera pardon the small size of the pictures.
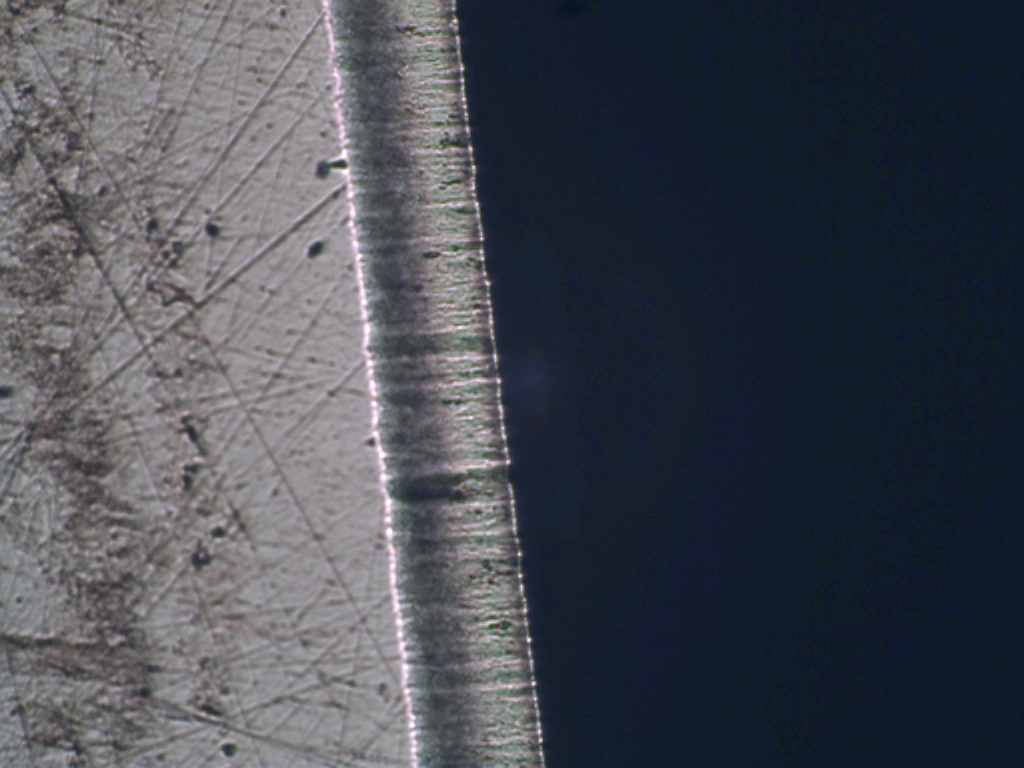
This is what A2 looked like after planing about 1000 feet:
And this is what O1 looked like at about 800 feet.
The grainy look of the A2 edge is carbides standing proud. This isn’t a reliable predictor for the edge cutting sweetly or not, but in this case, the 200 foot difference between the two was unpleasant planing. O1 simply ran out of clearance, and ceased to want to stay in the cut.
The reason for the very neat appearance of the wear bevel (this is the back of the iron) is because the cap iron was set fairly close to the edge. This wear bevel is about 3 thousandths of an inch. The cap iron was set around 8, which would be a good day to day setting on the plane used. If you think about this, it should make some sense – the chip is bent and would probably like to bend in a curve, but it’s also contacting the cap iron and being lifted. It doesn’t just travel the remaining distance to the cap and get bent up at a hard bend point.
This fact is probably why rounded cap irons are nicer to use across a range of work than those with a flat facet. If the shaving is thin, it can contact lower on the face of a rounded cap iron and at a higher angle. You won’t care because it’s not that hard to bend. If the shaving is thicker, it will contact higher on the cap iron at a somewhat lower angle and you’ll appreciate the reduction in effort. After all, you will have to finish with thin shavings. Nobody that I know of finish planes with a 5 thousandth thick shaving as the last step.
Back to the spokeshave:
These are the only two remaining LN tools that I have – this shave and the one that will shave a rounded surface. They’re really nice and I use this one and occasionally the other one for guitar work – a little at a time. I hate the original iron every time and have finally spent the 20 minutes that it takes to make a replacement for it out of O1.
Lesson Learned from the Chisel – Fluent Working
The chisel in the middle is more of a 19th century firmer style. It’s about 0.11″ thick at the front end and graduates to about 0.15″ in the middle and then just under 0.25″ at the tang. Firmer chisels are nicer if the last bit of the tool is closer to parallel in its thickness, but a chisel made of only a thin piece of steel is what you may find with some push chisels. It’s no good. The shoulder and tang need to be stiff enough that the whole blade doesn’t have more spring than you’d want.
I thought I was pretty habitually trained making these types, but have made more seaton-ish chisels recently, so my eye wasn’t really keyed in to just freehanding everything as it was. And add in the shorter radius grinder wheel and just that was enough to make this a reject based on the long tang length and ultimately ugly look. I’ll go back to how I was doing it before and maybe finally make a set of patterns to mark the blanks and refer to when grinding and filing.
I remember when I was a beginner – the idea of making 100 of something seemed ridiculous. But having spent a little more time on this chisel than I’m sure I did with the last of its style perhaps approaching a year ago, the fluency in making things come to mind. It’s not enjoyable really to work by hand until you’re fluent in what you see, how you get there and the steps just falling into place.
Someone recently said they’d like to see pictures of what I’m doing in terms of steps making a chisel. I don’t really want to share it publicly at this point, but there’s no secrets in the chisel. you could make the same thing and get the same result with a different method. It feels like it’s 5 steps, but I listed them out and it’s more like 16. That’s simple enough that you can easily learn to do it by feel, as long as the feel doesn’t change. At this point, other than the hiccup, the rest is getting faster and better at the same time.
I’ll figure out the thing with the induction forge, or I won’t and will continue to finish the heat treat with a propane forge heat. That’s not a big deal either way – it’s all of the other heats that occur other than that final one that take a lot of time sitting and waiting for something to heat, but having to watch it close enough that it doesn’t run away.
For you, if you’ve never found satisfaction in this hobby and jump from one thing to another feeling frustrated – consider making something a specialty. Something you will make well and in numbers, and if it’s difficult to figure out how to get rid of it, make it something you will be able to list and ship when you get good at it. If you like furniture, it could be something with drawers. If it has to be small enough to ship, it could be some kind of completely hand made box (like really hand made) with a french polish.
You will find more reward than you think in getting better by repetition. Very few can jump from one thing to the next and make the first version perfect. And even then, it’s hard to get a rhythm making things that way and it’s all stop and start in feel with too much thinking and not enough getting past thinking about the routine stuff so you can observe and adjust while in the middle of making.
Pickup up a different chisel and then using different equipment was more of a challenge than I thought it would be – not to make a chisel, but to make one to the same standard after an interval of not doing it. I don’t like the result, but I can live with it as it’s still gaining experience with the new stuff. But it reminds me of where I’d gotten to and how subtle it was. The only real pain with it is the risk of warp in heat treat. That never goes away unless you use an easy steel, but you can manage it. And heating the bolster with a brazing torch – a pain – either the gas is running out or when you put the torch down quickly to set the weld, it ends up pointed in a direction you don’t want cutting holes in other torch or burner tips, or it puts itself out – not a good thing with unburned oxygen streaming into the air waiting to go off with a giant pop so that you set the weld and then change pants.