Over the next however long period of time. I intend to get the unicorn stuff back up, but I’ll spare everyone adding each page as a blog post and just do it in the background.
I’ll perhaps be a little more visible with a comprehensive discussion of the double iron, planing and plane setups, but that’s also intended to be a permanent fixture and not just a stream of blog posts.
It’s not so much that I think the unicorn method is that important for most people, but rather that information in it will be helpful everywhere. Not just “following the method for a chisel”.
I’m reposting the Unicorn method here as the article that used to be on Woodcentral is for some reason, no longer active. That could be an accident, or it could be because one of the long-time sponsors (Veritas/Lee Valley) had a chisel that did not show well in testing in the article – you’ll see that here when the test results are on a separate page and you can see how each chisel fared with a variety of edges. Breaking this up into several pages with an index will be a better format, anyway.
What is the Unicorn Method, and Name Background
First, a brief explanation of the method – before you do any of the things here, you can work the back of your tool on a fine stone because everything else follows on the bevel side. Then, do the following:
1) Grind a long shallow primary bevel, probably about 20 degrees – anything close to that is fine.
2) Then install a secondary bevel several degrees steeper. I never measured this when experimenting, but demand during discussion later led to taking a picture of a chisel, which showed an estimated 23 degrees or so just setting this bevel by feel. If you know anything about chisels and edges, or knives, you’ll assume that this won’t hold up in wood. It wouldn’t.
This secondary bevel can be installed freehand or with a guide, it doesn’t matter, and with a stone that is a step off of your finest stone. Anything from a settled in fine india to a 4k waterstone or whatever would do fine. There is no need for a fine stone here unless you want to work the back of a chisel or whatever you’re sharpening since it won’t get the last step in most cases.
3) The last step is what finishes the job. Run the chisel or gouge that you’re learning with into a high speed stitched cotton buff with a 2-5 micron honing media. Do this more steeply than the bevel, buffing the bevel side only. Push your chisel into a stitched wheel – see equipment needed to see examples of a good wheel. Push the chisel into the just for a couple of seconds, but firmly so that you’re getting into the backbone of the wheel.
The buffer puts a lot of linear footage on an edge quickly, it does it without much support for the abrasive, so the combination leaves a very fine contoured surface that doesn’t form a burr, and a fine burr left from hand honing will just be removed. No further stropping after it. A chisel can be sharpened in a minute of total time and you will have to be uncommonly good at sharpening to match it.
I will discuss further how you can get in the ballpark if you don’t want to use a buffer. I would use a buffer – I think the speed and the ease and how it leaves the edge is better than other methods (drill mops, or something else similar) and there isn’t much around the wheels on a buffer to interfere. Too, the inexpensive harbor freight type 6″ buffers will do this as well as anything, so don’t go looking for Baldor buffers or something like that looking for “better performance”.
Now, the name. this edge will last longer, penetrate wood more easily and leave a better finish than most anything else you’ll do in combination. It’ll also be faster to create and if you don’t try to cheat somewhere (don’t skimp on keeping the grinding and honing fresh), on chisels and gouges, it’ll create a combination of properties that is difficult to get or seems like it shouldn’t be available – like finding a unicorn.
When we started discussing this, one or two people referred to it using my last name. I don’t care for that as I think it’ll be perceived elsewhere as branding and I’m against that sort of thing. Some variation of this is everywhere – the only thing I did was “discover” something that’s done or was done before and then narrow down what makes it work better than just “buffing tools” without any background.
Two Pictures Before Moving On
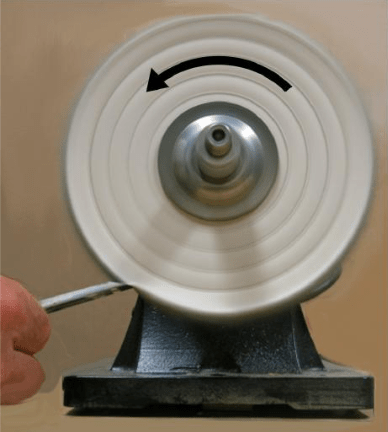
First, what it looks like introducing a chisel to the buffing wheel. Bill Tindall took this picture, but he’s fine with it being reposted here and I see no need to make another one.
Notice how the chisel is into the stitched wheel a little bit. Wheel stiffness increases quickly as you move in toward the last stitch. Notice also that the chisel is “under” the wheel where it won’t catch and even if it did, not much would happen.
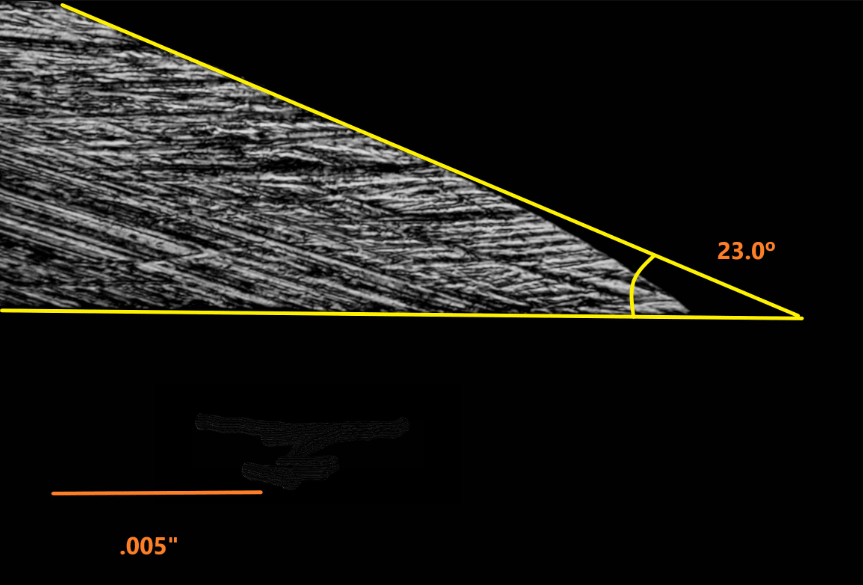
Now, the second picture, the edge. Keep in mind, this wasn’t theorized. I intentionally never looked at an edge before taking this picture – it shouldn’t be necessary, and it wasn’t necessary. I’ll bore you separately with how I ran into doing this – it’s a story of functional laziness dealing with a hard to sharpen tool that I use making guitars. At any rate, the line: you grind and hone shallower and shallower until the edge doesn’t hold up – you’ll find that point, where damage goes through the modified tip and into the next bevel. If you get there, it’s too shallow. But talking about this created the typical “how long, how many thousandths, what angle” questions that I was hoping to avoid. Those are small, too small to observe so we get to them by feel rather than by taking pictures and comparing things on the half thousandth level. And thus, I honed the side of a chisel and took this picture.
I can’t resist adding a third picture, we’ll call it picture 2a. This is what the edge will look like to the naked eye. The little “white stripe” at the very tip is the rounded edge reflecting light back toward you – i’ll be able to see it.
Back to the black background picture: note that the entire flat line is secondary bevel area, not primary. The buffer does something with a couple of thousandths, progressively more as the tip is what gets into the spine of the buffing wheel. Notice how there is no burr hanging off of the tip – it’s honed off and crisp.
Note also that in theory, the “honed” edge would’ve gone to the apex of the lines, but in reality, when you’re honing by hand, you won’t ever actually do that. We are essentially modifying the very tip of the tool edge where damage starts so we don’t rob ourselves of abrasive edge life by getting damage that creates bigger problems. If you think this “rounded” edge is thick and will be hard to push through wood, imagine what it would look like with nicks and steel sticking up several thousandths above and below, and you’ll be trying to push or mallet that through wood. No good.
And when you start to separate the very tip of an edge where you want to stop damage from the rest, you see this all over the place. On a straight razor, we use a linen and strop. The pair modifies the edge just enough to prevent damage and you can shave for a year every day with little edge degrading and hone on your finest stone for five minutes at the end of the year and avoid all of the nonsense that’s propagated on razor forums with honing away a good razor and ending up with something that performs less well in the process.
I will spare you pictures of razor blades, but this deflection that occurs on a virgin atom thin apex or anything close to it is why you dispose of disposable razor blades, not wear. Linen and cordovan leather on a straight razor halts that and you can shave your lifetime with a single straight razor without consuming much of it.
If you see a post like you may have yesterday, please navigate to somewhere or do whatever is easiest to let me know.
What am I referring to? WordPress added an option, I guess, to allow the Schwarzs, Numbs and the Wrights and whoever else to just wring a little bit more out of everyone. If you know me, you know I *hate* that mentality.
It created another radio button to click at the end of creating the post, and will with this one, to get people like me to perhaps think about limiting posts to paying subscribers only, and of course, that would lead to setting up some kind of payment system. Who knows, maybe WordPress would get a cut of that.
I’m fairly sure more than one person got notification of a post and then got to the front page to see a bogus message that “this post is for subscribers only”, even if you were a subscriber. I got the same message and then someone sent me an email to let me know it was there. I fixed it. Now there are three options – and I think this tailored nonsense to divide the haves and the have nots is a real pain in the cheeks. It reminds me of a Ron White joke “Let me tell you what I’m looking for in a tree”.
Whatever the case, if I ever do sell something, it will be tools, but at this point, i don’t do that. Ron White’s looking for a tree that shows that it’s alive by having leaves. I’m just looking to pay the annual cost to have a site and then post messages that are readable by everyone. Period.
This could lead to some kind of longer discussion, because I can never leave anything alone, but it does remind me of the VHS era to DVD era and such where folks who didn’t have a full book of work would supplement income. I think they probably haven’t adapted that well to the youtube and other era where the Wrights and the Numbs pretend to be accomplished (that’s funny) and the wringing is done by sponsorships, patreon or revenue reference links and pretending that somehow the topic is of interest for some reason other than to create this multi-faceted “up yours” hands out mentality that we used to call e-begging. That leaves behind those who wrote magazine articles, issued DVDs and had site instruction that people would’ve traveled to, resorting to posting youtube videos and linking their own plans or something that you can find for free these days, but trying to sell such a link as if it were the days when we’d pay $15 for a VHS or DVD.
I haven’t got a suggestion for folks like that – you won’t see me attempting to become a Schwarz or the other guys (who are worse yet), but if you talk to me outside of this blog, you’ll definitely get a head shake if you tell me a lot of people are willing to read Chris Schwarz’s blog and pay a monthly fee.
What little I do know well, I want to be dispensed like water or solvents that flow even easier than water. Maybe I need to get over myself for thinking there are bits in there that people would want to read about, but at least I don’t need to get over myself thinking I have something so great that I will be a turdy little gatekeeper saying “no…you can’t read that unless you’re in my club”.
So, anyway – if you ever see something like this, assume that it results from WordPress adding options I really don’t want to have to work through in the first place – it’ll be fixed. Personally, if I ever get video recommendations or links to a blog to hit a paywall, I pretty much ignore them forever. That part is important to me – you could be misled when you see a screen like that “oh, DW is taking his 75 views and day and jumping the gun to see what he can get out of it”. …………………No way.
First of all, even saying that, I feel like responding to myself “nobody asked”. Which is true! But I haven’t posted for a while and there are plenty of things I’d like to post here.
So, it’s not as if I haven’t made anything or done anything, and nothing bad has happened, just tied up for spring and making and doing things that aren’t really notable in the sense that I don’t want to become yet another blogger who “has a really great idea to share!!!!!” because they learned something a week ago and compared it to little.
But what I’ve been doing that I’m not that great it and that’s been absorbing time is basically three things:
Experimenting with baking japanning – the real stuff, not paint or tinted boat varnish. Turns out, we’ve all been cheated if we have read that it’s difficult or expensive – by people giving bad advice. The true baked japanning is easy and it’s fantastic.
Trying my hand at making rasps. Not as something to make a lot of, but just got a flying burr one day (my mother would say “something flew up your rear and now you’re up and around”) thinking wait…with all of this heat treat knowledge and belt grinding equipment, i should be able to figure out not only how to make a rasp blank and stitch it, but I should be able to make a very good graver or stitching tool to stitch one. And the latter is true. I’m on the fence about whether or not I’ll want to make this sort of a relaxing activity because it’s easy to stitch a rasp to some extent, but a little less easy to do several teeth per second neatly on a rounded blank.
And lastly – getting back to cooking varnish. Natural resin varnishes are superb. they are a much more durable and flexible version of shellac with a lot of variety. Steve Voigt is nipples deep in varnish experimenting for at least a year now, and he also skipped a burr across the state, even though he may never have intended to throw one, and that one flew up my rear and as of yesterday, I cooked varnish for the second time. And it came out not as good as I’d like, which is the best way for me personally to get motivated.
The Japanning
On the japanning – this sprung out of varnish. Japanning is basically a varnish (resin, oil, solvent) and the high quality stuff gets baked, which means the baking can actually do the varnish cooking and catalyze the reaction to dry all at once. If you’ve seen a black singer sewing machine, or stanley tools, same stuff. The recipe is a combination of gilsonite (natural very clean and high melting temp/good hardness asphaltum), linseed oil and turpentine. Asphaltum gets dissolved into the turpentine and then linseed oil added later. OR, it can be cooked into a varnish – I’ll not go into that further at this point but to say it appears that avoiding the parts that separate when mixed cold is attainable just by cooking the resin and oil together and making a varnish. You can search that further if you’d like – gilsonite powder makes this an easy task, but nothing related to making varnish should ever go on indoors – it is outdoor only and can be so stinky that you may want to wear a mask at the same time.
My attempts with cold mix are here, and I’m about to put the cooked version on a stanley scraper. This is so easy to do reasonably well that it’s almost sinful.
The cold mix is baked at 400-450F. Above that, it will smoke and potentially run, and below that, the oil and gilsonite asphaltum may not link, leaving you with a finish that isn’t durable and may separate over time.
Don’t substitute petroleum bitumen or roofing pitch or any of that. Those are softer resins and they are loaded with sulfur, so you’d get a soft result and a very very stinky house and probably a good dose of hydrogen sulfide if cooked in an enclosed area. No good.
The shaves above don’t look like anything special except they’re no longer missing japanning, but they feel divine and there is a durability to japanning that nothing else will touch.
There are so many ways advocated online to avoid making the cold mix and baking it that it really irritated me once I looked at this through the lens of a varnish. They often involve adding some colorant to expensive and very stinky marine varnish. it makes no sense to me other than that it’s just one more example of how we get enthusiastic or egotistical people in the woodworking community who want to be the source of information more than they want to provide accurate information.
The Rasps
There’s not a whole lot to say about the rasps. It’s not hard to make “a rasp”, but to make these, make the graver, and be able to heat treat them without destroying the teeth or having a warped blank is not that accessible, so I won’t go on about what it takes. It’s a personal experiment of mine, just something to add as an idle hands solution as it’s kind of relaxing and interesting enough to hold your attention if you can do it.
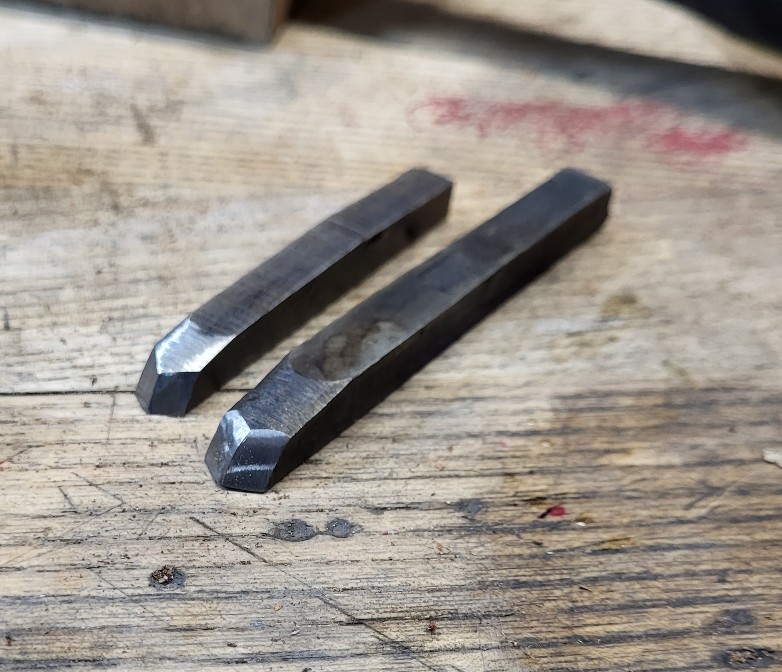
I don’t know that there’s much to read about making rasps. First is on the right, second on the left and third in the middle. They’re each a bit different but it’s safe to say I was still figuring out how to shape the gravers and what angle to hold them and how to not misstrike them and break the beak off on the curved side. A zillion tiny teeth sort of settled it at once. They’re hardened, and they work. And not reading a ton about it allows for finding what’s not so great.
The rasp on the right does have the tip bent upward to make handles – I wanted something more coarse than the gramercy version. it’s coarse. And I saw not long after that gramercy now sells a coarse version, too.
The one on the left with tiny teeth is great in hard woods, but they’re so close together that you have to stop once in a while and brush the junk out. The one in the middle is literally just a two sided coarse rasp for hogging. I’ll spare you my thoughts on the whole blogosphere telling people they should have a whole bunch of rasps aside from saying you shouldn’t have many if money is an issue and there are a whole lot of files that do the same thing as fine tooth rasps. Another irk, that this or that blogger who wants to be the source of information or who works for magazines and feels that it’s more important to convince you to buy tools than it is to give you good information – well, you know. “You have to have these, and a whole bunch of them”. you don’t. I’ll bet there are a lot of French rasps sitting around idle because some Pop Wood article or blog said people should unload $800 on them.
I think I’m mostly through this short experimentation phase…I left the varnish out of the discussion here. Maybe more on it another time. I think it’s worth doing if you’re interested, but it doesn’t need to be added here.