A break from the Nicholson talk. I’ve been trying varnish making beyond my first attempt 5 years ago. That varnish was just a pine/dammar resin combination to be used on a guitar. It was OK, but it lacked hardness which is a problem when used on a guitar. Simply put, with a long time inside a gig bag, the guitar took some imprinting from the bag liner.
At some point, I think varnish making is going to do rounds on the boutique scene, though I don’t know how many people will do it. It needs to be done outside, it’s somewhat unhealthful and potentially very dangerous if you do stupid things.
But what is it in general? With natural resin oil varnish making, it’s preparing (flax/linseed) oil and resin, cleaning the oil, if needed, to make it dry faster and then cooking both separately and then combining them. The oil and resin in a successful attempt bond together and you get something that has different properties than the parts.
Varnish is just a term people use. Almost everything that’s left on the market that’s a varnish is alkyd or modified tung oil with a bunch of solvents in. With new VOC rules, this gets less and less predictable as to healthfulness, and they’re stinky and generally designed for boats or something, anyway.
But even among natural resins, the variance is great. The pine and dammar resins are generally softer and make a varnish that isn’t that durable. At the far other end is amber -which you’ve probably seen sold to tourists in chunks where a bug is magically suspended in the middle. Amber is typically resin that has existed for a long time and is a fossil (or is it a semi-fossil?…whatever, it’s not something that dripped out of a tree ten years ago). Amber is hard, and can be tricky to make into a varnish because the point where it melts for the initial cook is at or sometimes above the temperature that it would burn.
What’s Copal then?
Copal is a group of resins, but fossil or Congo or Zanzibar copal is resins that are semi fossilized and also melt at a very high temperature – could be anything from 450-650F, and some that I’ve “run” (heated to cook out undesirable stuff before used) leaves bits behind that don’t melt at 650F.
But (semi-)fossil copal, unlike pine and dammar resin (and many others), makes a finish that’s much harder, and to my findings, indifferent to water in any reasonable period of time. It was stylish for a pretty long period of time up to the early 1900s because it makes a good varnish, frees the varnish makers from catching their varnish and themselves on fire with amber, and can be a lighter color. Some of us like finishes with a tone, but there was a time when harder darker resins left people grasping for what compromise to make to varnish light colored woods or to make pigmented varnishes of light colors. This is pretty easy to follow if you’ve ever used something light colored or mixed it and had it react and become dark. The best copal resin is lighter in color and if the process is gamed, can probably leave a very durable but relatively light colored varnish.
So, rather than paying my dues properly working all the way up, on my 6th batch of varnish (several others being just variations of one type), i just decided to do fossil copal – went great. And then I decided to do a second batch with some pieces of resin in the container that I got that looked dirtier, and I “smoked” that batch a bit. Smoked meaning that I wasn’t able to find the point where some of the resin would melt before it was just burned. Fortunately, most of the burned stuff seems to have fallen out as sediment and the varnish is still good, but the brief struggle with expensive resins wasn’t that pleasant.
I’m not encouraging anyone to make varnishes and take it lightly. Imagine you are dealing with a 650F resin or a 550-600F linseed oil that could (but shouldn’t) catch fire or splash, and the former is sticky, so aside from noxious high temperature cook fumes, you have the chance of getting serious burns. Or as George Wilson put it to me when he was trying to cook a type that’s somewhat reactive, and ignited it “creating a mushroom cloud” in your back yard.
However, if you’re really serious, this is something accessible and while it’s not that cheap to do in terms of the materials, the equipment to do it is pretty much used pots and pans dedicated to the use and a two-burner electric hot plate.
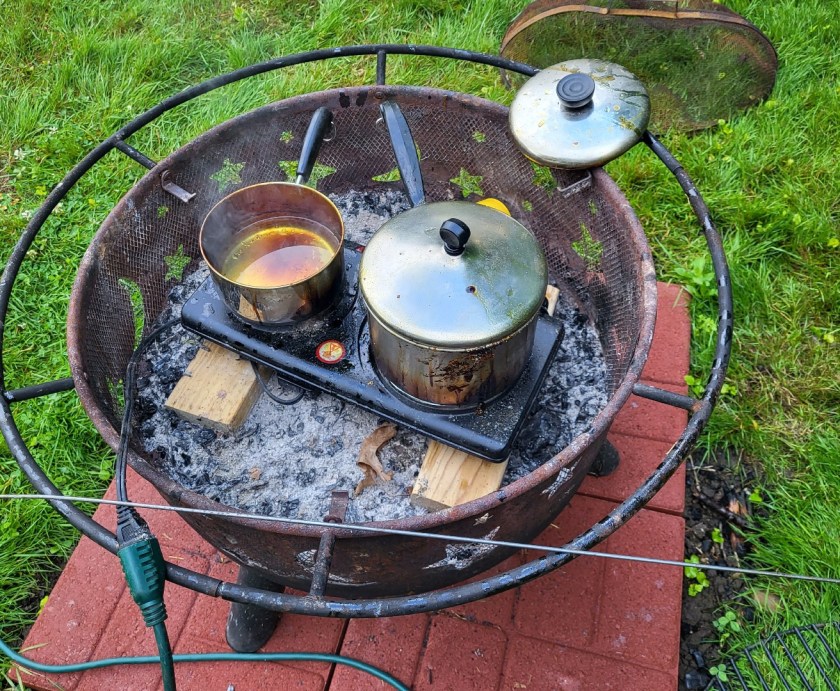
This is my setup – that’s it. Later, the varnish is strained when it cools, but on the left is a pot with oil in it. On the right is (not very instructive), copal from the second cruddy run trying to get hot enough to melt and cook out the impurities.
Here is what the better pieces of copal look like:
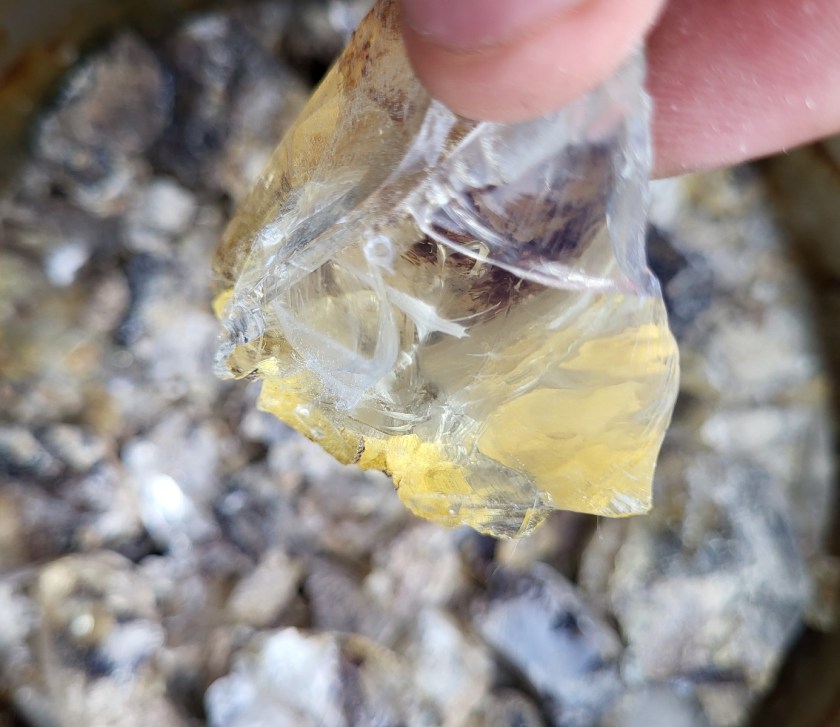
Probably about 20% of what I get in a bottle – and if you want to find this, all you have to do is search “Congo copal” on google. There’s only one supplier that I know of. Anyway, probably 20% of the congo copal is bright like this and then it varies after that with some of it having some clarity but dark coloring in it. In the old days when it was more plentiful, the various bits were most likely sorted to save all of the lighter bits for the highest paying customers.
The high temperature cook darkens it a little bit – but there is no way to avoid the high temperature cook with the harder resins, so it’s part of the process. Beyond that, once the oil and resin combine, the varnish is made better by extending the cook somewhat, which will further darken it.
Other than for maple (which I don’t care for too much other than for guitar necks or tops – color will be desirable there), I prefer some tone in finishes, and the tone matches the wood. The darker the wood, the darker the finish when choosing shellac. I’ve made too little varnish to have well formed thoughts.
But here is where copal varnish ends up:

This picture is the varnish after cook in the jar, and the jar has been leaned to the side so you can get a sense for the color.
This is what it ends up looking like on beech:

The line on this plane blank divides the better batch from the one that got burned/smoked a bit. This is just two very light padded coats, and the dark corner at the top can be ignored- the wood was dirty, and I scraped it while it was damp (picture of why below) – you’d not have that situation on a regular piece.
I had two test pieces drying in the sun get rained on, and to my surprise, even with a sheer finish, there is no evidence of water having been on the varnish – even though it’s only just initially dried and will continue to dry further over time.

note, the varnished part sheds rain. The bare wood below it definitely does not!
This is the same blank before padding the less desirable batch on the short end. The whole thing got left in the rain and other than some varnish that I may have had on my thumb (see the dry spot?), the wood otherwise just soaked in the rain. The thin coat of copal varnish was indifferent, and didn’t so much as degloss or blush at all.
To see how long this would last, I took another test piece later and put more water than this on that test sample and allowed the water to sit on the varnish until it had evaporated. Again, no evidence left.
Which brings me to the point of making varnish. I love shellac, but shellac isn’t durable in some situations where there’s a lot of hand contact or contact with water. I also can’t think of any cured finish that I’ve used outside of soft spar urethane (gross looking and too soft for a guitar – feels like a plastic case) that has this kind of water resistance. Not even some of the solvent urethanes or various common spray finishes used on commercial furniture.
Making a varnish for use gives the same option to have a warmer tone like shellac, but to have excellent long-term durability. And the resin and the finished varnish have unlimited life on the shelf. There are no driers in these varnishes, though they could be added if something needs to be hard in a day. Otherwise, UV light or longer term exposure to oxygen will cure the finish without any dryers. Making the varnish without eliminates the constant battle you hear people talk about with skinned over commercial varnishes.
Where can you Read About Varnish Making?
There’s a ton of talk on violin boards about making varnishes, but the varnish made for violins isn’t of great use for furniture or cabinets. You can find older texts in the public domain on archive.org or google books or just by searching google. Holtzapffel Turning and Mechanical Manipulation and another text called “German American Varnish Making” come to mind. These describe a relatively commercial process, but there are recipes in the books and enough to start to understand how interesting and broad this trade once was.
I’m not ever going to describe the trials and tribulations in great detail – if it’s something you want to do, you’re better off reading older texts. Just know that the descriptions of using jacketed vessels or open fires or cooking 10-100 gallons at a time are all not going to apply. You’ll be trying this in stainless, cast iron or enameled cast iron pots – the last being the best.
And once again, if you live in an apartment or don’t have somewhere to cook this away from your house and in an area where you can tolerate fire and really stinky smoke, don’t even think about it.
One more thing (Columbo reference)
It’s not cheap – the solvent of choice to add during the cook and thin later is true pine turpentine. There is diamond G in the US or a good quality of pine turpentine that can be gotten on ebay from Portugal a little cheaper. You can make varnish with less good materials – that would be your choice. I wouldn’t bother.
To make the copal batches cost a little bit more than waterlox gloss would cost in quarts when you compare the actual solids content from one to the next. I figure the brown quart jar in the picture cost about $65-$70, but the varnish is also about 65% solids or more, so a quart will go a very long way compared to most commercial finishes. In the case of guitars, it would be enough to finis several high quality guitars, and suddenly, the cost doesn’t seem so high in that context. Could very well be enough in one quart to seal a whole set of kitchen cabinets and pad on a sheer (but very durable) top coat just with one quart, too.
Other resins are much cheaper and can make suitable varnishes, though unfortunately, my initial impression is that the fossil copals really do live up to the glowing comments in older texts about durability and ability to take a high polish.
