Poorly Sawn Wood – Dealing With It

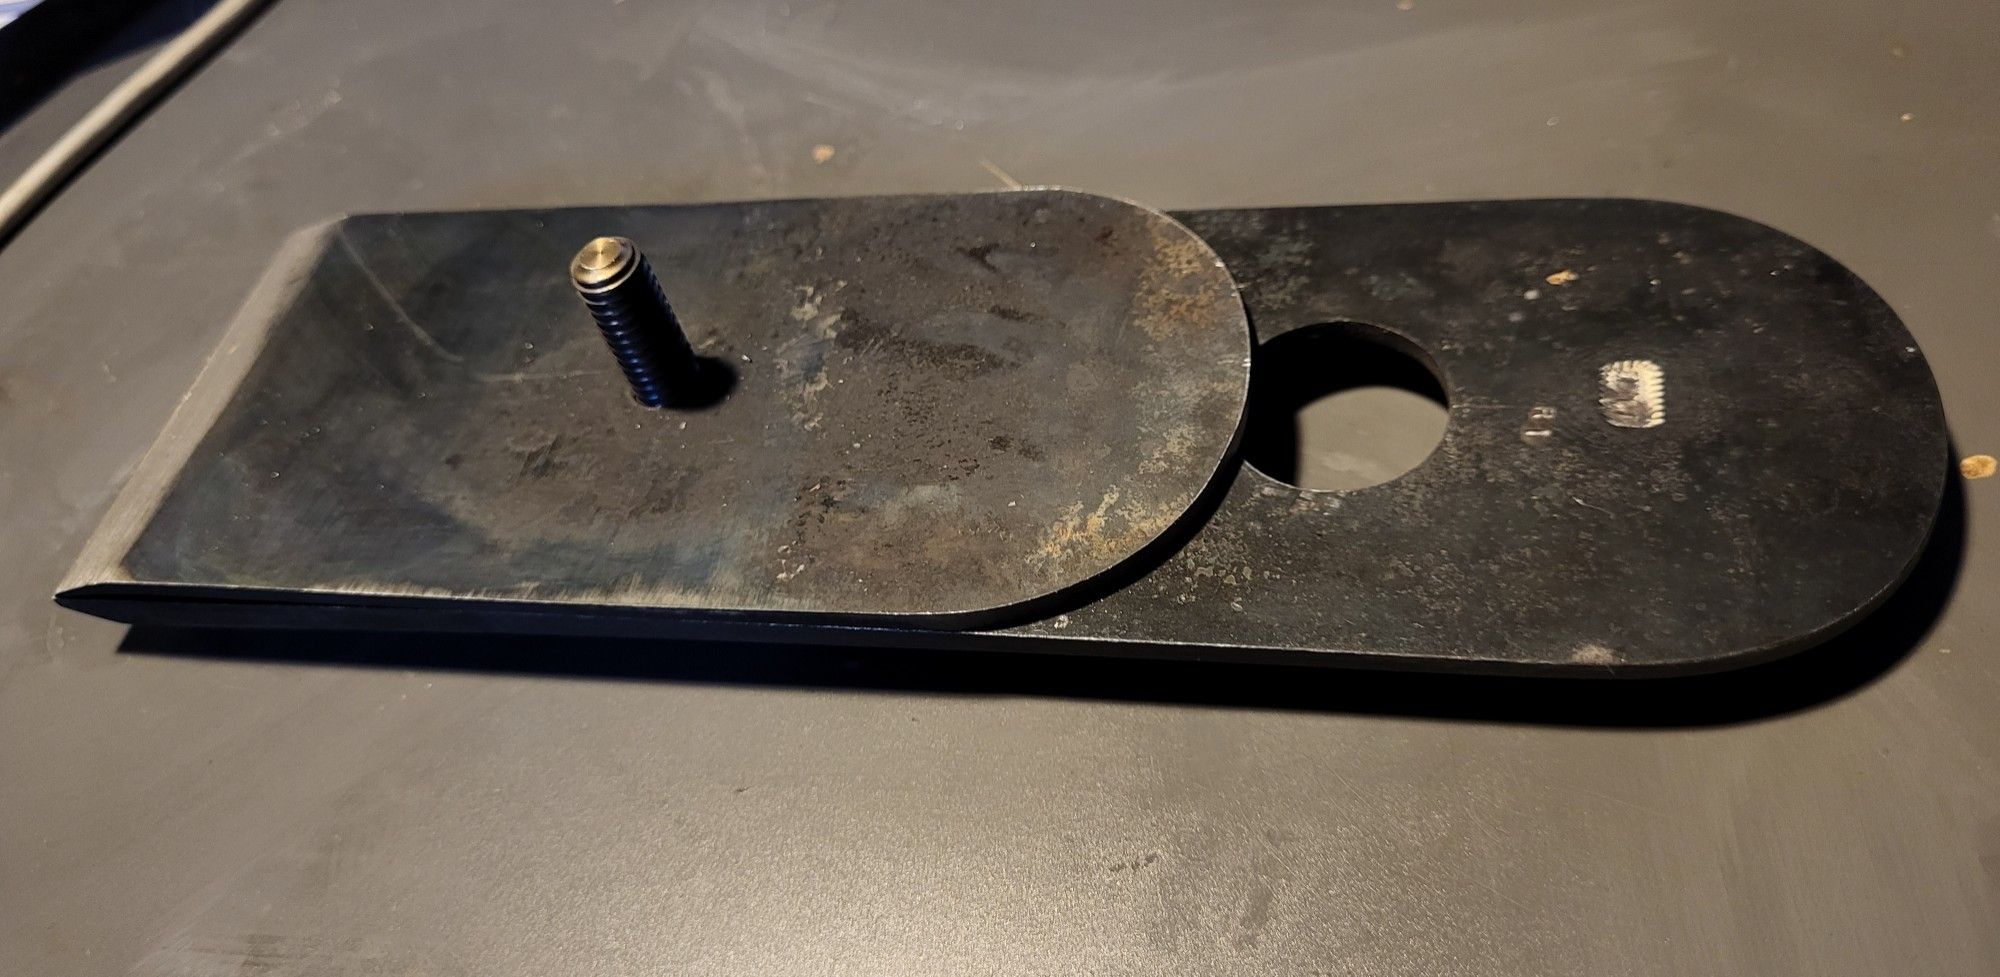
I set out to make a handle for the rosewood plane, and of course, you wouldn’t want the handle to be pine. I have some nice rosewood that’s 8/4 quartered, but it really should be saved to be resawn for a guitar top or acoustic guitar backs – which is what it’s for. I thought I had a pile of 8x8x3 and 6x6x3 blanks, but I don’t. I have a couple.

Over the years, I’ve tied to buy quartered and rift blanks when I see them because they give you a lot more options than one with the typical flatsawn C pattern in the ends. When a handle has wood that shows evidence of that, it looks weird. My best choice is this:

I have a terrible habit of getting a few blanks and then one is like this. What can you do with it? it’s a bummer as it’s sawn off center two ways and if you get obsessed with a 6x3x3 blank like this trying to get every cent out of it, the work suffers. I guess something like this with shipping and tax is about $50, but you can’t just go order 10 because stock pictures mean you’ll get all kinds of nonsense when you want quartered or rift.

I’m growing up a little and instead of procrastinating, the real answer for this is I hope to make stuff nice enough that I can have some waste from resawing this kind of thing into the right orientation and the rest of it be damned. If I spend 15 hours on this rosewood plane and try to save $25, and then don’t like the way the handle looks, it’s not a good decision. I guess that becomes the challenge – if the wood is too nice to waste, but still not good enough, make the work nice enough that you will want to make the wood right.

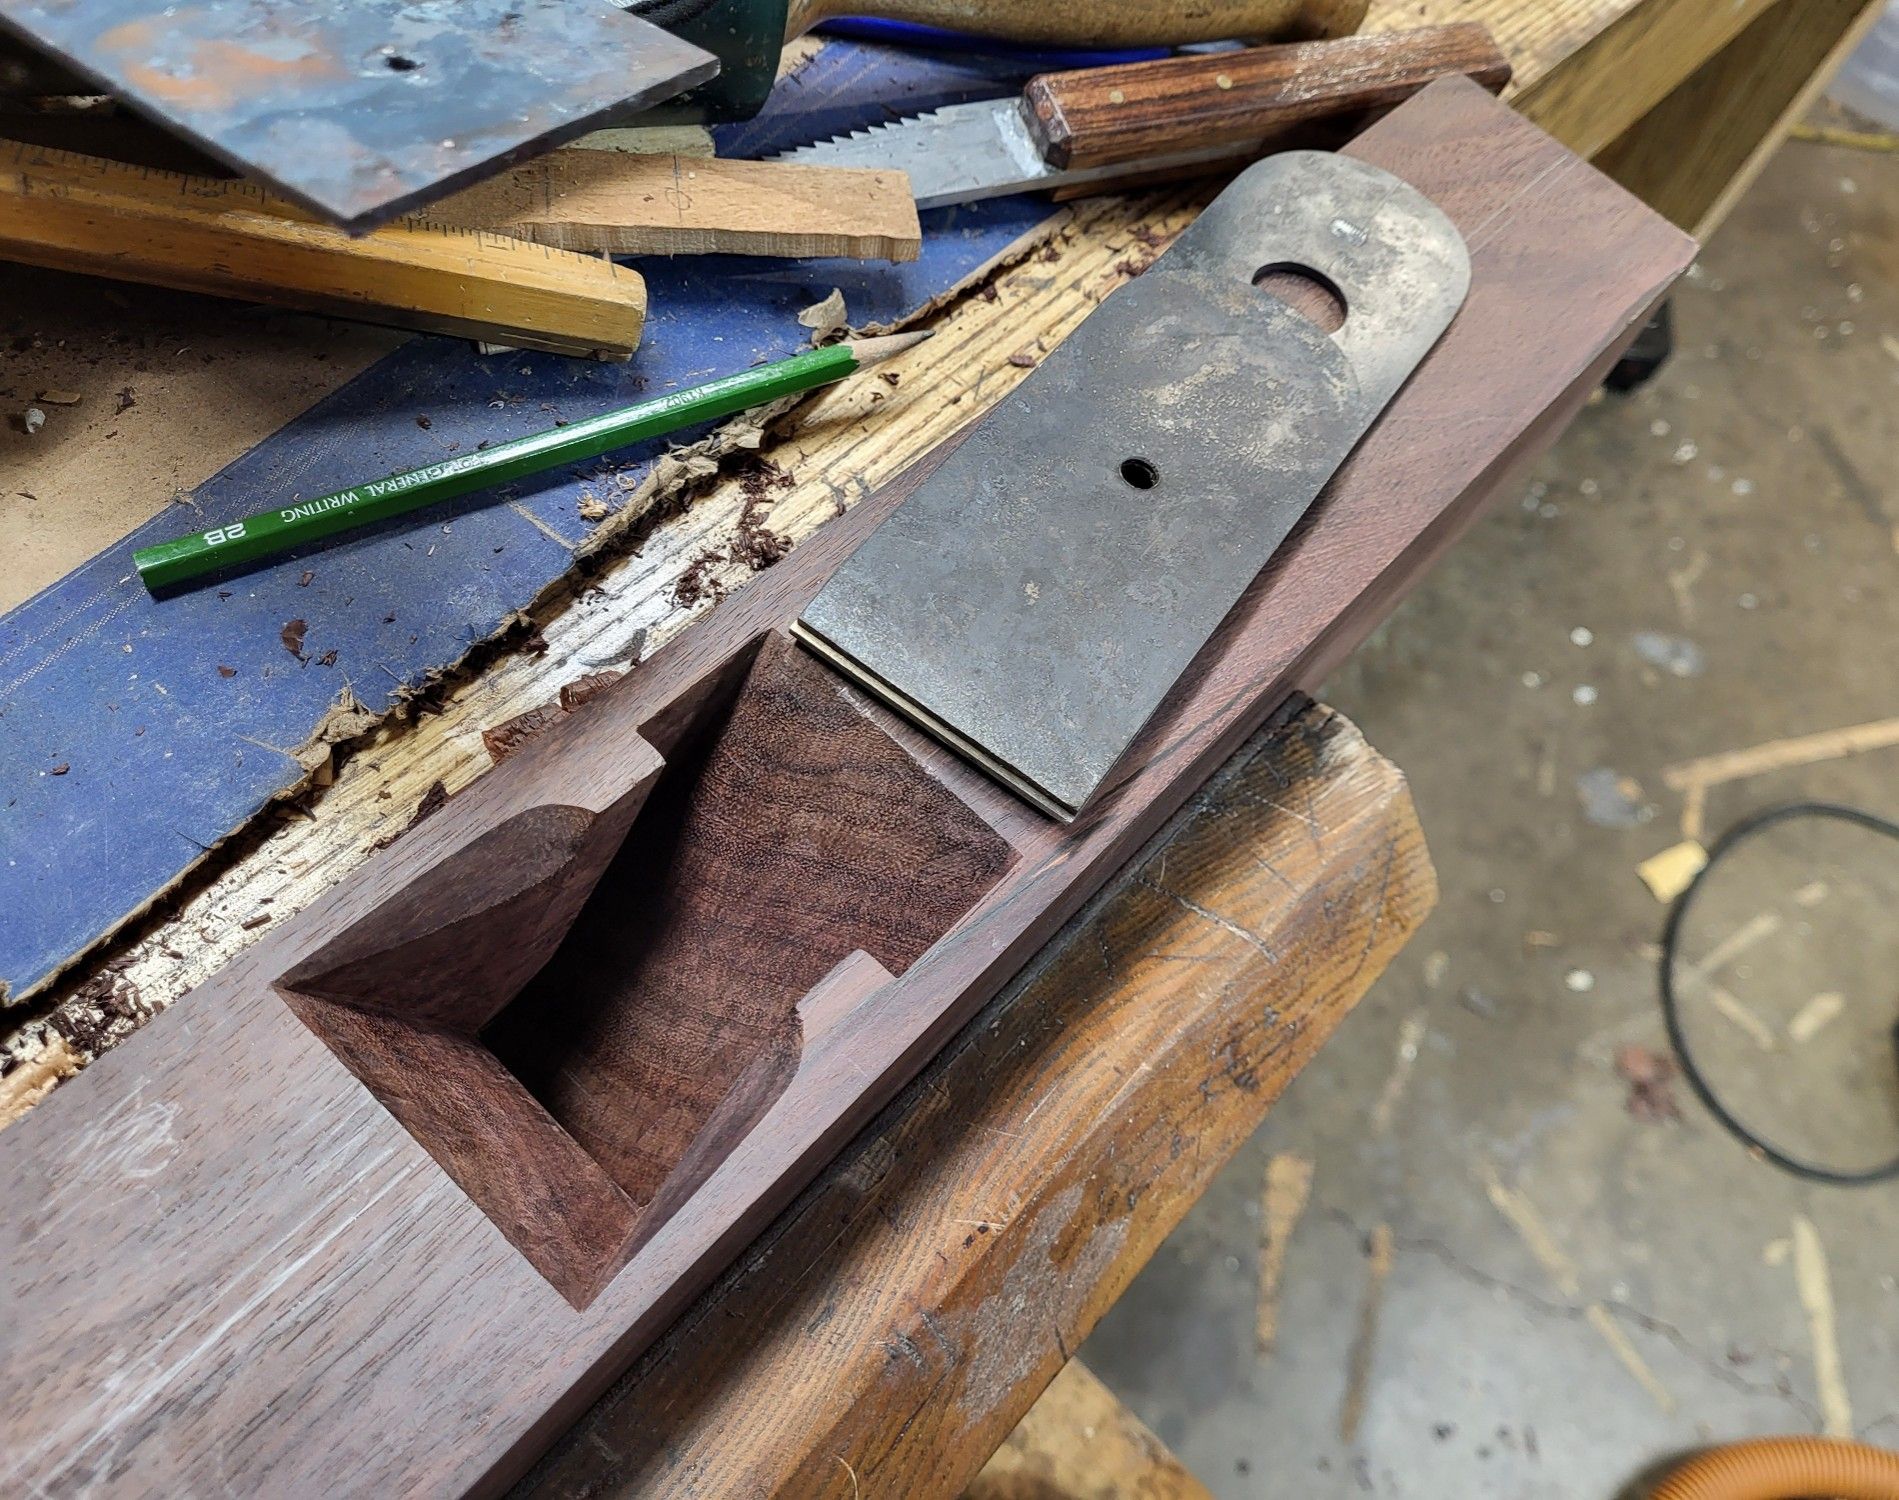
You can see pencil marks on both the sides and the top. Ultimately, I don’t have much for power tools any longer, though I do have a nice big dolmar chainsaw!! Unfortunately, this isn’t big enough for that. so by hand it is, which is good, because it’s what I want – I want to cut the wood, feel what it’s like, get a chance to look at it. My brain is slow and because of that, my work by hand is better than work that I used to do with machines. The opposite of what most people will tell you will happen.

This is especially true shaping the handle. I have a sort of routine, but it is not end to end step by step with lots of repetition. If I were to try to speed up handle making with power tools, it would result in errors or chipouts, etc, or just not enough time to look at what I’m doing – and my eye is pretty good for a hack, but it’s not good enough to look at something briefly and just slash wood away.

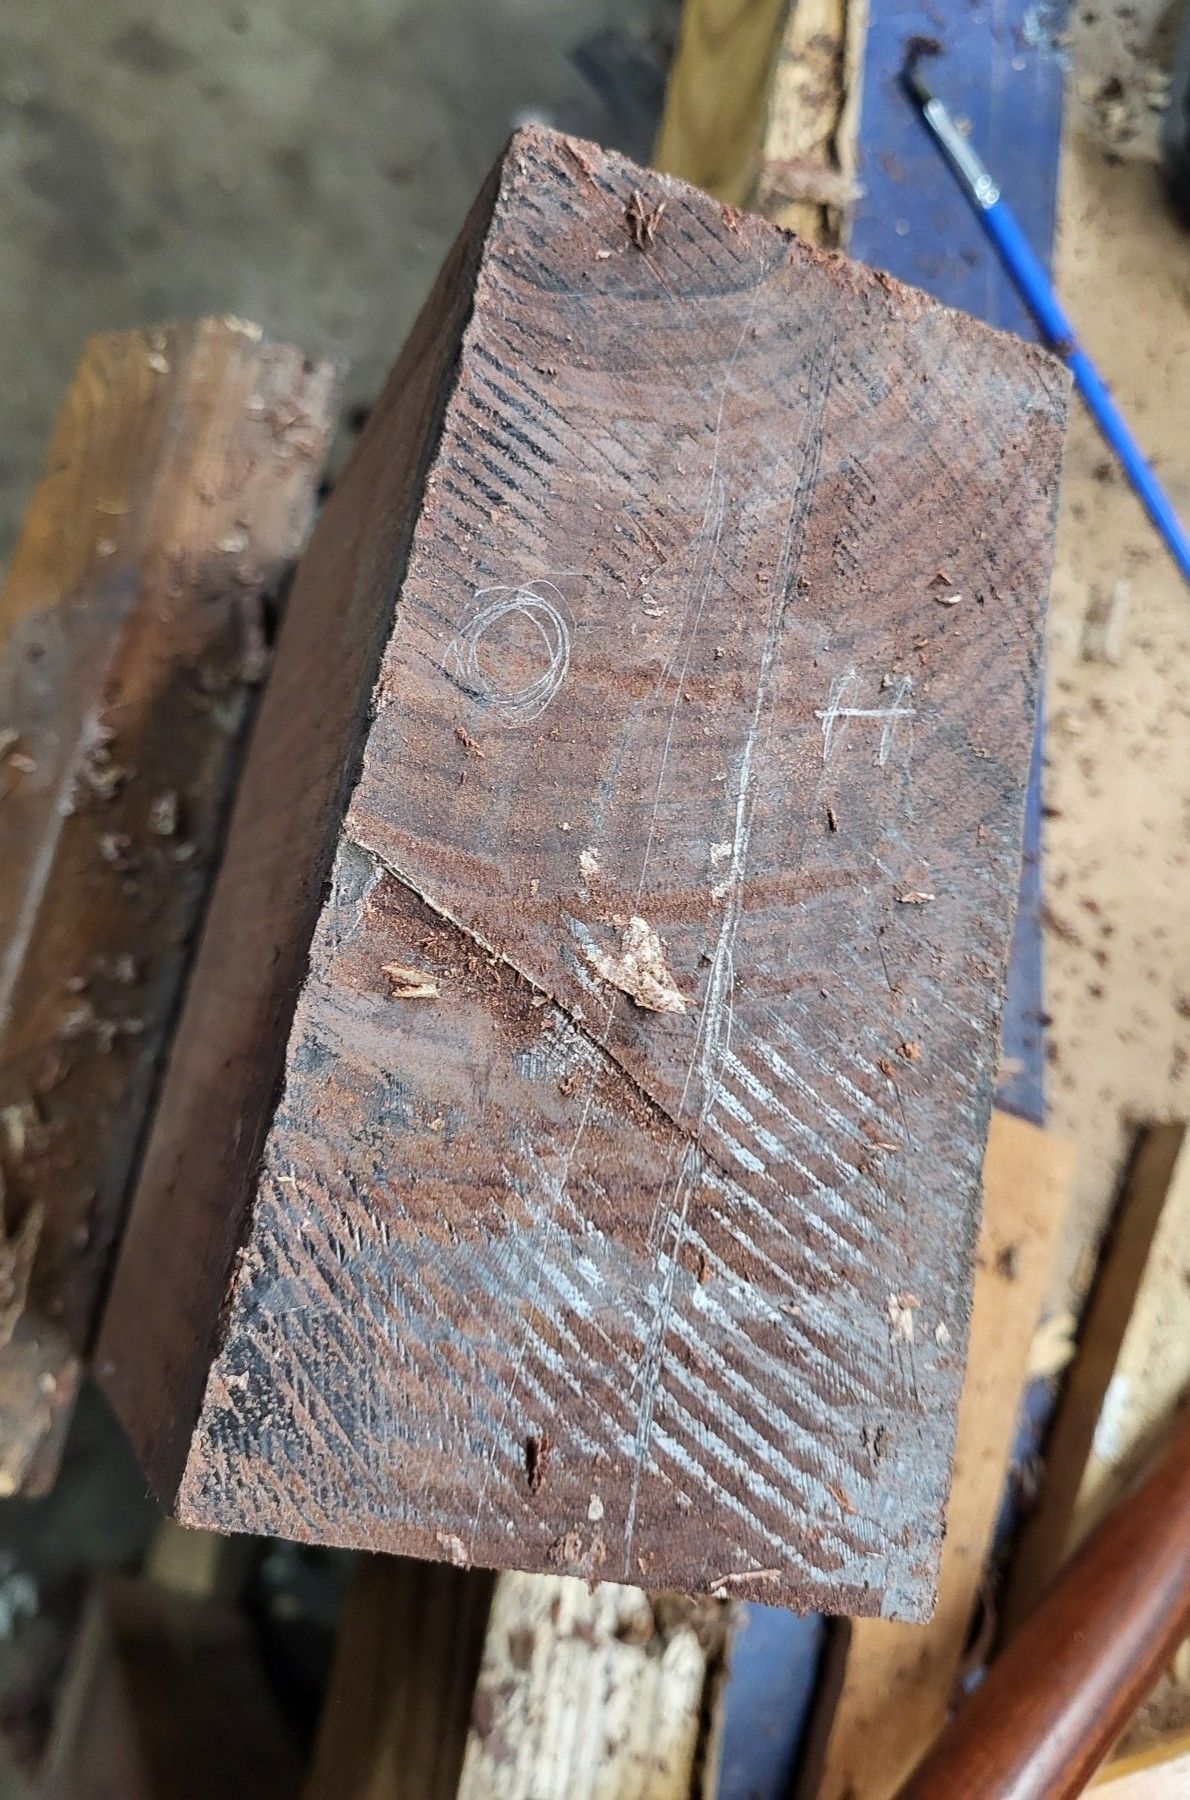
Now…the ends of this leave some decisions. The top left corner is near the pith. that side of the blank is closer to the center of the tree so it doesn’t have grain running vertical into the top of the handle. The wood on the right does.

I have no idea what I meant with the O and the H when I marked this, but I want the wood with the O to be on the back of the handle. Of course, this runs out into the side of the plane quickly, so it’s the right side that gets kept here. The trade is on the other end of the blank, the wood that’s visually nicer and getting cut off here is what’s kept on that side – so the far face on the ends is the back of the handle.

It does take about 20 minutes of hand sawing something like this with a rip saw to get what you want, but it gives me time to consider. If I had a bandsaw, what would it take? Not long, but dealing with dust and changing blades, etc, isn’t time free and at least doing it by hand, I’m working the wood the whole time.

Contrary to popular belief, a normal disston d8 rip set up for anything else cuts this just fine.

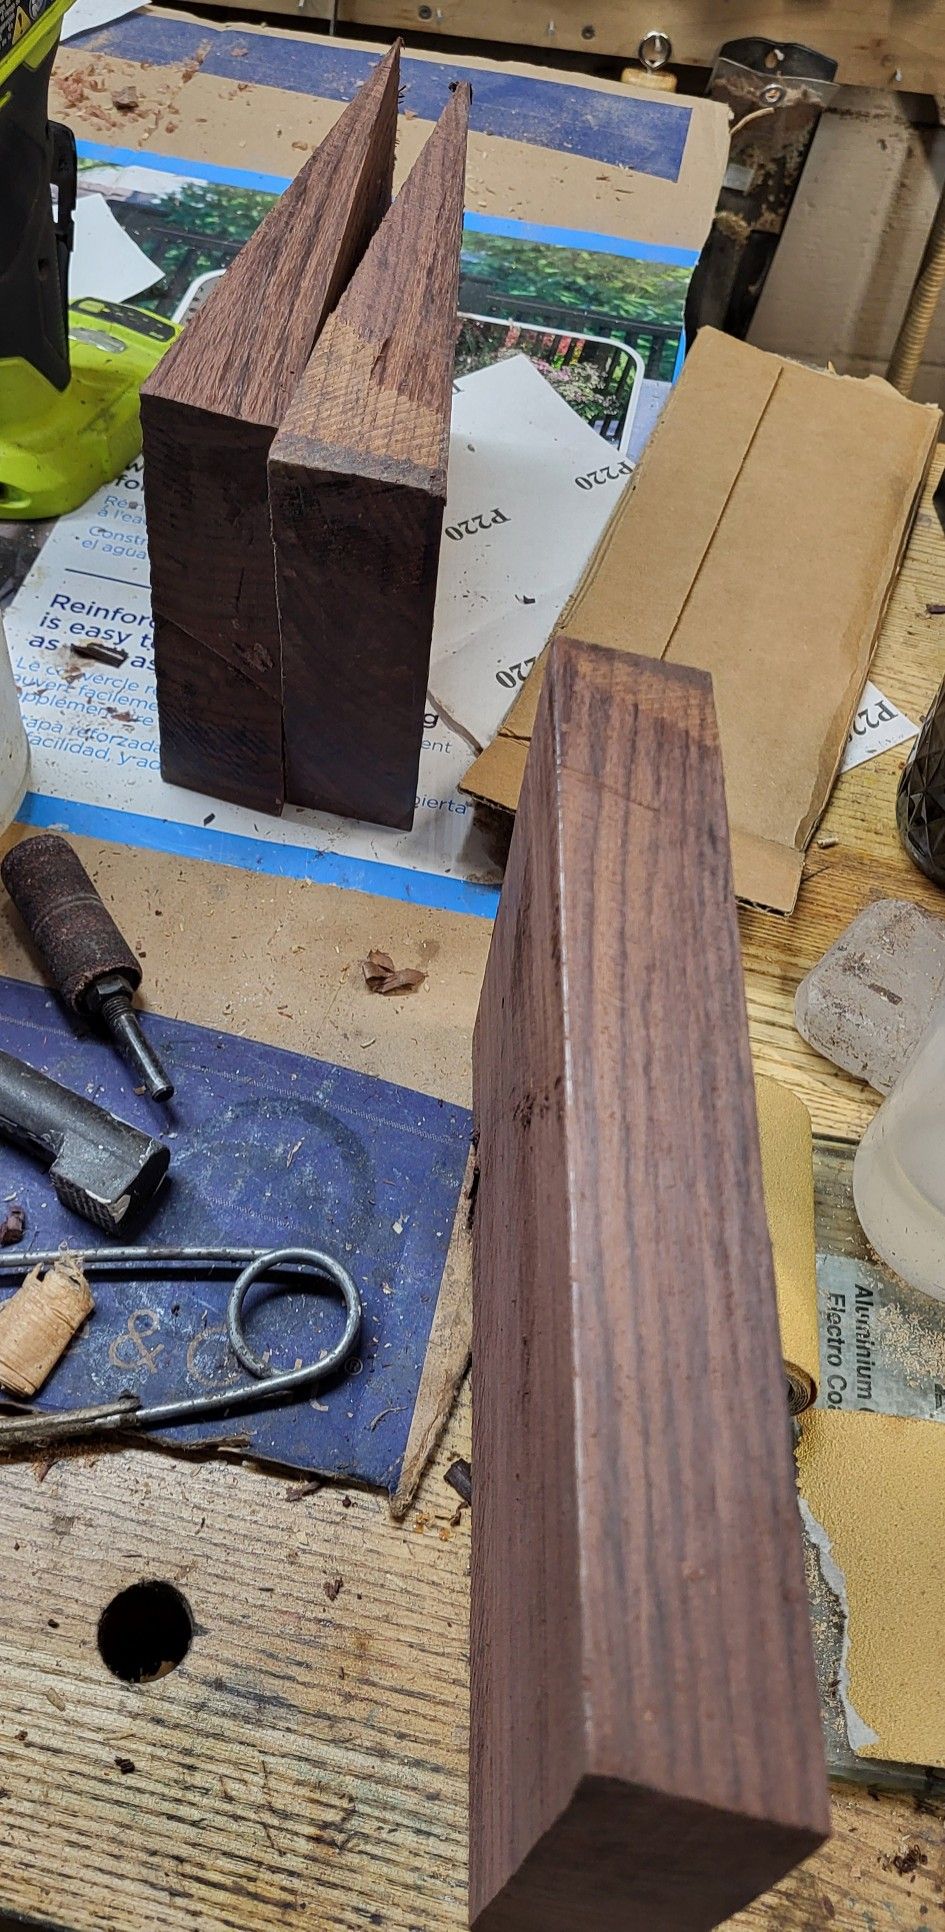
I have two thin wedges from the top and bottom not in the picture and the other two shown here. there may be a use for them at some point and if there isn’t, they can go in the scrap bin. The thin ones are ideal for ripping long boards by hand. hard wood with a really slight taper that will hold boards open, so I put them with the handsawing gadgetry just for that.

I left this a little fat – a little less than a quarter just to make sure there are no surprises, planed it and squared off the ends so that they wouldn’t be a bear with bench dogs, and then thicknessed it with a jack plane and smoother.

Resawing something like this can be a little awkward, but you can figure it out. Black rubber drawer liner – the holey kind, not the thin slick stuff – is nice for something like this as the wood is hard enough that it’ll be slick on a bench top and you’ll be whacking the holdfasts endlessly.

I always print out the handle profile I want, which is always a picture from straight on either as found or in this case, I took it from a plane on my shelves.

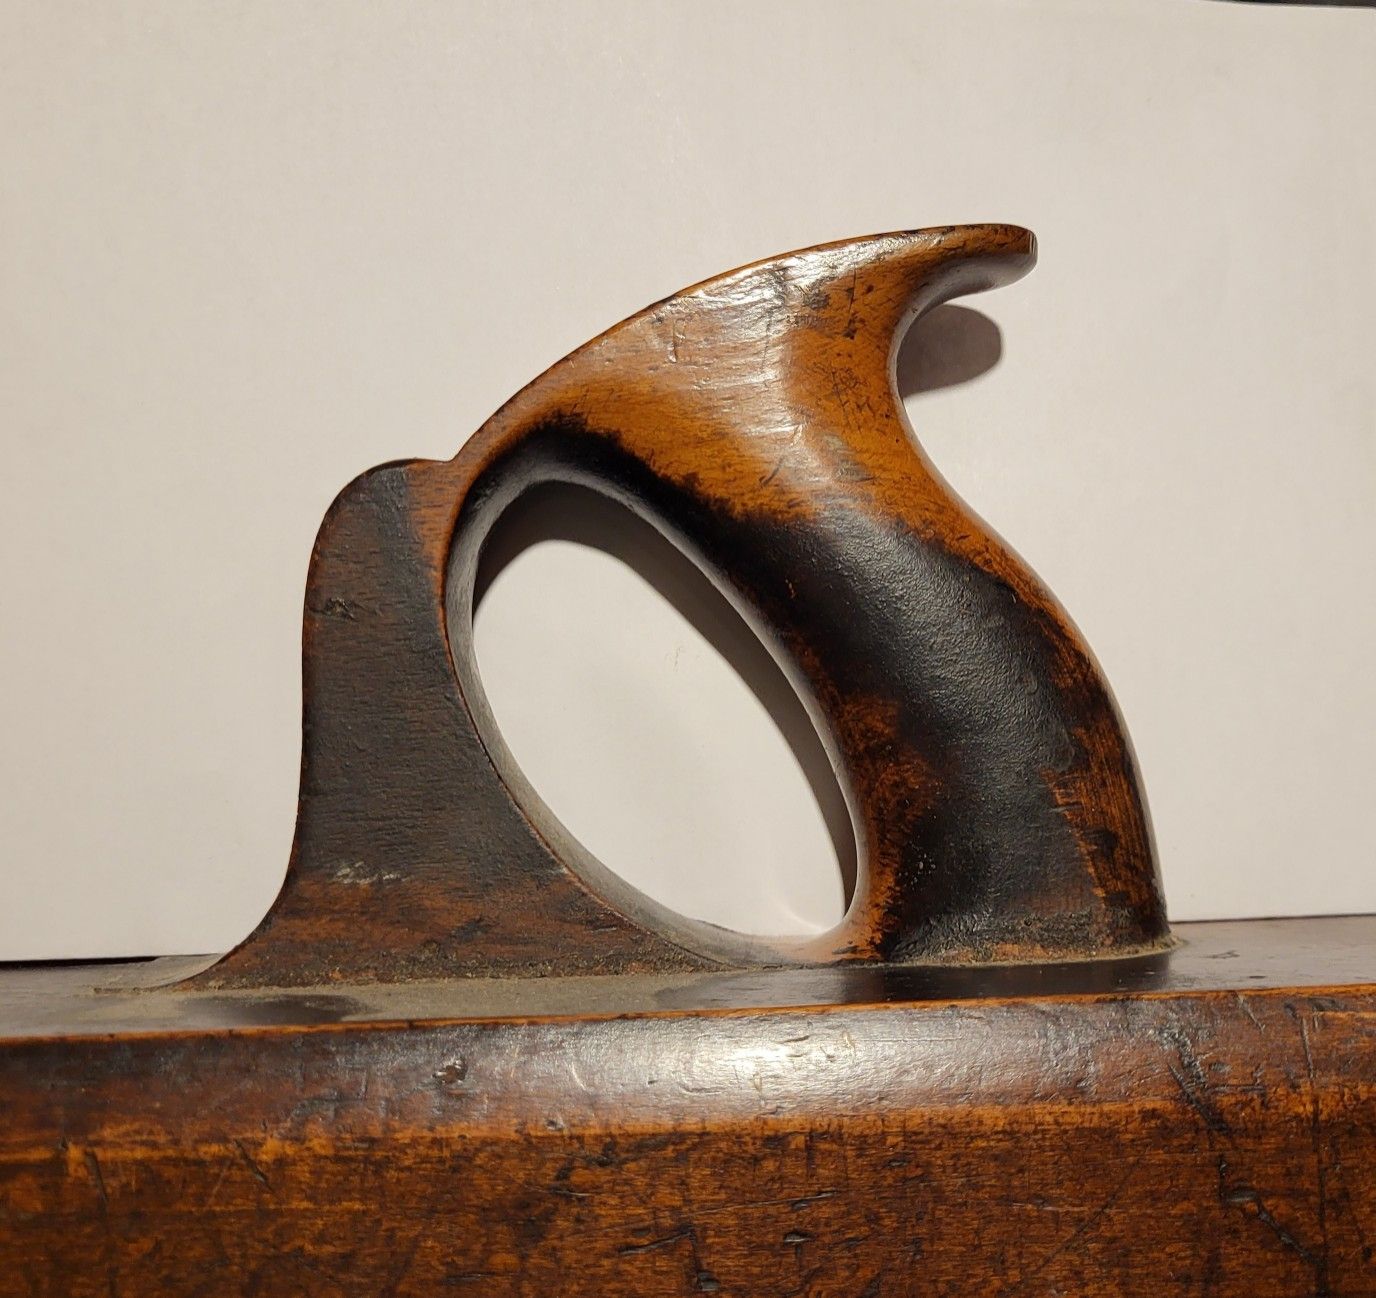
to get the right size, I handle a plane like this – surprisingly it fits my hand, which is kind of narrow – 3.5-3 5/8″ across the knuckles. it’s a snug fit and someone with a larger hand would have to work with a finger or two over the side of the plane. In this case, it’s about 3.7″ to the top of the horn. I want 4 1/8″, just by experience.

Anyway, I use windows paint, print the picture as a % of size as a guess (i guessed 50% in this case, just eyeball it with print preview) and then measure the result. From there, you can adjust the 50% by ratio and hit the mark right on the dot with a second printout, and then you can save the picture with the size and % print scale and not have to do it again in the future. For example, 56% in this case makes a handle 4 1/8. If I get some big handed oaf who wants a plane and likes the handle but it needs to be 4 5/8, then 4.625/4.125 * 0.56 = about 0.63.

I affix the picture of the handle by making it wet with water base finish. it stays on better than glue dries pretty fast and doesn’t have much penetration. if you don’t get the picture to stick right away on the wood blank, you can just brush a little more finish on top of the picture-it’ll go through the paper and contact the wood without issue.

After a few strokes of some tools, and then filing and a little scraping, we arrive here. The level of finish isn’t perfect, but it’s about where I stop with handles on planes that will be used. I’ll probably correct just a little more. No power saws, no routers, no sandpaper, and so on – just something that’s to make by hand, and again with my level of infrequency, things appear slowly enough working by hand that you don’t end up wasting the wood.

I see things that could be better in terms of lines without being stupid. Stupid is a really long flat horn that comes out almost to a point. It serves no purpose but to be broken later. But I also have left the horn a little fat because the break rate at my mailing address for horn tips – for no good reason but carelessness – is a little high.

By the time I’m done with this handle, there’s about 3 hours of work in it. I know that’s garish to some people. I stopped trying to be a factory long ago, and because of that, the work was really pleasant to do. In the end, I’m glad that the wood isn’t just running out in weird directions all over the handle, even if it may not have broken from being made like that.

Mortise Chisels – 1.25% Carbon Steel

I’ve dabbled with making mortise chisels off and on the last two years. Pardon if I end up repeating anything I’ve already said on here, but before even getting into it, what makes a good mortise chisel?

  1. Proportions – they need to be good both for feel in terms of chisel length and stiffness in the right place, and the height needs to match the purpose. Really tall mortise chisels rotate laterally pretty far and don’t do well in short or shallow mortises, for example.
  2. Toughness vs. Hardness as well as edge stability. We’re dealing with mortise cutting, not paring, but you will find pretty quickly that if you can get a steel that has good toughness at high hardness, the edge will hold up better. Not worse.
  3. Taper – part of proportions, but the taper needs to be something that helps the performance of the chisel , doesn’t create a bind by getting less tapered moving toward the bolster, and it can’t be so much that the chisel rotates too easily in the cut or is narrow at the top. Narrow just results in you bruising the ends of mortises. Interestingly, other than that, there is no magic level of taper. I can’t find anything to suggest that and a look at some similar ward and payne mortise chisels to the ones in this post shows that W&P at some point in the early to mid 1900s, applied all of the taper to one side of the chisel and the other was square. In practice, you end up with the taper even and the bottom isn’t square to it. it doesn’t seem to matter, but I’m looking to apply it to both sides of the chisel for looks and would prefer that.

To-date, I’ve made mortise chisels of O1, W1 and 52100. They’re all “good enough”, but it’d be nice to have better. The problem is, my better is 26c3 and probably 125cr1. Translated to english, these are water hardening 1.25% carbon steels. One is remelted (26c3) and the other is not – so in theory and probably in practice, not quite as uniform. Remelting also removes sulfur, which creates a problem called sulfide inclusions or stringers in steel that lower toughness. My recollection is the higher the carbon, the bigger the problem this is. Both of these steels from the suppliers I buy from have sulfur at .001%.

For reasons I don’t know, my 26c3 samples test better than the furnace schedule results say they should. That is, my samples in 26c3 were well harder than O1, but tougher (harder to break laterally). They actually have toughness numbers above anything I’ve seen for A2 and 52100. Of the chisels I’ve forged out of round bar, I guess they’re all fine but 52100 seems to be slightly better. A2 obviously isn’t on my radar, but it has nothing to offer here, anyway.

Not being able to get the 1.25% carbon steels in anything but flat stock of 3/8″ or less is limiting, though. There are other options (sourcing enormous old square files), but the steel would be questionable in terms of how clean and composition, and surprise, when you buy all of the 7/8″ square good files off of ebay, nothing in the money-makes-sense range reappears quickly.

125cr1 It Is

I can get 26c3 in stock up to 0.25″ and 125cr1 in 3/8ths Which means I can make mortise chisels up to 1/4″ in one and 3/8ths in the other. that make the decision pretty easy. I think it’s not hard to find a use for 1/4″ and 5/16″ mortise chisels in cabinet work. 3/8ths is also useful, but less so to me at least on door and face sticking. It looked like one of those cargo airplanes with the nose open, facing straight up. Snap.

the toughness data suggests that shouldn’t happen for my stuff, but you still wonder if you make something hard will it break. It’s a reasonable bias.

So, I made two. It’s not important other than to note – the uniformity of 26c3 does make it a little easier to heat treat. As in, it seems to land at the same hardness without as much heat as 125cr1, but there’s still plenty of wiggle room to get a good result. I would figure given the choice, I’d rather have 3/8ths in 26c3 because once you get to a bigger cross section and a steel that needs to be quenched quickly, you are apply cold liquid to the outside of the chisel (OK physics people, the heat is flowing from the chisel into the quenchant), and the center of the chisel is still providing heat until it finally finds a cold adjacent neighbor to travel into and then out. This is what causes some thick cross sections to not harder, or in other cases to be shallow.

I’m fairly sure when we get to 1/4″ thick irons and 3/8this mortise chisels, we’ll be conceding a point of hardness, and maybe that’s not unfavorable if it means some toughness retention.

I ended up with these – and aside from all of the above, the complication is added here that I need to forge on a bolster as I don’t have a round bar to work from to just draw out the steel on both sides of what will become an integral bolster. For whatever reason, this turned out to be harder than I expected as the forged on bolster absorbed the current from the induction forge and the tang of the chisel didn’t get much. That’s kind of a pain, but we’ll figure something out so it’s not quite as dicey as it was here.

If I have to think about anything, the first one always comes out wonky. the short one in the back has a very long tang, as I was fighting the bolster, I drove it on a little too far, then forge welded it on and then checked to see if it was in the right place. Nope, it isn’t. Not grinding it off and doing it over on a test chisel.

The one in the front is going in the mail later this week. As I suspected, the first one is fine for my use and the second is what I wish the first one would’ve turned out like. So be it. I also got a box of carpenter pencils in the mail, so there’s no ulterior motive other than that was the cleanest spot on the whole bench at the time, and I step on carpenter pencils all the time and cannot have one or three around or it will be none very soon.

These chisels are both 63 hardness after a pretty good double temper session at 400-410F, and they did come out of the quench 1 1/2 points lower than I’d have expected on a thin chisel. The compromise seems to be fine. The edge is more stable than I’ve had on a mortise chisel of any kind, and I’m sure they could be broken, but they won’t be broken in reasonable use.

I still would rather draw them out from round rod – the two ways take about the same amount of time, and forging is more pleasant than fighting differential heating with the bolster and the chisel, let alone getting out a brazing torch to heat the junction point.

I have cut a dozen mortises with the dumpy chisel in the back of the picture. Works great. The front chisel is just all around nicer. The handle is gombeira and the varnish is a slightly long oil amber varnish.

This one hasn’t hit wood yet, but the snapped sample of grain off of the tip looked good under a scope. It’d be surprise if it was bad. And unlike 52100, it is not on the edge of being a couple of points softer and suffering due to too much toughness.

I do kind of wonder if hand tool woodworking had held on, and by that, I mean to keep the legitimate toolmakers in the past working – what we have now is a bunch of subcontract it all and CNC follow – ons, it’s not the same – would we have seen offerings in steel like this? It would be difficult to do the same thing as i’m doing with an electric or gas heat treat oven, but i’m sure it could be done by induction in a production environment or salt bath.

There’s some second guessing in that statement, too. As in, if I’m perceiving better results with these two 1.25% carbon steels, why does it not appear in anything but razors and files historically?

Plenty of Time to Left…

…to screw this up.

So, what is it? Obviously, it’s a plane. At one point, I thought I might make a lot of planes, and compared to the average woodworker, I’ve made a lot. Especially if usability counts. As in, I know a lot of people make an LV kit or a krenov plane or something, but I doubt they see 1000 board feet of wood and 100 sharpenings. I made those, too, they were just single iron more classic style planes out of whatever I had around and I ended up throwing them away.

Because of the whole chisel thing, I usually will buy turning blanks when they are a good deal. Last couple of years, I found 3x3x18 Indian Rosewood blanks for $40 if you bought 3. About half were dead straight and the other have weren’t. I couldn’t understand how they could sell blanks that cheaply, and the last time I looked, their website returns nothing. too bad.

this blank is straight in parts, but other parts not. I don’t make push chisels, so the wood really has to be used for something else. Really, you’d want a dead straight or certain specific biases to make a plane, but these blanks will be used as their fitness will allow. This one is probably good enough for an 18″ plane. By the time you square them, they could take about a 2.3″ iron. I’d love something slightly larger, but that’s what’s there.

So I’ll end up with a weirdo plane that’s 2.25″ wide iron, just over 18″ long and with a closed handle as I don’t need a jack plane. Too, I wouldn’t want a try plane made of rosewood, so this gets relegated to making a pair of smoothers (will do that with another one) or in this case, something that seems like it might have limited usefulness. A plane that can be used on harder woods when a 2 1/2″ try plane just beats the shit out of you. And if you have hardwoods with runout, it takes a lineman to do that with the same ease I’d do with straight wood. So that’s the point of this one.

The other point is to use some of my tools to make tools that I’ll use or that someone else might. I need to make a bathroom vanity and rather than being smart and buying one that’s on sale, i’ll make one out of solid wood instead, and varnish it.

Iron and Cap Iron

The other thing at play here is I’ve learned over the years to make stuff out of metal. Early on, Larry Williams told me basically that without spending $3k, I’d not be able to make a tapered iron worth having. He wasn’t saying that to be mean, he was saying it because that was his experience and his lens was making an iron like the blanks that LN sells – the moulding plane blanks at that time.

So many people told me that you can’t heat treat hand and eye that I’ve lost count.

Both of those made me want to figure out how to do them and then get good results that meet my goal. Which isn’t “i have to be better than everyone” or any of that kind of chest thumping, it’s to make something that isn’t obviously amateur done. When you use or sharpen an iron that I make, it shouldn’t have faults and you shouldn’t immediately think “well, it’s decent for an amateur”.

I’ve gotten to the point that I can taper a full sized plane iron like this one with a belt grinder and contact wheel accurately, make the back slightly hollow like the old ones and hammer out any straightness issues along the way (so forget a clean surface ground type look) in about 20 minutes. All told, the pair here took about 1 1/2 hours from bar stock to a little further along than the final result *and* I still need to buy the screw, so I can’t quite say I made everything in the whole plane. I’ll think about doing that another time as I can’t think of an efficient way to make a screw without a lathe, but I can think of a way to do it grinding down round bar.

This is the shop made pair. The screw needs to have length cut from it, obviously, and I need to do some aesthetic things. With the oxide left on, I don’t need to consider grinding out all of the little hammer marks from adjustment – that part is nice, and I don’t think it looks bad. The carnauba wax stuck in the maker’s mark might be!, and the business end of the cap iron needs about five or ten minutes of bulk filing to get the final shape set, but we’ll get there.

This whole process also gave me the chance to harden the cap iron, which I like, but in sampling my planes, is only seen a small % of the time on older english stuff. As in, it probably doesn’t matter or it would’ve been done, but it costs me nothing more than five minutes of time with an induction forge and then a torch to blue the iron to spring, so I’m going to do it.

When this is done, if I don’t screw it up between then and now, I should have exactly what i’m looking for. The iron is 63 hardness 1.25% carbon steel, or maybe half a point harder, which is nice, and I’ll have a handle that I like and I think the wedge probably will be walnut just to start as it’s softer, won’t stand out too much and will have a little more give and grip.

Sometimes, it’s nice to make something just because the materials are on hand and it puts accumulated past experience to use. I think not enough of that is emphasized in the hobby – make something ten or 30 times instead of 1 so that you can do it better than you feel like your talent will allow. I don’t have that much talent compared to real makers, but you don’t have to make something unparalleled to be able to at least call it nice work. My work comes up short of fine, but “nice” is good enough.