If you see a post like you may have yesterday, please navigate to somewhere or do whatever is easiest to let me know.
What am I referring to? WordPress added an option, I guess, to allow the Schwarzs, Numbs and the Wrights and whoever else to just wring a little bit more out of everyone. If you know me, you know I *hate* that mentality.
It created another radio button to click at the end of creating the post, and will with this one, to get people like me to perhaps think about limiting posts to paying subscribers only, and of course, that would lead to setting up some kind of payment system. Who knows, maybe WordPress would get a cut of that.
I’m fairly sure more than one person got notification of a post and then got to the front page to see a bogus message that “this post is for subscribers only”, even if you were a subscriber. I got the same message and then someone sent me an email to let me know it was there. I fixed it. Now there are three options – and I think this tailored nonsense to divide the haves and the have nots is a real pain in the cheeks. It reminds me of a Ron White joke “Let me tell you what I’m looking for in a tree”.
Whatever the case, if I ever do sell something, it will be tools, but at this point, i don’t do that. Ron White’s looking for a tree that shows that it’s alive by having leaves. I’m just looking to pay the annual cost to have a site and then post messages that are readable by everyone. Period.
This could lead to some kind of longer discussion, because I can never leave anything alone, but it does remind me of the VHS era to DVD era and such where folks who didn’t have a full book of work would supplement income. I think they probably haven’t adapted that well to the youtube and other era where the Wrights and the Numbs pretend to be accomplished (that’s funny) and the wringing is done by sponsorships, patreon or revenue reference links and pretending that somehow the topic is of interest for some reason other than to create this multi-faceted “up yours” hands out mentality that we used to call e-begging. That leaves behind those who wrote magazine articles, issued DVDs and had site instruction that people would’ve traveled to, resorting to posting youtube videos and linking their own plans or something that you can find for free these days, but trying to sell such a link as if it were the days when we’d pay $15 for a VHS or DVD.
I haven’t got a suggestion for folks like that – you won’t see me attempting to become a Schwarz or the other guys (who are worse yet), but if you talk to me outside of this blog, you’ll definitely get a head shake if you tell me a lot of people are willing to read Chris Schwarz’s blog and pay a monthly fee.
What little I do know well, I want to be dispensed like water or solvents that flow even easier than water. Maybe I need to get over myself for thinking there are bits in there that people would want to read about, but at least I don’t need to get over myself thinking I have something so great that I will be a turdy little gatekeeper saying “no…you can’t read that unless you’re in my club”.
So, anyway – if you ever see something like this, assume that it results from WordPress adding options I really don’t want to have to work through in the first place – it’ll be fixed. Personally, if I ever get video recommendations or links to a blog to hit a paywall, I pretty much ignore them forever. That part is important to me – you could be misled when you see a screen like that “oh, DW is taking his 75 views and day and jumping the gun to see what he can get out of it”. …………………No way.
First of all, even saying that, I feel like responding to myself “nobody asked”. Which is true! But I haven’t posted for a while and there are plenty of things I’d like to post here.
So, it’s not as if I haven’t made anything or done anything, and nothing bad has happened, just tied up for spring and making and doing things that aren’t really notable in the sense that I don’t want to become yet another blogger who “has a really great idea to share!!!!!” because they learned something a week ago and compared it to little.
But what I’ve been doing that I’m not that great it and that’s been absorbing time is basically three things:
Experimenting with baking japanning – the real stuff, not paint or tinted boat varnish. Turns out, we’ve all been cheated if we have read that it’s difficult or expensive – by people giving bad advice. The true baked japanning is easy and it’s fantastic.
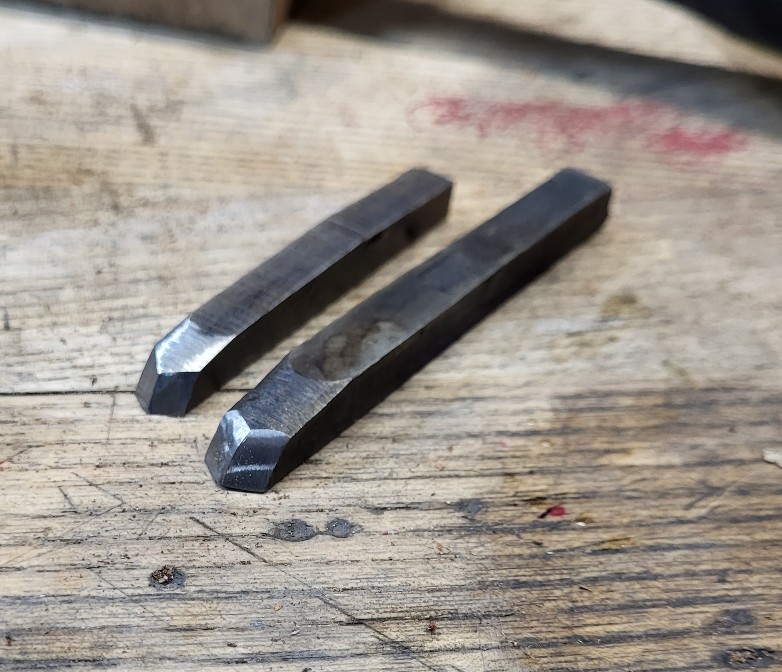
Trying my hand at making rasps. Not as something to make a lot of, but just got a flying burr one day (my mother would say “something flew up your rear and now you’re up and around”) thinking wait…with all of this heat treat knowledge and belt grinding equipment, i should be able to figure out not only how to make a rasp blank and stitch it, but I should be able to make a very good graver or stitching tool to stitch one. And the latter is true. I’m on the fence about whether or not I’ll want to make this sort of a relaxing activity because it’s easy to stitch a rasp to some extent, but a little less easy to do several teeth per second neatly on a rounded blank.
And lastly – getting back to cooking varnish. Natural resin varnishes are superb. they are a much more durable and flexible version of shellac with a lot of variety. Steve Voigt is nipples deep in varnish experimenting for at least a year now, and he also skipped a burr across the state, even though he may never have intended to throw one, and that one flew up my rear and as of yesterday, I cooked varnish for the second time. And it came out not as good as I’d like, which is the best way for me personally to get motivated.
The Japanning
On the japanning – this sprung out of varnish. Japanning is basically a varnish (resin, oil, solvent) and the high quality stuff gets baked, which means the baking can actually do the varnish cooking and catalyze the reaction to dry all at once. If you’ve seen a black singer sewing machine, or stanley tools, same stuff. The recipe is a combination of gilsonite (natural very clean and high melting temp/good hardness asphaltum), linseed oil and turpentine. Asphaltum gets dissolved into the turpentine and then linseed oil added later. OR, it can be cooked into a varnish – I’ll not go into that further at this point but to say it appears that avoiding the parts that separate when mixed cold is attainable just by cooking the resin and oil together and making a varnish. You can search that further if you’d like – gilsonite powder makes this an easy task, but nothing related to making varnish should ever go on indoors – it is outdoor only and can be so stinky that you may want to wear a mask at the same time.
My attempts with cold mix are here, and I’m about to put the cooked version on a stanley scraper. This is so easy to do reasonably well that it’s almost sinful.
The cold mix is baked at 400-450F. Above that, it will smoke and potentially run, and below that, the oil and gilsonite asphaltum may not link, leaving you with a finish that isn’t durable and may separate over time.
Don’t substitute petroleum bitumen or roofing pitch or any of that. Those are softer resins and they are loaded with sulfur, so you’d get a soft result and a very very stinky house and probably a good dose of hydrogen sulfide if cooked in an enclosed area. No good.
The shaves above don’t look like anything special except they’re no longer missing japanning, but they feel divine and there is a durability to japanning that nothing else will touch.
There are so many ways advocated online to avoid making the cold mix and baking it that it really irritated me once I looked at this through the lens of a varnish. They often involve adding some colorant to expensive and very stinky marine varnish. it makes no sense to me other than that it’s just one more example of how we get enthusiastic or egotistical people in the woodworking community who want to be the source of information more than they want to provide accurate information.
The Rasps
There’s not a whole lot to say about the rasps. It’s not hard to make “a rasp”, but to make these, make the graver, and be able to heat treat them without destroying the teeth or having a warped blank is not that accessible, so I won’t go on about what it takes. It’s a personal experiment of mine, just something to add as an idle hands solution as it’s kind of relaxing and interesting enough to hold your attention if you can do it.
I don’t know that there’s much to read about making rasps. First is on the right, second on the left and third in the middle. They’re each a bit different but it’s safe to say I was still figuring out how to shape the gravers and what angle to hold them and how to not misstrike them and break the beak off on the curved side. A zillion tiny teeth sort of settled it at once. They’re hardened, and they work. And not reading a ton about it allows for finding what’s not so great.
The rasp on the right does have the tip bent upward to make handles – I wanted something more coarse than the gramercy version. it’s coarse. And I saw not long after that gramercy now sells a coarse version, too.
The one on the left with tiny teeth is great in hard woods, but they’re so close together that you have to stop once in a while and brush the junk out. The one in the middle is literally just a two sided coarse rasp for hogging. I’ll spare you my thoughts on the whole blogosphere telling people they should have a whole bunch of rasps aside from saying you shouldn’t have many if money is an issue and there are a whole lot of files that do the same thing as fine tooth rasps. Another irk, that this or that blogger who wants to be the source of information or who works for magazines and feels that it’s more important to convince you to buy tools than it is to give you good information – well, you know. “You have to have these, and a whole bunch of them”. you don’t. I’ll bet there are a lot of French rasps sitting around idle because some Pop Wood article or blog said people should unload $800 on them.
I think I’m mostly through this short experimentation phase…I left the varnish out of the discussion here. Maybe more on it another time. I think it’s worth doing if you’re interested, but it doesn’t need to be added here.
First off, I don’t really do much following of type studies, but have taken a shine over the years to later stanley planes. Up to a point at least. Once there is a gap between the frog and the casting, I’m out.
At this point, I already have two 8s – a wartime Record that’s OK, but Record seemed to have a lot of problems shaping lever caps properly to fit over the cap irons, or making them the right length so they were over the hump and not pushing on it from the back (which also allows shavings to get through).
The other 8 is an earlier stanley that’s a typical ebay story. The plane was sold as in good shape, but it’s got a stripped thread for a frog screw that’s solved by a non-original screw, the bottom was nowhere close to flat -and I don’t mean like a little inaccurate – it’s a banana to the point that no sane person would flatten more than an amount of the sole needed. And, the “original” handle stuck on the plane doesn’t fit and can’t be tightened. Fortunately, I didn’t pay much for that – got it at the end of a regular auction.
I don’t use an 8 much – it’s generally a match plane. I plan to get rid of the other two 8s one way or another, but since I’ve taken a shine to type 20s (that are generally blue – but I guess not 8s?) I’d put in the back of my head if I eventually found one in good shape, I’d buy it and dump the others.
I have not yet found a type 20 plane that either has a lot of wear, or that has a serious issue with sole flatness. The smoothers are close to flat, and the 6 and 7 that I have both were hollow in the sole about 1-2 thousandths. Most of the hollow is from the tips front and back – I would guess the machining is done with a heavy hand and flexing of the casting leaves the toe and heel a little low. It’s too bad it doesn’t go the other way.
The tale of this plane is a bit interesting. It came with some other stuff, but what’s usable of that stuff to me is a standard spokeshave without adjuster (I only have LN types, and they are lacking if you are removing wood rather than cleaning up – the mouth is tight). And also included was a newer 9 1/2. I just got a 9 1/2 recently, but I can dump one or the other.
But the tale is this – a mechanic somewhere probably in NY where the plane came from was hobby woodworking and he’d gotten a smoother, a continental gutter plane and this plane. The smoother was worthy of the garbage can, so it went there – not sure what it was, but it wasn’t even on par with a handyman. As is the case with many, I think the hobby is vexing because the planes were all used until the irons were heavily damaged, and what was in this jointer was mostly dust from using the unintentionally toothed iron.
I found it interesting that among the very common things, the person who never got into the hobby as deep as they could have found a Stanley 8 with a smooth bottom. The iron shows some signs of being ground as 1/2″ of the length or so is gone and the plane itself shows almost no wear. The damaged edge has been sharpened recently, it was just blasted away and full of really large nicks, but the edge is otherwise fresh and was hollow ground.
But what about the flatness?
Getting to the point isn’t my strong suit. I paid $225 plus shipping and tax for the whole group. To me, and maybe not to others, to get a plane with little wear like this, I’m good for $200. 15 years ago, you could find a plane like this for $100, but it’s not 15 years ago.
I tipped this thing upside down in the vise and secured it lightly and checked the sole expecting a low toe and heel that won’t be much work to address.
And that’s exactly what I found.
I scribbled on the sole, but the scale of the picture here may make it hard to see. No part of the front allows a .0015″ feeler through. The middle just does allow one through, and then a small section just in front of the heel allows a 2 thousandth feeler just through.
For all of the talk about this or that flatness and how poorly the later Stanley planes were made, I just haven’t seen it. I have seen earlier planes that are out of flat without it looking like wear. I don’t know why.
This one will be quick to address some afternoon when I have an hour to very accurately flatten the sole. The discussion of whether or not the hollowness of this sole between toe and heel even matters won’t satisfy tax preparers and pallet furniture makers who always know more than everyone else about woodworking, but for someone working by hand, it will make a world of difference match planing. if the sole were opposite, flat in the center and toe and heel just off of a board, I’d never bother to touch it unless it had other issues (twist). I’ve not seen serious twist more than about 4 times out of probably 100 planes.
If I’m wrong about the type and it’s not a 20 (8s seem to get less common with later types), good enough
Too, I’ve mentioned it here before – one of my first large plane purchase was a machine gun purchase of both the LN 7 and LN 8. The 7 was straight as an arrow, but had the fault at the time that you couldn’t set the cap iron close to the edge. LN laser cut or punched the hole in the cap iron assuming nobody would want to do it. I ended up selling that disclosing it. The 8, on the other hand, was hollow like this plane. Almost exactly the same amount, and I tried to use it to match plane and joint long ends, and it was difficult to plane something without the ends falling off. People seem to have trouble believing that, but it’s not a matter of mistaking what was going on – it’s a matter of people who don’t believe that could happen overvalue their ability to reason and assert things. Conflicting with reality doesn’t phase them too much.
One Last Thought – What do the Numbers Mean?
I am throwing around thousandths and what matters and what doesn’t from the view of someone who will be using this plane for long edges. I will, of course, make the plane as easy to use as possible.
Given that I’ve had just about everything other than a 24″+ norris jointer, and I’m floating toward a late type Stanley, maybe I should address two questions:
What if you bought this plane off of the internet and you didn’t know anything about flattening planes, what would happen? Well, the answer to that is pretty simple. Not much. You might find it to be a little more difficult to get a laser tight joint at the ends of boards, or that you’d have to take a few shavings on already flat surfaces to get the plane to cut end to end (not great), but otherwise, you could end up with a plane about as accurate from a boutique maker pretty easily. I did from LN, twice out of about 10 planes.
I think the underlying question of “why not just flatten the original LN 8 and use that” could come up as beginners who pick up a new boutique plane will almost certainly think the experience is better. I thought so at first, but when the volume of work increased, I began to prefer older planes. And beyond that, most volume work is better done with a wooden plane if the work allows. In terrible wood and for fine work like matching edges, having an adjuster is a little easier. At any rate, it’s not strictly a weight issue – I just find that the whole stanley package is a little better than the boutique planes when the planes are no longer being used as a half dozen smoothers of different lengths. I also didn’t have the confidence a decade or more ago to just get after the sole of an expensive LN jointer. It was easier to disclose the sole’s shape and sell it – most people don’t care as long as it’s inside LN’s spec. it was uncanny how the #7 in that pair would plane everything easily and accurately, and that little bit of hollowness in the #8 was enough to keep it from coming off of the shelves.
But I do actually like the Stanley planes better, and thus have no boutique planes at this point. I just don’t see a reason to have any, and it’s certainly not a money issue. I migrate to what is easier to use – functional laziness. Now that I have a hammer (can flatten these planes by hand and accurately), the “nail” isn’t a big deal. I don’t care to flatten many more planes as I have better things to do, but to sort of cap off my collection and dump the less common more collectible English planes and go to “plain old cheap later Stanleys”….hopefully that will be a last move.
If anyone here started woodworking around the same time I did, you may recall that Blood and Gore (Patrick Leach’s site of Stanley tools) referred to the Stanley 112 as potentially the best thing ever to come out of Stanley.
Around the same time, LN and LV were coming out with various scraper planes – two large ones similar in proportion to the #112 and a smaller one for each, and LN also copied a stanley “cabinet scraping” plane or something of that sort with a fixed angle.
This predated figuring out the chipbreaker for me, so naturally, I did what people did back then. I bought some of these and a friend who was also interested bought others. After watching a Charlesworth video with a novel way to set a really neat precise and robust hook, they worked great. At least on wood that was already flat and clear.
With Stanley 112 and the large LV scraping plane in hand, I ran into a blanket chest project that had a lot of hard highly figured maple. After glue up, I set out on getting the surfaces near finished. One problem. A day or two elapsed after glue up and a couple of the panels cupped a little bit.
No Way No How
Despite setting these things as well as anyone I’ve ever seen, with five relatively large curly maple blanket chest panels to clean up, there was no way I could do it physically. These scrapers excel in taking a thin shaving on a surface that’s flat, they have a wide footprint, and they last surprisingly long in a cut, but nothing compared to a real plane – especially when you put the cap iron on.
A helpful forum member proposed to me at the time that since the panels were out of flat, but probably not in a meaningful way, that a scraper with a smaller footprint would probably do the job. And, thus, I bought the LN #212, too. And I got by with it, but it left little narrow scraped scallops and it was still arduous. Of course, not meaningfully out of flat means those panels were uniformly gradually cupped and once in a frame or with more seasonal movement, they’d have been no problem.
Well, I never finished the chest because ultimately, I didn’t care that much for the chest in the first place, and I don’t have a landing spot for it. The kids and the wife don’t want it in any of the bedrooms and it’s not needed anywhere else.
I suspect, but can’t confirm, that the popularity of these scraping planes had a lot do to with veneer on substrate where the substrate was dry and flattened. Why? Because by the time they were out in numbers under Stanley, that was the style of furniture being made in factories or on a small scale basis in the US. They did get made in some relatively large number – not like a Stanley 4, but it’s not like they only made two dozen of them. They just don’t make much sense for solid wood work when a double iron, card scraper and if needed, some sanding, is far more practical.
Of course, I don’t have any of those planes any longer, and if there’s any virtue on the boutique plane side, neither of the two boutique types that I had (LV large scraper plane and LN #212) were hard to sell and I doubt I lost much on the Stanley #112. The friend who also bought the LN #112 because we wanted to get our hands on them still has his, and he’s never actually used it since a little bit of trialing.
It’s my opinion that the popularity of these scraper planes follows the talk around them, which is folks are delighted to have a “problem solving tool” in hand, without knowing if it’s actually a problem solving tool, or just a space occupier and problem creator.
In true form, I’ve seen some folks mention that LN suggests sharpening with no burr rolled and just a honed edge. That’s too bad, the planes work far better and leave a better surface with a rolled burr, but I get it. The same company still recommends various frogs to avoid tearout on a plane that has a chipbreaker. It’s the way of the world.
But I’m happy to see less talk about them as they fall into the category of “is it really better to try something if it’s not likely to be useful in the first place?”. In this case, I think no. And while it’s very easy to set a burr freehand, even on these, once you get a feel for angles, I doubt a large percentage of folks using a scraper of any type learn to create a good uniform burr quickly.
There was such a huge array of advice being given when I first started woodworking that it was hard to really sort out what was useful. I think the Seaton chest probably gives a pretty good idea of what’s needed to work by hand outside of marquetry and being a trade carver, but let’s be honest – few are ever going to go from Paul Sellers or YT product placement videos to doing either of those.
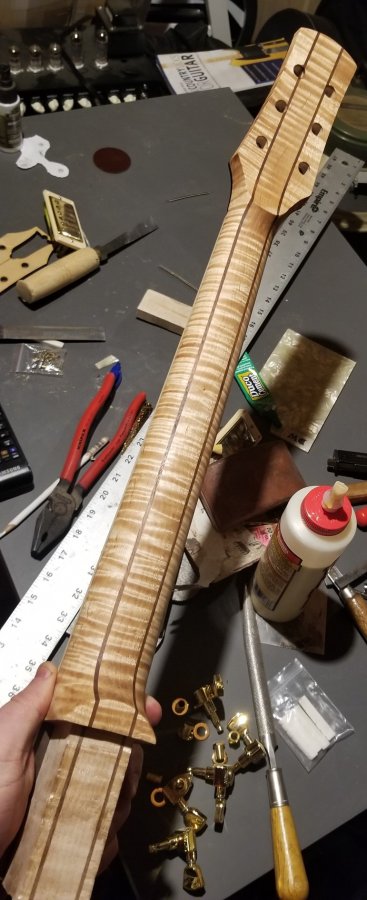
Oh, nearly forgot – what ever happened to all of this curly maple? Well, it sat for a dozen more years and I didn’t have the heart to throw it out, but just didn’t feel like finishing the blanket chest. Last year, I finally found a use for it – to keep it as stock for laminated guitar necks. it’s flatsawn, which results in a pleasant orientation for laminated necks, and in general, it’s not a good idea to make a single solid curly maple guitar neck in the first place, so the stock thickness of a solid panel is already close to what you want. Somehow, it’s no longer a big deal to plane it. But there was no good advice around – high angle and scraping was the suggestion and it just wasn’t and never will be practical for anything of size.
I like guitars more than blanket chests, and am glad that I never finished that job.
In all of my making of plane irons and chisels from steel ranging from 1084 to XHP, and including some very plain steels other than 1084, I still have not managed to make a plane iron that reminds me of a vintage laminated plane iron.
Is it that important? Not really – sounding like a broken record player, O1 will make any plane iron i’d ever need. 26c3 (high hardness but short edge life like white steel, sometimes still useful) and 80crv2 sort of round things out, and there’s a lot of other “OK” stuff. I think really good M2 would potentially be a good choice, but I’m not willing to try to figure out how to harden it in the open atmosphere at this point. It can probably be done, but how much it gives up vs. commercial, we really don’t want to work with things that we make compromises on.
Back to the laminated irons. The older irons of good makers (not all old irons are good) all seem to have a similar feel. Why doesn’t 1095 or W2 or 1084 seem to really be like it? I don’t know. I can send an iron to get an XRF analysis (the same method used to out PM V11 as CTS-XHP), it’s not expensive and from time to time, I can have it done for free. Even if not, it’s about $30, and I’d be more than willing to have three or four irons analyzed to see if they’re the same.
But the puzzler is that heat treat process, final temper, quench, whatever, I don’t quite end up with something that feels like an old ward or mathieson iron. They don’t wear long, but they feel different and the good ones have unbeatable stability at the edge and they sharpen easily for a given hardness due to lack of alloying.
And it’s possible that I have the equipment at this point that I’d need to actually make a laminated iron, but it’s just not going to happen.
There are so many variables
I’ve got a sinful number of taper and parallel irons acquired on the assumption that I may make 100 or so bench planes. I sort of tailed off of that, and ended up making irons now, which I also thought I would do. I like the style of the old irons and the feel and their geometry, but I can grind a same shape iron now, and I could leave scale on an iron and tool marks so that it didn’t look new, and I can stamp an iron so that it doesn’t look like something that was laser etched or printed on.
But I’m willing at this point to slide the “make it like the old irons” idea off to the side, and use what’s available and do what seems best. As in, resigning to probably not ever knowing the cause for the difference. It could be all kinds of things, like:
the old irons that were laminated were probably actually water quenched thanks to the lamination preventing cracking. Water quenching water hardening solid steels in plane iron and chisel profiles is something you’ll learn not to do quickly.
the old irons were probably made of a different type of ore, at least from what I’ve been told. There are two common types – hematite and magnetite. Before a chemist would tell me that processing removes this, I’d probably have to do an A+B test, and a very skilled chemist is who brought this up to me. One with a relatively open mind.
It could be the process of forging that makes things different – and I don’t mean in a “oh, you can’t get the same toughness with cut, thermal treat and shape” or anything like that. It’s not magic, but more a matter of whether or not something happens as the steel is heat treated so that it can be forge welded to wrought iron and the steel itself drops some of its carbon content
I really don’t know and the answer to these kinds of questions aren’t horseshoes to me. You may recall my comments ranting on about people who give answers that they feel like are good enough without knowing if they’re correct. Things like speculating that the Seaton Chest is incomplete or whatever else – if you don’t know, then you continue to seek and even when you prove something, you may have proved *a way* but not *the way*.
Not Sending Everyone Out
This discussion isn’t intended to send people looking for Wards, Howarths and Mathiesons and so on. The best way to get 30 really good irons is to buy 100 irons – this isn’t a buy once and you’ve got it kind of sport.
And this discussion doesn’t sidestep but rather ignores the fascination with abrasive wear resistance. I’ve abandoned woodworking with machines followed by “death by a thousand thin shavings”, it’s not practical for a hand tool woodworker, and a hand tooler learns to take as much as they can efficiently without horsing things around, so the jack plane works thick shavings, the try plane continues to work relatively thick shavings and the smoother follows it and has to do almost nothing. This sort of solves the mystery of why nobody got fascinated with alloying until recently, and why alloying that was provided industrially didn’t actually improve anything. Recall from the alloying talk that A2 and O1 are early to early-mid 1900s steels, and tungsten steels were also turn of the century. They didn’t make a mark in hand tools because they didn’t offer a skilled worker anything.
And purchasing something like a ward iron to replace your PM-V11 may not yield what you want if your planes plane between 2 and 1/2 thousandth shavings most of the time, and you sand everything thereafter.
Lastly, what’s funny in all of this is that I’d have figured “well, I’ll find something that approximates old English steel without too much issue, but never master the Japanese stuff”. Well, 26c3 is almost identical to White 1. I don’t think anyone would use the two in a blind test and tell the difference.
This will probably sound foreign, especially if I mention that linseed oil is a key component to good varnish, and most folks will think of it as something “out of date, replaced by better things since it was used”.
However, I’d made a violin varnish recipe a few years ago and aside from the fact that the oil was somewhat slow drying, and the varnish itself needed a good dose of UV light to dry, it turned out great. That recipe can be referenced on youtube if you look up “pine dammar varnish” and that should also lead you to a recipe.
However, there was one problem with it – the combination of the two resins just don’t have the ambient temperature hardness – especially if ambient is a little warm and whatever is varnished may have slight pressure on it for a while. Translation in this case, the problem was actually the case. The case for my guitar was a woven polymer gig bag and the weave itself has lightly impressed on the back of the guitar.
There’s little information out there, and I kind of forgot about it, figuring any number of things (and guessing wrong). What the problem turns out to be is that the resin that I used is just not hard enough even though the guitar doesn’t feel soft when you play it.
So, that makes the answer to the title pretty easy – yes, of course you can cook your own. It’s not like watching Animal Trades channel and mixing three commercial products together and calling it good. It’s like heat treating by hand and eye in that you need to learn visual cues and at least where I’ll start, I will need to measure the temperature in some steps.
But, It’s Uncommon Otherwise
I don’t see much information about anyone else making varnish, except Steve Voigt (the plane maker) has taken it up as a hobby. You can also buy a varnish like Epifanes with a thinner and brush it, but it will smell like an oil refinery, and I didn’t check the MSDS, but the resin is probably alkyd – a synthetic.
There’s any number of natural resins that can be tampered with by method or used as-is that will make varnishes, and when Steve brought this up, what caught my eye was a passage in the Holtazapffel book that some hard Copal (a resin) varnish recipes are very durable for furniture and can dry in 10 minutes.
Anyone who has used varnish, i want you to think for a second – have you ever applied a varnish that dries in 10 minutes without something arcane in it? I haven’t. And maybe I won’t be able to make a 10 minute varnish, but I’ve learned enough reading in the last week or two to know that there is some fruit at the end of the process here and that my initial success in making a varnish, that was slower drying and with a softer resin, should’ve been an invitation to learn more, and not to assume that varnish is varnish (say it like “motor oil is motor oil”).
The key parts of making varnish – first off, it is an outdoor only activity as you may sometimes be cooking flammable things at 600 degrees F, and you’ll be cooking flaxseed or linseed oil to improve its qualities, and that cooking along with cooking (or running) of resins will make things you don’t want in your house.
Too, about half a decade ago, I mentioned something to George Wilson about making varnish, and I already knew to make it outside, but George said “make it outside…I’ve made a mushroom cloud making varnish” due to having varnish foam over and come in contact with a flame. It’s an activity for people with big boy pants because there certainly is the chance of a mishap. But it can be minimized.
Steve has posted some of his goings-through thus far here:
Varnish making isn’t cheap, or at least it can become expensive, but even the too-soft varnish that I made had some qualities about it – the adhesion is incredible, the way it builds very quickly on the surface of wood without blotching is incredible. The turpentine smell is fresh, not oily or stinky.
It’s worth thinking about doing, as long as you have somewhere outside that you would be able to cook it.
As I experiment with it, I’ll post about it, too. I got my first big box of stuff from Wood Finishing Industries today and have some other things on order that should allow making of varnish that will have permanence like any finish, but with warmth and depth that a lot of finishes lack now, and without the odors of some of the older solvent based finishes that we’ve grown to love (like nitro lacquer). Who knows how long those will be universally available, anyway. They may have their hand forced into crappy recipes by VOC rules or some health standards.
You have probably heard conflicting information about this. I have actually tested it planing, so I’m going to tell you what really happens (additional fineness imparts significant additional edge life, not just a stroke or two), and then mention pitfalls at the end – things to figure out so that you actually get full edge life of any edge.
What really happens? If you have any level of competence, or are aiming to, edge refinement greatly extends edge life in the kind of planing people actually do now, and edge life isn’t the only thing that will improve. How easily a plane enters or stays in a cut and the amount of effort to do that will both be greatly improved and much less, respectively.
Why am I telling you this? I’ve heard twice already that Katz-Moses just did a test and that it proved that a high level of edge fineness is gone in short order, is transient and not worth the effort. Or something like that. I saw about a minute of the video, but, and I apologize if you’re the type who likes to get along with everyone – I can only see a minute before the overwhelming pressure of fakeness just makes the videos of people like Rex or JKM intolerable to me.
Those channels are not people who are “your friend”. They are people who look at you and think, “what can I get out of my audience without having to be a skilled woodworker. What can I sell to the mush-brained folks watching, and how can I spend my spare time learning to optimize youtube revenue streams rather than learning to teach people to be better woodworkers.”?
Fake as a football bat, as Jim Cornette would say.
That’s my opinion, and if you feel like it’s wrong, realize you are comparing people like JKM and Rex to Paul Sellers. That’s like determining whether or not it’s a good idea to gamble your money on blackjack vs. investing it because you’ve compared blackjack and roulette and ignored investing.
Is this specifically linked to JKM or anyone else? No. The reality is this kind of “definitive” testing is part of a long-term pattern of people who don’t have the skill or discernment wanting to attract attention and become a voice of authority because it’s good for their real business – selling ads, attracting sponsors, getting people to sign up for online schools or getting people to buy link-through items where the presenter directs a viewer to a product or service and then the viewer is tracked and the presenter gets a % of the sale.
The Truth about Edge Life – In Relative Numbers
In 2019, I planed about 40,000 feet of wood and took microscopic pictures of edges both from the start (you’d be surprised how often you didn’t finish the job sharpening if you use a guide and count strokes), and then along the way while planing. I was comparing alloys, but an offshoot was to compare sharpening angle and then edge life determined by edge fineness.
For ease, the ultimate test steps involved honing to a final flat microbevel of 35 percent to eliminate edge failure. You can theoretically get extra edge life by chasing the final angle lower, but it won’t be much below 35 that you are creating more work for yourself both by not extending edge life and increasing damage so that you don’t finish sharpening.
The values below are relative edge life by media. All done with the same plane on the same edge of the same board and with length planed recorded as well as weight of shavings. the test stops when the plane won’t stay in the cut by itself (this happens abruptly, not gradually).
The finest media that I used was 1 micron diamond, which is a good compromise of fine and fast, but only if you are willing to work just the tip of the iron. I will give that a relative score of 1. that means every other decimal is the percentage of feet planed by the same plane and iron vs one micron diamond.
I want you to think about the results above – they are from actual planing, and they show only the feet planed based on edge finish. Note, I also tried polishing one side finely and the other with 5 micron diamonds. Edge life tended toward the more coarse of the two sides, so there’s no point in trying to cheat and get a free lunch.
If you look at Holtzapffel’s description, they didn’t say “for the finest work only” for the sharpening method. There is one. They would’ve been aware at the time that refining the edge and removing the burr at the same time with fine work resulted in less labor and better results. They weren’t on youtube, and they weren’t experts in circular saw blades or festool dominos or mirka deros, they were experts at working wood with edge tools from rough to finish.
They knew better by doing – not by cutting strings and calling it the right answer for planing.
I personally found five micron diamonds intolerable. If you are going to use planes, you should be good at it. Every single thing needed for accurate effort minimized planing, and mark free planing on smooth planing, suffered greatly with the 5 micron abrasive. Diamond is aggressive enough that I would point out that 5 micron is probably more like a 2-3k waterstone, not almost a polish stone.
My personal opinion is that I don’t love using 1 micron diamonds all the time on cast or some other substrate, so I don’t usually, and I’ll give up the difference, or buff a little bit to remove the burr at the same time and make up the difference.
Science Would be Replicating Planing
There’s a bad public habit of defining anything that looks like a test as being scientific. In real research, the research team at Eastman Kodak would’ve involved creating a machine that imitated people planing, and potentially collecting actual data of people planing unless the sales department found that the string test showed some untruth that was more favorable for selling a proprietary product.
But that would’ve been marketing (sound familiar?) and not a strong research group. Realistic research involves observing a relevant outcome. The outcome is easy to observe in this case. It’s just planing and doing the work to get the result, and repeating some tests to show that the result is repeatable in a narrow range.
So, it’ll Take a Long time To Sharpen?
No, it won’t. You grind, hone and finish the apex. If you try to skip finishing the apex, you have to learn how to deal with a large burr and do it neatly. Amateur and pro circular saw blade experts don’t have a good grasp of dealing with burrs in the first place.
It takes about one minute to sharpen an iron that’s well ground by honing the wear off and preparing for dealing with the apex and then installing a high level of finish at the apex.
If you absolutely have to use a guide, this means working the back of the tool with your finest stone, and then setting up a secondary bevel and bumping the tertiary bevel up a degree or two.
if you feel like you’ll be able to treat an entire wide bevel with all steps, you’re wasting your time. It takes no more time to sharpen finely than it does to do a poor job, but you have to figure it out.
If you don’t, and you conclude everything you know based on 600 grit wet and dry or a 1200 grit diamond hone, you’ll just have incorrect conclusions about what can be planed and what can’t, and how neatly and how much sanding, and so on.
So – How does an Edge Get Screwed Up?
First, the apex of the tool needs to be able to stand up to the work. If you use substandard tools or damage the initial apex, you’ve just lost the game regardless of how fine you did or didn’t sharpen.
You need to be able to work yourself up to a method where you can set up the apex that stands up and that has a fine level of polish quickly.
Chasing angles too low is another pitfall. You read that you can pare wood at 25 degrees, or that LV touts that you can use V11 at very low angles? I have pictures of what happens. the edge gets destroyed. With just a small volume of low angle work, you will have several minutes at least of white knuckle honing to remove the damage.
So, you need to be able to actually finish an edge, which means you’d need to be able to confirm you did (something that you can do with nothing more than a $15 hand held USB scope), and you need to be able to understand how to prevent damage.
This sounds like big demands when you’re a beginner. It’s just basic hand tool work.
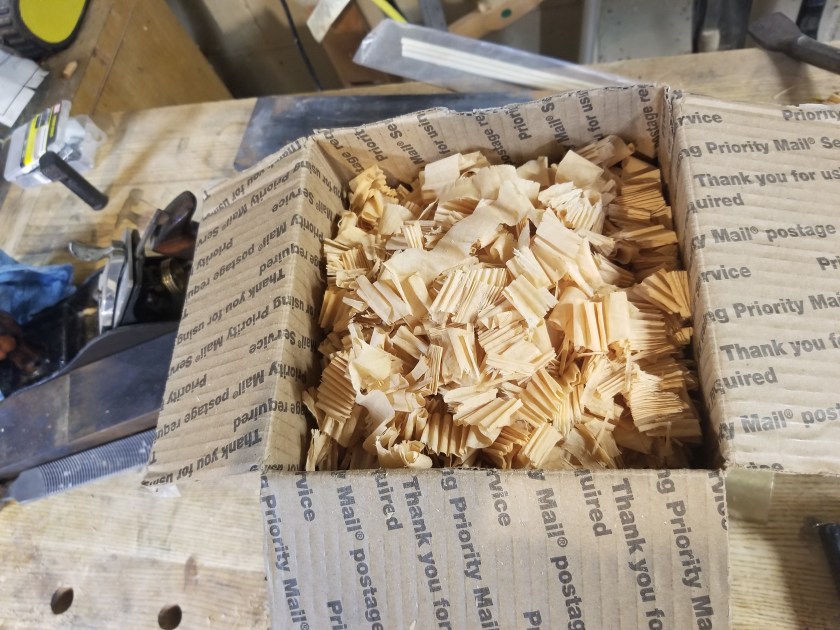
I figured I’d track down a couple of pictures from my planing test. I not only counted distance with irons in rotation on the same board, but I also checked the thickness of shavings coming from the plane often and weighed them. Some irons cut more sweetly than others when wearing. It’s not an even test unless you measure both distance planed and weight and confirm that you could set a plane so that the weight is proportional to distance.
The first picture is a box of end grain shavings waiting to be weighed. Yes, I tested planed lengths of end grain to see if the long grain relative wear ratios would hold up (comparing magic alloys to simpler steels, they don’t – end grain planing is just harder on edges and the wear isn’t just similar to abrasive wear).
Long end grain shavings of Cherry from the large Plane Test
A large pile of uniform continuous beech shavings from a plane iron test simulating smoothing flat machine planed or try planed wood. Test done to gather edge life of various alloys and setup variables.
As I’ve continued to put anything interesting and clean to the hardness tester, I’ve found a few more recent solid Stanley irons. I still don’t think I’ve found the original round top iron that I used to flatten my bench. I thought the one that I tested the other day was that iron, but I’ve got an affinity for later type Stanley planes and realize that there are at least three round top 2″ irons and the one that I tested is probably a more recent purchase, even if it’s not a more recent iron.
I went through a phase where instead of junking irons, I would hold on to the few that were no good at all until I needed to do something stupid. Like scrape something destructive of whatever else. And then those irons get tossed around all over the place so as not to put them in the “useful” drawer.
Nonetheless, I found yet another later Stanley iron, though probably not T19 or 20 – I don’t know. I can’t get that excited about the whole type thing or official names as I can hardly remember the names of things day to day in general.
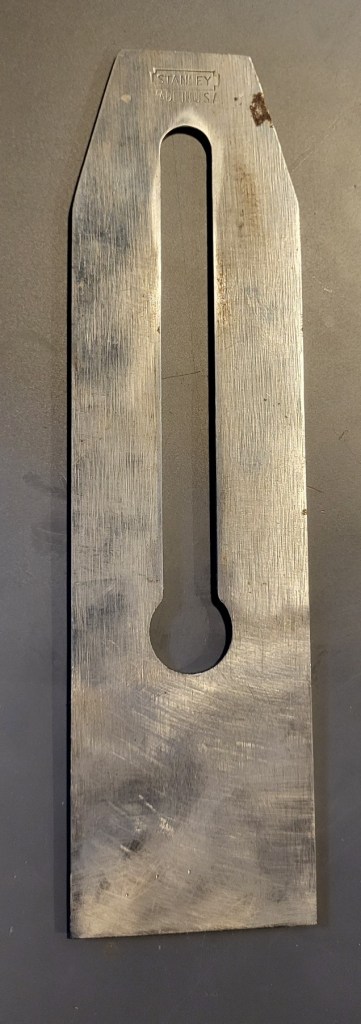
Anyway, I located this iron and tested it:
You can see a couple of little dots. I’m wising up as everything is getting pocked up with little craters, and if the finish on the back of the solid irons is good enough to be tested, I will pock the backs up instead of the fronts. This iron isn’t in hand, but the back is probably just milled and too coarse. Too coarse or dirty or really anything that doesn’t provide both perfect footing on the anvil and a solid continuous clean surface where the diamond goes and the results can be off the mark *and* useless.
Guess the hardness. 61.5
Again.
And then in the same pile, I found a recent Stanley Mexico iron. It had an annoying coating on it, but consider the market. I scraped it off of both sides and tested it:
Guess what the hardness was.
61.5
That makes five irons now that have hardness of 61 or 61.5. No solid stanley iron that I didn’t reheat has tested otherwise, though I’m sure changing eras or a much larger pool of irons from the era of these could prove to find something. Could and would are different things.
When I first got the tester, I stuck a couple of laminated irons. Their reading is too high to be believable, and the laminated thickness is below the minimum thickness for the tester, so I’m not going to test any of those or any irons thicker than a stock bench plane iron. There’s no reason to have bad information.
This makes a light bulb go off. First, the reports of the soft irons are false. Not just the recent ones, but in general, Stanley’s irons from 1900 or so at least and beyond that are not soft.
I used to think they were soft, but at some point, learned to use the cap iron and suddenly they seemed to hold up fine. I admit that I attributed it to some “protective” unexplained effect of the cap iron, and there is definitely some, but it’s not an extension of useful hardness as far as I know as irons that get below 60 suddenly have issues denting or forming a burr in hardwoods. Both of those things are obnoxious because they lead to the plane giving up before the iron is actually worn.
The effect of the cap iron, as far as I can tell, is just to take an iron that is thin and maybe not that stable if not used properly, and put it on wood and keep the wood continuous without a bunch of chattering.
I have another iron to test this theory – an IH sorby tapered iron that went into a cocobolo smoother years ago, and I instantly figured out that it sharpens fine, but it doesn’t last long in smoothing work. The solution was easy enough – use the smoother for work more coarse than smoothing, and that’s what I did with it. But I forgot to test the iron.
I’ll bet it’s going to be measurably softer than stanley’s irons.
After figuring out the double iron, using a stock stanley iron to make that cocobolo planes was one of the first things I did. Why? To find out if I wasted my money buying a bunch of high hardness and high speed steel irons before that because they were always the advice given, or almost always, if you were planing something exotic and needed “better than they used to use”.
I dimensioned the cocobolo plane blank and then did all of the planing to rough the coffin shape, and made the wedge with that iron and a stanley #4 and had to stop to sharpen once about 3/4ths of the way through.
Hardness is one thing here, though. Abrasion resistance is another. These Stanley irons are hard enough, but they would be the choice of an experienced user vs. something with a bunch of abrasion resistance. If the user is changed to someone with a honing guide and 6 minutes of sharpening with 6 stones, I think such a user would find the modern irons more pleasing. When you first start, everything is smoothing, and if it’s more than smoothing, it’s a million feet of planing to get to final smoothing. And suddenly when you do a lot more woodworking, the smoothing is after try planing and it’s over in a flash. Try planing doesn’t benefit from ultra hard irons because the shaving is thicker. But the try plane makes the work of the smoother very little. And suddenly everything starts to make sense with why nobody was clamoring for extra hard or extra alloyed steels until recently.
That doesn’t explain the 1920s-1960s or so, but anyone in the US will be honest and admit that there wasn’t a whole lot of fine hand plane use going on during that period. This is the United States and until the antiques craze hit, 99.9% of the population embraced modernity. My thrifty grandparents spent the extra money they had embracing some convenience after a life of wearing themselves out. The only hand tools I saw my grandfather use were axes to split wood and wrenches to fix equipment.
That big lull from the early 1900s until woo woodworking gave us a long time to forget why things were designed the way they are in stanley’s planes. Even in Hasluck’s guide to hand tool use, there’s a maniacal explanation of why hollow ground bevels are far better than complex, but it refers to a comparison vs. a site worker with poorly set saws (at least as far as I can remember). Somewhere between the late 1800s and then, the talk of the cap iron no longer was provided in long form. I think the explanation as to why that would be is simple – a combination of a lot of veneered furniture and the lack of economic value in finish planing when work went to factories.
OK, it’s not really insanity, but I thought about it after the last couple of posts where we’re actually talking about steel and i’m off of the annoyance with the forums and such. That’s generally in the past and a short dose of posting on forums will remind me about the lack of depth there.
Especially after reading something like Steve Voigt’s excellent blog posts on retracing steps in manually “washing” oils and things of the like for making varnishes. Something I’ve dabbled in only lightly, and is yet another thing we can do by hand, albeit making varnish in a house would be asking to stand and watch the house burn, so be careful if you get into that.
There’s this whole world of little details out there, and if you get away from thinking you need to make this or that joint, you’ll probably also find something you really like and will put the time in to learn and then share. Even if you have TMI as I do, the people who are actually interested in it will sift through what you put out and find the valuable stuff.
I would never have guessed that I would be doing anything outside of heating O1 steel, or guessing at hardness based on alloy, or separately by feel.
But the CR60V question is just general curiosity. There is a weird dynamic of steels that are used in common tools vs. stuff that is sold as precision ground stock for a whole number of purposes (like O1) or specialty knife steels that are used in boutique quantity, and by individuals, but not commonly turned out in 100,000 units a month.
CRV60 – there, I’ll just put the numbers in any order from now on – seems to be everywhere, cost almost nothing and the fact that it turns out well, at least within spec suggests that there’s something that makes it easy to use. Is that valuable to us? Probably not, but it’s part of understanding how things work.
I don’t have the interest in trying to find little bits here and there only to write about so as to build some kind of following – plenty of other people can do that and be smiley all the time and pretend they’re not full of questions.
As time goes on, since I own the site and thus the decorum, I’ll think about putting up some summary things. Such as basic steel discussion. What are carbides – you probably know what they are, but a small definition of them (combinations of carbon and other elements forming a ceramic) could be useful. If someone isn’t interested in carbides, they can just drive their car by.
I don’t expect the pondering to have any long term value other than what shakes out of it. Something might.
I realized as I was writing about the stanley irons earlier that I’ve never seen an actual spec sheet for CR60V or CRV-60 or any other iteration of those letters used on tools that come from overseas.
So, I figured that as common as it was, there would be a standard composition, perhaps one of a Chinese spec or a European spec, but I come up empty.
All I can see of it is that it’s anticipated to temper from 58-60 if it’s hardened properly.
Which….is no surprise, because that’s pretty much the exact range that a lot of the low cost imported chisels hit.
I’ve assumed that it is a 0.6% carbon steel with an uptick in manganese and carbon with a little vandium. The middle two make it easier to harden the steal, and the last makes it hard for the steel’s grain to grow. Without anything other than carbon and manganese added to iron, the grain can grow wildly in 15 seconds of moderate to significant overheating. When I’ve subjected 80crv2 steel to even more overheating than that, I see no increase at all in grain size. If the exercise were stretched out further, we would see it.
Vanadium is good at this. Chromium also seems to be protective, but probably not as much. 1084 is the only steel that I can think of where the trusty shop method of thermal cycles and then a quick temperature overshot requires more discretion on the overshot. No problem, you remember it and do it.
But, I can answer that question for 80crv2. I can answer it for SAE6150, which is what folks sometimes think is the “only” chrome vanadium steel. I can answer it even for O1 when there’s an addition of vanadium as is sometimes the case -that is also a steel with chromium and vanadium.
But I guess I’ll have to admit that the low cost tools that come labeled as 60crv or any other similar name, maybe we just won’t know the composition, and I’ll still assume that it’s 0.6% carbon, but won’t know.
Theirs vs. Ours
They being everyone other than the US. SAE 6150 appears to be used in a lot of tools, like sockets and various bits and all manner of things. It’s got a serious increase in manganese and chromium over something like 80crv2. I don’t know why this is, but would guess that it has to do with trading more and more of the content to manganese and chromium in favor of making the steel easier to harden.
I don’t think we see much of it in woodworking tools on the market now, but who knows.
in the “theirs” category is a wider range of steels that have chromium and vanadium, but aren’t pushing a percent of composition for each. I’m sure there are reasons for that and would guess as carbon goes up, increasing alloying would decrease toughness. In a steel like 6150, carbon ranges from a little below to a little above 0.5. Since this stuff is everywhere in wrenches and sockets, it’s obviously useful. I just doubt it would be useful in woodworking tools and wonder if some of the reputation for Chrome Vanadium steels being though of as shiny and gummy is because it was tried in site tools.
Whatever the case is, I guess we’re guessing. 80crv2 is as low as I care for in a steel that’s a little more on the plain side. It’s pushing to get it to temper in the sweet spot around 61.5. It may not sound like much, but hitting that instead of hitting 59 is kind of a big deal. Even then, I’m not sure about its edge stability yet, because it will land around 63 hardness tempered at 350-360F (double tempered even), but the edge won’t be stable for a picky hand tool user. I don’t mean like beginners – I think most of the boutique tool market would be happy with it at high hardness because they are not yet initiated to the fact that harder isn’t better if the edge can’t take advantage of its hardness.
To prove that it’s the hardness and not grain growth, I’ve done a follow up temper to 63 hardness 80crv2 at 400F double tempered. It ends up around 61.5 and the irons are excellent. Whether or not they’re as good or better than O1 would take more follow up and use in actual projects.
That said – if anyone comes across a spec or a cross reference to another spec for “CR-v 60” or anything of the like and it’s more than just a sales listing for screwdriver bits, I’d love to see what the actual composition is.
It could be that like some of the low cost stainless steels, it just isn’t offered for sale to the general public due to lack of interest, and customers for it are more of the “I’ll have a melt of this” rather than “I’ll have two bars”.