First off, I don’t really do much following of type studies, but have taken a shine over the years to later stanley planes. Up to a point at least. Once there is a gap between the frog and the casting, I’m out.
At this point, I already have two 8s – a wartime Record that’s OK, but Record seemed to have a lot of problems shaping lever caps properly to fit over the cap irons, or making them the right length so they were over the hump and not pushing on it from the back (which also allows shavings to get through).
The other 8 is an earlier stanley that’s a typical ebay story. The plane was sold as in good shape, but it’s got a stripped thread for a frog screw that’s solved by a non-original screw, the bottom was nowhere close to flat -and I don’t mean like a little inaccurate – it’s a banana to the point that no sane person would flatten more than an amount of the sole needed. And, the “original” handle stuck on the plane doesn’t fit and can’t be tightened. Fortunately, I didn’t pay much for that – got it at the end of a regular auction.
I don’t use an 8 much – it’s generally a match plane. I plan to get rid of the other two 8s one way or another, but since I’ve taken a shine to type 20s (that are generally blue – but I guess not 8s?) I’d put in the back of my head if I eventually found one in good shape, I’d buy it and dump the others.
I have not yet found a type 20 plane that either has a lot of wear, or that has a serious issue with sole flatness. The smoothers are close to flat, and the 6 and 7 that I have both were hollow in the sole about 1-2 thousandths. Most of the hollow is from the tips front and back – I would guess the machining is done with a heavy hand and flexing of the casting leaves the toe and heel a little low. It’s too bad it doesn’t go the other way.
The tale of this plane is a bit interesting. It came with some other stuff, but what’s usable of that stuff to me is a standard spokeshave without adjuster (I only have LN types, and they are lacking if you are removing wood rather than cleaning up – the mouth is tight). And also included was a newer 9 1/2. I just got a 9 1/2 recently, but I can dump one or the other.
But the tale is this – a mechanic somewhere probably in NY where the plane came from was hobby woodworking and he’d gotten a smoother, a continental gutter plane and this plane. The smoother was worthy of the garbage can, so it went there – not sure what it was, but it wasn’t even on par with a handyman. As is the case with many, I think the hobby is vexing because the planes were all used until the irons were heavily damaged, and what was in this jointer was mostly dust from using the unintentionally toothed iron.
I found it interesting that among the very common things, the person who never got into the hobby as deep as they could have found a Stanley 8 with a smooth bottom. The iron shows some signs of being ground as 1/2″ of the length or so is gone and the plane itself shows almost no wear. The damaged edge has been sharpened recently, it was just blasted away and full of really large nicks, but the edge is otherwise fresh and was hollow ground.
But what about the flatness?
Getting to the point isn’t my strong suit. I paid $225 plus shipping and tax for the whole group. To me, and maybe not to others, to get a plane with little wear like this, I’m good for $200. 15 years ago, you could find a plane like this for $100, but it’s not 15 years ago.
I tipped this thing upside down in the vise and secured it lightly and checked the sole expecting a low toe and heel that won’t be much work to address.
And that’s exactly what I found.
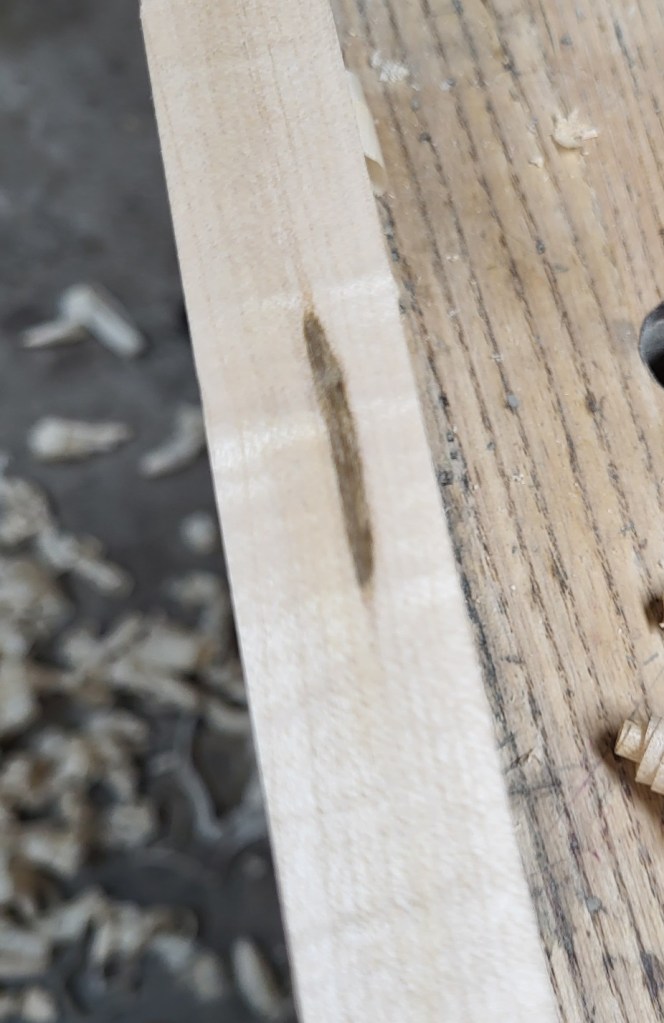
I scribbled on the sole, but the scale of the picture here may make it hard to see. No part of the front allows a .0015″ feeler through. The middle just does allow one through, and then a small section just in front of the heel allows a 2 thousandth feeler just through.
For all of the talk about this or that flatness and how poorly the later Stanley planes were made, I just haven’t seen it. I have seen earlier planes that are out of flat without it looking like wear. I don’t know why.
This one will be quick to address some afternoon when I have an hour to very accurately flatten the sole. The discussion of whether or not the hollowness of this sole between toe and heel even matters won’t satisfy tax preparers and pallet furniture makers who always know more than everyone else about woodworking, but for someone working by hand, it will make a world of difference match planing. if the sole were opposite, flat in the center and toe and heel just off of a board, I’d never bother to touch it unless it had other issues (twist). I’ve not seen serious twist more than about 4 times out of probably 100 planes.
If I’m wrong about the type and it’s not a 20 (8s seem to get less common with later types), good enough
Too, I’ve mentioned it here before – one of my first large plane purchase was a machine gun purchase of both the LN 7 and LN 8. The 7 was straight as an arrow, but had the fault at the time that you couldn’t set the cap iron close to the edge. LN laser cut or punched the hole in the cap iron assuming nobody would want to do it. I ended up selling that disclosing it. The 8, on the other hand, was hollow like this plane. Almost exactly the same amount, and I tried to use it to match plane and joint long ends, and it was difficult to plane something without the ends falling off. People seem to have trouble believing that, but it’s not a matter of mistaking what was going on – it’s a matter of people who don’t believe that could happen overvalue their ability to reason and assert things. Conflicting with reality doesn’t phase them too much.
One Last Thought – What do the Numbers Mean?
I am throwing around thousandths and what matters and what doesn’t from the view of someone who will be using this plane for long edges. I will, of course, make the plane as easy to use as possible.
Given that I’ve had just about everything other than a 24″+ norris jointer, and I’m floating toward a late type Stanley, maybe I should address two questions:
What if you bought this plane off of the internet and you didn’t know anything about flattening planes, what would happen? Well, the answer to that is pretty simple. Not much. You might find it to be a little more difficult to get a laser tight joint at the ends of boards, or that you’d have to take a few shavings on already flat surfaces to get the plane to cut end to end (not great), but otherwise, you could end up with a plane about as accurate from a boutique maker pretty easily. I did from LN, twice out of about 10 planes.
I think the underlying question of “why not just flatten the original LN 8 and use that” could come up as beginners who pick up a new boutique plane will almost certainly think the experience is better. I thought so at first, but when the volume of work increased, I began to prefer older planes. And beyond that, most volume work is better done with a wooden plane if the work allows. In terrible wood and for fine work like matching edges, having an adjuster is a little easier. At any rate, it’s not strictly a weight issue – I just find that the whole stanley package is a little better than the boutique planes when the planes are no longer being used as a half dozen smoothers of different lengths. I also didn’t have the confidence a decade or more ago to just get after the sole of an expensive LN jointer. It was easier to disclose the sole’s shape and sell it – most people don’t care as long as it’s inside LN’s spec. it was uncanny how the #7 in that pair would plane everything easily and accurately, and that little bit of hollowness in the #8 was enough to keep it from coming off of the shelves.
But I do actually like the Stanley planes better, and thus have no boutique planes at this point. I just don’t see a reason to have any, and it’s certainly not a money issue. I migrate to what is easier to use – functional laziness. Now that I have a hammer (can flatten these planes by hand and accurately), the “nail” isn’t a big deal. I don’t care to flatten many more planes as I have better things to do, but to sort of cap off my collection and dump the less common more collectible English planes and go to “plain old cheap later Stanleys”….hopefully that will be a last move.
This isn’t going to be what you think. I could give you a method to get an aesthetic and a result, but I think you need some background based in reality, and my reality is having bought probably 200 chisels from japan, and viewed thousands or tends of thousands for sale.
Myth vs. Reality
There are two myths that I can think of, and they don’t present themselves often in well used tools. First, the myth that everyone in japan sharpens chisels over a great long period of time with extreme care and with perfect bevels.
They don’t. I have received a single set of used chisels that were actually being used that were perfectly prepared. Someone was carefully using them and the very tips were perhaps ever so slightly rounded. I mean the last couple of thousandths, but the bevels were flat and cosmetically nice, and the backs were flat.
I have never received another single set of chisels that were in use that were in such a condition.
The second myth – that the genuine tools are tempered extremely hard at some level that doesn’t make any sense. By this, I mean that Japanese chisels typically are harder than western chisels. It’s the nature of the steels, white 2 and 1, or other similar surplus carbon steels. Hitachi’s tempering range starts around 325 degrees F, which will result in hardness around 66 with the right choice of steels. Such a chisel will still behave as a hard tempered tool (chippy, etc) in hardwoods. I have seen accounts of people claiming their favorite maker tempers chisels at 100 degrees C. Or the boiling point of fresh water at sea level.
It’s possible that a maker would do that, but it will not result in a good-to-use chisel. It will provide someone who wants to temper their own chisels with a starting point.
To pretend that a chisel that chips easily even in sharpening is somehow a good chisel is nonsense.
When I receive chisels from tool lots in Japan, I always try to find chisels that have been some-used , and sometimes that means getting 20 when you’re looking for 10 of the group, or perhaps in combination with blades.
When a chisel or three is undertempered, it is almost always erratically sharpened or hardly used. Neither is a good thing. A trip to a tempering oven sans handle at about 350 degrees will still result in a very hard chisel (guesstimate, 65 hardness, could be still toward 66) that can suddenly hold its edge in hardwood.
Back to the perfectly prepared set of chisels that I had – what was the key? I don’t know for sure, but they were one of the softest sets of well made chisels I’ve ever found. I would imagine that an experienced user got his or her hands on them and realized how compliant they were on good quality stones and realized they were just the ticket. I have a very developed sense of estimating hardness of plain steels on stones, and would estimate that set of chisels to be about 62 hardness. White steel has nothing in it to resist wear, so a set of chisels with a good soft lamination at that hardness will sharpen with little effort.
If they Weren’t Flat, How were they Sharpened?
Most of the chisels I’ve come across have a little bit of convexity on the primary bevel, sometimes with a primary that wasn’t that neat, and then some steepening near the edge.
Why? Because you can remove the bulk of the bevel that way and then focus the fine sharpening on the tip of the tool and zero in to the tool being durable. that’s my assessment, at least. That method also takes some of the pressure off of a natural stone being able to finish tools quickly. Most tools are factory finished on a very large diameter wheel, even the expensive ones, and you get to establish a flat bevel if you like that.
I would like to show you an array of pictures, but I never thought much other than using the new sets as a place to experiment on expediting setup/prep. so I have hollow ground and then honed out the hollow or flat ground almost every chisel I’ve ever received experimenting with ways to get that nice aesthetic bevel and finish it without getting bogged down in the idea that what’s touching the edge should touch the whole bevel.
Too, the finest stones, even the natural ones, won’t leave a very subtle but crisp defined soft to hard line. Anything other than wrought, and even wrought iron to some extent (usually found on plane irons, but sometimes on chisels) will become bright. it’s nicer to keep the bevel maintained with a fast synthetic stone followed by a relatively fast natural stone (guess what- a slurried washita leaves a divine finish), and then use something exceedingly fine on the tip of a chisel.
So, How Should You Do It? The Sharpening?
First, understand what allows the edge of the tool to be held without chipping. That means you can’t look at a piece of paper, and say “oh, two flat planes meeting at 30 degrees” and expect success. You have to find it. Obviously, I have a bias toward things that round the last several thousandths of an edge because the durability is outrageous and the sharpness is pretty divine, too. but you can use very small bevels – I think a very slow stone and doing this freehand is good. You’ll learn touch and maybe get better results than a jig -not to mention faster.
Notice also that when you read Odate’s book and see other pictures of actual users of chisels, you will find the silicon carbide stone is in the set to deal with damage. If you have a chip and you’re using a 1500 grit stone, there’s no virtue in that. It’s got nothing to do with using the tools.
Don’t deprive yourself of learning what works by experimenting. Get on ebay and find tools that look like they’re reasonably well finished but not prissy. There’s no great difference between the better tools I’ve gotten for $15-$20 per, maybe from time to time with an adjustment to temper, and any of the three Kiyotada chisels that I have and have used. If I’m honest, those chisels are like the three bears. Two are parers – one is too hard tempered and needs to be adjusted – it will not hold up in use, and it’s so hard that it will crumble on a coarse sharpening stone. The second is a little softer than expected, and a more recent mortise chisel is excellent – just in the middle. More recent meaning that Stan C. got it for me as new old stock from a dealer’s back room in Tokyo. An excellent chisel, very subtly finished, but it’s still a chisel, and it will still chip if you pry with it and it will not work for three weeks of continuous use or anything like that.
So, lesson? other than not overheating a chisel, use stones that are efficient and that are fast enough that you will sharpen often enough that you’re not wasting time avoiding sharpening and using dull tools.
Lastly – Who is Telling You How Tools are Prepared in Japan?
A lot of the information told to western buyers is woo. That a routine white steel chisel would be $300 per is woo. That a typical user has some $3k natural stone in a shroud to finish their chisels is woo.
It’s not difficult to get on a proxy link to yahoo auctions in Japan (Buyee, for example) and look at tools that have been used. You’ll be able to find everything from the same kind of “made for westerners” $4k chisel sets to well made used chisels made for experienced workers selling for $150 or a little more. Try to find a set of chisels that are significantly shortened but that retain perfect edges and a perfectly flat bevel. I think most professional users were more pragmatic than that.
Maybe another day, I will make a post showing the process of setting up and sharpening a Japanese chisel. It should be quick and intuitive, not punishing.
Like Colombo used to day – just one more thing. Am I trying to make excuses for myself? No – when I used Japanese chisels (sparingly now that I make my own chisels), I would make them tidy for pleasure. As with many things, it wasn’t a matter of just getting the tools neat. It was making them have aesthetic appeal, but learning to do it really quickly. Below is a picture of a chisel that I had sharpened that was in my “user” set. White 2 chisels with a wrought backing. They, too, were just a touch soft. Guess? 63/64 – supple on natural stones. This chisel was serving a second purpose sometimes – demonstrating the finish left by a finishing stone that I was offloading on etsy.
I really like the way this looks. Even the one single set that I found that was prepared nicely still wasn’t done was well as this. The rest, not remotely close. And people still managed to use them enough to get the handle and the blades shorter than they were when new.
Except I wasn’t working on a “real life project” while doing it. This is also a poo-poo of hard maple for hand tool work, which I think most people will come to if they try to work from rough to finish by hand with it.
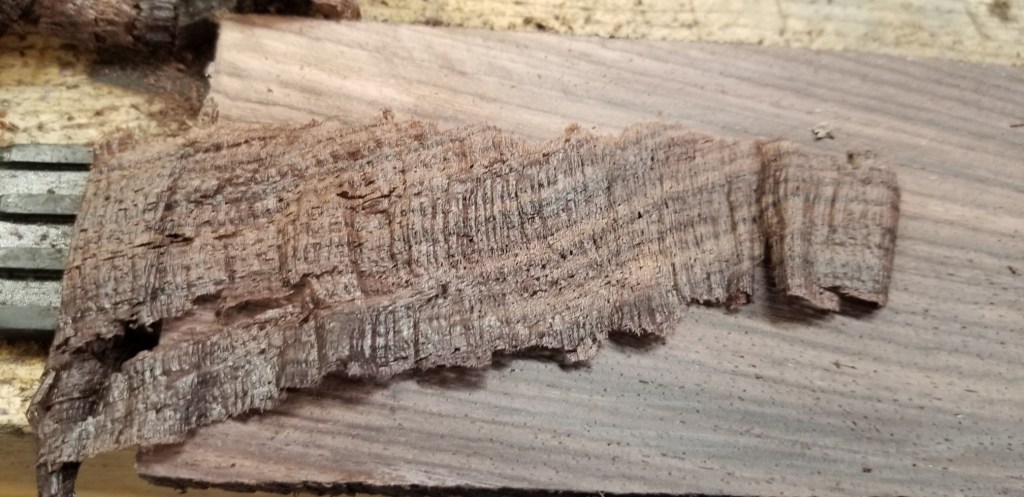
I’ve mentioned woods that cause edge destruction. I don’t think anything other than silica is usually responsible for this. I find it in rosewood, cocobolo, etc, and for a regular tool edge, you can usually figure which will destroy edges not by hardness or some other easy boast, but by the fact that there will be visible silica. In rosewood, it shows up in pores – just look close. It looks like little white balls.
Note the white dots. Silica. They’re loose and you can brush them out or vacuum them out, but as soon as you plane through the pores, the next set of pores presents a new set.
You can see them in some soft woods like mahogany and limba, and they just do what you would guess in those. They make a plane dull quickly, but in soft woods, the planing seems nice and easy and suddenly the plane is dull.
Except, in maple, I don’t see anything like this. I see gray or brown spots that just look like minor discoloration and destroy edges as bad or worse than these little white balls do.
This stuff ruins tests
You can plane a few hundred feet and see nothing of these, and then find a discolored area that’s a couple of hundredths deep and gone. Before you get through it, though, it will prevent planing and it doesn’t have to damage much of the edge width to stop planing. A few small areas creates blunt damage that you can feel, and of course, you can feel the ridges on wood.
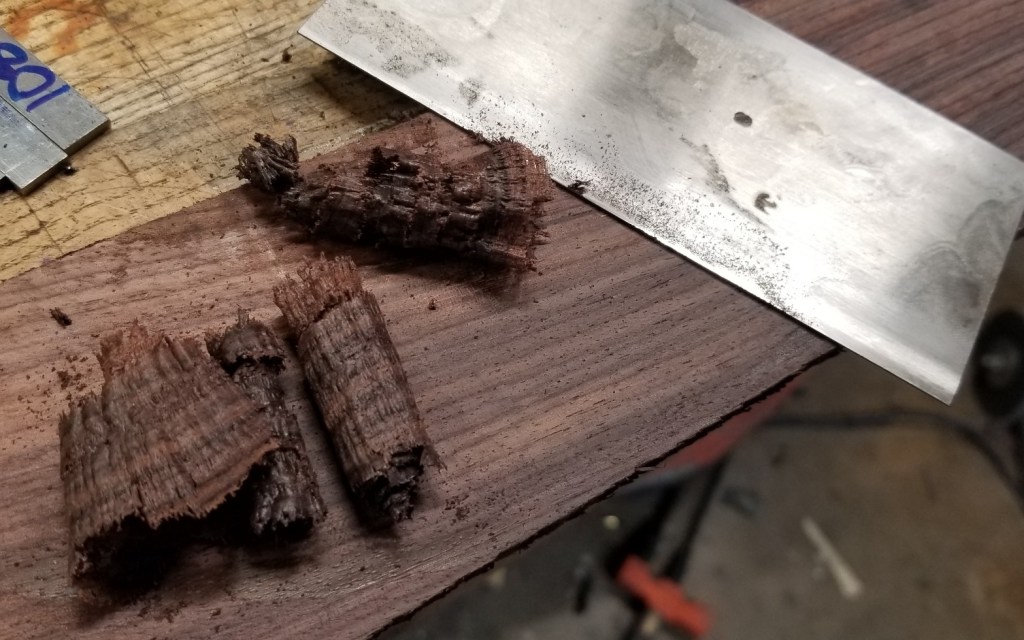
I was patterning carbides in the 10V test iron by literally just setting the cap iron close and planing wood to wear the matrix of steel away leaving carbides proud. And as I’ve seen this in maple before, I have planed probably a few thousand feet of shavings in “real work” as well as trying to get carbide patterns. No gray stuff. But it showed up here. Because they look innocent, I always think “i’ll bet this one will be all color and no edge destruction”. I think I’ve been wrong every time. Here’s what it did to 10V, magnified at 150x.
Ouch. About 1/8th of an inch of the edge length looked like that. It stops the plane from being able to enter a cut not just due to the dents, but because there is a 3d component to this. The edge is pushed back but also with deflections coming off of it going up and down. You can hit it on a hone quickly and remove the deflections and plane a little bit, but not for long.
The next two pictures show close up what these deposits look like both on the wood and in a shaving. Looks innocent.
When I first found these weird spots testing a bunch of plane irons 3 years ago, of course, I used the occasion to plane every iron through the spot to make sure all of them got destroyed the same way. They did. All with a 35 degree total final bevel. The harder the iron, the better it fared, but none planed long. Perhaps 8 or 10 strokes and the work stops, and you have 5 or 6 thousandths of iron length to remove before you really know for sure it’s gone. And that is *a lot*.
So, what do you do when you encounter these? you may have wood that destroys edges like this from time to time and have no clue what’s going on. If you were planing across a board with a little brown or gray spot smaller than this one, fun ceases quickly. You may not believe that the little spot that shows nothing shiny or gritty is doing it and start blaming things on a defective iron. If you sharpen without actually being able to look at the edge, I can almost guarantee you’ll leave damage in and then blame that on the iron a second time.
And then go shopping for supersteel. Except that will probably make your life worse, because it just gets harder and harder to get the damage out.
The old texts and some gurus talk about “planing teak and woods like teak” by increasing the angle 10 degrees. I wonder if some of them have planed teak. You can certainly increase the angle and at some point it will probably plane OK but be intolerably steep.
The answer in this case is to buff the bevel side and maybe the back a little bit. If you buff enough, you’ll have trouble planing at all. If you buff too little, you’ll still find some damage, but a moderate amount of buffing will make it so that you can plane all the way through the damage, deal with the strange feel (a freshly sharpened iron that doesn’t dig in quite as easily) and move on. The level of damage that’s in the edge will probably be removed in one or two normal sharpening cycles, or only 1 or 2 thousandths deep, and if you get it dead right, there won’t really be any.
If you find wood like this and it’s not really pretty, then it’s wood to avoid with hand tools. Cut it with power tools and sand it. Maple is worth it for guitars, and you wouldn’t tolerate the discoloration in the first place in higher cost wood, so it won’t be encountered. Rosewood, mahogany, limba…obviously worth it sometimes, too.
Just don’t kid yourself that spending a lot of money on another iron will fix the issue.
I ended up buffing a 26c3 (razor steel, similar to white or good file steel) iron that’s very sweet but not very long wearing. It was fine planing through the gray area, at least with the concession of loss of clearance and increasing the shaving thickness a little bit. The resulting damage was about 1/4th as deep as the pictures above or less, and the deflection was minimal. The nice thing about steels like 26c3 is the buffer can polish them reasonably quickly.
10V, I haven’t experimented that much yet, but would expect you’d have to buff it for a *long* time.
This blog is short (for me). I constantly look for easier ways to cut time sharpening but get better results as the combination doesn’t just give you an extra 20 seconds sharpening, but it gives you much less time working wood and a better tactile feel working wood. As in, the results on the wood itself are better and the experience is more pleasant.
It’s no secret that at least some very large fraction of amateur woodworkers struggle with card scrapers. When you read opinions, someone encountering the same struggle creating a consistent burr will hear from everyone who gave up and who doesn’t use a burr at all. This isn’t a good compromise, as there are plenty of cases where you’re doing both finishing and sizing with a scraper.
The typical setup suggested is to joint a scraper edge at 90 degrees and then go through a series of steps to get two burrs.
Forget it. Add a bias to the scraper instead and try freehanding the filing with a bevel of around 20 degrees – something you can do by eye without any jigs, and then hone the bevel of the scraper at a lower angle with an oilstone. Oilstones and saw temper steel are a thing of magic compared to using modern abrasives. So, summarizing this – try freehanding the bevel on a file at 20 degrees of lean and then half of that on the stone. With an oilstone, if your file isn’t dead flat, no big deal. When you freehand the honing on the bevel you’re creating a microbevel of sorts, and you can allow the scraper edge to go over the edge of the stone without tearing it up.
When you file, you’ll see something like this:
Note, the card is leaning over about 20 degrees – it’s not vertical. Joint it until any prior honing is long gone. Do this each time the burr no longer is of good quality or has a short life.
The view from behind then on the stone – a smaller angle. It’s not important exactly what it is, just that it’s between vertical and the angle of lean you used filing the scraper.
Notice the lean on the washita stone – a mdidle oilstone is ideal. 15 seconds on the bevel and the bevel side is complete. don’t forget to do an appreciable amount of work on the face.
Once you’ve done good clean honing on both the face side (put some pressure near the edge and bias the work so it’s done where it counts, and not just the entire flat face of the scraper) and the bevel side, you should have no burr at all, but clean undamaged steel.
Lay the scraper over and draw a good smooth burnisher over the edge (since you used an oilstone, you’ve already got a lubricated edge, and now your burnisher will also have a film of oil on it for when you re-draw the burr. Don’t clean the burnisher unless it gets foreign particles on it.
Drawing the edge on the flat side and working it for half a dozen or a dozen strokes is important – you don’t need to mash it with all of your bodyweight – keep it need and undamaged.
At this point, you can easily turn the burr and you can turn the burr with a stroke 90 degrees to the face of the scraper because you’re already working with a final honed bevel biased about 10 degrees. Everything is in your favor, and now you’ve got a little more room to not overturn the burr.
Don’t create a giant first burr – give yourself room to increase the burr side with subsequent drawing and you should be able to re-roll the burr an appreciable number of times before you have to file again. The fresh burr when you start this should feel perfectly smooth – and it should cut perfectly smoothly.
With the angles biased in your favor, and honing over the edge of an oilstone, you shouldn’t fail to complete steps like most people trying to keep everything square. What you have in two potential long edges on a rectangular scraper should take less than half the prep time of a 90 degree edge, and you’ll probably find the two edges will do more work than four mediocre edges.
after removing any saw marks or unevenness, these shavings are well formed and can be unrolled to a continuous length.
Once you get quick with this, a full re-joint of an edge, honing of the bevel and face sides and burr rolling shouldn’t take more than about a minute and a half. Scrapers don’t hold burrs for 800-1000 feet like a plane does, but count your progress in times that you have to joint edges on an actual project. It probably won’t be many, and the clean burr will improve feel and give you fewer skips or lumpy surfaces leaving you little to sand if you wish to sand.
As you get good at this, you’ll also develop another good habit – your tolerance for a poorly set up edge will be little and since you’re sure you’ll get a good clean burr every time you reset things, there will be no barrier to going back for a minute and a half and starting anew.
The scraper set up like this is near magic in working to a line on curved surfaces and leaving a crisp transition, too (think curves surfaces on instruments or tools meeting flat surfaces – it’s easy to scrape them to a finish, but sanding things like that to a finish without sanding the life and crispness out of them isn’t that great, plus, you still have to do the sanding.
The TL-DR of this very long post is that it’s a long discussion about what chisels were like when they were designed for work at the bench, how to find chisels like that, and some supposing about how we got to where we are now with chisels made from air-hardening steel alloys that are cleanly finished but proportionally odd. Remember, this entire blog is intended to discuss working by hand or entirely by hand. Choice of hand tools deserves more consideration and time in acquiring, and while it might be interesting to read through much of this otherwise, if all you want to do is cut some dovetails, just about anything reasonably hard and shaped like a chisel is fine. You don’t need to delve into the weeds that grow below.
1960 is just a choice of year. That appears to be about the time Sheffield, England was switching over to really automating production of bench chisels, and around the same time, tools made in lower volume started to disappear.
I’ve got a set of incannel and firmer gouges made by Marples likely made in the 1950s. They have what good chisels have:
Wonderful proportions – everything just fits when you hold them, and the bits from the bolster down are not overly fat. As time went on and costs were cut, the finish may have shown a little bit more hustle, but the proportions didn’t change. It’s hard to duplicate these proportions with jigs or CNC – inevitably, chisels get fatter if they’re forged or if they’re thin, they’re just cut out of flat stock.
Some semblance of hand work around the bolsters, even if they look relatively quickly ground. Once you see a round bolster that looks like it was turned on an automated machine, the odds of the chisel being a great one go down. However, as I’ve seen thus far, the market for used tools prices both the same.
Plain steel, but not lacking in carbon. Alloying above that needed for hardenability does nothing for you using a chisel. Once the grinder (the person, not the machine) and the glazer (terminology in England for finer grinding or finishing after initial grinding) are out of the equation, focus starts to shift from easy to grind to easy to keep flat and not have to grind much. Steels like A2 or V11 can make good chisels, but they can’t make a chisel as good as a plain high carbon steel that will achieve the same hardness.
In the world of internet guruism, it’s popular to focus on specs. Especially steel. “What’s your woodworking steel?”. This is not necessarily asking the right question as most of the differences that bloggers perceive in “steel” is really differences in hardness. It is true that you’ll have much difficulty getting a barely-high-carbon steel to be harder than oilstones will handle (or above Rockwell 62 or so), but it isn’t the case that something like A2 at 61 hardness will yield anything above and beyond a plain steel at 61 hardness. A2 definitely costs more than something like 1.1% carbon drill rod, but the real reason A2 is being used is because it’s stable in heat treatment.
What do you as a user care about stability in heat treatment? The answer to that should be nothing. That’s the business of the maker, and the stable steels generally have some carbide volume and carbide volume isn’t what you want in chisels. You want fine grain, little to resist abrasion (you’re abrading a chisel when you sharpen it) and hardenability in a range that you can sharpen quickly. Abrasion resistance will never yield anything practical in chisels.
My thoughts are that you as a maker, if you’re going to use chisels, will want to look at how chisels were made when people were making with them, vs. putting them in a tool belt to go to a work site, or later, collecting as beginners. By making, I mean making the things you want to make – likely work at the bench. Not wet wood, not door mortises, not opening paint cans, but working wood at a bench.
I Have an Admittedly Narrow View
This narrow view ends up leading to English chisels with square or octagonal bolsters, a tang rather than a socket, some length greater than you may like if you like “butt chisels” (that’s yet again, something pitched to beginners to make it easier to pinch the chisel blade instead of holding the handle – an unproductive dead-end habit).
There’s a clue here, and there’s a clue in a lot of older tools. That clue is, if you get something that was widely used and prefer what you’re using (for example, a short fat bladed socket chisel), you may have habits that aren’t serving you well. Efficiency in using a chisel comes from striking a chisel in rhythm with predictable use and not a whole lot else. Place and strike, and from time to time, turn the chisel around and relieve something in a corner or pare. If you’re pinching chisel blades or switching hands a lot to cut simple joints, you’re making things unnecessarily difficult and holding a chisel by the handle and putting it in a mark is probably less than one project away.
What has Progress Looked Like?
Having had hundreds (maybe still have hundreds) of chisels, it seems that chisels in the US went to site chisels relatively early. Somewhere around 1900? That led to shorter bits, sockets and softer steel fairly early. A set of stanley 750s will generally be softer than they could be. It’s not that the steel was too low quality to be harder, it’s that stanley chose to make the chisels that hardness. One can only guess that’s what the market wanted. Stanley irons of the same era show no lack of carbon (based on looking at the carbides under a microscope – low carbon steel wears smoothly, but as carbon or other hardenability alloys increase, you can see carbides remaining proud of the worn edge. A stanley sweetheart iron shows plenty of them. My 0.9% carbon O1 irons show almost none. Irons that I’ve made of 1.25% carbon steel show a large crowd of carbides.
So, for this (getting long!) discussion, we probably have a cutoff from US made chisels in 1900 that parallel 1960 in England. Cabinetmaking work simply lasted longer in England. You’ll find if you expose yourself to a lot of chisels before those dates, there isn’t a universal lack of hardness and chisels generally feel like they’re about 61 hardness to me (you don’t have to trust my sense in judging hardness, I’ll prove that at a later date – safe to say, novaculite will tell you a lot about hardness of plain steel tools if they’re anywhere close to the same hardness of the stones). Some are harder than that, and some are slightly softer. With lots of exposure, you can name the tools that are generally softer (buck brothers chisels tend to be softer, and if you go *way* back to the early 1800s, butcher tools will often be a bit softer – I would guess because the stones common in England were slower cutting even than arkansas stones).
After 1960, things were hit and miss and by the 1970s, anything that suited hobbyists as good quality sold new kind of suffered. Interestingly, footprint seemed to have continued making chisels around 61 hardness, and though they moved to socket format, the sheffield made wood-handled chisels have proportions like older tools and with reasonable hardness.
The era that follows the doldrums in the 1970s went to japanese tool enthusiasm in the 1980s (this was likely a function of a hugely advantageous exchange rate and a market that had no clue about the markup being added to sell good quality tools in the US – this was paralleled in the guitar market where japanese guitars selling for $350 in japan retailed for $1,000 in the US). In the late 1980s, the exchange rate declined in the US to the tune of about 1/2 or 40% of the previous purchasing power – and japanese electric guitars nearly disappeared. Someone around at the time may confirm the same with tools – I wasn’t woodworking then – the craze for japanese tools seems to have encountered a gap (exclude retailers in the US who sent glossy catalogues as they have always managed to double the price of the tools in japan and continue to sell them) until most of the public had email and internet access. I do have and like japanese tools – I may post separately the direction I’ve gone when I get them – used high quality tools in japan are no big thing. Most of what has changed in 60 years is the same as the US, which brings us to…
We’ve Traded Proportion and Fineness in Geometry for Surface Finish
…though, to be fair, you can get Japanese chisels now that are as good as any that have ever been made. But the notion that there is something to a $600 chisels performance-wise that isn’t available if you sort through $15 used and under-loved chisels on Japan’s version of ebay isn’t correct. There is (and should be) some care in the expensive chisels in heat treatment, but makers of choice in Japan become somewhat of a fad and as the fad buyers become particularly, the price increases and the surface finishing of the chisels moves to art. You or I can harden plain steels about as well as you’ll find in any chisel, it just takes some testing and understanding to get what you want. We may not be able to press or forge laminated chisels together easily, but that’s generally tradition. You can purchase something like 26c3 and make a chisel that is a match for anything from japan, and that will overmatch anything offered in the United States.
The parallel in the US is chisels that have little hand work in them and are sanded/ground to a fine finish, cut from flat stock, or made in tubby profiles with CNC machinery. They are nice chisels. But there is something lacking when you compare them to older English chisels. The proportions are off a little bit, the cross section is overly thick making them bit heavy, or in the case of some of the popular paring chisels, they’re just flat stock stuck in a handle, but surface finished finely. For some reason, finding them in the sweet spot with a steel that isn’t abrasion resistant is difficult. What’s the sweet spot? It varies by alloy. I’ll cover it better on a metallurgical post in the future, but figure 1095 and O1 steel like something around 61/62 hardness. A2 likes the same, but it offers nothing that makes it a better chisel and will resist you sharpening it, and V11 probably likes to be somewhere around 62 (based on someone on sawmill creek having a chisel XRF’ed (google it) and posting the composition and naming the same or very similar alloy. White 2 steel will like something around 63, and white 1 and 26c3 will like 63 to 65. All of these can be made harder, but behavior changes.
Notice – I didn’t mention blue steel and I only posted A2 just as an example. I’m not even that sure about 1095 at this point as I don’t really see any advantage over O1 with it – especially to you as a maker. Just as I don’t see any reason why O1 in chisels isn’t closer to Footprint and Iles’ spec than softer.
So, we’ve gotten way into the weeds and the above will all seem hypothetical at this point. Where does that leave you?
The Checklist of Aspects to Put the Odds in Your Favor
Let’s flatly state what’s usually found in older good English chisels as they’re probably not equaled for bench work:
Tang construction (though Ashley Iles and Footprint both have mock sockets and are close in proportion to older chisels – just with a different look)
Blades that taper along the length-in thickness, and that aren’t too fat at the cutting end.
Reasonably fine lands, but not zero lands. If you’re looking at older English chisels with a square or octagonal bolster, you’re not going to have an issue here – there just weren’t many fat sided, fat bladed chisels – the market of professionals didn’t accept that. The reason zero lands aren’t practical actually has to do with the corners. The lands provide some support in the corners and zero lands offer little functional benefit and lead to corner failure. Even if it’s small, what’s the point of having a super fine corner if the edge doesn’t stay on?
A handle with a brass ferrule (and not thin brass, but substantial)
A maker’s mark stamped into the metal, not printed on it. It’s a fairly simple thing to find, but the stamping of the name into the chisel disappeared partly due to cost and the need for someone to stamp it into the blanks, but also because the act of stamping a chisel actually causes distortion. This is worked out by skill and follow-up grinding on older tools, but it’s not really practical on newer tools when the objective has become hands-off making. It’s useful that this seems to coincide with about the same time that hardness dropped off and chisels were delivered at “site hardness” more often than bench hardness.
This sounds like a great list and you’ll get instant success, right? Well, I like buck brothers chisels -but I’d put them off even though you’ll find many. They are very fine grained if they’re made as mentioned above, but for some reason, generally tempered soft.
These aspects put the odds in your favor, but you may still have to buy a couple and then resell the ones you don’t want. That’s not bad advice in general when the old ones cost about 25% of the new ones. The hand-wringing over “wasting the money” to try a couple of different older sets of chisels is nonsense when two to six sets can be bought for the same price as a new set.
And..you’ll probably have to do some minor work to good chisels to get them in order – like initial preparation of the back and re-establishing the primary bevel.
Beware of Gurus who Specialize in Teaching Beginners
Please keep in mind, I don’t have enemies in the hand tool world. This isn’t a whole big attempt to bend opinion toward some aspects with a grand plan to release chisels that look like the ones I prefer above. I make chisels, but I don’t make chisels for sale – I want to be a maker, but not limited to marketing something. Making things and making them well gives you an understanding of what’s out there and when you finish grind a few dozen warped chisels, you get the sense why manufacturers may not love water hardening steel, or even to a lesser extent, O1 steel. O1 is more stable, and hardens more easily, but it still requires more follow-up grinding than air hardening steels like A2 or V11.
So, on to the issues with gurus. Imagine you’re teaching a class of beginners and you have two hours to get through the first part of the class. Suddenly, three students show up with some old chisels that are pitted on the backs – what will you do? Your objective may be to charge the beginners several hundred dollars each (or more) to get into the first steps of beginner-land and now you’ve got folks who are starting to count minutes and calculate dollars while you’re attending to someone who wouldn’t buy the new tools you suggested. I get that. Once you’re not a beginner, those gurus don’t have anything to tell you, though. If you’re reading this, you may already have chisels that work fine, or you may have 10 sets.
We’re not in beginner-land. This is a foray into making things out of wood, and we will end up discussing making things that we may used to make wood. And when we do, we will do so with the goal of making things that are at least as good as anything we could buy without any real limitations. Further, you’ll find that most of those gurus will want you to have instant success across the board, but we want to work by hand, with skill, comfort (even pleasure) relying as much as possible on our sense and eyes and less on tedious prescriptive methods or unneeded work. In short, when the gurus make blog posts telling you that buying older tools is false economy, they’re living in an alternate reality. I have had A2 chisels, I’ve tried V11 chisels, and blue steel, and HAP 40 and YXR-7, and M2 and probably a dozen other steels. I cannot imagine trading a good set of vintage English octagonal bolstered chisels for anything made now.
Why?
Because they just work in the cycle of work. That cycle is in the context of actual working, at the bench, in wood, where you sharpen periodically and relatively often. The chisels of the proportion used when makers were doing more making and less magazine and blog reading tend to do almost everything very well, don’t require special hammers to strike them (or instructions not to), special abrasives to “cut through the carbides” and generally do everything they don’t do superbly well enough that you will rarely feel the need to look away from your work and find an alternate tool to do something special. No dovetail chisels, no push chisels that can’t be struck or striking chisels that are awkward to push.
George Wilson used to post on one of the blue background forums. I have since come to learn a lot from George, and I know that George is (and has publicly said) that he’s just a tool fanatic. He is a lifetime maker – a maker’s maker who at times has made some of the finest tools I’ve ever seen, all the way down to making a wonderful infill panel plane that was flaked and scraped (and subsequently bought by someone, relieving George of his plane). When I first began to talk to George, I asked what chisels he liked. He said he had made almost everything with a set of Marples chisels that he bought new around 1960 or so (it may have been a year earlier or later). At the time, coked up with magazine articles about socket chisels and Japanese chisels, I was puzzled as to how someone with so much access to have or make *anything* could be satisfied with a name that I equated to soft plastic handled chisels. I’ve since found some older Marples chisels. I get it. I get that they may be used and require someone to tune them up. As George relayed to me, those last-of-the-good-ones Marples were perhaps a little bit overhard if anything. But they are good enough at anything that they leave a maker wanting for little. I’m sure the steel in them (as I’ve got similar era tools now) is very plain, inexpensive and with little more than carbon, iron and just enough other stuff to making hardening them successful.
If you’ve hung on this long, I’ll show you what the English pattern chisels look like, as well as what some of the “dead era” chisels look like
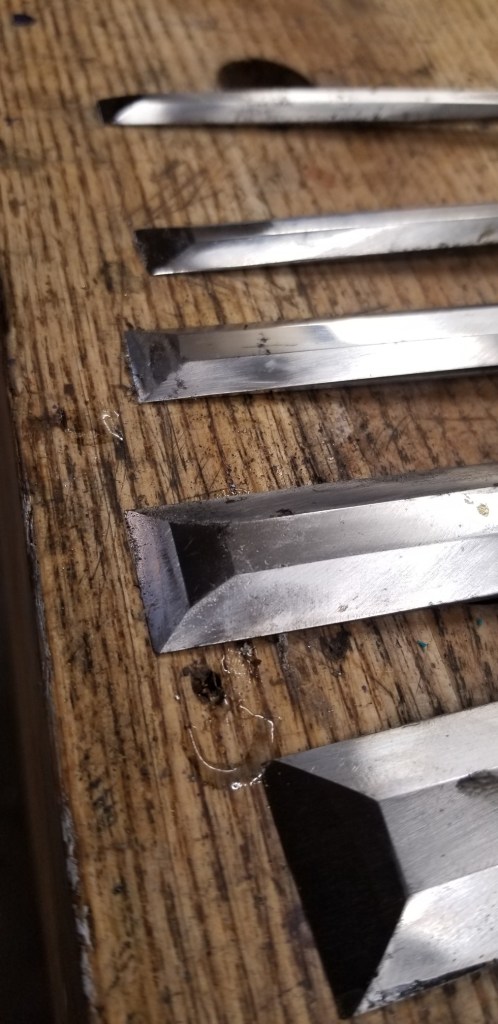
A Marples Parer– the Key Bits
Note, the name is stamped into the chisel (not printed on it), the lands are finely done, and the bolster isn’t round/turned on an automated machine. As much as I love parers and like to make them, even a wonderful chisel like this will find little use if you have a good set of bevel edge chisels of similar style.
Newer Marples – Deceivingly Pretty, But…
Note the boxwood handled Marples chisels at the top. These are so close to being good, but so far away. These are a set of ten – the name is stamped only in the wood and printed on the backs of the blades with ink, and the boster is rounded. You can see the lip at the bottom of the tang where the jigged grinding setup finished its work and left an abrupt stop. But the real problem with these (I can look past the rest – easily) is that 7 of the ten chisels are unhardened. I don’t know what happened, but since no job grinder (a person!) was grinding the bevels on to question why they ground so easily, out they went. Even when they are good, they are a step off of the hardness. An Aside – the chisels in the drawer bottom are of my own make – with a side note that they are .08″ thick at the business end, high hardness and you can still strike them hard enough to break the handles if you wish without any consideration for the metal at all. The style is much older English, the steel is 26c3 (very plain 1.25% carbon steel still made now), and you know from the article above why I would copy English tools in the first place. When expensive chisels are marketed to not be struck, I’m baffled. The marples parer in the prior picture would suffer nothing if it was malleted, even though it’s long enough to swat flies.
Well Loved Set of Tyzack / Hall
This set of five chisels (there’s six – where the 6th went escapes me) was $55 including a roll and shipping. They’ve been well used, but have a lot left. Unfortunately, they landed in the shop of a pig who will probably do little more than admire them, and possibly replace the one over-loved handle. I did use them briefly before continuing on the making. They sharpen quickly, suffer no edge holding ills, and have a look at the lands. Four of the six are marked tyzack and two are Hall. I’ve had harder modern chisels but none work better in the cycle of work. The cost of boxwood now would be more than the set (the one on the right is probably hornbeam or a fine grained fruitwood). I cannot convey how pleasurable these are to sharpen – they yield steel to a stone easily and the wire edge disappears effortlessly in the middle of finishing the edge.
But, I still want to Support Modern Makers
By all means, do. I guess I’m a modern maker, but you can’t support me because I’ve got little to offer other than relaying experience. I know some of the modern makers, especially those who work by hand. I would support them first if it’s under the maker’s mentality. As in, you want to support the makers who are chasing this kind of craftsmanship? Steve Voigt is an example with planes – Steve is making planes that have the spirit of the chisels I’m recommending.
If you’re more of the engineering type who sees surface finish and admires the idea of automated process, by all means. Support the makers who make things you like and can relate to.
But, please -don’t become a parrot bad information telling everyone new to the hobby that advancements have made better tools with better steel since some arbitrary date, and don’t repeat stories from gurus who started in the 1970s and whose view of old tools is whatever was available new when they started.
Where do You Find the Old Ones?
I’ve found most of my older chisels (many have passed through) on the UK ebay site, and some from dealers who will ship to the US. I’m an amateur woodworker and toolmaker. The fact that I’ll buy just about anything to see close up isn’t really relevant if you’re just looking for one good set and then you’ll stick with it. It does, though, give me the experience without relying on statements of others – the experience to tell what works best at the point of this post.
Some dealers won’t ship to the US, and sometimes you’ll find a reasonable set in the US already. Look just a little before you leap. I’ve never had to pay more than about $30 per chisel for a nice vintage chisel, nor more than about $60 for the finest parer that I’ve come across ($30-$50 is more typical). What sent me looking directly from England rather than through dealers in the US is the markup is just too much, though it may be narrowing. Before you could easily find UK dealers or proxy shipping from UK ebay, it wasn’t uncommon to see a parer like the one pictured above for $100 or more. That’s the business of dealers – to find something that’s $30 in the UK, get the good ones and sell them in the US to a captive market.
You’re not captive at this point except to your patience and a little bit of diligence – and the understanding that you may need to do some rough work on the back of an older set of chisels with coarse PSA paper- this isn’t the territory of 2000 grit waterstones.
Be wary of two things – newer chisels that look like older (e.g., the round tang and bolster) and basket cases. There are enough good tools out there that you don’t need to buy a chisel that is broken, overly short or pitted.
One last do if you’re on Ebay – log in to the UK site, not the US site, so you can see sellers who don’t specify whether or not they’re posting to the US. If you see a wonderful set of chisels with every important part photographed and looking fine, and with an auction price that’s really attractive – take advantage of that by asking the seller if they’ll consider shipping to the US. Some will. Chisels don’t weigh that much and it should never be more than $50. Oh ….and never have someone send tools with handles that are rosewood or could be considered rosewood by an drowsy proxy shipper in Ebay’s global shipping program. They’ll be seized – and you’ll probably get a refund – but you want the chisels, not the assurance that Ebay made you whole.
This is the first in a series of posts where I’ll address what makes you productive if you’re working by hand. This often draws people who use mostly power tools and cut joints and smooth plane some wanting to discount this advice. It may also conflict with what you will hear from the gurus who never really work by hand in the first place and who may run classes where using something that’s not ready to go would be catastrophic. Those classes are fine for starting out, but you don’t want to be a beginner forever, and at some point, you’ll realize that most of the older tools are more appropriate if you’re working entirely or mostly by hand. If you’re one of the minority who wants to have the physical satisfaction and the same feeling you’d get from a brisk walk – the mental and physical pick-you-up, as well as the skill development that comes from actually roughing wood (no kidding, getting good at the rough work makes the fine work intuitive), then you have to tune out the self-appointed experts. Those experts will usually tell you about edge retention based on the tool (you are the key to edge efficiency in the cycle of work, not the types of stones you use and not the alloy of the steel), and perhaps include their comment that you are wasting your time working by hand. If you take their advice, you’re really wasting your time.
The Case for Tools that Will Be More Efficient
Planes that get you instant success and plans that get you to be physically efficient (where work is predictable and your energy is spent on removing wood vs. making friction or lifting heavy tools) aren’t really the same. The first wooden plane that I purchased had an ill fitting wedge – very ill fitting. I incorrectly assumed that wooden planes were probably always a bit loose and difficult to use and maybe they came from an era where wood was soft, very straight and easy to work. I was wrong about that – fitting the wedge properly and understanding the use of the cap iron were key, but so, too was getting some familiarity with lots of little nuances. It’s almost impossible to hand-work wood efficiently with metal planes doing the rough and middle work. No matter how much of it you do, if you experiment in measuring your output over a set period of time, the slight increase in inclination needed to use wooden tools for the rough and middle work is the only direction to go. How big is the difference in your output (not to mention, your fatigue). Somewhere around 1.5 or 2 to 1 in volume of work done with a wooden jack and try plane vs. a metal jack and metal jointer. The more you move toward heavier metal planes, the worse your output will be. Premium metal planes are generally fine for following power tools and doing limited work, and they’re great for giving you a feel for how well a plane can work, but if you’re doing significant work by hand, they’re toxic.
This is a real bummer to me, personally, as I’d built 4 infill planes before finally recognizing that they’re not an upgrade for an experienced user. And even beyond that, if you work backwards to planes used around 1900, you’ll find most infill smoothing planes are closer to a stanley plane in weight than they are to whatever’s being marketed as a super heavy, super flat “improved” plane. I still have a love for infill planes (and still have about a dozen of them), but they’re not on the bench for long in a volume of work. I simply have them because I like them, but they become intolerable if you’re dimensioning wood and any more than a very small amount. Keep the wax handy and bring a canteen!
What then is an efficient set of planes for dimensioning and smoothing?
An English style jack around 15-17 inches with an iron 2 1/8 -2 1/4 inches (continental style is fine, too, if you like that – avoid adjusters, though).
An English style try plane around 20-24 inches (I’ve seen 24 inches referred to as a “long” plane) with a 2 1/2″ iron (or perhaps a quarter narrower if you find that too hard to work – but persist before you decide you can’t handle a 7 pound wooden plane with a 2 1/2″ iron). Continental is fine here, too – avoid the adjuster again.
A Stanley 4 (or 3 if you like) smoother (in comes one metal plane – if the try plane does its job, smoothing is spectacularly quick and this is the one case where you’ll find the adjuster useful). Common pitch, stock iron and chipbreaker – you can replace those but if the stock versions in your plane are good, thicker/harder/more carbides – none of those equate to more work done, but may equate to less. If you feel they do, you need to work on your sharpening cycle time. More on this in another post – but safe to say, an experienced user won’t find any benefit with increased abrasion resistance in steel.
Stanley 7 or 8 – For the occasional poorly selected wood or prissy jointing work where you want a very fine joint, a sized bailey pattern plane is nice. You don’t need a 10 or 11 pound jointer, and in the case of wooden planes, I don’t think a 28″ jointer is favorable. They generally have a long nose and you won’t use them much, so the efficiency of the wood contact is lost. Interrupted cut trashy wood will also hammer your wedge loose. You’ll find in general that once you’re good with the try plane, you’ll be able to make unseen glue joints without resorting to tissue shavings (which can be a waste of time when they’re not needed), and stock large enough to need a longer plane will be uncommon. If you have a little trouble at first, the metal jointer can be helpful, just as it’s helpful in wood that really won’t tolerate a jack plane at all (such as knotty wood or wood dominated by grain runout in every direction).
Do I have a lack of exposure to tools? No, I’m sure my total take from LN and LV in the last 15 years is five figures or nearly touching it. At one point, I had an LN 8 and LN 7, and bevel up LV planes at the same time. I’ve had at least fifteen planes between the two, but I no longer have any. They’re more effort to use in work, and the seeming advantage of “modern steel” in them really doesn’t hold water in anything other than ideal conditions. Again, more on that elsewhere.
This advice isn’t an oppositional viewpoint, it’s what constructive laziness will get you. Constructive laziness is an odd thing. is it more effort to dimension wood by hand? I guess that depends on what you like to do. I would find taking a lot of my shop’s footprint with stationary tools agonizing, as I would dealing with sanding dust, saw dust and a reasonable dust collection setup. I’ve skipped those. I find hand dimensioning pleasant (though it took a while to figure that out) and much like a brisk walk. If you’re fighting friction or woodworking like you’re pushing a tackling dummy or handsawing leaning over a sawbench holding your entire body up while you slash saws around, then you’re working against yourself and you’ll need a nap. Constructive laziness is about figuring out what keeps you in that brisk walk territory, using more subtle movement to create smooth constant output, and doing so in a way that’s rarely uncomfortable.
This entire idea, doing something efficient, predictable, in rhythm is why you can’t rely on advice from anyone telling you that you can’t make anything entirely by hand.
There is an Obligation, Though
You’re going to need to understand how tools work. Everything is incremental in life – anything you learn to do well. You understand little bits at a time and then they become trivial. The cliquish recommendations that you find online (though to be fair, with an equally cliquish “old tools only” counterpoint from experts who sell a lot of woo) leave you wanting to know one trivial fact after another, but those bits of advice don’t often connect and help you understand much.
The obligation is that you’ll need to understand how tools work, how you get them set up if they don’t come as nicely set up as you’d like, and how you maintain them in the cycle of work. It’s a little bit different than what you’ve read from writers who write articles for a living or teach beginners.
You are working toward the point, instead, where feel, judgement, work are intuitive and you’re going to be more influence. A simple example is the almost certain fact that when you first start, if you buy a Lie-Nielsen bronze smoother (A lovely plane, and a great idea if you’re looking for one tool that will show you what to expect from your own), it will almost certainly be easier for you to start on the near ends of boards, the plane will have a great chance of being dead flat, and fine adjustment will be easy. But you’ll eventually find it nose heavy, with lots of friction and once you learn to manipulate the Stanley at the start of a cut and it’ll be less work to use. I kept a bronze 4 for a very long time just because I admired the tool and the effort LN made to make it work so well out of the box. But in the end, it was just more effort to use than a good stanley example, and I appreciate the faster adjuster on the stanley. You might, too. The issue of being harder to start just goes away on its own – when it does, you probably won’t remember that.
Your obligation is putting in the time to get there, knowing it will become pleasant and trivial, and the skill and control and contribution to your own constructive laziness will find utility everywhere. Your obligation is to understand that you can learn every aspect of something like a stanley 4 or a wooden try plane relatively easily and then learn to manipulate them, and your familiarity with this smaller set will allow you to plane anything that can reasonably be planed (or scraped) without feeling the itch to buy a large scraper plane, or some other quick fix like that. You can go down that route (I did – curiosity and experimentation led me to have both premium large scraper planes, a stanley #112, a bunch of very steep rosewood planes – they just don’t do much for getting anything done, even though they’re fun to plane with). Doing everything by hand will quickly give you the ability to do all of those “difficult wood” tasks with your core set of tools just as a matter of trivial moderate exercise. No steep frogs, no scrapers, no specialty alloys need, and no double weight planes.