I’ve dealt with this one for years, with some smug incapable professionals as well as high-self-opinioned amateurs saying the same thing.
That no good craftsman observes what the shavings from the plane look like. The response is this. “I look at the surface, it’s the only thing that counts”.
First, the easiest way to tell if you’ve set a double iron properly is to observe the shaving. If it worked by the action of the cap iron, it will take on a different quality – from somewhat irregular to thicker shavings actually going straight for their entire length or long sections. This is useful to see – it doesn’t guarantee no tearout, but it guarantees safe planing for the time being. Without this cue, you’re potentially headed into the weeds blowing past marks.
Second, fine tearout that ruins a finish planed surface or shows up only once you apply finish will show up as discontinuity or holes in thin finish shavings. This kind of thing is hard to see on the surface of bare wood, or judge if it’s just the structure of the wood (lack of density in grain) or if it’s actually fine tearout.
To tell beginners that nothing can be discerned from plane shavings is stupid, and when it’s paired with assertions of much professional accomplishment, the accomplishment and the planing are not linked.
This kind of stuff is just too bad, but as mentioned in the prior post, you can’t bulldoze water uphill.
What do most of these folks do? I’m sure they sand everything, and their use of planes is far more infrequent than they admit. Some of them I know from actually talking to them. With revisionist opinions about good plane setup that match nothing that they said prior to 2012, it’s a bit obnoxious.
You may be asking, what’s the big deal if you’re going to sand? Aside from giving terrible limiting advice to people combined with puffery, even if you are going to finish sand a surface, you will be able to do it far more quickly and to a final level if you are good at planing a clear surface. Perhaps in one linear grit.
Someone capable with planes will not rely solely on shavings, but they will discern an awful lot from them.
I’ve seen this question a few times. Someone pointed me to a dumpster fire post on Sawmill Creek describing what firmer is, and it slipped on a cowpie into declaring registered chisels as being something made up or a made up word, as if they’re no different than firmers.
As usual, the discussion devolved into assertions that firmers are flat-sided only, and are “firm” so they can be hit harder.
Before this morning, I’ve never looked up firmer. If a word in English doesn’t make much sense or describe function, it’s probably a mangled version of another word. In woodworking, I guess we don’t have too much German or we’d have chisels that go by five-word compound names.
The short answer is findable in a regular dictionary. Imagine that. Firmer is an English mangling of a French word that means “to form” or “former”.
Referring to Nicholson’s Mechanic’s companion, the firmer is described in a way that probably won’t make sense to the typical 21st century hobbyist. Basically, the way I make chisels and probably many did before they become “tapered flat planes”. A flat bottom, and a top with curvature leading to a relatively thin edge (with flat sides as of 1840) with the last few inches closer to parallel. If that doesn’t make sense, it will if you ever seen an older firmer and wonder “why is a chisel intended to be ‘hit firmly’ not thicker”. The reaction to this is sometimes that “tools now are made better, they’re heavier”. That’s also not correct.
Understanding why a firmer is the “former” of the wood, according to Nicholson to be followed by a paring chisel when needed, clues us in to why the heavier chisels referred to as registered chisels are not the same thing. They are, in fact, much heavier cross section chisels with a heavier tang and stronger bolster design, intended to be struck. A 1928 Marples catalogue shows these at this page, this picture specifically.
If you travel to the the first link, you’ll find the picture mentioned, and you can see firmers listed on the prior page, with and without bevel edges. Entirely different purpose and format vs. registered chisels, and the firmers aren’t “fat” chisels intended to be pounded. I would imagine two factors led to the introduction of bevel edge firmers later, which explains why nicholson described them as flat sided – synthetic abrasive wet wheels so that a trade grinder could quickly grind side bevels on a hard chisel. And steel that could have added thickness at the middle and still through harden without being quenched in water. When you use the plainest of water hardening steels, many will cease to through harden fully on cross sections bigger than 1/8th inch.
One of the other differences (firmer vs. registered) that you will find with factory handled chisels is the registered chisels are also hooped, but catalog listings show them sold unhandled, so this isn’t a guarantee, and I’ve had more than one thin cross section delicate firmer that’s been rehandled with a hoop. To get an idea of what chisel would’ve been sold as a registered chisel if it matters to you has more to do with understanding the thickness of the chisel’s profile – which type would have come from the maker with the intention that it could be levered in heavier work. Firmers are generally more like a bench chisel, but longer and thinner. The whole idea of fat “bench” chisels and fat overweight firmers (not registered chisels) is a modern thing, also aided by oil and air hardening steels that can through harden pretty easily, but then the chisel becomes overweight and not very nimble in work. On a jobsite, though, such a chisel would be harder to bend over and break by apprentices.
I didn’t look up the origin of the word “registered” in the context of chisels, but the average person would probably consider that “registered”, like an internet tough guy would say “these chisel using hands are registered as lethal weapons in 14 states”. I would guess that the original word was also not English and has nothing to do with that, but rather like the firmer, the use or function of the chisel. It is more reasonable to say “i’m guessing” because, that’s what I’m doing.
I could probably ask Warren and not have to do any work. Next time I see him, maybe I will. If it also started out as French, he’ll know.
One Could Look at this Two Ways
Why forums (and writers, and woodworking personalities and magazines) remain such a terrible source of information other than who is currently selling woodworking tools is probably a combination of two things.
The first: The resident experts usually providing information will not peel an onion back very far, and they’ll refer often to someone who they like. It could be Paul Sellers or in this case, Adam Cherubini, who declared that the term registered appears to have been made up. It’s a little weird for someone to be that involved (costume and all) and not be curious enough to answer this question. The person who overruled a legitimate comment by referring to Adam as if he is the atomic clock of tools, less surprising.
That’s my relatively dim view of it – the first round of answers you’ll get may include a correct one (it could be Warren, he’ll answer briefly). After that, a fast layer of guesses and answering “from reliable friends” and personalities. One in this case referring to Adam Cherubini – someone I don’t really care for but that’s OK. If there is a right answer or something more likely, why don’t we just establish it and move on so we aren’t making insane guesses for 2 decades. Forums are generally traffic heavy in “at the bar” discussions of things, even topical, and the ancillary bits that could be used to define or clarify things are not well thought out. I don’t think they were intended to do that – I think they were intended to create an easy format to draw in beginners and connect them with advertisers in the interest of the forum owner. That’s important to remember – the system itself does not function to provide information. It functions mostly to coordinate advertising or e-begging members for money.
The second view about forums, and one that I discounted in the “could we curate this to move up a level and have better advice and real answers” frustration……..Nobody really cares on forums if answers are accurate. A few people will, but they’ll come and go. I remember George Wilson’s response, that eventually, he realized that if you provide good advice, it’s not as if people will necessarily follow it vs. the next blog post by Chris Schwarz, or an article about blue tape on dovetails as priority #1 before considering if a piece will have the potential to look nice in the first place.
And there is one more important point that goes with this. To have answered this question like I did here, were I still on the forums, creates two things. First, it kills productive follow up discussion. The origin of firmer is simple, it’s factual. And second, if it doesn’t kill discussion, what follows after it is a cow pie of “that’s probably wrong” or “what would a dictionary know about woodworking vs. Adam C.”. And that leads to resentment. If there was always a brief accurate response, which by necessity, would have to come from a number of different actual professionals or very enthusiastic Don McConnell (who used to provide superb dead-on answers, but long ago disappeared from doing it), that creates resentment. If good answers come from the same person in disagreement with “friends” (imagined friends, pointing also back to the strange dynamic that if you pay Paul Sellers, Rob Cosman or Chris Schwarz, then he’s nicer than someone who offers you a brief answer that you could go confirm), that creates resentment. And I can guarantee you some of those folks will complain to forum ownership, and you will find out that the purpose of the forum is more about 20 posts that leave the question standing than one that answers it.
I’ll be clear about this, too. I don’t know Adam C. and I doubt he posted an answer on knots eons ago thinking it would come back to bite. He just ends up being the source example in this case because that’s what actually occurred. He posted something, and it got referred to as if it is as reliable as Nicholson, an old Marples Catalogue or Holtzapffel.
Where do you really find answers to most of your hand tool questions? Not from me, not from Adam Cherubini, and certainly not from Chris Schwarz or Derek Cohen. You can just go to google books and read an older text. Just the bits you want a little at a time. You don’t have to buy stockings or a pirate shirt. You’ll be shocked for something like Nicholson’s Mechanic’s Companion how compact the descriptions of tools and their uses are. And how accurate they are. But if you start referring to those sources, you can expect that if you try to do it on a social mock-informational medium like a forum, it will work like citronella to create some social distance and you may hear crickets.
My Motivation Here is a Little Bit Selfish
I fell into the same trap early on. I thought Adam C. woodworked for a living. I never got a legitimate vibe from Chris Schwarz outside of his publishing other peoples’ works, and fortunately woodworked long enough before the loud Sellers videos to see that there was something missing there.
But I don’t want to be a better source of information. It’s not a competition. I have some resentment that when I figured out how to use a double iron more or less in a vacuum, it’s something that could’ve been taught to me earlier. I wasted 6 years to get to that point, and I’m sure others much more. My selfish motive is wanting to have accurate answers that I can learn from. Someone pointed me to Nicholson (probably Warren answering something), but it was years before I ever even heard of Nicholson. Before that, I was pointed hundreds of times to the woodworking personalities, etc, of the sorts mentioned above.
To look for this type of discernment ends up being a little bit dividing. At least if the folks offended by finding out they’re giving bad advice can’t get over it. I get that. But it’s more important to me to heat treat steel better in isolation than it is to do it the way Paul Sellers does it and come up with a subpar result that dozens will cheer for.
I have no delusions that my interests and depth of pondering are going to appeal to a large group, nor do I have any interest in the whole fascination with brevity when brevity gives an incomplete picture with overconfident information gatherers running around and saying “according to dave _____” with horrifyingly inaccurate statements following.
I’m also not that deluded to think many people are quoting me, but a few have.
However, I recognize as a reader initial of Larrin’s metal stuff on knife steel nerds that it was superb for me (and more concise than my writing), but I would guess the average person who isn’t trying to use something and pick the cow patties to find the corn – well, they probably think the articles on larrin’s site are too long or confusing.
“Just tell me what’s good!”
So as I write new posts and then categorize them, I’m going to put a link just below the title “give me the short version!” that distills the main point from the posts without the pondering and without the pictures. I’ll also gradually work backward through useful older posts and add the same thing to each.
I’m never the consumer of this type of thing, but I think almost everyone else is.
So if you read the posts and lose track, you can hit the easy button and see what I think in outline or in shorter writing. I’ll start with the ruby stone.
These pictures are the tail end of my testing, after getting a sense for how steel sharpens and grinds. I first want to see if the steel rolls or chips, if so, when, and how, and get an idea of the carbide pattern in the steel. Why? There are published micorgraphs of carbides for most steels. I don’t know that there are any of W2, but W2 is a lot like 1095, and the carbides may be slightly more coarse, but it should look a lot the same.
Translation in this case, I should be able to see them, but they may not be quite as prominent as expected since there’s not so much alloying to keep excess carbon (>0.77%) out of the matrix.
Compare this to 52100 bearing steel (tough, hard to break) where there’s enough chromium to make it less easy to dissolve carbides and free excess carbon. According to Larrin Thomas, this is what’s influencing how the martensite in steel – the stuff that we want to create and then temper – is arranged. With carbon more in the 0.75-0.8% range (my guess), the martensite is formed in laths. As you get closer to 1%, the martensite can form in plates without laths, and I’m guessing some combination between.
What does this do? Subjectively, plates form with excess carbon and the carbides will not be as prominent as expected given the carbon content. Laths would suppose more carbides and maybe bigger in the same or similar steel composition.
Laths are associated with toughness (do they interlock like fingers? I don’t know) and plates, less strength, and a toughness test where steel is broken by striking it in the middle shows at higher hardness, the toughness can differ by a factor of three. Tougher football players are better, right? Tougher shoes, tougher cars, tougher tires, so tougher steel is always better? if you’re bending a knife in a split in a tree or stabbing ice cubes, the toughness will prevent breaking. I haven’t found an ultra tough steel that I like too much in chisels, and only one in plane irons (80crv2, though 1084 is OK – it’s just not as good as many other options).
I haven’t had W2 toughness tested, nor hardness tested (I can guess at the latter accurately). I care more about how the irons or chisels perform in wood than knowing how much energy they absorb when being broken in the middle. it took quite a bit of experimentation to know that just getting more toughness and using it to allow more hardness doesn’t necessarily translate to greatness at the edge.
But I suspect W2 isn’t very tough. Perhaps similar to O1 or only slightly tougher. Anyone have a problem with O1’s toughness in tools? I don’t.
Strength is what most of us think of when we talk about the condition of tool edges – how much can steel tolerate before it begins to deform in a way that it doesn’t “come back” after deforming. Breaking is long after this. We like steels that are “strong”. Toughness is harder to make a generalized statement about.
I have found over time, too, that unlike knives, if a steel is tough – it will retain deformation. you will then push deformation through material (imagine cutting with a knife that has a rain gutter shaped bit curling around the edge instead of an apex). All good chisels, if challenged, let go of the edge instead and what’s left behind is less wide than a rolled/deflected edge.
Soooooooooooooooo……
to get an idea of how all of this works out, I set the cap iron really close so that it pushes the wood into the back of the iron, rubbing some of the matrix away and hopefully leaving carbides standing proud. Getting pictures of carbides is a real trick – not so much getting pictures of them, but comparing them. To see them, we need something to cast a shadow. However, if they are round domes, the microscope looks directly down on them and it prefers light that comes right back up. That means if we see a shadow, we can assume that’s pretty reliable, but the bias of the scope is not to show one in the first place. Higher light level also means less shadow, and lower light level means more, but discerning details becomes difficult as it gets too dim.
Moral of the story? Don’t trust everything you see. At some point, I may screw around with introducing a lateral light source stronger than the top tube light to game the system, but I haven’t yet.
the magnification of these pictures is a true optical 300X. This is beyond the capability of hand held cheap scopes, and for scale, these pictures are a little less than .01″ tall from top to bottom.
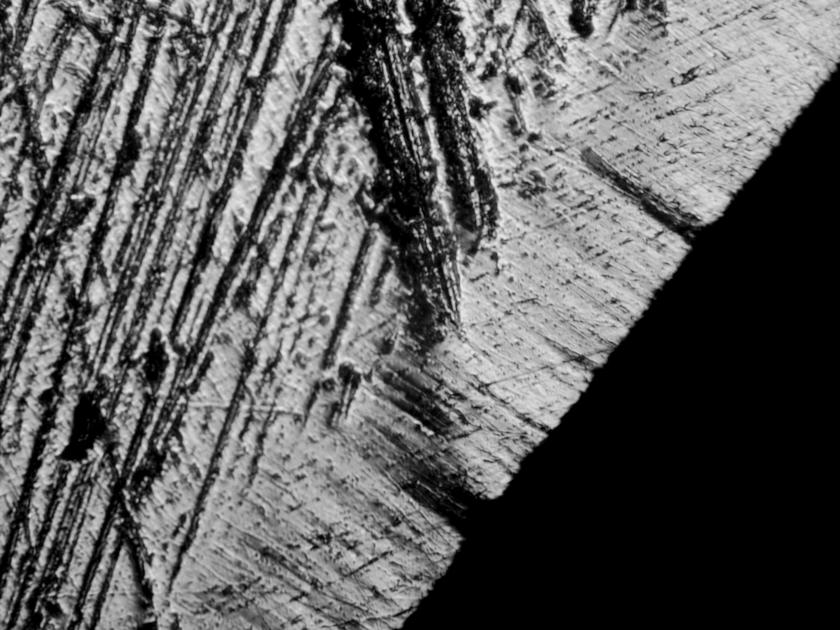
First iron of the pair, this is the first picture that I took:
This picture was disappointing. The halogen bulb in the scope was on its last leg because I left it on for days recently (oops). What we see seems to be a lot of carbides 1-2 microns. good, but I learned the low light is a bit deceiving because most of my other pictures are at a higher light level. also, the edge doesn’t seem to wear very evenly. These are tiny deformations, but other stuff (26c3, O1, 80crv2) seems to wear with almost no interruption in the line). But since this is the first use, it’s possible some damage is left from initial grinding, even though shallow. The grinding and honing of these irons, and flattening is brisk and harsh. I’m sure the same is true of commercially made tools.
Nonetheless, with dense carbides, my thoughts tend toward “well, it might be slightly soft compared to what I’d guess”. it’s easy honing and only the third or fourth hone really gives a good idea of where hardness will be – when all damage is removed and there are no deep scratches in the back that hone away easily.
I set up the second iron, but came up short doing it. it still provides interesting information:
What happened here? I changed the bulb in the scope and took a picture. The carbides are harder to find. This reminds more of O1 – at least no big odd carbides at this point – that’s the worst possible outcome.
the edge looks wavy, but if you look closely, you can see large deep scratches remaining above the edge. Those are from a 180 grit diamond disc. the edge still looks a little more ragged than expected. Higher light level does a better job of showing all of it, so the low light ragged edge is probably better than it looks – the lower grooves just can’t reflect enough light back for the camera software to decide to show them.
when I flatten the backs of these irons on the rotary disc, I have a drill in one hand and hold the irons with the other. Once in a while they grab and probably leave some deep scratches in the very tip of the iron even though the iron looks honed otherwise. Translation, these are deep at the edge, but they definitely are gone in the rest of the iron, and i just need to go spend two or three minutes honing more focused at the edge.
But first, I took another picture, as it would be nice to know if those scratches got to the edge. On a good iron, if there is a defect, the iron wears away around it. With steel that’s less stable (bigger particles, like V11), more damage will occur around the groove creating a bigger deeper nick before everything becomes stable.
that’s what I wanted to see. Notice how the deep scratches, at least one of them got to the edge, and then the iron wore a little faster around the scratch, but the shaving direction is perpendicular to the edge, so it wore away some of the edge and then created its own route back from the edge in the direction of the shaving. To see this and not see the remaining divot wider than the original scratch is fabulous. this is what older irons often do that newer irons with large particles don’t.
I bring up V11 because it has high carbide volume. A2 has less volume, but it does have carbides about as big and sometimes unevenly dispersed. Cracks start in carbides, and five microns is about the size of the smaller groove at the top. A five micron round carbide isn’t five times the volume of a 1 micron carbide, off the top of my head, it’s 25 times as large in volume.
The edge looks more even away from the damage. The carbides are hard to find, though. The faint diagonal lines going the other way are oil. A tiny amount of it after wiping off the iron several times – it’s hard to get rid of all of it. that’s oil left after use, not after honing, too. And that’s why your oil stone sharpened tools never seem to rust and waterstone sharpened tools do quickly. You probably never get all of the oil off even when you think it’s gone. The carbides are there, but not big enough to cast a shadow. the shape of the wear is sometimes scooped, but it’s not here. If it’s scooped, from the shaving wear as the cap iron pushes the shaving back down to resist it, we can see the carbides easily. More wear to the edge rounding it would also help, but I didn’t plane enough.
Back to the other iron with the new bulb and a lot of light to try to see if the edge really is uneven…after two more hones. it looks pretty good. Same iron as the first picture, the light washes out carbide shadows.
There’s some relief on my part here – an iron that wears unevenly at the edge is no good because it feels dull sooner. Recall from the revilo high speed steel iron, I’m sure the steel has better abrasion resistance than plain steel, but the lack of uniformity at the edge while it’s wearing eliminates any ability to actually make use of it in wood. Uniformity is good.
One last experiment then, taking a pair of pictures of the two irons in lower light – I sure hope they show carbides and are similar.
Oops, a little too dark. This is the same iron as the last picture – notice the scratches haven’t moved. Round carbides make what look like little comets, though they’re probably not really ideally round. The carbide is at the front and the tail of the comment is the steel matrix that’s protected from wear a little bit longer. You can also see how at low light, some of the edge disappears at the apex, giving a false sense that the edge is uneven. I’m still learning all the time!
then, the other iron at slightly higher light.
Notice how even yet after a few minutes, the almost very edge of this iron still has some scratches. it’s pointless to remove them if they don’t get to the edge. They will be removed by subsequent wear and honing. the same is true for someone getting a new iron and believing they need to have an optical polish for the first inch.
You are better off buying one of the cheap hand held scopes to avoid wasting time on stuff like this. While those scopes won’t do much to show carbides like this, they will show most scratches that are visible. I’d have very very easily seen the stray scratches that bungled the first efforts in two and three. But the blessing of those is they answer how stable the steel will be around a defect. Because scratches aren’t the only thing that propagate damage – nicks do the same thing.
I’m glad to see the carbides again at lower light. When you’re going back and forth with different pictures, you get all kinds of thoughts. “maybe the composition isn’t uniform in the bar stock”. That happens rarely, but it’s possible. The variable in this case was me.
This is a very stable steel, though I can’t see any commercial value to someone like LV or anyone else making plane irons. It takes a different skill set, and it would take a savvy experienced buyer to appreciate it in a plane. It would be appreciated in a chisel pretty easily, though, but not practical in a market where people like lego-like chisels crudely made but with a high level of finish and an optical back.
If I go pro at some point in the future, I’ll offer stuff like this for people who just haven’t tried enough different stuff yet.
Maybe these thoughts are more kind of a study in how people reason, and what they assume they know. I will share something that most people wouldn’t, though it’s becoming more common – a little less than a decade ago, I went through a deep depression that was probably there a little just because most people who like to think aren’t that happy, but drastically exacerbated (by a factor of 100 times – the experience was not pleasant) by an adverse reaction to migraine medication. And that was lasting.
What that left me with was living too many layers deep in the onion, as I’d put it. Pondering how many things we really know and how many do we assume out of convenience or just nothing more than we haven’t disproven them.
This isn’t a great place to be, but it taught me something very important (I recovered, of course, with no real harm done other than the misery). What it taught me was to explore things and always assume I could be wrong in a way that isn’t just bubbling insecurity. Rather, it’s being less assertive about things you don’t know well and waiting to see if information comes your way to give the opportunity of discussing things more accurately with people. I think we owe that to each other – your entitlement to have me tell you something that is correct is more important, by far, than my entitlement to believe something and then insist to you that it’s true when it may not be.
I don’t know if this onion thing has been defined by anyone else, but I would say standing on the outside of the onion is parallel with hearing something from someone else or just supposing it on your own, proudly and confidently asserting it without any self awareness and never choosing to look further. Even when proven wrong. The first layer of the onion is thinking about things, making a reasonable decision and then running with it. I think most people do this, but due to ego, there is resistance to changing of disproven.
As you go deeper and get too deep for daily usefulness, at least staying this many layers deep, you start to realize things like “we haven’t really proven that the reality that we perceive is actually reality, or that there aren’t 100 realities going around us or 100^100, and that our perception is changing with actual reality”. That kind of stuff is temporarily interesting, but not so great to think about if you’re trying to keep track of things that your spouse told you to take on and you forgot to write down.
My desire for outcomes in the hobby and then understanding instead of coming up with an analogue that I read, or whatever else comes from this – but somehow it goes far beyond just the burden to elevate discussion (however poorly received) that’s accurate to other people. I used to be sometimes a surface of the onion guy and other times first layer, and then willfully second. But if I was on the surface and someone was bugging me from the second layer on something else, I was ready to dismiss them as a pain or a pedant). I am still a pain sometimes, but now far more conscientious about whether what I’m saying accurate for the sake of someone else, not just me. Self awareness.
So, what does this have to do with Bridge City?
I have almost completely stopped reading the forums. The forums go to a steady state of paul sellers and rob cosman and whatever else that I just don’t care about. If the forums are a bucket full of gravel (the hand tool sides at least), those are the big rocks, and vibrated into the spaces between them are constant discussions about which tools to buy and how “nice of a guy” this or that guy is.
Enter John E. John is a somewhat unique individual. I have zero Bridge City tools, which isn’t by chance. This is an outcomes thing – I don’t get the need for them. But some people love them, and if you love them and more than you don’t love paying for them, then they’re for you. I’m not heading down the layers of the onion to try to make you have the same conclusion as I do as consensus building is quite often inertia to being accurate.
What’s happened with Bridge City? Well, they publicly stated (they being John, I guess) several years ago that they sold to Harvey Tools, and I stand to be corrected if that’s not correct. But what occurred initially was that the BC tools that we began to see being sometimes much more expensive here than in Asia were being handled here for orders in the US. I don’t remember what that meant – maybe it meant looking over, final fixing of little nits, who knows.
John said he had been working with Harvey Tools or Harvey Industries, whatever it may be and the rest of the details went out of my head after that. But I assumed that we don’t know how long ago Harvey was doing a lot of the grunt work or more for the BC tools, and I felt like for buyers of those tools, if that was the case, transparency would’ve been nice earlier. But it’s not that out of line – that kind of thing is really common, and I’d bet it’s common all the way down to a lot of the small boutique makers, as some have stated publicly that they subcontract work. Konrad Sauer, for example, was asked if he did the machining on some of his planes, and the answer was that some part of the process was done for him and then he took over. No big deal.
But what I’ve noticed on the forums is that there’s a huge tendency toward “that guy’s my guy, he does all of it, so you’d better not tell me different”. Having seen the actual Bridge City tools discussed on an international woodworking forum and noticing that in some cases, the prices were a fraction of what they are in the US, I suspected the reason for the price difference was charging what the market will bear. I also suspect the whole Harvey thing has a lot to do with it, and being the pondering type, I felt bad for Harvey, who purchased a business and probably little changes with who is actually doing most of the work, but now due to a change in perception, it may be difficult going forward to keep the same US market prices and clientele. Many of those regular purchasers are older, and just really liked the whole message.
BUT….
Seeing this come up a few times on forums lately, and seeing really harsh posts about wanting to see the Harvey operation go broke now because “now they’re being made in China, I think some folks could probably peel a layer or two off of the only both in what they’re learning and what they expect of themselves.
What do you think the likelihood is that the “now they’re Chinese tools!” wares weren’t generally Chinese tools before is true? Maybe that answer is known, but I don’t know it. I suspect it’s another instance of being the designer and purveyor vs. being the manufacturer no matter how large the business scales – that those are two different things.
And people need to chill out.
I have another admission – when Harvey took over, I also quietly thought once the aura of “these are American made tools” wears off, maybe they’ll be made in fewer variants and in greater numbers and be more accessible.
I’ve gotten a lot of steel from Voestalpine and Buderus lately. In fact, I’ve never knowingly bought steel from China, but what if Voestalpine and Buderus buy supplies from China or even contract finished steel and then they roll it and it comes out great. I don’t care. And if there were a supplier of steel from a small scale Harvey-like operation in China where there was a guy who was just a nutball like we can be about really liking to make and process good steel…..I’d probably buy the steel, and probably not assume that there are no other end users for the guys wares adjusted or relabeled in other countries.
I’d bet John E has heard some of this stuff over the phone from patrons, and if I’m right about this being a business arrangement going back reasonably far in terms of years, he’s probably had to bite his lip.
And that’s something I wouldn’t be able to do. Which is where my fault is. I’d probably inform the person on the other end of the phone that reality is different and the tools are generally the same, and most things have some contribution in them from China or Vietnam or wherever else and that I personally think that’s OK.
Because I’ll bet Harvey (if that’s his name) is probably a decent guy, and I’ll bet there has been no shortage of sweat done by him and his crew in helping to make what a lot of people like and consider to be good tools.
Cut Harvey some slack – wishing he starves doesn’t do you any good. Consider that he may have made some of the tools you already have if you have that type, and if you like them, they’re still the same tool. This isn’t the real life version of Red Dawn.
Some Things Above at Odds
If anyone reading has known me long enough, this “grandpa’s waiting to be wiser” thing of being cautious about what you know probably doesn’t match how I have the reputation for being belligerent or intolerant on things that I do know well, like the function of the double iron or heat treating steel in a forge by eye.
That’s certainly the case. Being considerate and thinking about other people doesn’t mean you need to be a pushover and roll over when some BS floats by.
In my case, it leads me to discussing certain things that I’m confident of a lot and very little of others (ever see me providing much advice on power tools? What about turning bowls? which finishes to buy or which retailer is “the nicest person”).
And I’m always open to being clued in to something I missed. Even on the things I think I know well. 20 years ago, I could’ve gone off track and lumped Harvey in with a specific date that “tools went from being made in the USA” to “now they’re made in China”.
Maybe I’ll grow to find out I knew almost nothing about the double iron or looking at steel or whatever else, but it won’t be because I was closed to learning or pushing a version of reality that I hoped for. And when I don’t live up to that, I hope to be called out and proven wrong.
Pulling back from the forums and not constantly being annoyed by who is on the right layer of the onion and not having a T chart of knowns and unknowns worked through for every discussion until there was proof for all has been nice. Nicer than I thought. But it’s sort of like going to the zoo now. Whether I’m the people at the zoo and the forums are the animals, or I’m an animal looking at the people at the zoo – that’s yet to be determined!
I’ve described some excruciating details of 1084 and 1095 and 80crv2. The last makes a superb experienced user’s plane iron, and actually good for anyone, but I get the whole market thing about wanting to plane 22 times as many feet before sharpening. It’s in conflict with understanding efficient planing. 80crv2 was an attempt to fix issues with 1084 and 1095. But after making W2 chisels last week (substantially better as chisels than 80crv2), I got the urge to make plane irons.
Why? the old laminated water hardening irons set the lower limit on footage planed, which sounds like a problem. They’re about 75% of the life of O1, sometimes slightly more. But they have excellent edge stability and the frequent sharpening and low abrasion resistance means sharpening stays ahead of nicking, which they seem to do less of in the first place. You get in a rhythm with such a thing and nothing breaks it.
O1 and 80crv2 stand out to me as good plane iron choices. I like a certain things in chisels (as a toolmaker, but you would come to appreciate those things if you do a lot of chiseling and are past beginner stage). W2 has those things. 26c3 has those plus some, and 80crv2 is pushing it to be good at them. However the bias toward apex strength (hardness) isn’t really needed with plane irons. We will be wearing the tip of a plane iron, no way around it, and other geometric options solve things that trouble irons – silica, dirt, minerals in wood, etc.
So, liking the feel of 1095 but annoyed by inconsistency with it and sometimes defects in the bar stock, W2 offers the one thing that 1095 was also missing – a trace of vanadium to pin grain size. You can chase the heat level up just a little before quenching and get excellent hardness without any visible (magnified) grain size change. It’s not scientific proof, but thus far, I have not seen any decline in quality in use if there is no visual increase in grain size in a snapped sample.
By not scientific proof, I mean that perhaps there is some loss of toughness that occurs before grain grows, but if there is, it hasn’t affected woodworking.
So, knowing that W2 probably won’t last that long planing, I still wanted to experiment with it to see if it’s the 1095 that I wish 1095 would be, and with characteristics like vintage laminated irons. I don’t fully know the answer to that, but i did get a strip of .094″ stock and have made two irons with it in the last couple of days. And I’ve had a chance to run them through the plane iron routine.
The Routine
I have a routine when making a new plane iron. Part of it involves snapping samples as mentioned, and then moving on to making an iron. I prefer to heat before quench as high as I can, though that’s really in a very limited range – it shouldn’t be taken to mean that i’m eating a sandwich and watching steel turn yellow. It’s a matter of seconds and change in color.
After hardening, you can check steel with a file, but you have to know what you’ll get. For example, M2 high speed steel will be harder in some tempering ranges than it was before it was tempered. AEB-L will not be as hard as something like W2, but it may temper to a result that’s just as hard despite that.
In this case, anything plain steel – like W2 – we want to see “bull hard”, as my grandfather would say. I rarely do this file test on plain steel, but W2 in this case actually has hardenability alloying further reduced from that in 1095 and 1084 to allow it to be manipulated when differentially hardening. You have to be quick. So, i did check it with a file and confirmed that in thin things like chisels (earlier) and plane irons, it’s an instant file destroyer when untempered.
I double tempered the steel at 380F, hoping this would result in hardness around 62, but hoping for a free lunch (a point or two harder would be fantastic, but more realistically, would probably be a sign of grain growth).
After visual confirmation that nothing took tempering colors beyond what’s expected, I’ll finish the steel (remove the scale), and then profile the top of the iron, flatten the back, and then grind the bevel and hone. This should all be quick – the wildcard is the back. if the iron warps almost none, the back flattening and polishing is two minutes. If it warps a lot, this may be ten. I’m experimenting with 10″ diamond rotary laps to see how long they last. I’m wiling to spend a dollar of consumables without a second thought on each tool or iron if that removes dealing with a hand lap to do this. The hand lap is messy, hard on the hands and high pressure and low speed can actually lead to burning the iron accidentally.
After setup and honing, I like to plane a couple of hundred feet with an iron with the cap iron set close, assess edge stability and then get a picture of the edge to see visually how even the wear is and get a look at the carbide patterning. That allows comparing carbide distribution and size with published micrographs. I should not have something that doesn’t match. An SEM at this point would be dandy – that’s sarcasm. They’re not impossible to find used, but a good visual scope is fine here.
If you’re thinking about making five irons, you don’t need to do any of this. You can make your irons, sharpen and use them and over time, you shouldn’t have a thought that you’d rather use a commercial iron. If that’s true, you did well.
A Time Out – My Processin Quenching– Deference to FlatnessHardness at the Same time
Steels like this that need an extreme hurry on the quench have a reputation for warping because…they warp. I used to use oil. Then, I realized that faster steels need a fast oil (parks 50), and eventually found that the result is better if the low end after most of the heat is soaked out is finished with water. The result is better meaning the steel is noticeably harder. Water itself is a no go unless water hardening steel is laminated or thick. Not the case here – you’ll find the cracks instantly, or later when you are preparing the iron.
And then I read and learned that finishing in the freezer will improve a little more, but there’s still the warping thing. And I made quench plates out of aluminum bar that I have around and filled a stainless paint can with propylene glycol (think something used in cosmetics, but it won’t freeze at my freezer’s max effort -30 to -40F, usually right in the middle).
The quench sequence goes like this – you may find something like this useful even if you take part of it.
Step 1 – bring the steel to black as quickly as possible after the heat – in parks 50. Parks 50 is fabulous – it feels like any other oil, but it will draw heat out of steel quickly even when it’s not preheated, and even when it’s in a cold garage. Depending on the microstructure of the steel, it may be a point better than heated vegetable oil, or it could be 5 better. I go a little past black, but not below about 500F or a little more. The objective is to prevent pearlite formation, which is what you do intentionally when annealing in ash – try to get a mostly pearlite structure.
Step 2 – two quench plates. Place the iron between them and stand on it for five seconds to try to constrain the initial movement efforts.
Step 3 – quickly get the iron in water to get most of the rest of the heat out ( you can throw the iron in the freezer right after this – make sure you’ve gotten the heat out of everything, not just the part you’re quenching, as heat in the remainder of an iron or chisel will work its way back toward the end and it won’t draw temper, but it will prevent conversion of the “soft bits” in the steel to stuff that will be hard and tempered back. This is at a level like micro clay, not like sand, but it’s still occurring on a very small scale). This is seconds, but if water is your stopping point before the freezer, you can just drop the items in the water a couple at a time and leave them there. The colder the water, the better.
Step 4 – for me, is to use the propylene glycol so that I can get as cold as possible faster, and then when a pair or quad or whatever I’m quenching is done, I’ll take the metal bits and put them in the freezer.
This all sounds idiotic and tedious. For each quenched tool, the time from getting out of the heat to getting into the bucket of P-G is less than 30 seconds. I’m in a hurry on water hardening steel – it makes a difference. The whole thing is a bunch of compromises, I’ll describe them briefly. The colder the end of the quench, the harder the steel. But just racing to it with no control (as in, leaving out the plates) will result in a lot of warping. So the first part of this is fast – in parks 50. I don’t have to worry about the oil heating due to small batches and because if the oil gets a little warm, it doesn’t make a difference – steel doesn’t finish in it, just start.
I’m chasing every bit of hardness I can get without growing grain and without tolerating warp. The only thing I can think of to chase a little further is the liquid nitrogen, and if I were lucky enough to live next to welding/gas supply, I’d just keep it on hand all the time. It would replace P-G in this case.
The plates don’t eliminate movement, but they lessen it a lot when used properly, and there may be some concession to hardness, but if there is, it’s small. The water prevents whatever is coming out of the oil and plates from heating up the final P-G paint can.
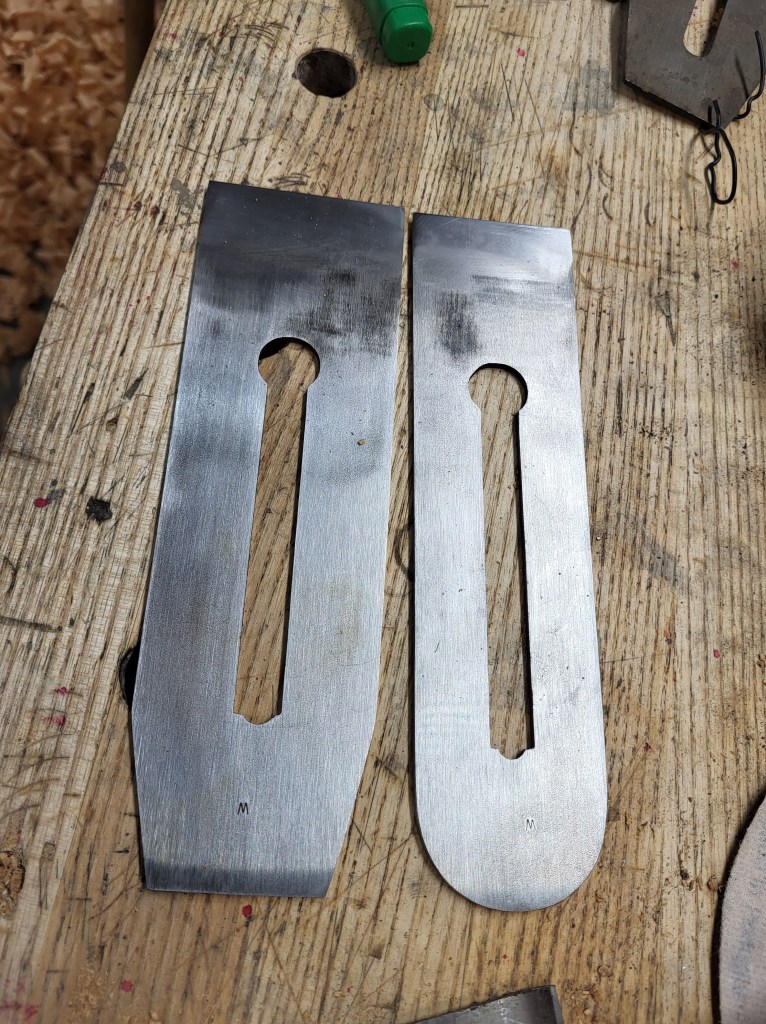
Since this has gone long already, just describing getting something in good shape to test, I’ll post the close up results for W2 in a separate blog post within a day or two. Until then, I can at least show a picture of the two irons. I used to not mark anything, but I’ve realized over time that putting it off until later makes things difficult! I use no other steels with a W, so stamping a W on the top of these irons is good enough for now. I’ll find my number stamps later – finding a source of 1% W1 is always possible in the future.
I don’t know that too many people will make it through my prior discussion about W2. I could sum it up a lot shorter, like “it’s a lot like older steels because it is a current melt/roll of older steels with little alloying, and it results in a suitably hard plain steel chisel that will deal with hardwoods and not tie you up on sharpening stones”.
That’s true.
But wrapped in that whole discussion is that I am a subset. If you are going to hand make things with metal and really strive to do the heat treatment well – like furnace matching well or even see if you can poke past at least the commercially offered tools in a similar alloy, you run into what’s available.
W2 is available from one source that I’ve found at retail. Zknives lists at least 45 or so branded mill products that you could get if you wanted to order it. What’s the minimum size for a melt? no clue. I’ll bet something is being used industrially in great amounts – we just aren’t allowed to tap that supply like a maple tree and get what we want.
And when it comes down to things ideal for quick heat treatment in a forge (and markedly better than something like 1084), that just means what could be available and what is are different.
In this case, LN lost heat treatment of O1. Hock mentioned that he lost his local source. I noticed more than one discussion of heat treaters pulling up the ladder on O1 steels and removing them from their list of what they’ll heat treat.
The only reason that I can get W2 is not for woodworking tools, but because not very hardenable (only gets full hardness with a very fast quench), which allows manipulating the appearance/transition on decorative knives.
Whatever the case is, I’m glad W2 is currently available. It’d be just dandy if the increasing hobby knife market draws more of these oldies back off of the “could get if ordering a melt” list to “stocked by retailer” list.
(I realize that the point of the commentary below may not be immediately obvious, so to state it briefly before getting into it; it’s critical to learn to like the bad taste that comes along with making something that you realize you don’t like. You may even immediately dislike something you’re making vs. the slow “ah…the more I look at that, the less I like it”. But, understanding how to make what you like and what others will like builds heavily on learning the feel and eye appeal of the things where you come up short. Allow yourself the space to come up short, ponder and discern to make things better.)
Sometime in the last several weeks, I was listening to Don Shipley, a retired Navy Seal who busts fake seals, and several other things. But he’s famous for confronting people who steal valor.
While he was talking about something, he said “that’s about as desirable as dogshit flavored toothpaste”, or something along those lines.
When you’re a beginner, you want success. Success is like eating candy. Whether you’re experimenting making tools, or furniture or cooking, keeping things only easy and refusing to venture out really limits what you can do. Referring to my good friend George Wilson here is perhaps the far end of things – George doesn’t have to brush his teeth with dogshit flavored toothpaste too often, but I’ll bet he’s done his share of it to get where he is.
What do I mean by that? The mindset of someone learning, or perhaps someone curious but destined for some mediocrity in the long term. We are fed a line by people selling gimmicks, or touting quality in their goods that will keep us safe from realizing and then subsequently improving our own shortcomings. Selling you the line that you have enough stuff to make things 95% of the time and what you lack is skill is a very low profit thing. It’s also unsafe for unaccomplished and some accomplished people when it comes to ego and wanting to share something.
I want to share failure and what it can do for you. But willful failure. I bring up George because George is a savant. He is a design savant and a savant in understanding and executing, but he is still human, so it serves us nothing to pretend we can’t learn from him. If George makes one of something, it will probably be better than my 5th try. It may be better than someone else’s 2nd and a third person’s 20th, and of course, there will be a few people who don’t get it at all and should find another hobby. But I know George didn’t shoot out of the tunnel at birth with a quill pen in his hand drawing sailboats freehand. He learned to do it. He spent time doing it and I’m sure he made things he ultimately didn’t like.
Welcome the Flavor, it’ll be Mint Later
When I started, I didn’t have the patience but I wanted to make things. Or at least, I thought I did. It was hard to separate the people who could make things and would share knowledge from everyone else. It was also hard to understand standards at that point and design, whether visual or utility with feel. Some of the fine makers seemed harsh, and as I learned over time, the Facobs asserted some long experience and criticized, but they really have nothing to offer.
I hated mistakes. I hated making something and looking at it and then not liking it. And then sometimes throwing said item away without much feel for what’s next. What’s next should just be more making, but I chose to do tedious things and get sucked into “well, I’ve got a long list of things I need” vs. a long list of making to do. That resulted in things like four hour dovetailed drawers that are now 1 (and better), too much pondering, trying to pretend that I have an organized mind. I don’t – I have a classic attention deficit type mind – lots of planning, but execution has to be something other than that because the execution of a complex plan is agonizing, whereas it’s bliss for someone who is conscientious. The whole attention deficit thing is a weird topic and maybe worth discussing another time – it’s got a branded label, but I think it’s just a better description of how brains work and not which urn you fall in – red balls or blue ones.
Where’s the stinky toothpaste come in? I never really stopped dreading making until i realized that brushing with the dogshit flavored toothpaste is how I find out how to stop doing it. Or put differently, if I try my best or reasonably best at something and expect item one, or maybe even item 5 to have characteristics I don’t like, then at some point, eliminating those as part of the process is a lot easier than trying to avoid them.
Here’s my latest brushing exercise:
This is just a kitchen knife in AEB-L that I offered to make for someone. I really like to put straight handles on knives but I’m thinking that sometimes, the handles that have a slight drop at the back and some registration to the sides are more appropriate for inexperienced users.
If you’re wondering what I mean by that, look up Zwilling Professional S knives. Those are big bulky knives with some kind of polymer handle. The handle is huge, but the knife is heavy to balance it out. I’ve made several knives with a drop on the back but attempting to put them with a lighter blade is leading to a lot of brushing with dogshit flavored toothpaste, so to speak.
The knife above is closer to success than any I’ve made so far save one that looked terrible but was a little more comfortable. I kept that one for myself. This one, I will send along anyway, but a second “free one” (the first one is free, too) will follow so that I can compare.
so, what’s wrong? Well, the knife is very light. The heel is a human finger filleting machine, but that heel is often useful, and the last section of it can be honed a little dull if it’s not desired. I like to have a little cut in at the front of straight handles so that gripping with thumb and finger onto the blade is comfortable. The trouble here is that the handle is kind of blah already *and* the notch is exactly where you don’t want it when you hold the handle without fingers on the blade. If you grip the handle, the notch is just there, teasing your thumb or forefinger forward. I have an idea to improve the next one. Having not made this style of handle as small as this before, I couldn’t have anticipated just how much it would be like brushing with dogshit flavored toothpaste to hold the knife handle for chopping.
If the knife were just for me, I could get used to it. If you were enamored with things made by hand just by the notion of it, you probably could, too. But if you objectively compared this handle to a lot of others that aren’t any harder to make, you’d have to admit that the notch is just wrong in most cases, and at the length of the handle, it would have to be handed and only on one side. Which isn’t great, either. There are left-handed people in the world who have already settled in to playing guitar left handed and so on. I should be able to make a knife that accommodates them.
So, instead of getting a really foul attitude and throwing the knife across the shop, I’ll take that feel (taste?) and how it it immediately felt like “ghee, I just made it worse than doing nothing by a mile putting that notch where it is”, and use it so that the next issue isn’t that. I appreciate what I’ve learned, and looking at the lines of the handle, see other things that could be improved – it’s just a little uglier than it needs to be.
Perhaps a better maker would have to brush with the stinky less often before figuring things out, but who cares – I’m not another maker. The disappointment is short and quick. If it takes five of these in the end to get one good, lots of little things are still occurring to learn from, and finally getting things right puts one in a place to make something better and more thoroughly thought out than any first item – no matter how good – could ever be.
It would take a really unproductive ego to go at this with the idea of entitlement, that everything will be minty fresh from the start.
I’m not one for New Years resolutions. They seem like something that people put off too long and the gimmick of giving them a tag makes them seem novel.
Losing Weight Would be Smart
Lots of people would like to lose weight. This year may be a good year for me to do it, too. Not for any imminent reasons, but 50 is a few years away and I see enough to know that it’s more beneficial to do it earlier in life and not later.
Quitting Forums and Commenting in Pointless Blogs
I also intend to stay off of the forums, or at least mostly do it going forward. For me, forums are always kind of an illusion of potential. There’s potential to push the discussion forward and somehow have that become a collection of useful information. But it never happens. Forums were really created as a medium for advertising, an offshoot to another business (think Woodnet as a forum created by a publisher, or Knots on Fine Woodworking), or whatever else.
The dynamics aren’t there for them to become an organized and efficient discussion of anything other than new beginners, people who have progressed from beginner to beginner over 15 years and the businesses that rely on finding a continuous stream of wide-eyed folks intent settling in to imagining woodworking for a long time.
The potential isn’t there. If you’ve ever frequented the UK forum for example, there’s a group of relatively well adjusted folks, but the discussion goes nowhere. And there are some cracks, and in my opinion, one fraud – in my opinion – who probably never really has done much hand woodworking, but has been there for as long as I can remember. Paul Sellers would win an election for parliament among them if parliament were to be filled only with fine workers. And that’s appalling.
But one has to think a little harder, and many are smarter than me – what’s the conversion rate of someone coming in and getting good advice, and actually intending to use it. It’s just too low to bother, and the minority of really fine posters who used to frequent forums 10+ years ago – they’re gone. Moderation on forums isn’t there to try to boost the level of discussion – it’s counterproductive.
I’d love it if there was some kind of setup where the George Wilsons and Peter Ross’s of the worlds could kind of command and curate an area of expertise, where the questions and fine guidance sort of filtered up into an organized area of information, but it’s not to be. That would be a business nightmare, anyway, as those folks would talk about what to make, not what to buy.
And I wouldn’t get into discussions chiding a retailer for selling a $95 diamond hone with really insulting marketing or ad copy that looks to be a $6-$11 per unit Chinese stone. That would be good. But it’s that enormous margin, and the “everyone wins except the person looking for advice, they just don’t know it yet” that makes them go.
Spending on the Materials – the Making
There’s a point where you get into hobbies of woodworking, instrument making or tool making, where just trying to progress and purchase the things you need is daunting….
……and then you get to the point where you do one of two things, or both:
One is tool upgrades. This is something manufacturers do. Makers get to a point very quickly where this isn’t a limitation.
The other is buying expensive materials.
There’s no way around the fact that if you start making nicer things, you’re going to be buying materials. In some cases, you need to have them on hand for a while before using them. Exotic wood is a good example. Even that which is advertised as dry and aged doesn’t pass the lip test (damp wood is cooler than everything else when you take it out of packaging), or the weight/shrink test.
If you want to make nice things, I think it’s probably more useful to find and source good materials than it is to constantly ponder tools.
I don’t need more tools, and what I do need from time to time, I’ve learned that making is better than buying. Buying is expedient – “ah, I solved the problem”. The result can be mediocrity or just tying up household money for no reason. I don’t really even need more materials right now, but sometimes the consumption of belts and bar stock steel is pretty high.
Without the illusion of continuing to upgrade tools, or the fear of having lots of stuff and not measuring up to its potential, I feel more comfortable just spending the money.
I’ve long thought having a dewar of liquid nitrogen would be nice. I suppose the dewar is a tool, but why i don’t have one is an indication of past habits. They’re not expensive used. However, tou get the dewar, and the consumable that goes in it isn’t free and has a fairly short life span. It is something that would improve my stainless knives by improving terminal hardness, and it would add some crispness to my carbon steel tools. So rather than dream about $3000 belt grinders, electric furnaces, and $2000 anvils, I’m getting the dewar.
And when I want bar stock for a project, no more screwing around trying to save $2 per tool on something a little cheaper.
Reflecting
I’ve done a lot of reflecting on what making will mean going forward. If I can’t get into the shop three or four times a week, I am unhappier even than the forum version of me who wishes that the TOS would allow someone to tell Facob to take a hike, or to just blast the people on the forums who offer nothing in terms of making, but are quick to spend a whole post telling someone they spelled an irrelevant word wrong.
I’m getting older, and I guess over the next several decades, will start the decline – or continue it – of decreasing limberness, eyesight, patience, ability to absorb new things, and who knows – I could lose my parents early or have a spouse who decides she’s had enough of the husband who makes a *whole lot of dirt*.
There’s no grand plan, just refinement to finally break some of the stupid habits that I’ve had that are controllable. and I won’t say I “wanted” to do them earlier. Maybe I’ll make a post about “want” at a future time as one of the permanent tattoos on my brain came from an older female coworker of mine who let me know about using the word want, and how it’s a word for losers unless “want” is paired with what you are doing everything you need to do to …well, do. I haven’t wanted to lose weight, or drop the expedient entertainment of the forums or maybe really adjust my behavior about keeping things I don’t need or not buying things that I could really use (good materials, with discretion). I want to do those now.
Somewhat heavy on my mind is pondering what it is that we owe each other. Absolute honesty and advice with good intentions, not carrying the water for someone else and above all – doing it without regard to whether something will make me look bad or too direct or whatever else. I think we owe that to each other, and I think we owe to each other putting aside concerns about whether or not it may help this business or that business or not make a group of fans of some guru unhappy.
It’s still the same day as posting the prior two posts. I intended to let this sit a while until I had a practical task, but something about the other results didn’t sit right. The results are negative, but maybe it really is just heat at the initial edge. I walked to the shop to think about it and grind off most of the bevel. More than 1/8th of an inch, though that may not have been necessary, I don’t want to inch up to seeing if this is fixed by getting away from the factory grind.
So, I also noticed that I have a few maple shorts left that I’ll never used – I forgot about them. That gives me a chance to bungle up their edges with the cordless circular saw and then plane them and time the planing.
I figure that I planed about 8 minutes on maple with the prior edge in test #2, and 2 in poplar (go ahead and say it…”popular”). So, that’s what I did except I skipped the poplar.
Grinding: uneventful. it grinds relatively nicely, it’s fine and it doesn’t get that hot and at no point was any part of it – not even the very top, hot enough to boil water or burn my hand.
With a belt grinder and ceramic belts, this whole process, even being careful, takes about 5 minutes including installing the updated edge.
Noticeable Change!
When I went back to the stones, the updated bevel is harder to hone. I’m somewhat surprised by this, but I’m a feel toolmaker. Test and observe outcomes, but get feel at the same time. I was surprised how easy the initial edge was to hone, but it doesn’t have bad wire edge / burr behavior, so I ignored it. Maybe it was easy to hone because of the small carbides – this is actually a thing in heavier honing – small carbides will make things a little easier until fine polishing.
This seemed very positive, except it does seem like I shouldn’t have to find the heart myself. I don’t use machine shops for anything, so I can think of (as someone who has done practical heat treating) two possibilities. An exposed bevel that gets heated a bit too much in temper, or one that is ground and even though doused with liquid or cut intermittently – either will work – done just a bit too fast.
The resistance on the diamond stone, india stone and then through the 1 micron diamonds on cast seemed greater, but again, the wire edge came off nicely without any fanfare (this is a good thing).
I proceeded to plane 8 minutes timed, stopping the timer each time I ran out of edge and had to cut some width off with the cordless saw, and then resuming again planing with the timer on.
Far better results
I didn’t bother trying to make this take longer and test several irons against the Magnacut iron – I just wanted to see if the same task could be a little better. By feel, too, the shorts that I had were a little more agreeable than all of the bed slat boards, but they’re still hard maple, and I didn’t baby them.
The edge damage this time is far more minor, and this is an iron that has a better feel of being something I could live with. It’s now slower to hone, but that’s a trade we expect to make with plane irons. I should wear almost as long as V11 in an idealized situation.
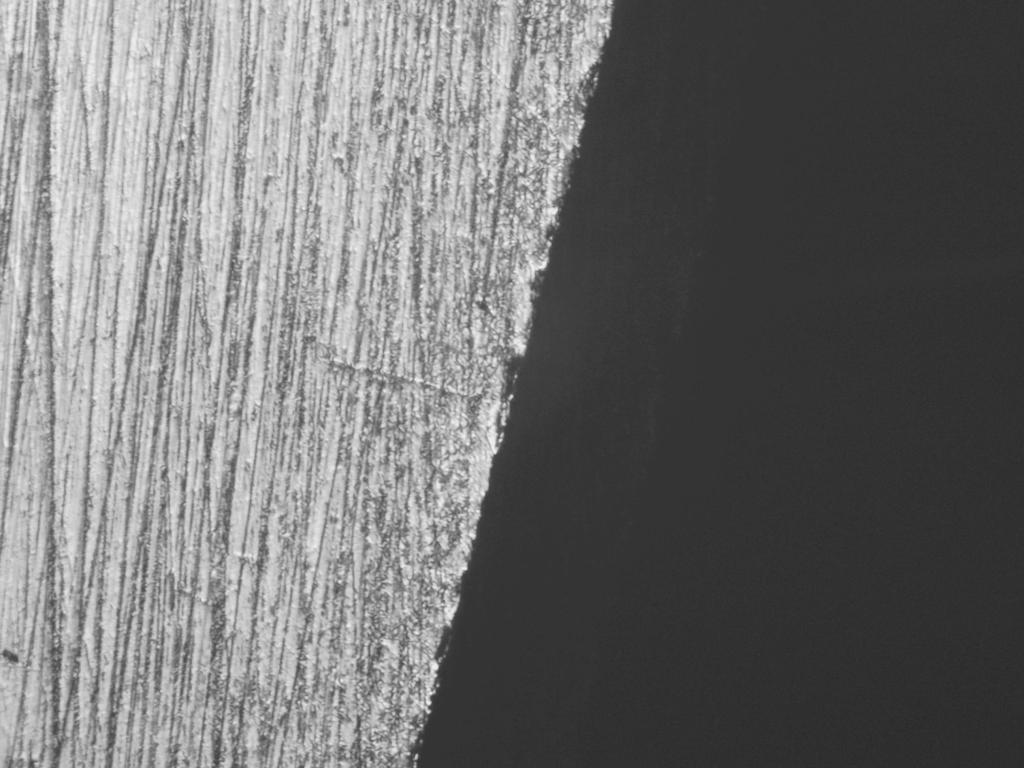
Magnacut 150x – after grinding of significant length – typical minor damage. This is inconsequential and most of the length of the edge used looks like this or better. Regular honing will remove all of it, which is important. We always want to have an edge that has damage no deeper than regular honing because the talk of “stopping to grind out nicks” is something that sounds good in a Pop Wood article, but you will tire of it about like you would a girlfriend who is never there on time but OK otherwise. It makes you wait for something you don’t need to wait for.
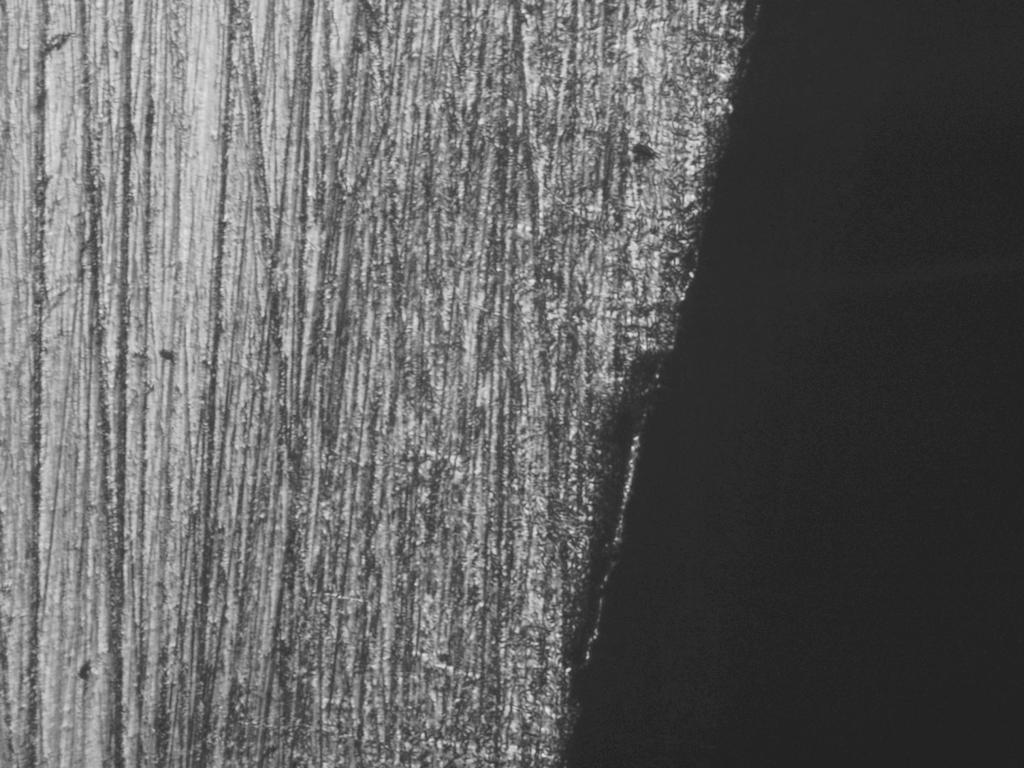
Magnacut 150x – typical minor deflection – but even at that, not occurring on much edge length and not worrisome.
Only one more signficant deflection occurred. Fortunately, you don’t have to ask if this is a carry-over from the prior test as I removed a lot of edge length grinding the bevel back.
Magnacut 150x – worst damage encountered in the third test. Wide, but note how shallow it is. Not as bad to hone out. Note that the wear doesn’t look as significant. The wood could be a little more favorable – wear appears to show up as darkness in these pictures.
This is a resounding difference vs the factory edge, both in feel and in the depth of defects. None of these will leave large topographical lines and most probably won’t leave anything you can discern, and a full wear cycle may remove a good bit of them.
Too, with that, just minor buffing (and not edge life reducing large amounts in nature) could also eliminate the defects. And this is on interrupted hard maple.
I am glad I didn’t sit on this, though I no longer have the fervor for testing, I do have it for fairness.
I didn’t expect that the initial edge would be a little underhard (my perception, not proven), but I also didn’t expect because of that, that we’d see a big improvement. As little different as these may look vs. the earlier, the difference is drastic – from intolerable, to usable and practical, at least from these tests.
How much would you have to grind off? I don’t know. I don’t have any qualms about grinding length off of irons and cutting an entire new bevel, but this is a steel that doesn’t tolerate excess heat, so if you are the type who can’t grind without burning carbon steel, you may just want to wait it out if this is a characteristic of all irons.
I mentioned in the prior post that we like to see almost all of the edge totally undamaged, and in this case, almost all of it is.
Now, I can go set the cap close and wear a “cup” of steel out of the back of the iron by letting shavings ride it and we’ll see if we can find a more copious reef of carbides to look at. The point? Only curiosity.
I think this would make a wonderful kitchen knife, but it is out of my league for shop heat treating for the most part.
Though it’s of no consequence here, the other save on this is that I can safely unload this iron – safely as in all in good conscience, and if it had not improved, I’d be more or less forced to keep it and maybe segment it into two very expensive stainless marking knives. I really didn’t want to do that.