NAD and the defective 115crv3

Not like go-nad, but “new anvil day”. I used to like buying stuff, but I kind of despise it now. And buying a new anvil or a good used one is something I’d have liked to avoid. The 115crv3, by the way, is definitely a lost cause, but more on that afterward.

I have seen anvils over 300 pounds hours away and I’m fairly sure that my ability to get them into the car without damaging the car, and then get them back out is not great. So, I ordered a hardened ductile iron anvil from JHM. Ridgid (peddinghaus) also makes a 275 pound anvil that’s apparently a step further up in quality but it’s both hard to find in stock and also a step up in cost – a full one. Nothing is cheap in the world of anvils unless you’re a lucky flea market shopper. I will be practicing either asking for forgiveness instead of asking permission, or perhaps husbandly hiding and avoidance.

The deciding factor was first that I don’t believe I need “the best and super hardest 60HRC anvil” and despite the scant feedback on the ductile hardened cast anvils, I saw no actual reports of damage. The big one (the “competitor”) was on forged in fire, and I have to admit when I see products placed, I usually avoid them, so that was a strike against the anvil.

The company that makes them, though, was quick to respond to a freight quote request, and they shipped the anvil pretty quickly. The only question was that at an actual weight of 270 (claimed size is 260), how hard would it be to lift. If you have a bad back, I don’t want to goad you into lifting heavy things, but the lift was less eventful than I thought it would be. Anvils have no lateral leverage – the weight is just all right below you and centered unlike a weight bar – the latter being something my hands haven’t touched in decades. I had other plans if it couldn’t be lifted, but they involved a hydraulic jack and pushing over to the stand, and I had a real fear that would potentially result in an anvil slipping off of something and falling.

In the end, I decided if I could prop up the anvil about 2 1/2 inches on the bag cart, that would take away the hardest part – the first few inches, and that was true.

I’m not a strong guy if there are strong guys in the room, so I’m pleased. Youth did provide some chance to work in a rural areas, including on farms and finagling rounds to be split for firewood (far more awkward and threatening to backs than anvils, for sure) – I guess that turns out to be useful.

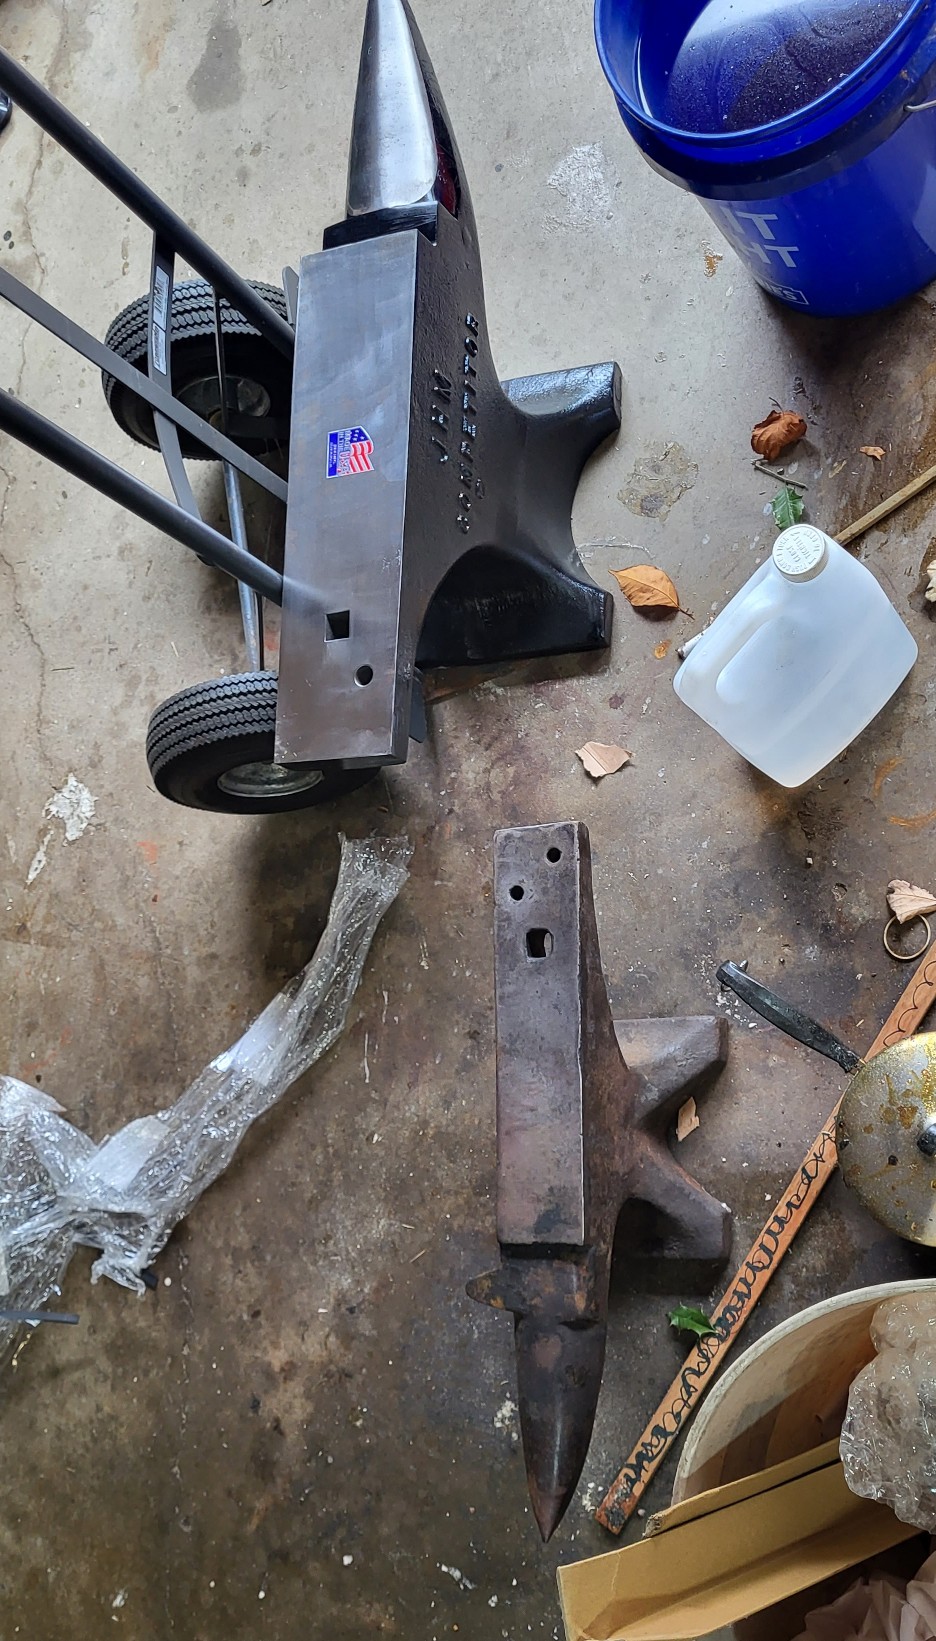
The anvil in this case sits with one of my favorite things – the induction forge. Put rod through that little ring and the first heat, you’re forging in one minute. After that 15-30 seconds between heats. Weird device, but super – no combustion of propane in the shop setting off smoke detectors elsewhere in the house and aside from a somewhat unsafe (by US standards) shielding of the live wires on the back, it’s predictable and cheap to run.

So, here’s a comparison of old and new – the old anvil being a very nice farriers anvil, an unmarked copy of a Soderfors anvil. I only wish it was 250 pounds instead of 125.

I find myself now in the place of someone who just wants something good, not wanting to be barraged with the “no anvil under 300 pounds or $4,000 is worth having”, which you can get. And I see through the lens of someone who has been woodworking for one year and who runs into several people giving advice, all the way up to “nobody can do woodworking without Kikohiromahru chisels”. Or Tasai – fill in whatever you want. I’ve seen both of those being advised to someone who hasn’t made much of anything yet.

The challenge for us is a little different – be less particular about making demands of only having the best, and try a little harder to prove we need something better because the tools are limiting. This anvil won’t be that – i’m a piker with a heavy hand hammering hot metal, not ball peining anvil surfaces.

phew.

On to the 115crv3

I encountered various things, like stable graphite in the snapped steel samples, and what never gets to be more than very superficial hardness. But the chisel that’s shown in the couple of prior posts and that I probably will swap for another to wrap up that series of posts first, doesn’t get to the hardness I should see after quench even with brine. And then second, what hardness it does have is lost far more than expected with a very cool tempering temperature.

I forged those, so maybe it was me.

A test of the 115crv3 rod that’s as simple as cutting a sliver off, doing nothing other than normalizing, cycling and heat treating shows the defects are in the rod, and hardness is less even with the sliver. With W1 and O1, the forged goods also seem to get slightly above the hardness target I’d get from flat stock. we’ll see if that holds up.

I’ve attempted to cancel the rest of my second order of 115crv3 from the seller (Maedler) but haven’t heard back. The last thing I want to do is sit waiting for a backorder when it’s likely the stock won’t be any good. Plans to try to hammer it thin and make knives or something, it’s really just unsuitable for anything all the way down to trying to make a thin plane iron out of a forged sample at .08″. never experienced anything like it.

What I do have is a second iron forged at the same time out of 0.75″ O1 rod. First order of business with that one is to see if it has any defects that rolled flat stock doesn’t have due to my potentially damaging influence forging (escaping carbon, bad microstructure, etc), and then after that, to identify any differences in looks under the microscope or feel in use and see if there is anything positive about forging the iron.

So far, I just don’t know, but the O1 version is a point harder than I expected and so far not brittle. I realize a point sounds like nothing, but when you’re working with stock that you know the spec of and see no variance, when you get an extra point of hardness, it’s first a potential worry and then also a curiosity. Is it possible that the forging doesn’t lose that much carbon into the atmosphere but may get more of it in solution? I don’t know.

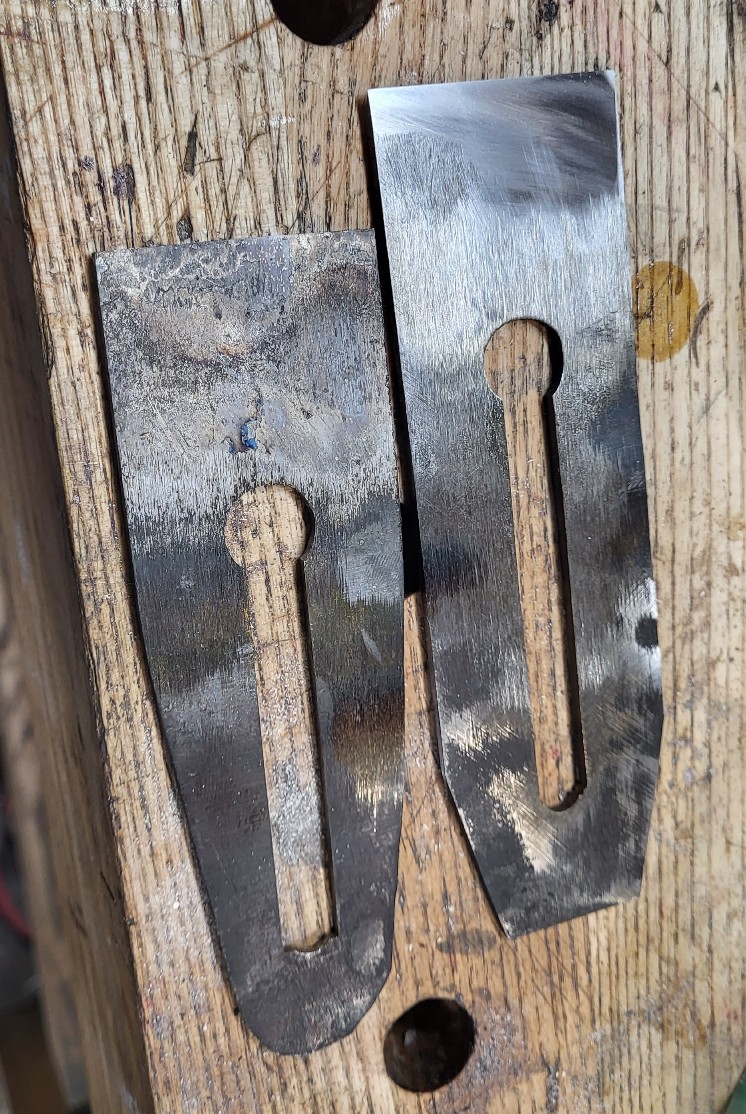
Both the 115crv3 test iron on the left -that can only get superficial surface hardness that’s lost into the mid 50s with a 350F temper (should be 64 at that point at the very least), an the O1 iron on the right, which after a double 385-390 temper is still 63.

if it looks like the back is out of flat, keep in mind, I flattened this iron with a contact wheel and eyesight, not a flat surface. if it’s any good, the little bit falling off on the right will be worked out with subsequent sharpenings. No sense going nuts and finding out that I don’t care much to use the iron. Starting out with 3/4 tool steel rod and hammering these out by hand isn’t that smart, but it takes a lot of heats and really gives me an idea of whether or not decarbing will be a problem because of that. It’s a good learning exercise, though. The iron on the left is oddly shaped because of hammering technique. The one on the right is straight because the first one wasn’t.

Edit/UpdateAnvil Use – Poo on the Idealists

After using the anvil a little bit this afternoon, I’m ashamed that I allowed the discussion of what’s ideal lead me astray. I have no idea why anyone would claim they couldn’t work on it vs. “it’s not my preference”. Love it. It’s a bit of a ringer and that will need to be addressed – it will take a mark from a misstrike, but the rebound is almost as good as the small one in the picture above and the size increase negates that small different several times over. It should outlive me, and if I can ever use it so heavily that it becomes unusable, I will boast loudly about how much work I did.

Also, I think I might be wrong about it being the anvil on forged in fire. Emerson Horseshoe and Traditions are two I remember, but at the same time, I am no expert on forged in fire and only learned that it existed after a coworker said it when I mentioned making chisels (“You mean forging? like forged in fire?”).

Not in Houston, but

We have a problem.

Nothing about the 115crv3 data sheet suggests it will be anything other than slightly easier to heat treat than 26c3 and slightly harder to heat treat than O1.

Great.

However, after several attempts to harden the steel bar that I forged into the chisel in the two chisel posts, I get around 61 hardness at the tip and after a 380 temper, that’s 58. No good.

Not just accepting this, I’ve heated and quenched and broken about 20 different iterations terminating with a slight overheat and a brine quench – which gets more uniform results, but 62 out of the quench.

So, what do I think? I think the steel that I got may not be 115crv3, but I have no idea what it is. Even something like 1070 or some other lower carbon steel would harden at a high initial hardness if you push it, but it will not have the same edge as a higher carbon steel and it will slip more in tempering than a surplus carbon steel like 26c3.

I changed my quench oil, tested other things I’ve forged from rod (O1 and W1, both end at about 62 hardness after a 400F double temper). I suspected my hardness tester was off, perhaps there was a significant decarb layer, or the steel wasn’t hardening through and through and who knows what else.

Nothing.

So, I’ll brine quench the chisel in question and lightly temper it and we’ll move on.

I’ve never had anything quench neatly in water let alone 10-15% brine (much faster than even a plain water quench), but a not quite finished other chisel of 115crv3 took the “ptthhhhfttt” noise in the brine, which is a violently fast quench and hardened nicely if 62 is nice and very evenly because no part of it transitioned from hot to cold slowly. I have used water quench before just to experiment and cracks are almost certain if you’re pushing things.

I am curious enough about these bars to see what will happen if I hammer out a plane iron. Will it show carbides, which suggest enough carbon to form them? I think it does in broken samples. If it does, why won’t it come out of the quench greater than 62, and what will I do with 12 feet of rod, which will literally make about 25 continuous feet of finished goods – more than that if making chisels. I think it’s destined to be put aside and used for junk knives. Since the steel is so uncommon in the US meeting actual spec, there aren’t any options to order more and compare. Others that I’ve seen listed claim 1% carbon, more chromium and more vanadium. I don’t know what those are – they may be an English spec of something, but they aren’t 115crv3 regardless of what the listing says.

This kind of stuff is part of the process and even if the rod that I thought would be ideal isn’t at all suitable, I’ll learn other things from it, and in this case, quenched in brine for the first time.

Hand Forging a Chisel from Round Bar – #2

After the prior post, I had a chisel that needed a tang. Admittedly, I am not quite to the point where I want to hammer that tang out immediately – a little break is nice. However, I’ve done it and can do it. Which brings something to mind for me in terms of hand work. There is a version of tired or fatigued where you can take a break or set up a rhythm that I refer to in definitions on this site as “the count”. Work happens neatly and is pleasant when you can do that.

Then, there is a level of work where you push yourself and perhaps it only accomplishes a little bit more, but it ruins you for the day, or in the case of my arm and elbow, may lead to problems in the long term.

Hand work doesn’t involve that kind of thing. Hand work involves the former, as it allows you to assess what you’re doing and not be distracted by pain which leads to errors of stupidity or contemplative neglect.

Don’t do it.

I will be comfortably hammering one of these chisels out entirely in one stop soon enough – it may be chisel #12 instead of 6. That happens not just from brute strength, but neural development, efficiency and control. That combined with your brain understanding what’s easier is part of what I like to refer to as craftsman’s magic. You get better at things just by doing them, they get easier, you don’t have to become a strong back weak mind version of yourself.

On to the chisel.

Here’s where it stands after guillotine and hammering

Kind of ugly. I would prefer grain direction fan out from back to front but the tip of this chisel sort of has the grain flowing in like the toe of a shoe. I’ll grind that off. I’m sure this steel still has directional favoring as far as toughness or resistance to breaking goes.

there’s a lot left here and in time I may get close to the finished product above the shoulder, but the penalty in this case is about ten minutes of heavy grinding.

After a total of perhaps 15 minutes of grinding, I’ve arrived to this point.

this probably seems quite a leap, but I can’t really give you much advice on grinding other than making sure the general direction or flow in the roughed piece is the same as the ground part. you just have to grind and file things to learn to do it. Unless you make 100 of the same thing, you are not going to establish a mindless routine. Not that getting to that level would be bad if still doing this by hand, but I would say grind just shy of where you want to go and file or then light grind to finish. That’s what i did here.

There’s nothing special about my mark here, by the way. It’s a piece of old file that I heated, then when it was cool (unhardened), imprinted some reverse letters and put on mock serifs, and then used a checkering file to crate a postage stamp border. you can make your own if you can find the reverse stamps, and then just mutilate something to make those little serifs on the ends and bottoms of letters.

My grinder for this is a combination belt and wheel – it’s a strong jet 8″ grinder. They make at least two. This one draws 11.5 amps and it’s nice to have it on tap. You can grind something this size without ever slowing the machine down.

This area is a mess. there’s another one of the same thing with a larger narrower wheel back right, my OSS, which is typically a light use tool for guitars and obviously gets cleaned off if making them, and on the left is a 4×36 direct drive bench sander.

Dust collection or fanning metal dust is an absolute must. Wood dust is annoying. Metal dust is that squared and probably a much greater long term health threat. I have a bucket below the belt both to dip tools and to catch most of the dust so I can throw it away later in a big rusty brick. The vacuum is hooked to the dust port on this grinder and it doesn’t catch everything, but it catches a lot and throws it into a bin.

The fan sitting on the top of the heap sends all of the remaining fines and smoke out of the garage in a gentle breeze. I don’t grind with the door closed. In winter, whatever is being ground is hot enough that just having it in your hands will keep you warm. I thought that was odd until I read that it’s more effective to warm someone by warming hands than full body warming if the input energy is the same. That was something from a doctor discussing hypothermia, not something from bro science.

After some more filing I’m here, starting to file the bolster:

width doesn’t matter to me on tools, and I like a slight taper in width with the bevel edge being widest. This chisel is probably between 5/8th and 3/4ths. It’s a mule, anyway. If accurate width is important, you can leave yourself a hundredth or two of fatness and belt grind it off after heat treatment. If heat treatment distorts more than that, you’ve got bigger problems. Whatever the case, hitting something within a couple of thousandths in finished width is not difficult.

Filing the bolster is done with chisels that have been made safe edge and also had some of the corner transition to the cutting side ground off. You’ll figure out what’s right if you file a few of these.

Files are consumables, and there’s no need for anything expensive here. The round filing at the shoulder is done with cheap files, the heavier filing is done with mill files and a cheap double cut half round file, and taper saw files and chainsaw files do a good job of cleaning up the rougher work.

Just like grinding, filing the bolsters on is better learned by doing it, and not by memorizing a 14 step process. That’s nonsense you will pretty quickly realize you’re filing flat facets on work like this and that dragging the file backwards is a good idea because it prevents pinning. Again, files are consumables. Don’t trade a dollar of file wear for an hour of wasted time or ugly results.

Something important does come up here:

You can overcut things or file into the tang. You don’t want to do that. When filing the bolster, I file five strokes and look, five more and look. This happens in rhythm. It both keeps fatigue away and also allows to see things that are occurring and adjust without having to think about it. And importantly, it builds in rhythm an assessment that prevents overcutting. This is something worthwhile in all hand work that looks good if it’s done just right and terrible of done a little more than just right.

Heat treatment is next, where we could find out the whole thing has been a waste of time of we get serious warping. This will be the first thing I’ve ever heat treated out of 115crv3, but the heat treat schedule and the composition suggest that warping should be my only problem if there is any. Water hardening steels like a fast quench, though, and the potential for warping is already there. Go too gentle on the quench and the chisel won’t be full hardness- that’s even worse.

The most common thing with chisels for me is vertical movement or bow. For example, the flat back of a chisel ends up not close to that and grinding it out leaves the tip thin.

it’s once in a while, not every other, and the skill to do these water hardening skills right – especially with manual heat treatment by judgement as I’m doing – is why you don’t see alloys like this used by the tool making companies who sponsor manbun parties.

Hand Forging a Chisel from Round Bar – #1

I’m going to post the process that I’m using to make a chisel from round bar. Two things about this – I’m sure it will be refined as I make more chisels, but it is already practical. Second, this is my sixth forged chisel from round bar and only one of the other five is fully finished. But, I’ve made a lot of chisels hammer tapering flat stock and then affixing a separate bolster, so those two pieces of information is useful. You may get to this point in six chisels total (i doubt it) but if it takes longer than that, I’ve paid my dues and enjoyed it rather than running from the failures and hoping to avoid them.

The point of this, as mentioned in yesterday’s post, is both to get to more forging, but more importantly, to have the chisel made from a single piece of steel. I’m making this chisel out of 115crv3, a relatively plain steel (less plain than 1084, more plain than O1, and miles more plain than A2, for example). I’m using this rod type even though it’s kind of hard to find because I want a chisel that is going to land in the 63 or so hardness range with a solid double temper of 400F, and 0.9% or 1% steel can suck wind a little bit in trying to achieve that and not be a bit chippy. This steel is 1.15-1.25% depending on the melt. I expect to lose a little bit of that as decarb from forging, but not too much due to the induction heating instead of sitting in a hot gas or coal forge. Induction allows you to focus more on the part you’re hammering and heat adjacent areas enough to avoid cracks, but not have to heat a whole blank end to end to upper forging temperatures.

So, unlike most of my very wordy posts, this is going to be more pictures and fewer words. The goal here is just for me to share what I’m doing. The goal in the future is to really get the amount of chisel made forging vs. grinding and filing increased. I’m not there yet, but have made huge strides just in six.

Here is the round bar – 20mm 115crv3 steel. I’m not fully decided yet and have ordered three more bars of the stuff with some smaller, but I think I’ve learned enough thus far to know that I don’t actually need anything smaller because drawing it out is easier than expected. That’s not to say it’s easy – it’s a little physically demanding by hand.

115crv3 alloy rod – sold in the US only in one place and apparently intended as stock for material conveying systems.

The first step is to start drawing the stock out from the bar. There’s guess work here until I’ve got more experience – as in what will yield a chisel between 5/8 and 3/4″ from the bolster down, and hopefully a little over 5″.

I leave a lot more at the tang shoulder because this chisel will have a classic taper with top curvature (eat that CNC), and then use a guillotone to start to establish the tang.

That gets me to this.

Blank after adding the roughed tang.

You can already see why I like doing this – the bolster does not have to be upset to greater diameter, the basic rod is there and it is high quality, so I know it won’t be brittle or weak.

This is what the guillotine looks like. It’s apparent from this making and others that I will probably want to make a guillotine anvil/bar set that will taper this more into the shoulder and perhaps leave the tang area a little shorter than the 3/4″ flat default. But those are things to learn. I’ve already ordered more 4140 bar stock to make different anvils – this will become a useful tool for a one-man operation.

The guillotine, resting. You lift the top bit and put the work between the bars and then hammer and turn.

To this point is about 15 minutes of heating and hammering. 1/3rd of 1 and 2/3rds of the other. I’m using a 4 pound hammer and am by no means a physical specimen, but I’ve not handed in my man card yet in exchange for looking in the mirror and always-clean pants and hands.

After establishing the roughed tang, I draw out the steel in about the taper that I want to have less some room for grinding and finishing off the outer layer, as well as the expectation that more will come out of the tang area. Not much needs adjusting near the business end, but the tang area is nice to leave a bit to work with as distortion there is a pain.

The last 1/4 to 1/2 inch of this will come off. it’d be nice to have left a bit more on the end, but we’ll live. The objective here is to get closer to straight top and bottom to avoid distortion in the quench later. I will grind the top curvature in, hoping that the warp in the quench doesn’t make that difficult. The actual tang thickness will be ground down quite a bit, but I will probably mark this one with my stamp so there will be some distortion on the blade below the tang from doing that.

It’s slightly wider at the shoulders than the business end, and grinding will deal with that pretty quickly.

The Plague of Influencers and Affiliate Programs

I’m fresh off of a tirade writing about WBW elsewhere and the stupid affiliate programs all over the place leading to Jabronis (my opinion) pretending that they know something or “have a new favorite” only to put up a revenue token link and never just level with audiences and say “listen, I really only put this video up because when you click on this link, I get a temporary window of a day or two where you buy anything from the retailer and I get money from it.”.

And, of course, it’s not just WBW – it’s every other no accomplishment or mediocre accomplishment person showing their new favorite this or that or a supposed “test” result that just allows linking a whole gaggle of affiliate links at once.

What a plague all of that stuff is. Wood Whisperer telling you about his new favorite rust protection? The revenue link corresponds with the company boasting about a 20% affiliate commission, while the presenter tells you “he bought the product” in a lot of cases, which is misleading. My opinion is that it’s intentional – you would probably get far more than 5 additional sales (erasing your cost) by implying that you just chanced upon something and omitting you’re getting a huge affiliate commission.

It’s pretty much nematodes and tardigrades in the world of woodworking, though. Everywhere and permanent. You don’t immediately see it, but the whole system is set up to create separation between you and retailers or manufacturers while implying that the transition person laundering the information is impartial or “a friend”. A friendly person who never manages to tell you their actual incentive, or recommend things from a full menu of choices without bias in their wallet’s favor.

How do you tell? This isn’t the acid test, but I’ll tell you a story and then tell you one of the acid tests. My dad is retired. He doesn’t do much for investing, aside from give someone his money. He leaked to me a few years ago that he was going to talk to a financial advisor. My dad also gets more pension and social security income than he spends by a wide margin (he’s cheap), so the last thing he needs is an annuity. I said “make sure you don’t do something stupid like buy an annuity that you’re being sold just because it’s far more profitable for an advisor than it would be for them to collect a fee and direct you toward index investments”. His response was “I don’t think he’ll try to do that, I already bought two annuities from him”. A-hole alert. You won’t know enough to know my dad’s financial situation, but I do – no independent advisor is acting in my dad’s interest doing that and my dad could be protected by elder law at his age. He insisted that the advisor is very friendly and has a lot of clients and they all like him. Well, his advisor definitely was successful ad curating a group of clients who aren’t investment savvy and judge advice by smile and whether or not there is free stuff like coffee.

I said “the guy is an A-hole and he should be prosecuted if he’s your financial advisor and not a captive insurance agent or someone who you’d clearly know only wants to sell annuities”. My dad was offended, obviously I’m implying he’s been had and he wasn’t aware of commissions or the idea of annuity income when you’re already unable to spend the income you have. I said “OK, here’s your asshole test. If he tries to sell you another annuity, you’ll know he’s an asshole if you don’t already. I’m telling you ahead of time. It’s pretty easy to smile and give someone coffee if you’re bagging a $5k commission for an hour sitdown”.

I had to break through what my dad felt was a good trusted relationship, and suddenly he had to be whatever pilled you would call it where he understood what was going on, and not only did it put a cloud over him for going to the meeting, or potentially, it made him feel stupid, and while he’s not the same kind of “questioning and digging asshole that I am” (a whole different kind of a-hole!!). Nobody likes to hear, either, that they could be protected by elder law prosecution, because that’s code for “you’re senile and dumb” to a lot of people.

My dad was unhappy with me, audibly, and I value my relationship with my dad a lot. He is rock solid and I would trade him for nobody else. Later that night, he called and he’d gotten enough time to get a little removed from knowing that his son can be inconsiderate or impolite when it comes to lining out something that’s a problem with principle, and he said “Well, I just wanted to call and let you know. You’re right. He tried to sell me an annuity. He said it returns 8%, so what’s your son’s problem?”. I had given him a no-authority order tell the advisor to call me and why – tell him I want to have him call me, what I do for a day job, and I want him to explain why a financial advisor or planner would recommend an annuity. I used something from my secret underground and estimated the cost of an annuity for someone his age and found the yield to be around 2% after expenses. The payment was about 8% per year of the single premium for the annuity. Of course, his advisor was an A-hole, and gave him the fake act of “sure, I’m going to call your son and explain it to him”. Of course, the guy never called, and my dad later called him and he said “he changed his mind”.

Would this have really hurt my dad? No, he’d still have more money than he could spend, but it’s an issue on principle. I have no clue if I’ll get an inheritance and don’t plan for it and don’t really care – it’s my dad’s choice, and I explained to him that if he found a worthwhile charity, I’d rather he give 100% of his money to the charity than will me anything while giving half of his money to an advisor who misled him. And my dad proudly announced I wouldn’t have to worry about that because his advisor (late 40s in age) had sold his company and was retiring.

That’s a long story, but if I could influence a few people to bust that kind of crook, it’d be worth it without question.

Back to influencers. How do you tell someone is an A-hole? My definition. They provide you with information about their “favorite thing”, a “test of various products”, “secret tips” or anything else, and what they’re discussing includes some combination of links to amazon with the word “redir” or “token” on it, and possibly direct links to the products they’re talking about with more in the URL when you hover over the link than just the base website of the maker.

You have every right to ask them how much the commission is on what they’re talking about, and why they don’t disclose affiliate program details as part of talking about something. Just saying “i might get a small commission on some things sometimes” isn’t enough. It’s avoiding the subject, and the information should be specific about the video and about what’s provided. Why doesn’t the Wood Whisperer go nuts telling you about all of the various ways he’ll earn affiliate commissions on a video that purports to be a test about various hard wax oils? Simple, because if he did, many would start to think a little longer, and more folks would probably do what I do – request Youtube eliminate suggesting videos from “creators”, one by one, if the videos have revenue token links or sponsorships and the presenter doesn’t make a pretty big deal about what they’re getting from all of that.

You can certainly decide that I’m just a grouchy rotten person who is peeing on campfires, and I think that’s fine. I’m not really that big on telling people what to do, but rather floating some information out there. I can guarantee you when you are the kind of a-hole that I am (operating on principle, even when it just seems really negative sometimes), people will have the same feeling my dad did. “But I liked that guy”.

What got me on this today? I upset someone who was recommending “carbon method” rust preventive because the wood whisperer recommended it. I didn’t know anything about it other than that it makes little sense as a rust preventive and the wood whisperer figured that even though he used it and got rust on his table saw, it would be worth making another video about it and saying he still liked it. Why do I think he made the video? Well, a good starting guess would be the publicly advertised 20% affiliate commission, though we don’t know what WW’s link token really gets him. It could be more, or it could be less. I doubt the latter, but who knows – I’ve seen online retailers get short arms when someone is especially good at referring people to them, and change the terms of an affiliate program. I have a special distaste in this case, because the person who was glowing about the video and passing it along to other people made the very big pronouncement “well, he said he bought it on his own”. Well, here’s a potential scenario for everyone to think about. You are an influencer, you find a product that has a 20% affiliate commission and you buy it hoping that you can get it in a video and then perhaps get a relationship that’s even a little more special than that. Do you think influencers might be more interested in shopping affiliate programs than products? I do. You may disagree.

But I think if you start to observe this pattern, and you’re aware of it, you may start to change your opinions just as my dad now is fully comfortable that his advisor was an A-hole and he’s more comfortable that I’m not calling him dumb for being taken on investment decisions he signed off on.

Today, I learned that WBW tested some new irons and he’s impressed by them. Guess what. There’s an affiliate link to what he’s talking about for at least one of the products. I bought one of the same iron (the 10V iron tested here). I have no idea what to do with it – the alloy seems to have potential but it doesn’t pan out used side by side with simpler steels because of the way the edge is as it wears. Did I pay for it? yes. Did I ever refer anyone to collect something from the site’s affiliate program? Absolutely not. Did I ever do that anywhere on any platform with anything? Absolutely not.

Different person, same site, with an upbeat pleased feeling to be passing the information along from the video. I think they probably aren’t considering why the video was made in the first place. A link to the right for a recommended short let me know that WBW also has a new favorite marking knife. It’s $120 and made out of about $3 of Nitro V steel….he boasted that in 6 months, he hadn’t had to sharpen it. Nitro V steel wears about as long as A2 – it’s pretty easy to keep a pristine edge on a tool if all you need it for is to make a video to collect revenue through an affiliate token. Guess what the description of the video had in it – a reference token to the site to buy the knife. What do the people who are the viewer version of my dad at the advisor’s office get out of the video? A guy they like has a new favorite marking knife that lasts forever compared to other knives (it won’t – there’s no shortage of catra and toughness testing information for the steel alloy – it’s basically a variation of AEB-L steel, itself being very cheap), and since the video shows such a large number of other knives, it implies that this commission-yielding marking knife is unique. I don’t know what the token link sends back to the video creator – maybe in affiliate interest it is. Maybe it’s not that high of a commission and just another day at the office. I don’t think most people stop to think “maybe this is about generating commission revenue in the first place”, or want to learn more about the steel to find out if it’s really long wearing and really expensive, or if it’s just a very expensive marking knife made out of fairly common materials.

I named a couple of “creators” here – it’s awkward. That should not be confused with me saying these are the two worse or that there aren’t 2000 of the same thing. I’d bet you could find your favorite alcohol infused flying bugs to be doing the same thing, and just about everyone else. Left behind are the videos from people like Curtis Buchanan – actually telling you things that will make you want to go to the shop to do more than open a box and then lose interest and go buy something else.

I Tried Reddit

I don’t think I can take it. The forums are for all intents, dead for hand tools. I’ve registered for reddit in the past, but I don’t remember why and the system is a bit foreign to me.

It looks like a site not really for sharing knowledge, but there’s plenty of panic questions from people who screwed something up, and folks who are making things and trying in a veiled way to advertise them. Which is against the TOS. Which is good, because the format is boggling in terms of the number of redirect attempts to get you to look at other topics, and especially ads.

In just a couple of weeks, I’ve seen several posts of people who want to use a plane with a chipbreaker and have no idea.

And the whole “Karma” thing is dopey. It would keep the Charlie Stanfords and other O.G. knots trolls from having their posts displayed, but there’s a catch with it. If someone says Paul Sellers is the GOAT and you say that’s an alternate reality, you’ll get so many downvotes that perhaps your posts won’t show up, and if you’re not really sharing anything except legitimate suggestions, that kind of defeats the point.

Reddit isn’t a forum run by some guy with delusions about personal ideals being better than other woodworking media sites’ personal ideas, it’s a well oiled calculating data mashing enterprise. This setup is on purpose, because it is the best for advertisers both in terms of the mood and for attracting the type of people advertisers want. Advertisers don’t want me, they don’t want half of the people who will read this blog and they certainly don’t want a Warren who likely won’t suggest much of anything made recently.

It’s so different that it’s entertaining, but it’s not going to be entertaining very long for anyone other than folks who just want to show they made something. And for that, it’s probably great.

It’s in some ways like stepping back in time on the forums, aside from the transient impersonal feel of everything on it. That is, the bulk of the group seems to think the Rob Cosmans and the Paul Sellers types are the high end makers, and that they infallible sources of information. Probably because the nature of the place prevents any distillation of information for the better – to an extent even worse than the forums do.

Of course, I love to shove everyone toward using the cap iron, and there are lot of folks there who could use it. But I don’t think anyone reads over 1000 characters of text (that being told to me by a guy who was sort of educating me about the consequences of making a negative post and then responding to people who posted rebuttals to clarify – that’s apparently a good way to just get multiples of all of the pissed off karma bees running your score down, and then you’re supposed to care about that. I think it’s a good acid test. If honest answers prevent you from having posts displayed, then you know what you need to know about the site).

Since paul and the other who knows who – i can’t keep up with all of the shallow youtube video link-revenue experts like the wood whisperer or Rex or whoever else. And yes, I know a lot of people love the wood whisperer, but a recent search on hardwax oils (I had no idea such a finish was so popular, but I guess so were velcro shoes for a while) that all have revenue links or actual direct affiliate links to each product. Or the “carbon method” – barf. You’re not the customer viewing those videos, your the product.

And reddit dovetails with that. I don’t think anyone is going to read anything about the chipbreaker when they ask how to deal with tearout. Even though you can show a picture like this – a mexico made stanley (and not a particularly good one) working through something that will tear out.

But, anyway…weird – it’s like some people showing fine italian food, but commentary getting offended if anyone says they’re not thrilled about online classes on how to make Ragu.

It does seem like it’s a shame that you can’t get the long-time accomplished hobbyists and pros on a site in a focused discussion anywhere, where useful information could fall out and be stored. But that ship has sailed – the strong makers for the most part abandoned the forums, and there’s no reason to worry about “what could be” when it’s already proven to be “what won’t become”.

Basic Principles and Terminology of Natural-Resin Varnish

I mentioned I’m not going to talk about how to make varnish other than to say that you can go out to youtube and read about it, along with old texts. The texts written around the turn of the century or a little earlier are still accurate for us, sans the quantities where things are in proportion to 100 pounds of resin or 100 gallons of finished product or some other such large numbers. Some of the resins are $6 a pound in quantity, and some are $70 even in quantity if they are uncommon (semi-fossil copal). But I want to define some things because you may want to go figure this out, and I want to talk about varnish and if I use terms without defining them, you’re not going to follow what I’m saying because it’ll seem like jargon. However, some of the terms apply to all finishes and since I want to talk about varnish anyway, this post is a limited intro to terms used with varnish making.

By the way, when we make varnish, it could be a very small amount up to probably some fraction of a gallon. I typically try to make a quart that in better varnishes will be two when it’s properly thinned. A quart of varnish that’s 70% solids is a *lot* of finish. The large quantities in older books would not only be a logistical and budgetary issue, but also probably not legal to make in a lot of jurisdictions because of VOC rules. That sounds like a weird restriction for a hobbyist, but varnish cooking was an industry, so the rules were written for it as well as manufacturing other coatings.

Defining the Basic Process of Making an Oil Varnish

An oil varnish, like what you’d think of as being on a boat, woodwork or a violin is made from a resin (usually from a tree), an oil (usually linseed, but sometimes walnut or tung) and a thinner (usually real turpentine, but many solvents will work and commercial varnishes are typically made with cheap hydrocarbon solvents – good fresh smelling turpentine is $62 a gallon at the very cheapest, and some is much more than that.

The process of making varnish is typically several steps, but it’s not like a recipe for brownies.

Step 1 – prepare the resins and oils. Preparation is focused mostly on cleaning things off of the resin or out of the oil that complicate step 2.

Step 2 – cook (“run”) the resins and cook (to “break”) or cook and oxygenate the oil. This step prepares both parts so that they will bond together in step 3.

Step 3 – introduce the finished products from step 2 to each other, cook them together until they bond with each other, and then perhaps longer if searching for certain properties, and at the tail end of the process, introduce enough turpentine to make the varnish suitable to be poured later.

Steve Voigt is doing an enormous amount of work on this subject, and he’s got lots of information on his blog that’s much more precise about actual cooking and details on the steps, and I’d direct you to him as he’s done a lot more of it than I have.

He also has an excellent recent video trio on making copal varnish, which is probably the most desirable varnish for woodworkers, and would’ve been on instruments, in my opinion, if adherence to tradition were less important than results.

There’s enough there for you to do what he shows, though semi-fossil copal is expensive and it’s not a beginner’s first step. It’s also potentially dangerous to make varnish, and if you introduce open flame like a propane burner or a fire, you risk very serious injury. You may hear rumors of bad burns from candy making with sugar at 350F, and so on. Varnish resins often run around 600F or higher, and the oil can be in the same range for preparation – there is no doubt that in larger quantities, people have died making varnish, and anyone who does a lot of it has some scars. Lucky for me, I’ve had two little half-bb sized spots of hot resin spit out on my arm, but even that was enough for blisters and two little purple scars on my forearm. Just keep danger in mind, skin graft type burns aren’t out of the question.

Terminology for Oil

Washing – literally shaking oil in water, vinegar and water, water and salt or all types of things. Washing oil is a matter of separating things in the oil (like antioxidants) that will prevent bonding of the components in longer polymer chains to themselves, or in bonding resins and oils in a later step to make longer polymer chains.

Breaking – cooking or perhaps some other treatment I’m not aware of (chemical?) to separate parts of the oil from each other and destroy unwanted proteins.

Blown – oil that’s been introduced to oxygen while preparing it – like blowing air through the oil while heating. Obviously, drying oils dry with exposure to air. Treating the oil with air can initiate the drying process, but this isn’t like epoxy or two part finishes – raw linseed oil can be blown or manipulated and then the treatment stopped and the oil will just dry faster later, but it won’t finish drying on its own.

Terminology for Resin

Rosin – this is cooked pine tree resin. Pine rosin quickly cooked into a varnish isn’t particularly good, but violin makers used a lot of pine rosin based stuff. It can be aged or oxidized or treated to make it better. But it’s the same rosin you think of with baseball pitchers or as a block for violin bows.

Fossilized – resins that have been around so long they have fully transitioned to being a fossil. Amber is the only one that I can think of.

Semi-Fossilized – resins that are between sort of “new” and fossilized. Could be hundreds to millions of years old depending on the type. India and Copal resins are of this type. Some Copals are debatable. There is a stark difference between the aged resins and the type that have just fallen on the ground recently. The former makes a harder and better varnish. The latter is far less expensive and I haven’t seen a good reason to use it, but new or unaged resins are popular for incense or “spirit” varnishes (like shellac – just dissolve the resin in a solvent and have an evaporative finish).

Congo/Madagascar – the two semi-fossil Copals that can be purchased and used. Both make a hard varnish that is essentially waterproof and that won’t soften appreciably when exposed to hot temperatures. Madagascar is apparently much younger, but it’s a *very* hard resin.

Run or Ran/Has been Run – resins that have been cooked to get undesirable stuff out of them so that they will bond chemically with oil when cooked together. Running resin can stink so bad, depending on the type, that a rendering plant manager would’ve called the police about the smell. Amber is by far the worst thing I’ve smelled thus far, the fumes are really unhealthy in the first place and shouldn’t be breathed, but the smell will make you wish you had only stuffed your nose with cat poop.

Terms for Cooked Varnish

String – after oil and resin have combined in a cook and have become a “block co-polymer”, the polymer chains will link together allowing the varnish to stretch out in strings if you touch a cooling drop of it and pull your finger away.

Clear – when cooking, if you haven’t gotten oil and resin to bond together and drop a drop of the hot mix on bright metal, it will be cloudy looking as it cools. Once it’s clear, you’re either at string or working toward it.

Pill a property of varnish such that the oil and resin are thick and not oily, too think to string, and can be rolled into a little pill. Asphaltum in a cooked varnish strings easily and will get to the point that it pills.

Gelling- I’m guessing a little at this, but I’ve had two varnishes gel. I believe this happens when the cook does something to introduce so much air or heat to varnish that it’s partially cured and will no longer flow.

Quick and Light or Cheap Short String– I’m coining this, but it’s described in old texts as an inferior varnish. It’s gotten by mixing components at high heat, getting a string quickly and then removing varnish from the heat rather than cooking it to a better quality. Reasons for this generally have to do with cooking a shorter length of time so that the varnish remains light colored.

Strong String or Long String – it’s not yet clear to me what level of string was typical in the old days. Perhaps a foot or longer. Longer string varnishes mean the varnished produced has longer polymer chains, will be tougher, and probably will be harder. This property also makes the varnishes of the same components feel sticky (very hard to get off of hands without a solvent) and much thicker at the same thinned level.

Long oil or Short Oil – you can vary the amount of oil in a varnish in proportion to the resin. The more oil (long), the more flexible the varnish, but softer and slower drying. The “shorter” or less oil, the faster the varnish will dry, the harder it will be in general, and also, if pushing limits, it will be hard and easy to crack. 1 part resin and 1 part oil would be neither long nor short. Some of the old recipes specify very little oil for cheap furniture varnishes to get a hard bright polish.

I think that should cover enough that I can blog about the varnish that I’ve been making and you can read older sources if you want and there will be overlap so that varnish-related posts don’t just lead to . ………. o O (?????).

Grubby Grubbing

A friend mentioned to me a few weeks ago that his sister has a tool she absolutely loves. It was a Wilkinson Sword weed grubber. This brand is seen in the US in razor blades, and probably has been for other cutting tools in the past, but the garden tools aren’t that widely found as far as I can tell.

Here is a stainless version of the tool. Call me lazy, I’ll push a plane and saw for several hours in the shop, but I don’t like getting on my knees to garden and would put this thing on the end of a long handle. Gardening on knees and leaning over literally will give me a migraine. I don’t know if being unable to tolerate that kind of thing is lucky or unlucky.

But, it’s not for me. There’s also a carbon steel version of this thing and it’s probably all of about $15 US equivalent. I couldn’t find it on alibaba but other similarly priced tools from WS can be found there for about $2 each. The trick is you need to be willing to buy 20 of them. This is the nature of what we buy in the US. In lumber terms, we often hear something like “it’s 10 cents on the dollar at the stump” or at the mill.

Here’s the problem with the tool – the whole $1-$2 item branded and shipped and retailed is just the way things are now. That’s not so much the issue as consumers ultimately dictate what we get. The problem is that it looks like it’s blanked (many inexpensive plane irons are, too, and double edge razor blades definitely are), and that favors using a thin piece of steel and then stamping or manipulating the blank. My friend says his sister loves this tool, but it breaks at the handle.

He asked if I could make something similar – who knows. I hammer shape flat stuff, but it was worth a try.

I decided I’d use CruForge V and heat treat it a little under so that it’s still fileable. You do this with simple steels by heating them to nonmagnetic and no more and not getting too brisk in the quench. They get some stiffness and strength after temper, but can be filed, and you’re not gambling with tempering embrittlement like you would be doing if you just temper to 500F or so. Embrittlement occurs when it takes less energy to break something at a lower level of hardness than it does higher. It’s pointless territory. I also have no need for CruForgeV as I likely bought it some Tuesday lunch at work grasping for straws regarding a 1% steel with some vanadium, but not too much. Great in this case would be 0.3%, but it has 0.75%. I didn’t believe it could possibly lead to stray vanadium carbides of any size, but it actually does. They’re sparse and not that small – I really don’t know what the point of the steel was and maybe I’d need a power hammer to figure it out. Needless to say, it’s no longer made and you can still get old stock from retailers years later.

Translation – no big deal if someone breaks it and I have to find something a little tougher. it is tougher than something like O1 or 1095, though, and especially vs. something like a PM steel of any significant carbide volume. All of those types are intolerant of bending and prying.

Well, here’s what I came up with.

It’s 1/4 bar stock heated, flattened on the business end, hammered to the S shape and then hammered and ground at the tang.

Rather than trying to seat the handle by friction on a tool that gets pushed and pulled, and will perhaps live outside, I just epoxied it in with a very healthy amount of epoxy, and the bolster is glued on, and then also bound by the epoxy spillover. If it comes out, it can just be reglued.

I would guess CruForgeV steel is water hardening and underheating it plus just dropping it in the quench rather than moving it means it’s not fully hardened, and beyond that, it’s less hard in the middle. That should give it some forgiveness. Who knows how this would be handled industrially. I don’t.

Now, here’s my point about this tool – it could be made like this in China for $3, I would bet. Maybe the handle would just be something ashy looking with a cheap varnish dip, but that’s functional. It cost me probably $15 in materials to make it, so if it doesn’t outlast the original for some reason other than the tang, it’s just a fun project.

The handle is london plane tree, and it’s varnished with copal, and the business end of the tool is Japanned. If I won’t spring for stainless, it is probably good form to at least protect the steel and wood from rust until it’s confirmed that it’ll be used often enough to keep the rust abraded off on a regular basis.

The varnish isn’t neat, it’s just padded on and little bits of paper towel and other nonlevel stuff is left – there’d be no virtue to a slick-handled garden tool, even though it’s much more fun to really tart handles up.

The japanning is a full varnish, cooked and linked together like a true varnish so that it can’t settle in the jar, and all that it needs is either a long long time of air exposure to dry, or more smartly, the cure catalyzed by being baked. Which is what I did. Plane tree is sort of a boring wood – it’s one of the Acer woods (like hard maple) or it’s half of that and some kind of hybrid. It’s like a weird feeling hard maple, but the varnish did a great job of bringing out figure when there’s not too much there. Something natural resin varnishes do a little better than shellac or hydrocarbon or synthetic polymer finishes.

Like many favors – i hope once this thing is gone, I never hear about it again. That’ll be good enough – it will mean someone is happy enough with it and didn’t break it. It should be difficult to break it in the first place, but I’ve got no clue what people do in gardens. There are always rocks and roots in dirt, and not having the right tool in hand to deal with such things really doesn’t stop most folks and it never really stopped me.

The point of this thing as it is, I gather, is to go straight in, grab the stem of the plant below the dirt and tear it up or pull it out…..something I’d much rather do standing.

It’s all part of making. I’m just a tinkering amateur, not a pro by any means. it’s still much more stimulating to think about how to make something like this and experience it than it is to incessantly read various catalogues and try to be an expert on what can be bought.

Preventing Rust

I have to admit that part of this post is motivated by animus toward the “friendly” presenters who recommend obnoxiously expensive “nano” rust preventive measures toward the “friends” that they are making videos for. Let’s be honest, at least if you are cynical like me, they are making videos *at* people, not for them. You can skip the rest of the discussion that follows other than perhaps canceling the idea that maybe I just don’t have a very damp shop – and go down to the next header if you’d like. My discussion of humidity and circumstances follow because I’ve fielded at least half a dozen comments that “your methods wouldn’t work here”. Unless you’re getting a mist of salt water in the air, that’s not the case.

There is nothing difficult, expensive or time consuming about preventing rust on tools in the shop, and probably also not for metal surfaces on stationary tools. I used to have stationary tools – a jointer, a bandsaw and a table saw, and once in a great while early on, they would get a dot of rust. Let’s get something I guess set and clarified from the start – my shop is extremely humid in the summer. It is halfway below ground and it is not heated or cooled beyond whatever it gets from the ground and the surrounding house. Typical dewpoints in PA where I live are mid 60s to mid 70s, and on the hottest of days, my shop will reach 80 degrees. I *really like* this setup because whether it’s 95F outside or 0F outside, my shop will be in a narrower range -about 30-80F. You can work by hand in that range. But it does result in high shop humidity. At the moment, my shop is 86% humidity according to the digital hygrometer. I often hear people claim that they live somewhere hot and it’s 95 degrees and close to 100% humidity. Actually putting the dewpoint and temperature in a calculator should dispel that nonsense. RH is an interesting figure – when it gets really hot, it’s not common for it to be at or above 60% (95 with a 75 degree dewpoint is typical in the south – that’s an RH of about 53%). Really high relative humidity generally occurs when you take high dewpoint air and stuff it in an environment where the temperature quite so high. It’s 86% humidity in my shop because the shop is partially underground.

At any rate, like many, i started with a set of power tools and then mostly premium hand tools, and I ground the layer of patina right off of a lot of other tools. I spent a *lot* of time doing stuff like rubbing rust off of clean fresh cast and wringing my hands. It was a complete waste.

Here is My Recipe for Rust Prevention

  • First, the lowest level of effort – Oilstones (wipe with high quality mineral oil if you insist on waterstones). I moved to oilstones a few years ago for a simple reason. They are faster to use. They don’t cut faster, but they’re faster to use and include much less screwing around. Once I did that, chisels and plane irons ceased rusting. period. If you are using oilstones, you can get the bulk of the honing oil off of tools such that it won’t mark tools easily, but it will take a lot of effort to remove every single little bit of oil protecting a tool surface. This is a good thing. You wipe oil off of the tool, it doesn’t mark wood, but you still have a layer of protection.
  • Second, I use wax – on anything that I don’t want to constantly coat with oil. Paraffin on plane soles sort of covers those, and a Johnson Wax (RIP!) can or Briwax or whatever else for stuff you want dry, and then a 50/50 mix of beeswax and hydrotreated mineral oil makes a spreadable non-drying wax. Hydrotreated mineral oil is the stuff sold for all kinds of things – including as a honing oil. Could be bovine/equine supply, commercial kitchen cutting machinery, sewing machines, whatever it may be. These two types of waxes make a very persistent coating that will tolerate anything other than water laying on tools due to your absent mindedness. This is something you should avoid in the first place.
  • For the worst, Light cut blonde or super blonde shellac – for anything that you find rust on, anyway, a very light cut of shellac – like 1 pound, can be wiped on. Just rub it into the surface of the metal – if you already have wax or oil on cast or steel, it won’t care – it’ll stick to the metal and then itself and if anything, push the oil to the top (exactly what happens in a french polish). The result should be almost invisible, and if you ever want to take it off, rub with an alcohol soaked rag, and it’s gone. If you put any shellac on metal and still have rust, something is amiss.

Wax your saws when you use them when they get in a bind. If you have new saws that you’re not sure about timing on use, use a light coat of paste wax – just wipe it on and wipe it off. You’re not finishing furniture.

One more comment about the oil and the comment “hydrotreated”. Hydrotreated mineral oils for cutting equipment, or if thicker, hydrotreated mineral gear oils, have had volatiles refined out of them. They will be clear unless someone colors them, they’ll have no odor (unlike some stinky honing oils) and if you put them in a container exposed to air, they won’t change over time, at least not in your lifetime. The princely sum for a hydrotreated commercial kitchen supply oil is all of about $18 for a gallon. If you get stuck shipping something, you might end up buying food grade mineral oil from amazon or somewhere else for about $10 more.

If you see a mineral oil by the gallon and you’re not sure – if it’s clear and for food use, it’s probably hydrotreated. You can google the SDS and confirm.

Too, the lack of volatile contaminants in hydrotreated oil doesn’t just keep it from stinking. It keeps it from drying, and means there will be no extra film like you might get from WD40 or something of that sort.

And that gallon of oil will find uses in a whole bunch of different things. French polishing, the oil and wax beeswax mix mentioned above, in an oilstone bath, and so on. It will take a very long time to use it. Of the things mentioned above, it’s the only extra purchase that I made to actually deal with rust, and my first gallon is almost used over 15 years, due to several things (like changing oil in an IM-313 oil bath) – but if just used for rust preventives, you’ll never use it all. That puts you $15 out of pocket. I’ll keep my gripe about commercial paste waxes to myself other than to mention that when I started, a pound can of Johnson’s was $5.95 and had a little bit of carnauba in it. The carnauba went away, then Johnson’s went away, and we’re left with paraffin wax-only garbage in a lot of cases for three times the price. Waxes that have 5 or 6% carnauba like blue label mowhawk wax fall into the category of a product that has almost no manufacturing cost, but those appear to retail now for $30+ tax or more.

If you have full fast changes in temperature

….and a dirt floor in your shop or something of the like, what I’ve mentioned above will still work. If you find that you have something persistent that still causes problems, then the problem tools can reside in a box that shifts temperature less quickly. Temperature swings in my shop are moderated by being part of the way underground, but my tools have all been handled so much with oily hands from sharpening, or waxed in use, that there really isn’t anything that rusts unless I see water laying on whatever it may be out of laziness and just let it go. Since water is handy for grinding with a power belt grinder, it happens.

You shouldn’t be subject to people who want to market nonsense to you, but they’ll always be the most persistent. I’ve got cans of dry lube, bike chain lube, mutton tallow, and who knows what else – all in the original attempt to keep things lubricated. I can’t vouch for the tallow -the beeswax mix obsoleted it, but it could probably be made into a soap.

I really despise videos and other parroting of such about nano or graphene rust control or whatever the next flavor of the moment may be. My opinion is that all of that stuff is intended to give you the perception of value by a bunch of cliquey talk. One of the relatively famous guru youtubers made a pitch for it in the past ($70 for one ounce of the coating, without even getting into the nonsense “pre cleaning spray” and slippery after coating), and found rust on a saw that was put into storage. Using the discussion of the rust to come back and pitch it again. The video comes with the obligatory “sponsored video” upper left hand corner tag. It’s up to you to guess whether or not the second video was made because “it just worked so well”, or because there’s an underlying agreement that required more than one video.

It’s too bad this stuff isn’t called out a little bit more loudly. If the video maker would’ve applied 15 cents worth of thin cut super blonde shellac and returned later with an alcohol soaked rag to remove it, there would be no rust.

Nicholson on Cutting a Rebate

If Lloyds had odds on cutting rebates, what Nicholson says here would be high odds for anyone who has cut a hundred feet or more of rebates and worked by hand, and very low for people who buy boutique tools or use a table saw most of the time.

Why? Cutting rebates is best done with a moving fillister plane, and a wooden one at that – not a Stanley 78 and not a Veritas Skew Rebate or whatever else. Everything other than a wooden moving fillister is slow at this and the perception of metal accuracy is misplaced. The moving fillister works accurately, but not generally to finish accuracy – it’s set to cut and the rebate is finished with a separate rabbet plane – the skew kind that you’d find with no other fixtures at a flea market for about $10. There’s a reason they’re everywhere. From experience, you will get to this pair on your own, along with a marking gauge and anyone describing setting a metal plane “precisely” without marking the joint instead and doing the fine work with a second plane will seem a bit dippy.

So, let’s get on to what Nicholson says. Page 139.

Nicholson mentions the wood needs to be tried on two sides – those would be the ones that you’re cutting the rebate into. The first discussion is rebates less wide than the plane, which you will find yourself doing, anyway.

The discussion immediately goes to setting the plane short of the final width of a rebate and the depth stop foot short of the final depth. If you’re thinking this sounds like more steps and it will take longer because you can find an “accurate boutique plane that can be set perfectly”, you’ll find that not to be true as all of the speed of the moving fillister is lost in this process and the short front foot and issues of your own technique will never be as accurate as finishing to a gauge line.

Which gets to the next point – the joint should be gauged (marked) both in width and depth. Do this first so that you can easily set your plane off of the marking. Again, if you are thinking this sounds like an extra step, if you’re cutting many rebates, you’ll gauge them all at once. it gives you a perfect indication end to end on the stock you’re rebating and when the lines are gone, you’re done. You set the mark, don’t get lulled into believing that the feet and fence on a plane will do it for you – you’ll have no clue where you are and if you’re over a mark – how will you check, with a dial caliper? No thanks.

Nicholson goes on to mention setting the moving fillister relatively rank and equal depth across the plane. The rest of this paragraph is my words: Do this by eye sighting down the sole and also use the ability to do this as your indication for honing bias when you freehand hone the iron, which is how you should sharpen a moving fillister iron – if the iron doesn’t want to project evenly, you’re going to both have a strange out of square bottom, but also a plane that favors cutting toward the heavy side. Each time you hone, you’ll inspect this and it’s very easy to prevent. if you hone with honing guides and fixtures, you’ll drive yourself crazy here. Most fillister planes are steeper than common pitch, so if you’re pretty gross at freehand honing, you’ve got plenty of clearance and this is a good place to learn.

The rank set part is important – you are not taking smoother shavings, you are taking something between jack and try plane shavings, tending more toward jack if the wood allows. Set the rankness based on what the wood tolerates. you have but one mission, remove most of the wood inside of the gauge lines and don’t break out any wood past them.

Nicholson goes on then to describe a great deal of something simple – where your hands go. your front hand goes on the side of the plane with the thumb over the top, and your back hand pushes. Your job is to keep the plane in the cut evenly – the fact that the shavings are rank will allow you to get done pretty quickly, and it’ll also stretch out the volume of rebate cutting substantially vs. taking thin shavings. Sharpness is always important, but you’re going beyond fine shaving cutting here and you need to go back to the stones only when the plane tells you to.

Job number one for you at this point is to keep the plane relatively vertical – just look at it vs. your marks if you need to, especially at the far end of the board once you cut. Efficiency here leads to pleasure, and that means accurate work, not hurried, but in rhythm. You must use the front hand to keep the plane against the work – if you don’t, you’ll cut pyramid side like things into the wall of the rebate and leave yourself a chore with the rabbet plane. If the wood is good, the shavings will be thick enough to look broken.

Nicholson’s nod toward efficiency then goes into planing sectionally on the board and not walking the length of the board with one shaving after another. I think if the plane is rank set, if you’re an amateur, it probably won’t be that big of a deal. The more the wood dictates backing off of shaving thickness (if it’s poor grain orientation) the more you get out of planing sectionally and then moving.

Finish by taking a few through shavings as you work just shy of the marks. personally, if the wood is planing really nicely, you can probably plane right to the marks for all but the finest of work, but pay attention. The long through shavings will lead to the plane communicating all kinds of things to you – high spots, terrible wood, whatever. Use your judgement to make sure you’re not feeling any remaining high spots or skips.

Nicholson then goes on to say what I guess I jumped the gun on – you need to be able to feel vertical, and hold the plane vertical and keep the cut close. This isn’t a burden or tedious – it is the same sense of feel you will develop everywhere, it’s not as if it’s a skill that’s attributed to a moving fillister in isolation. Just don’t lose track of being close to vertical. Nicholson then says to use a skew rabbet plane (the kind open on both sides and with no fence) finely set to plane to the final mark.

You will be shocked how much faster this process is than trying to use one metal plane or one anything to cut the whole rebate right to the mark. You remove material, then you finish to the mark. It’s not the same idea as “use the plane like you would a rebate router bit”. I think the insane discussions about set screws and this or that on boutique metal planes (which have enormous friction in the cut, too – it’s really unpleasant) comes out of the idea that you can turn a fillister into a routerman’s dream. Poo.

What about the nicker?

Note there’s little discussion about the nicker and its relation to the side of the plane and projection of the iron from or equal set to the side. That’s because the role of the nicker is to establish a crisp edge across the grain. For long grain cutting, this kind of thing isn’t that critical and the nicker can be set up out of the way, pointing back to having a finely set skew rebate.

This pair instead of one is so dominant for another reason – it eliminates the idea that you need to have fillister planes that go in two directions. You don’t. The rebate plane (not the fillister) makes the finish cut – you just use it in whatever direction the wood prefers.

Wide Rebates

I have my doubts that many people do this by hand, but it’s worth noting.

If the rebate is wider than the moving fillister plane will allow, you will gauge the width of the rebate and plow a groove shy of the gauge line. A good plow plane has a depth stop, so the same rules apply – do the coarse work and leave the fine work to the mark until later.

Then, you use your moving fillister plane to cut some of the rebate on the side toward you, leaving a column of waste in the middle that you can remove any number of ways. A firmer chisel is fine, as would be planes if you have the means to use them. If the waste is relatively wide, you can groove several plowed grooves, chisel and then pare or rebate what’s left and work to the mark.

The text goes on to mention that if the groove is really wide, but a sash fillister can be used to cut from the opposite side of the board to finish with width, then that is also fine. For the uninitiated, a sash fillister is a plane that cuts the rebate to the width of the waste (it cuts on the far side away from you gauging off of the side toward you, much the way a router fence attached to a base establishes the width of the uncut wood, not the width into the cut).

If the rebate is very large, you can plow both sides of it leaving a solid bit of waste in the middle.

And while it’s not mentioned here, if there rebate gets so large the planes won’t work to depth or plowing becomes unruly even with a wide plow plane blade, you’ll be sawing the waste out so that you have less work to do. Same care is needed – cut short of the marks, discard the “stick” that you end up with, and then finish planing to the mark with something finer. You can do this sawing with a carpenter rip saw easily and safely if you proceed with the start of the cut slowly.