Everything is associated some way in my mind, at least if there is a weak multi-degree association. I realize being a poor processor of outside information, at least without a lot of repetition, this stuff has a low probability of being noticed or digested the way I’m thinking. Which reminds me of a comedian at one point suggesting that jokes that are too complicated or obscure just aren’t funny. This comedian has this same disorder that I have – pattern noticing, association, predicting, checking, testing accuracy of predictions. But I get what he was saying – that you can have two issues when something gets complicated just to be interesting to the person, in this case, telling the joke. First, you’re just being a snot and arrogant trying to cater to a very narrow audience. I don’t much care for personal ego leveling up or “high end groupism” and labeling, so that’s not my bag. The second, is you end up saying a bunch of stuff that nobody gets.
And sometimes that is. So I apologize for some posts on here where I go deep on W2, or whatever else – I’m in my own bubble drawing associations between things and to some extent, documenting them for my own edification. This blog isn’t about trying to draw a big following and monetizing it. If I want to monetize something, eventually I will sell tools, but it won’t be through the blog unless I’m desperate for money. I guess that’s possible, but it won’t be soon.
So, what’s the title a play on? Nesting boxes. I am actually building a stone box, but it’s not a nesting stone box. Boy that would be weird. But it’s also a play on my previous comment about shop nesting. Shop nesting is a trap – one that leads to wasted time and then too much time spent leads to a lot of folks not wanting to dent or allow anything to get dirty. If the nest is the point, that’s fine – I wonder how many people feel like it isn’t the point but they get stuck in it. A perfectly clean shop with a lot of money spent, especially when you count the cost of real estate occupied, and walls full of jigs (that aren’t for recurring professional jobs – I think we’d call those patterns) lining the nest.
It’s my goal to make things in the shop. I hate cleaning – and I hate extra effort organizing. Organizing to a large degree is necessary in a shop with more than one person and shared space. It’s necessary for us at work. if you’re working in your own shop by yourself, it’s not that critical and has little chance of increasing the volume that you make. It does have the chance of costing you money, wasting time and I guess if you are thin skinned, you can show your friends your shop without being embarrassed about disorganization.
So, I have this bug in the back of my head- if incessant organizing is needed to actually do work, then I have too much stuff and need to dump things instead.
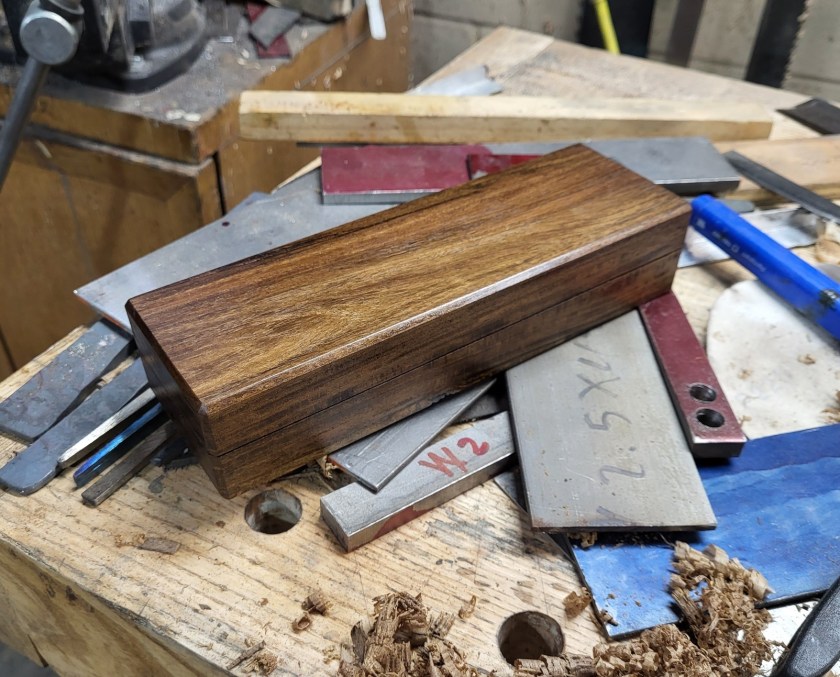
Back to the box. Keeping a nice organized bunch of exotic woods (OK, I keep a bunch, they’re not organized) is nice in one sense. They’re never as dry as they claim. In another, loss of wood over time, it’s not so great. Stuff cracks in winter here. So, the fodder for making a box comes from a stick of Louro Preto (you can find it on wood database) that has delaminated a little around a growth ring. Since it’s already fire fodder, it’s good waste for a box and I fixed the ring by gluing it with CA.
Even in the Little Bits, There’s Chance to Experiment.
I don’t want to spend any significant time making this box, which means i’m not going to come up with some router setup, i’m just going to drill it out and fit it to the stone after chiseling off the sides and corners. I’m not sanding it, I’m not scraping it, not any of that.
But there’s an opportunity. Louro Preto isn’t that great to plane. It’s hard, and the grain is often disorganized. The wood database puts it just below rosewood, but it’s worse to plane. The general stat at the wood database is dent hardness and density.

I had no intention of posting pictures of this, but as I was planing, I realized this is a wood that will illustrate the shavings issue. Look at the shavings, and now look at the wood surface. the wood surface (aside from the sapwood) looks pretty good. Look at the shavings – see the little holes in them? You would have to make a second set for the cap iron to plane this really cleanly (really close) and this doesn’t rise to a project of that level. So I don’t do it, but I know when this sees shellac, there will not be a mirror surface. From experience, I also know that if I french polish it for sport (something you can do while watching videos – a functional fidget spinner), they will be sealed.
But there’s information in those shavings. I’d say trying to smooth plane Louro Preto would be in the single percentage digits up with the worst woods. It’s relatively hard, but between the rings and in some of the ribbons is weird powdery wood. So you get shavings and a pleasant aromatic dust.
Don’t discount what the shavings show much more easily than does the wood.
Planing the Ends
More than just planing – Louro Preto also splinters easily. This box will have bevels – plane them to size, or plan ahead a little better. I should have marked the board carefully, but didn’t, because the wood had a delamination and I thought I’d just be going for another length next. If you’re working by hand, think about stuff like this. I can mark and saw something like this by hand in a way that very little work and no squaring will be needed on the ends. I just didn’t do it in this case because I wasn’t particularly engaged in the whole process.

There’s not much end to plane here. If I hate sanding, I hate sanding end grain five times as much. It feels like an activity meant for people with no brain. I also don’t like the look of sanded broken edges, so I don’t do that either. you can plane the bevels on the fresh wood, but it’s faster to use a file or super shear, so the dust you see on the bench top is just what came off of the super shear. This box isn’t think enough for large bevels, and if one were to make a decorative box with them, mahogany would be smarter. It’s more stable, anyway, and five times easier to work.
After planing the end grain, I shear it off a bit with the super shear and that’s it. It takes much longer to type this than it does to do it. It’s important to note that since this is a splintery wood, but practice in general, the bevels are on before the planing, and they are also safer with a file on wood like this as even planing the bevels can cause small splits at the corners. the planing itself is done in a way that the iron goes on askew and comes off askew. If you don’t do that, you’ll find out why when you try to bull the wood and it splits in a long line parallel to the width of the iron.
The stone is in the box here to help with alignment. It’s in tight enough that it won’t allow the lid to move while planing – that can be addressed with light scraping of the sides later.
And if you’re actually thinking about making a stone box, break the edges just a little bit on the bottom part of the box. Your hands will come in contact with them. Nothing garish is needed, just a small break of the edge, and if it’s a facet filed, it’ll actually look better. Even if it’s done quick and sloppy like this box.
I plan on sticking something non-skid to the bottom and adding more shellac than this first bit rubbed in through linseed oil. Not because it needs to stay pretty – the shellac will get dinged and so will the box. but because I don’t want the box to be black from handling down into the wood.
You can only just see the evidence of the edge being broken in the last picture – it’s discontinuous. the small bevels around the top of the box meet in a triangle at each corner, made by starting pulling a file backwards to start. those would also be punishing if let untouched. If you make fast-as-you-can small bevels like this and they don’t all line up, just adjust the long bevels slightly as they meet and then address later vs. pretending you’re a machine trying to make four perfectly identical freehand bevels. they only need to be close. You probably didn’t look at the picture and say oh, how uneven. Save the fine efforts for work, not the nest, unless you’re testing a method in earnest that’s going to be used on work soon enough that you won’t forget it.

I’m assuming you also included end blocks…
LikeLiked by 1 person
In this case, I didn’t. Where I like this stone is following an india stone when making a new iron. I haven’t used it in regular work yet, though I think it will work well paired with buffer or compound. time will tell. I intend to use the stone with a very heavy hand and get a diamond hone on it often, and with end wedges, I’m a little concerned with contamination in this cause because iron making in process means contaminants will be flying around everywhere.
but I do like end grain end blocks in most cases.
(I think the ruby stone is one that a beginner could have a cold feel about pretty quickly, but it’s also one that some oilstone users might like. Outside of heavy handed initial flattening, though, I couldn’t vouch for it being more practical than a good washita).
LikeLike
Something else just popped into my head that might provide context. Since this is kind of a middle stone thing, where I need the assist when making is giving it a hot lunch working the back of irons strapped to an aluminum block. the bevel side work is pretty brief following an india stone. It does a good job illustrating the effect of large surface vs. not when working a tool (i.e., it will hone a burr, albeit fine one, on the bevel side, but it won’t cut the iron back that fast).
Oilstones are great day by day, but a washita or a hard ark with diamonds will get hollow in the center pretty quickly when making irons. And I think as I transition to making things and listing them (elsewhere), one of the holes in the market is carbon steel and O1 irons for LN planes.
Making a plane iron is about like turning a pen – it’s long enough to be interesting and short enough to finish fast and have something useful.
LikeLike