My last post about varnish stuff was a glossary and intro. If some of the discussion in this post don’t make sense, you can find definitions or discussion of the terminology in that post. Pardon the winding length of this post, by the way. Yesterday was an adventure replacing the cold water line in my house and some of the stems off of it – I finished at 1:30AM and am wiped out. But, back to the varnish…
Amber varnish is probably the earliest “super varnish”. One that has good toughness, high hardness, and is suitable for a lot of uses, from furniture to floors to whatever. I’m not sure if it was used for coaches and things of the like as the texts I’ve read are later, and semi-fossil Copal resin varnishes dominated.
Amber’s interest because Copal is described as being lighter in color than amber, but Copal also relieved varnish makers from having to make varnish out of Amber. So what’s behind these two things? Amber has to be heated to a very high temperature to run and be made soluble for linking to a suitable oil (usually linseed). As discussed in the terminology post, the oil and resin are cooked together to make a long polymer chain. The run temperature is high enough that cooking over fire would’ve been dangerous – it’s only a couple of hundred degrees between amber’s autoignition. The other thing about it, and perhaps some is the resin and some is the temperature needed in the cook, is that the resulting varnish is the darkest I’ve made. I feel like I’m new to varnish making and haven’t made much, but by jar count, this is the 16th varnish I’ve made.
Dark varnish isn’t necessarily a bad thing, but if all varnishes are dark, of course rare then would be a light varnish. Copal allowed relatively light hard varnishes if it was cooked quickly to short string and then used as it was.
At this point, I think the changes in semi-fossil Copal availability have made it so that the baltic amber that’s available, and even at a relatively reasonable price, isn’t much harder to cook than Copal, and maybe not any harder than madagascar Copal.
And, yes, amber resin is the same thing you’ll see with bugs suspended in the middle of it, or polished into sort of a relatively soft natural gemstone. The baltic amber that’s sold for varnish making appears to be little pieces that aren’t valuable for anything else. For the purpose of varnish making, this is nice – the resin does not need to be broken down and it doesn’t have tree trash and dirt in it that some Copal types have.
What makes cooking difficult?
The difficult part of basic oil varnish making is getting a good clean resin to start with and then getting it to melt without burning it. With softer resins, this isn’t much of a challenge unless you’re really new. But with something like Amber or the harder Madagascar Copal, I can see thermocouple temperatures of 700F or so and still have unmelted leftovers after filtering the varnish. My setup is sort of gamed so that it’s not easy to get much past 700F. I don’t have any interest in an eruption of sticky burning stuff that you can feel the danger of if so much as a raindrop or two falls in it and spits a tiny bit out.
If that unmelted stuff is something like 2-15% of a run, I just throw it out. While you’re cooking resins, some part of the mass escapes into the atmosphere, even if you keep the lid on the pot, and burning the pot contents probably just would lead to the same amount of usable resin in the end, but it would be smoked. Like dark and it actually stinks.
After reading extensively about how Amber is difficult to run, warnings from authors not to run it, and pictures online of people stirring what looks like charcoal, I kind of expected it would be a failure, but I also kind of expected that my easy “for dummies” setup with some experience would make it doable. And it was.
There is only one thing I didn’t anticipate: the smell of the resin being run was perhaps the worst smell I’ve ever smelled. Running resin stinks – enough that it’s inconsiderate to neighbors as it’s a putrifying kind of smell, not just like a campfire or burning cooking oil. None is pleasant. But amber takes the cake as being the most disgusting I’ve smelled, and it lingers, even outside. Like on the leaves of trees and under the eaves of the house even though my cooking setup is nowhere close to them.
But I’m happy to have run something that is warned against, no fire, it’s not black, and the properties of the varnish itself are nice. it’s basically a 1 part resin to 1.5 oil, and 15% of the resin or so was pine rosin to create a melted layer to help avoid burning things. Older recipes include Copal (probably easier to melt than what’s available now) and pine rosin up to 50% of the resin content as a cheaper alternative.

A picture of the final amber varnish in the large jar, and some poured off and thinned to use in the small jar.
I mentioned above that the old texts mention you can make a lighter but less durable varnish by getting string, which signifies that the oil and resin have combined chemically, and then just stopping. I use the term “quick varnish” for this. Get them hot, put them together, and take them off the heat before they get darker. Since this is already going to be dark, this is a long-string varnish. Long string in my experience is easiest to get by keeping the varnish over heat for some period of time, testing periodically. As string gets longer, you have to pay attention as the varnish can become so well cooked that it becomes a gel, and it’s generally a lost cause at that point.
So, I cooked this as far as I cared to push it and the mildly thinned result in the large jar is almost like corn syrup when it’s poured, and it has unbelievable adhesion, even wet, and is immune to soap and water.
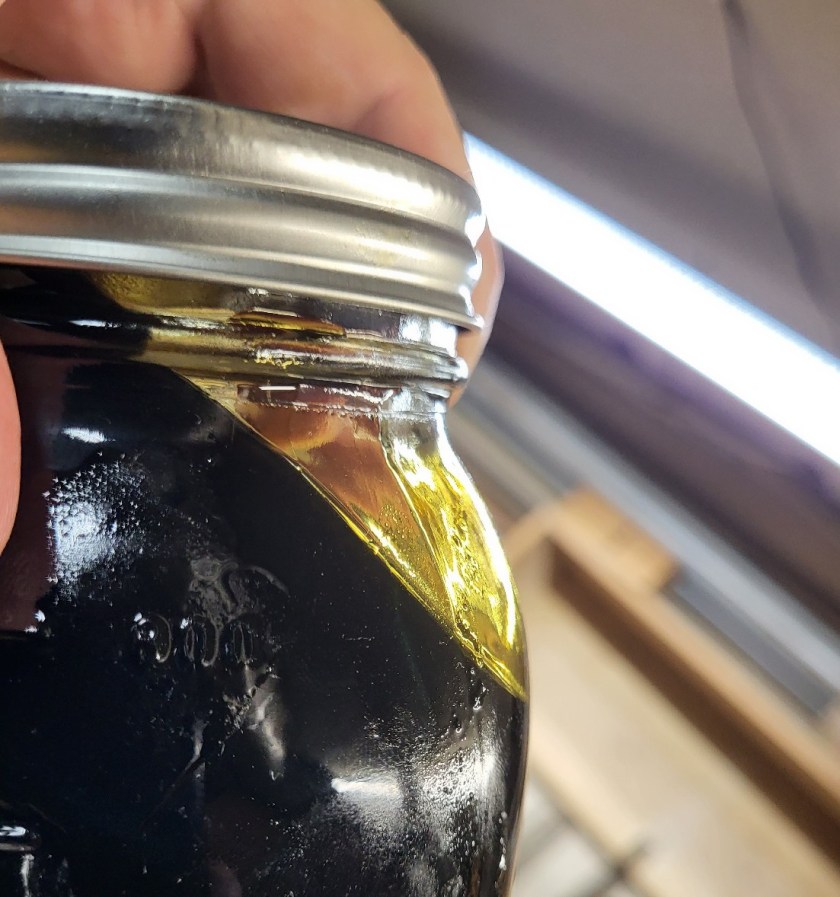
Here’s a look at the side of the large jar tipped just to get an idea of the darkness of the film.

Very dark finish demonstrated by tipping the jar to see a thin layer on the glass.
I have no idea where to use something like this other than intentional dark finishes or on very dark woods. I don’t think there’s any limit to its shelf life, though, so there’s plenty of time to figure it out.
It’s waterproof, like a modern finish, and I test for that by pouring water on a piece and just letting it stand until the water is dry. If the varnish is impervious to water, it won’t let water into the finish, but also, it won’t even degloss. Semi-fossil copal and amber both do this. I’m sure some others do, too, but inexpensive pine rosin varnish definitely does not tolerate much water contact. BTDT leaving a test piece in the rain by accident, discovering the surface swelled and bumpy with water the next morning.

A test piece of beech finished with a thin layer of amber varnish, water has partially dried. A brushed finish would be considerably darker, perhaps tending toward the color of a violin.
So, about 4 hours of effort in this case, but not all of it with me being attendant. Probably about 2 hours of actual involved time, and all that results is a quart of finish. That’s true, but it’s worth noting that the finish is about 70% solids, so it’s more similar to a half gallon of a higher quality urethane. And it’s just a different animal, anyway. There will be no curing in the jar with this, and if sunlight is available, it’s dry to the touch in about an hour or two.
Two other Varnishes for Color Comparison
It’s not impossible to have a lighter varnish with good tolerance of water, but I haven’t made one yet. I think it’s hard to look at the first picture and get a sense of just how dark the varnish actually is, so here are two more pictures for comparison.
Semi-fossil copal short-string quick varnish. Still a good varnish, but gives up durability in theory to keep this lighter color. Note the film color left on the glass as the varnish jar is tipped.

A fast-cook limed pine rosin (lime added to increase hardness and melting temperature) varnish. The film is so light it’s hard to see on the side of the jar. Unfortunately, the durability and hardness of the varnish isn’t that great.
I may return another day and try to improve this post so it’s not just like some short-sleep dude typing at random, but if you’re reading this last sentence – I haven’t done it yet.
And maybe that’s suitable for Varnish. I could make this varnish on a regular basis, but making it was more about making something that’s practically forbidden in some texts and less about doing it regularly. Especially with the smell – bad enough that 10 ounces of it running would’ve easily tinged the nostrils of dozens of neighbors.

What is the shelf life of this varnish? Asking ‘cos all my store bought just gelled in a can since I don’t use them that much. Also, does it make any sense trying to cook a very small batch, say 100-150ml?
LikeLiked by 1 person
it’s indefinite, at least in our lifetimes. You put it in a jar without any drying agent added and it needs heat, oxygen or UV light to cure. Like direct UV light of some sort. Keep it in a dim area and it should be fine.
I don’t know what’s in polyurethane, or the can varnishes – many of those are no longer the same as they used to be, but probably cobalt and manganese drying agents (“japan drier”).
it’s just as easy to add those later since they’re a dissolved liquid now and don’t need to be added right away when you make your own.
Or you can skip them and bake the varnish if putting it on something metal, or put it in the sun if circumstances allow, and you’ll have a varnish cured enough to move on in a couple of hours.
not sure on the small batches. it’s about temperature control and observation, so if you can do 100 grams of resin and 100 of oil, for example, that’d be fine. I don’t know how much smaller than that can be reasonably done with temperature stability.
LikeLike