Just a one-off sideshow that seemed interesting. For framing the discussion narrower than generalized, I’ve typically flattened any plane that I use to be close to a starrett straight edge, but with a combination of files and sandpaper. The usual is to file most of the bulk away, confer the results with the lap, check with the straight edge and then try to have the tail and the front tip of the plane slightly higher than the rest of the sole. I’ve seen comments that this makes the plane the same as a plane only as long as the flattest part, but that’s a false assumption based on the idea that the wood is already perfectly flat, among other things.
At any rate, the starrett edge and feelers allows quickly getting to very close to flat. Within LN’s specs if you’re doing your job. that may lead to question, which is how to file the center of a convex plane a little hollow, because if you’ve done planes that are banana, it’s hard to make a convex plane flat. One that is contacting a surface on the outside perimeter is much easier.
The answer to that is either using a flexible file, or a bastard file and turning the edge up a little bit to use the curved area at the edge of a file. I don’t mean like perpendicular to a plane, but lay the file flat, and rotate it the tiniest bit and then draw file down the center of the plane with the curvature. It will hog material off spectacularly.
At any rate, the results scraping two planes quickly – that had already been flattened before, are this:
Notice, the bottoms aren’t neatly done like you’d see on machine ways, they’re scraped off using an anderson brothers scraper with a steel (not carbide) insert.
Rather than going into things at length, the video does a great job of describing what to do. I already have a 12×18 reference granite plate from eons ago. MSG or whatever the lower cost machinist supply place used to be offered those big near 100 pound plates for about $70 shipped, and I bought one for applying abrasive paper and never really did use it for much
I’ve cleaned this off completely since, but it sits on a bench that’s used to sharpen stuff and support a machinists vise. Realistically while making tools, I use the IM313 which has been stuffed to the far left in the photo and the rest of the surface just turns into a junk pile.
Generally, we have vises, and I have a leg vise, so if you watch the video above, there’s no need to create a special holding box. And I don’t have prussian blue, so I made marking fluid or whatever it’s called using a thin oil and 0.5 micron green chrome, which took about 2 minutes and didn’t cost anything. If you don’t have stuff to do that, buying the right thing is a better idea.
The fellow in the video mentions carbide, but the scraper that I bought doesn’t have it. I found pretty quickly that a 150 grit belt and a stiff swipe across the belt sander refreshes it. I don’t need carbide on the plane on the right above (Stanley), but the plane on the left is a Marples plane that, frankly, continues my belief that really nobody else made planes as well as Stanley did. This marples plane is older, the casting is bonkers hard and it was twisted. To top it off, it has the pain in the ass overlook of having a lever cap lip that’s too fat to fit in a cap iron screw, so when you’re working with it, you always need to have a screwdriver laying around to take the iron and cap iron apart. The second plane is hard enough that it was a bit of a pain with the steel insert scraper.
At the outset of this, I marked one of the smoothers that I lapped. I’d expect to see contact in the center of the plane and not at the ends because they’re a tiny fraction above. Left to right, you will generally see some convexity, but it’s OK when you lap a plane as long as it’s not enough to affect iron exposure. If it becomes that big of a problem, it’s back to the file trick mentioned above to hollow the plane a little and lap it out.
What I made is far more pigment dense than prussian blue, so it looks thicker than it is. The dimension of the green stuff is probably a small fraction of a thousandth of an inch, but I did work it thinner than this. it’s doing its job accurately here, though. Flat around the mouth and front to back and falling away a little at the sides.
This plane has no performance issues and was just lapped as I recall. It’s not my daily #4, but as mentioned, I don’t keep anything that’s not a jack plane laying around unlapped or untested.
Scrape the green:
not a great picture, but as you go along, you get to the point that the whole surface ends up looking much more broken than this.
After each step, I followed the video above and stoned the sole with a washita fingerstone.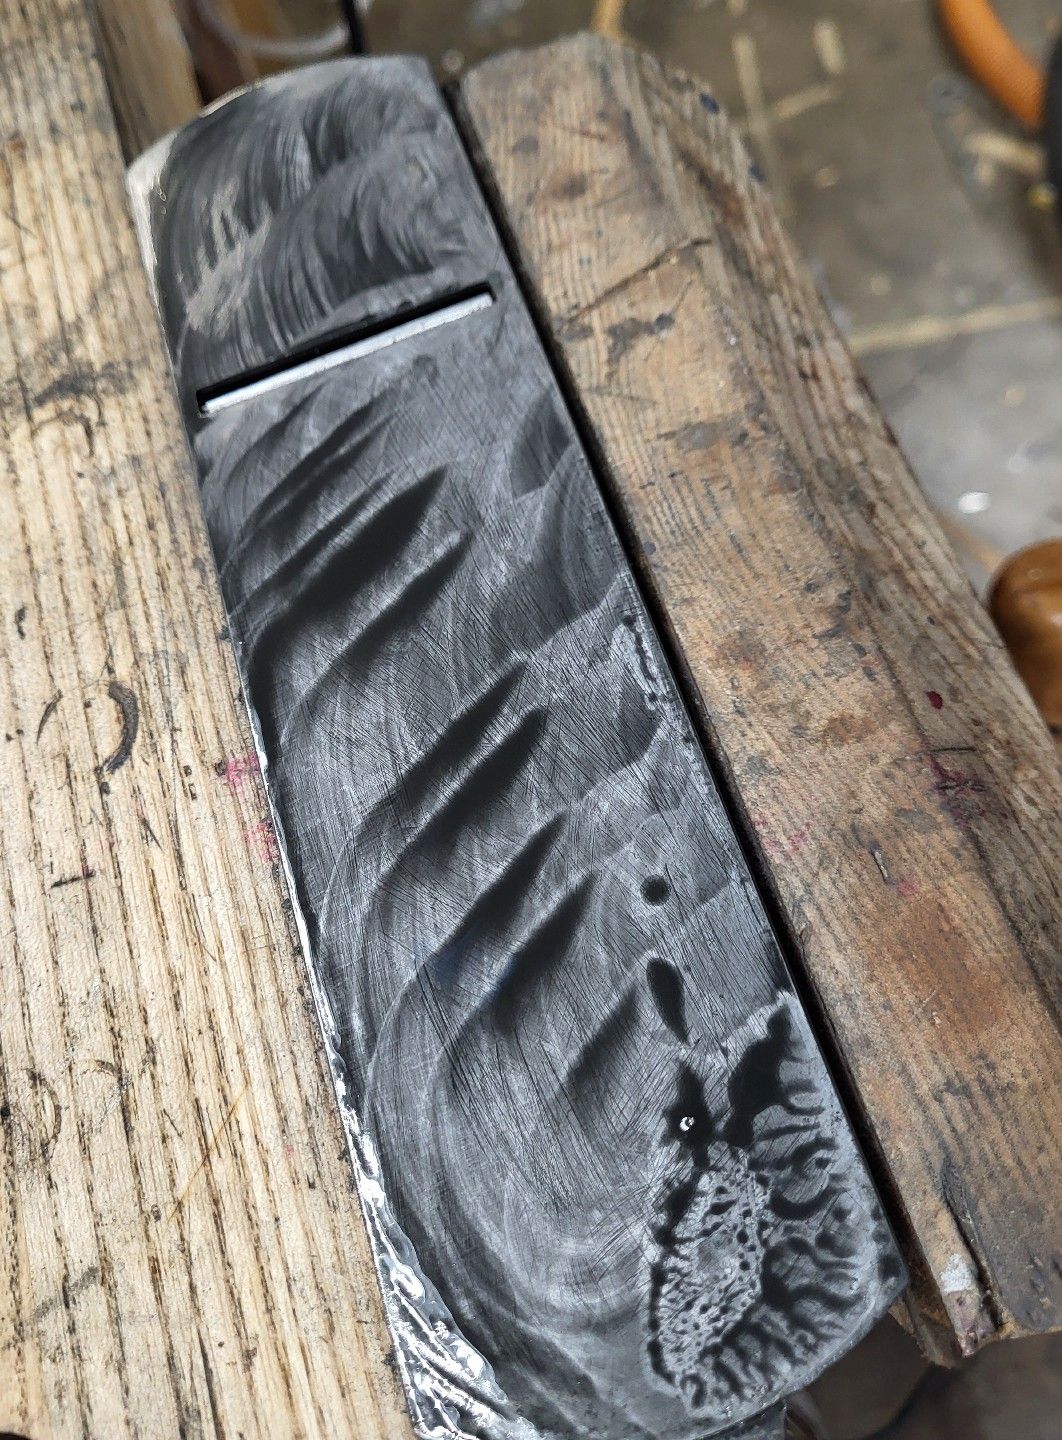
That removed any burrs and abraded just a little off the tops so you could see that the stone was reaching something in every small area. As the video mentions, even little burrs could affect where the next mark shows up.
Most of the markings were not as bold as the second picture above either, I’d probably just reloaded the stone surface a little bit.
When everything is done, the sole looks like this:
There is a neat and pretty way to do this, and I didn’t do it because it’s not the point here. The scraping should be done in directions that don’t match so as to not create a bias or rows, but even that isn’t that important for woodworking. while getting the hang of the steel insert, I could tell that damage to the edge of it that occurred going across something on the plane sole would then create a burr that made more marks. And the shiny little squiggles are due to some piece of grit that I picked up on the washita stone.
But…the whole sole at the end of this is now light-tight to a starrett straight edge. I looked at the result and though it was pleasing to look at.
It took less than an hour to do the initial lapping and the scraping here. I think the lapping is time well spent. Scraping here is a skill I’d like to have if it’s not too time consuming, and in some cases, it’s less mentally taxing than it is dealing with a glass lap and trying to figure out what is right if the lap and the straight edge don’t seem to be in agreement.
Does it make a difference in performance? In this plane, when planing, i couldn’t tell any. It’s a smoother and faults were already removed. Lapping a smoother properly is absolutely worth the effort, and even if it’s twice as much work again to scrape the plane and get to this point, it’s hard to regret that. It’s far worse to work with a plane in a longer term that’s missing efficiency from faults on the sole.
I have enough reference surface length to scrape a #6 and will do one and see how that turns out. neater work and decorative flaking is very interesting looking, but i think doing this neatly vs. getting woodworking flat is many orders of magnitude above just this simple work.

Definitely on my long term list of things to try. I think I may try grinding a radius on the end of an old file just to see whether I find it nicer than localized sanding to bring down high spots.
LikeLiked by 1 person
it’s definitely a little slower than the spot sanding and slower than the rolled up file, but with the reference surface, there’s much less left to thinking and about. if a plane is really far off, it’s a nice way to finish the process after doing the heavy work with files.
LikeLike
Hi David, could you post the link to your rumble account here? I tried to find you on rumble, and then Google, the closest I could find is ‘flat earth Dave’… …Thanks!
LikeLiked by 1 person
I’ve been tardy getting things into the channel. it’s here:
https://rumble.com/user/DW162
I’m definitely no flat earther. More of a round belly guy than a flat earth guy.
LikeLike