Updated Thoughts on Scraping Planes – There’s no Practical Gain

If you’re reading this, you may have seen the Youtube video that was superbly done by someone in England. That being a very clear description of scraping cast iron.

So, I scraped 7 planes. Two infills and five Stanley planes. It may have been 8. I planned to scrape 1, but 8 just happened.

I had two Starrett straight edges, and now three. My 24 inch straight edge is a walk about for the shop and it has seen a lot of wear. There’s really no abuse outright, but it’s a $30 (square edge) and the corners are what you try to use if light does not go under the flat edge. And with a blunt square edge, it’s easy to get something flat enough that no light shows. Those edges take wear and it gets a little difficult to tell if you’ve addressed it cleanly with fine files and other tricks to clean it up. One of the easy things to do is check a surface with two parts of the straight edge. Scraping afforded the ability to get things flat within a fraction of a thousandth of an inch and start to see these differences.

So, I went out looking and found a starrett #386, thinking it was a #385 at less than half price, but it’s actually a lighter version for drafting. Fortunately, that’s not bad. But I got it for about 85% of going rate for a new one vs. 40% of the cost of a #385 (both being bevel edge). They have the same straightness guarantee, and I kind of like the lighter weight. It’ll be useful in the shop.

So, having gotten off track already – what’s the fourth? A 4 foot #385 that I bought new a while ago that never gets away from a carpeted area – it’s a reference until or unless something spoils that, but it’s also pretty heavy. And they have become off the wall expensive, so keeping it as a reference is fine.

Back to the planes. it’s very easy to scrape a plane to the point that a 0.0012″ feeler doesn’t have a chance. I found the bias I expected – that the toe and heel on my planes were above the mouth – and I’d also grown accustomed to liking that. It affords some control that makes planing a straight edge just in the process of planing off roughness routine – no extra staps.

A Dead Flat Ground Plane is Not Better Than Properly Lapped

What is properly lapped? Figure on something like a stanley 6, you can just get a .0012 or .0015″ feeler under the toe and heel using a good straight edge. This is a small number, but it provides a very practical benefit. When you use a tool room granite surface, this level of error looks enormous, but it also doesn’t take that long to scrape out, which is where the 1 became probably 8.

Can I tell any difference in use? I have to be honest, I liked the planes a little bit better before scraping, except for one or two that I was lazy on and didn’t finish the lapping job. For years on the forums, we have heard that you can’t do anything practical to a plane that compares to a surface grinder. Since I have quality straight edges and feelers, I could quantify what kind of error I was creating (intentionally) when lapping, but you may recall if you’ve read any of my conquests that I would also file the center out of a plane draw filing if it was that far out or already convex.

A person with a file, knowledge of planing, and a good straight edge will give you a plane that will suit you better than someone with a surface grinder. A person who doesn’t have that knowledge could lap your plane into a banana.

The idea that you can’t address cast iron or steel, even significant amounts, by hand, is bullshit. I get tired of reading the sentiment from people who don’t have experience with both types of tools – one properly lapped and one surface ground or 10 of each, or whatever. It’s usually someone with knowledge of something other than woodworking, be it manufacturing and testing things (like a lab engineer) or machining. I never see a legitimate long term hand tool user ever muse about machining being something that’s needed.

Rather than only scraping, as i’m getting close to a scraped surface being flat, I’ve followed each repetition with some focus on some light lapping of the tail of the plane being scraped. It’s a tiny amount of insurance that the tail end isn’t dead flat or even a miniscule amount low, but even just that little bit makes the outcome better than flat to the reference surface. Flat to the reference surface end to end is practically lightfast on the starrett straight edge, even leaned, edge to edge and corner to corner. An example group of pictures follows with a Norris No 13 panel plane.

Those pictures just show an iron that’s quickly sharpened fine india, hard ark (not the most expensive kind, slightly more coarse) and a quick buff strop. The wood is yellow cedar, though it doesn’t really matter what it is. A lower angle plane would be better, but this is just a quick thing for feel of what the plane is doing as the tail end comes to the wood. You can’t feel it, but I can tell there’s no magic here that will result in better function. The last picture is an attempt at showing a reflection on the planed surface. Of course you’d expect this, but the improvement in cell phone cameras really makes these pictures disappointing. The reflection is glare and the camera really won’t tolerate it, even in manual mode – it’s just blurred.

Interesting things I found

My lapping did leave the planes I lapped slightly bandanaed, but less than my finest feeler in most cases. That was filing and lapping most of the time recently, because it makes it so easy to prevent more banana effect, and the file is *really aggressive and fast*.

But, I also found that I had slight convexity across the width of planes and my lapping made the “error” slightly on the diagonal as the reference plate showed. I say that partially in jest, because it was an error only in the sense of being able to measure something other than straight and true. In reality, it was a nicer plane to use, and all of the absurdly thing shavings I’ve shown were with those hand lapped planes. The scraped planes don’t really do anything better, and the loss of the ability to ensure the far end of a board doesn’t fall off just by pressure variation in a through stroke is a legitimate minus.

So, You Shouldn’t Scrape?

I wouldn’t say that. But I would say if you have a good setup to lap, or file and lap if you have a plane that’s convex, there’s nothing really to gain.

You can see in the plane sole that I didn’t take my time and scrape very deliberately, so some of the scraping marks are deeper than others and there’s no perfect pattern left. Some of this is lack of neatness, and some is that I did work over the sole with 220 grit paper on a block and a lap, so the deeper marks remain and the others are more faint.

I’m glad to have tried it, and it’s an easy way to make sure that what you have (even if you lap the tail and nose off a little) is very dead flat to start.

I spent about an hour each on these planes in total – some less, some more. To do a perfect cosmetic job would probably require using carbide (I used high speed steel) or really careful use of the HSS, which can burr and then leave deep scratches for a ham and egger like me.

This points back to sending a plane off to a machinist. if you’d like to do that, you can. I think it’s a huge waste of money, and I’d never send this particular plane off to a machinist, but to get dead flat and the same feel as this vs. lapping, i’d be disappointed shelling out money to have that. And I’m being prissy saying the next part, but I think modern surface grinding looks really cheesy on a vintage plane. It definitely looks even more cheesy on cheap imported planes that have really really deep surface grinding marks.

Making Amber Varnish – Part 2

Part 1 of amber varnish making left off with 600F+ degree resin that wasn’t really doing much yet. This is unique to Amber, and probably some bits of other copal. In most cases, you’re going to see something that’s completely melted long long before this.

As the time is passing and the temperature is slowly creeping up, the thermocouple passes 700F. This is probably dicey territory and important to not get here fast and blow past this level. Reality is the varnish will turn into black char if you do, anyway, but it could catch on fire and that’s bad. Potentially bad for a maker, too, as in getting burned.

I backed the heat off a little bit and stood by to make sure that was happening. The thermocouple is in the middle of the pot and close to the bottom to make sure I’m seeing the hottest temperature I can track. The resin sitting on top of the pile is certainly not this hot. At this point, it’s time to just let it go and see if it will melt.

And it does.

I’d prefer to never see 700F or above, but one has to experiment to find the point where you don’t have to go further and a couple of hours at 50F less and no progress is no good.

The resin look like it’s totally melted here, but it’s really more of a very viscous liquid and somewhat foamy. You can make other varnishes and allow the resin to settle, and maybe that’s possible with Amber, but I haven’t seen it. I have zero interest in seeing the resin start to solidify. You can see in the photo that the bottom temp is down a little bit and it’s back to letting it go for a while and looking and *just a little* getting a tiny whiff of it to make sure it doesn’t smell different – like burning. you can see a brownish hue to this. you can also see efforts at amber online where the resin is black – it’s burned in that case. Who knows? I’d rather not fully melt all of the resin and run with what i can than smoke the varnish and have something that’s no good.

The time between getting to 500F or so and then ending up here in the next picture where I’m satisfied things aren’t going to go much further without chancing burning the whole batch is probably about 2 hours. At this point, I’m stirring the resin every 15 or 20 minutes to make sure none of it is sitting in an unexpected cool spot.

What’s not shown in the pictures is that the oil is sitting in the pot around 560F, just hanging out there. In a lower temperature resin, it can be cooled some if desired, but in Amber, I just want to get resin and oil linked as fast as possible and everything liquid. This is from experience with copals – get a good varnish first, worry about trying to get something perfect some other time.

So, I back the temp of the Amber down to about 650F and pour in a little bit of oil and stir. I’m testing the waters to make sure nothing really strange or dangerous happens, and then I gradually introduce some more, and then just introduce the request quickly once I know it’s safe. And stir.

Holtzappfel talks about getting resin going, adding hot oil and “boiling” the mix. I don’t know what that means. it’s a little lively and I don’t want to make it any hotter. At this point, it’s 600+F and just holding it there forever is going to darken it, so I definitely don’t want to shoot the temperature higher.

You can see the lid of the pot – the dots on it are prior varnishes, tested to see if they are varnish. Just about every old book and every reference online talks about putting a drop on glass. I don’t bother with that – by this point, one lid is cool and I dribble a drop.

Three things can happen here: 1) the resin and oil aren’t linked, the drop is not clear and the feel is greasy, 2) the resin and oil are clear, linked, but don’t have much string, and 3) the long cook has left the components really ready and the varnish drop is clear and very sticky and strong in terms of stringing, almost like a glue.

If #3 is the thing, another quick stir for good luck and it’s time to get the varnish that’s made at this point off of the heat before the string gets too long and the varnish is a gel. Gel is no good – it’s a pain to handle, and my experience with the gelled stuff is it’s partially “spent”, as in when it dries, it doesn’t get as hard as wanted.

This stuff is pretty thick from the start, and the drop looks like this:

It’s a lot darker than the other varnishes on the lid because most of them are rosin or lighter copal varnishes. You can’t really tell, but the drop here is clear – it has no oily base, and it’s quite thick. The strings made by touching it are kind of fat and pull out to a long length that quickly looks like spider web.

It’s a candidate to come off of the heat right away to avoid ruin, and I do that by taking it off of the heat entirely and turning off the burner.

I’d love to let this get down to a really cool safe temperature before adding turpentine, but the first time was allowing the varnish to drop in temperature, it started to get thick enough that I wasn’t going to chance it.

I’m not going to tell you what temperature the turpentine goes in. It is much less than 600F – turpentine autoignites by various sources between 450F and 500F. Google says turpentine boils around 300F. From my experience, when it boils, it gasses off pretty quickly, so if you have to add it above 300F, there is a handy side effect that it will boil and somewhat self mix, but a less than handy side effect that it will also escape in some sizable fraction and you’ll have to add more.

This is one of the reasons why I use turpentine that’s $50-$60 a gallon rather than $40 a quart or more.

We have varnish now, that needs to cool to a temperature that won’t break a canning jar before being strained. I prefer the jar to metal cans just so I can see what’s in it. Jars are also a dollar each, roughly. Empty metal cans, definitely not.

Expected somewhere around a quart with no loss, but we knew there would be loss. Amber would lose some of its mass in the run to just losing trash we don’t want to keep, and I ended up with about 2 ounces of unmelted amber, as well as the gooey mess of stuff that’s around it – maybe another ounce, and quite a bit of turpentine escaped. As far as the rosin goes, who knows. it definitely did not leave a uniform layer of melted rosin early on – maybe it disappears from the run temp.

Because there is a bunch of unfinished junk left in the bottom of the pot, when I pour it, I pour it through a dollar store sieve, into a funnel that’s lined either with a paint strainer or stainless screen that I found on the internet, with the idea there being if the stainless screen gets clogged, I can possibly burn out whatever is in it. Pouring this directly into a paint strainer is a no go – the trash and leftover stuff just plugs the screen and then the paper strainer seam will give way and it’ll just all go into the jar.

Once this cools, I take it inside and add turpentine in to mostly top it off. I generously labeled this as 2 parts amber to 3 parts oil, but it’s probably more like 2 to 4, respectively. Since this is batch 2 of the amber, I figure in the future if the desire is to get something really stupid hard, the solution is not chasing perfection – just start with more resin.

In reality, this varnish is still very hard despite being a little longer in oil, it’s super tough and you can’t begin to touch it with a fingernail.

It should be put aside according to holtzappfel (and probably everyone) and allowed to settle. Holtzappfel describes a month as a minimum and the longer it ages, the better.

Why do I keep referring to Holtzappfel so much when there are much more extensive tests? Because it’s relatively low information compared to a lot of stuff like the German American book that’s public domain digitally, and I can apply it more easily and refer to it. The focus in it is cabinetmaker’s varnish, carriage varnishes, Japanning and spirit varnishes (shellac and other varnishes that are basically resin or other ingredients dissolved in a solvent). There are certain things described such as photograph spirit varnishes with Sandarac, and other things of the like, as well as kind of complicated little french polish recipes, but I think if they were great, we’d still be talking about them. Sandarac spirit varnish probably is excellent for photos – it’s out of the scope here, though.

The last thing I do, almost always on the first day, is take some piece of wood and dab varnish on it. It doesn’t have to be anything nice, but I want to see that with sunlight or UV light, it will harden relatively quickly, and if water resistance is desirable, I will make sure the test piece is flat and after requisite time (an hour or so in direct sunlight for a thin film, or five or six times that exposed to UV light from UV bulbs), just pour water out on the varnished test piece and let it dry. This will occur over some fraction of a day. If the varnish is good, you can observe that the water has dried or is shrinking and see no visual change or feel in the wet area, or the area the water has escaped.

In this case, I just took a piece of chakte viga that’s waiting to be made into a handle later and slathered some on. There is no drier in this varnish, so without light, it would take a very long time for it to dry. Varnish can also be baked to a quick and very good cure, but on wood, not that practical here – most test drops that I’ve done end up spreading out in the bake and they get darker, anyway.

Darker on the left is the varnished cylinder, and on the right is just raw wood. 
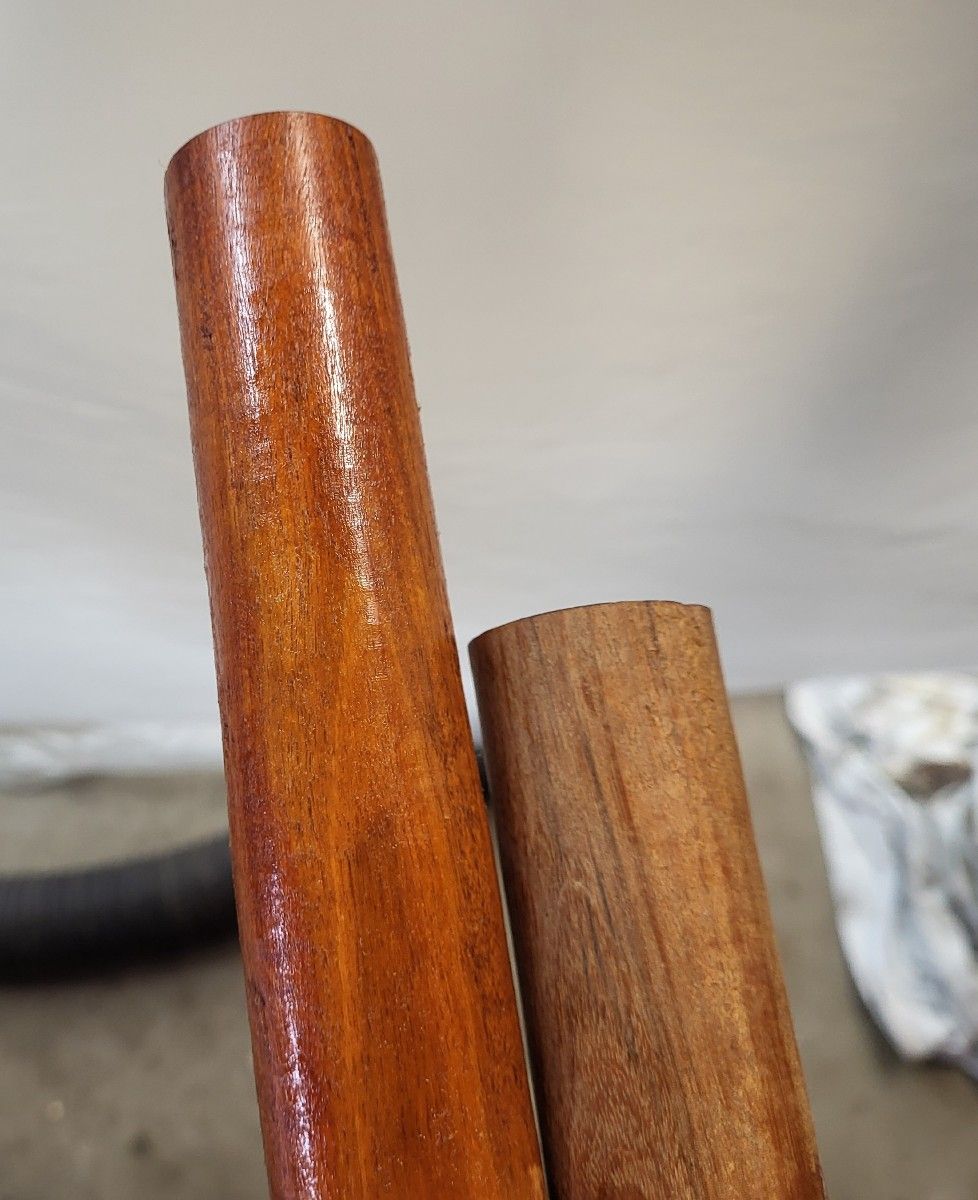
George Wilson tells me there’s all kinds of results you can get from Amber depending on the resin, and that he’s seen resin that has kind of an ugly grayish hue. The only place I’ve ever bought it is Wood Finishing Enterprises, and the result is the reddish brown color here. the little grains are all different colors. If you like sorting socks, you could actually separate them all and color match them. I’m satisfied with the mixed result. On dark woods like rosewood, you can’t see the reddish and on orangey red woods, I think the color is a strong enhancement of the base wood, and it’s in the varnish – not some faff-around experiment with dyes or stains. That’s a nice thing.

I’ve not had any luck with any of these varnishes being particularly good brushed without drier, and when I put them on chisel handles, even wiping, I want them to be dry in a day. To avoid bricking the whole batch, I only pour off about 2-4 ounces at a time and add 1-2% japan drier (nothing special, just hardware store stuff) estimated based on the total oil and resin. The old books talk about adding driers in the cook, and maybe the effect is better, but I’ll just mix it in to the poured-off amounts as I’ve seen no detriment to it, and it would be a shame to see this gel within any period of time in the jar.

With 2% drier, i’ve generally had good enough luck to be able to brush a coat of varnish on something once a day. That may sound stupid, but I’ve had trouble getting the coats to mate – even with drier, I think the varnish is still open for a little while, but it’s also hard enough to sand or wetsand. Another benefit of making the varnishes that are very tolerant of water – they wetsand well, and it’s easy to wipe off most of the unwanted stuff rather than having it rolling around in the next coat of varnish or contaminating the bursh. Cheap pine varnishes absorb the water quickly and the swarf and surface become a gooey bunch of pilling and nastiness.

You have to do a little math if you cook varnish, or I should say arithmetic and maybe some algebra here and there. The easiest thing for me in terms of getting the japan drier right is just using a measured syringe. you can use a lot less than 1 to 2 percent and still have some effect, but it goes back to the day thing above. I’m not afraid of the dryer and I want to be able to handle or recoat whatever is varnished the next day. Nothing is permanent – that’s just my preference right now. Having cooked amber twice, copal maybe 8 times and 22 or so total batches of varnish, there’s not much going on but just initial observation and a pleasant surprise of reasonable success.

Making Amber Varnish – Part 1

In the last week, I’ve made five batches of varnish. I’m not sure how that happens, but the first four were quicker much lower temperature resins, so personal time involvement was only about one hour.

Last year, I made Amber varnish. I made it for two reasons. First, I’d had success with a resin (Madagascar copal) that I think most people will find difficult. Especially because it looks innocent – the resin is nice and clean without what looks like 6 digit years old bits of junk in it. The temperatures that I had to bring the resin to were surprising, and it seemed like a good jumping off point after that to do Amber. Amber’s melting points are a very wide range, but at the top end, some of the resin doesn’t melt until it’s over 725F. This is not particularly safe, and when I made the amber varnish last year, some remained unmelted in the pot.

It bothered me at the time that there weren’t any youtube videos running amber the way I wanted to run it, but there was a violin maker’s demonstration of it that resulted in a varnish for violins, but at a huge cost of pollution to the neighborhood and a whole lot of the resin was just cooked off leaving a small fraction of the original amount behind.

I was so happy that I got a good serviceable varnish from my effort that I thought it might be nice to make a video of the process and put it on youtube, but you can’t control who watches your videos on youtube, and the temperatures worked with Amber are seriously close to autoignition (resin meets air, resin catches on fire, etc). I don’t know what happens when the whole glom gets enough energy to ignite, but there are stories in older texts talking about how unsafe it was in an era where safety was 97th. I just don’t feel like putting it on youtube is a good idea because someone is going to get hurt, possibly worse, and possibly burning down property. The audience here is a lot more limited and…

….I am putting this up more for public record and would generally recommend you don’t think about doing it…unless you have already done it before or you have somehow worked your way up through making successful batches with madagascar copal, and I would suggest that’s in the same category if you are thinking you want to make varnish. You do things like making varnish and throwing half gallon jugs of gasoline in burn barrels at your own risk and I assume none of it. Nothing I’m writing here should be considered a how-to, rather a recorded record of a batch.

Too, what goaded me on with this is reading about Amber and having several conversations with George Wilson (who has also made Amber varnish – George can do anything, it seems) who mentioned that getting Amber past its first run results in a resin that’s really pleasant and cooperative. That statement is a bit of shell game – that “first” run, or melting and cooking of the resin before combining it with something or putting it aside as basically ready to use is difficult to complete without either catching it on fire or just turning it into something that’s burned ash.

I’m also goaded on because none of the older texts mention thermocouples and a lot of the discussion on the internet (violin makers and others) don’t talk about using thermocouples, but of course, I have k-type stainless thermocouples for tempering steel, and I have kawool on hand, which is handy for the cheap pots that I use with really high temperature resins.

But don’t do it. There will be one or five nutballs who cruise through google and might find this as a reference who have burned a few batches, and maybe they’ll be able to take parts of this and find something helpful. I’m less of a fan of the idea that someone will copy it not just for the danger, but because I’m guessing a little with the whole varnish cooking thing and doing what works. I wouldn’t dream of attempting this without knowing temperatures.

Should I say it about 14 times – never do anything inside with varnish that resembles cooking. The fumes that come off of running resins or even just heating linseed oil are disgusting, and from a chemist who seems to have a pretty low tolerance for chemical scare tactics, seriously unhealthy. When someone who dismisses some cobalt in japan driers as being overblown tells you that varnish fumes should seriously not be breathed, that means don’t breathe them. When George Wilson tells you that he made a mushroom cloud at one point in the past, that means you absolutely cannot consider making varnish anywhere that a mushroom cloud would do more than maybe get you in some trouble with the neighbors. There is enormous energy in the oil and resin, and if it is belched over the pot sides and is on fire, nothing good is going to happen.

Lastly, I generally make varnishes in the way they’re described in Holtappfel and I was the oil the way Joe R. said was an easy way to do it on a conversation Steve V. posted – just with water washes (three in my case). First, on the Holtzappfel varnish (I removed one named resin so this isn’t a perfect quote) “Amber and Copal are usually dissolved by fusing the gum and adding linseed oil heated nearly to the boiling point and then amalgamated by stirring”, and then at some point (a dangerous point, i’m sure) turpentine is added. Against some wise advice from people who know more than me, I have continued to run the oil and resins not and mix with the oil nearing 600F and the resins not at all cooled. So far, I have not had a varnish that didn’t turn out by doing this, and it’s not safe from a safety standpoint, but it’s safe in that you quickly get the oil and resin to link together and then you can decide what you want to do after that, as in, if you want to cook more.

Part of my point in relaying all of that is if you have read a lot about varnish and ask me questions, I probably won’t have a clue. If you use proper terms from the really old texts, I’ll have no idea what you’re talking about, and if you ask me about processes other than making both parts hot (separately) and then mixing them together, I won’t know that, either.

The Resin and Materials

Amber is for sale a lot of places, unlike some of the less common resins. But it handily comes from many of the suppliers in these little BB sized chips.

These are clean looking compared to some resins that have all kinds of not-varnish stuff on or in them, all the way down to tree bark and bugs. But you never know, so I wash them even though I think they don’t need it. A water wash would probably be enough but a light bit of lye sort of soaps the outside of the resins, and then you can rinse the whole thing until the outside isn’t slick. Color me stupid, but I imagine getting a fresh outside layer on the resin doesn’t hurt.

You can see how dirty the water is. I strained it through a dollar store strainer after this (dollar store items are good for varnish making – the mess left behind some things is easier thrown away)

One of the challenges with the really high temperature resins is getting heat into the resin in the pot without just burning the surface. This isn’t a problem with stuff that melts at 400 degrees, but it is with stuff that melts at 675 degrees F.

To get the bottom layer of amber going, I’ve laid 2 oz of pine rosin on what is 10 oz of amber. There are recipes in some of my books that go further and combine high temp resins with rosin 50/50, but I’ve mentioned before and it remains true – i’m not much of a reader and mixing the two for now seems like “laying up”. I want some of the good stuff to try out and examine.

The rosin is almost like a thermal paste and as the temps get to the point that amber is melting, I don’t think the rosin is much more than a burned off layer. It doesn’t seem to be there in the bottom of the pot for long. At least you get to see my dollar store strainer. It’ll be used later when transferring the finished varnish into a jar.

To get this setup in a pot, I just flip the strainer over and the resin goes on the bottom. It probably doesn’t matter where it goes, though – it melts so easily it’ll end up on the bottom like oil.

I’ll bet there were ways to get amber hot (preheating it in oil or partially in oil or solvents or something), and later in nearly sealed vessels. Not an option for me.

At the same time, I weigh out 10-11 oz of washed linseed oil in a separate pot.

the proportions here are intended to come up a little short of a quart jar. 10 ounces baltic amber, 2 ounces rosin, 10-11 ounces linseed oil, 11 turpentine, though you’ll see later that a lot of the turpentine doesn’t survive the cook and more needs to be added later.

I got into the habit a while ago of making varnishes in about equal parts oil and resin, though some of the resin is cooked off, and both times I’ve made amber, probably 10-20% fails to melt and I don’t chase perfection at the risk of burning away or charcoaling the whole batch.

if you read around the internet, there are some surprising quotes about how much resin is burned off. Sometimes as much as 80%. There’s a reason, I don’t know what it is. I try to keep as much as I can and not cook it longer after it seems to be uniform and unchanging. More on that later.

There’s a bunch of stuff to carry – I pour turpentine into the jar that I’ll be using for the final varnish, and everything including the k-type thermocouple and reader goes into the box. K-types can go far hotter than we’re going, but a lot of the cooking thermcouples end around 570F and we’re going past that.

I’ve got an aluminum funnel, and not seen is a finer screen for inside of it as well as the dollar store sieve to be used as a large-trash sieve before the fine screen when pouring the hot varnish in the jar.

This stuff is all filthy and the pots are sometimes sticky around the edges- it’s just easier to put it in a box.

My cooking area is a fire pit. I walked outside and it’s windy. It may sound dumb, but if it’s windy, the pots will be affected temp wise, and this isn’t the time to have a cold side on a pot. So I use the same stuff I use to insulate the forge – kaowool, and wrap it around the resin pot sides and affix it with stainless “picture hanging” wire. Kaowool is a great insulator and it will withstand stupid temperatures. Whether it’s resin or something else melted on forge kawool – you can always just light the stuff on fire and burn out whatever is in it and the kawool will remain. You have to get into cutting torch ranges to do much to it quickly.

This is my setup. The dots on the lids are from testing drops of prior batches. If I run out of space, as inexpensive as the Farberware pots are, or whatever they are, used, I’ll just pitch them and get new. In reading early on, Holtzappfel or another book (can’t remember) suggested enameled cast iron pots are the top of the top for varnish making. They were talking about purpose made pots, and not cookware, but figure the same will be true. I have three that I bought used, and just haven’t used them consistently for anything other than heating oil. If you clean things, you may want to consider them – they are definitely better and more uniformly in temps along the sides.

I don’t remember reading anywhere to use kawool, but proposed it to someone else and they beat me to it. I also don’t remember reading much about using a thermocouple, but on easier varnishes, I adopted it for ease after testing a non contact thermometer vs. the thermocouple. Non contact types seem to be confused by pot sides, reflection in the oils and resins and smokes, and I wouldn’t trust them – especially for this. Reading 200 degrees cooler than actual could lead to skin grafts.

I am familiar with my electric burners. 10 oz of oil on 3.5 on the right side will eventually get to about 575F, and high temperature resins need almost all the left burner will provide. This cheapie goes from a couple of warming dots to 1-5 and then “max”. 5 will cook this resin terminally at about 650-700F. Another burner that I bought will not reach these temps – you can hear its thermal cutoff shutting it off. It stops around 550, which does nothing for us. No advice other than buy until you get what you need. Assume the burner will be destroyed and thrown away at some point, because it will. If something catches on fire on this one and it damages it, then I’ll get another.

I’m doing most of the heating here with the lids on – they are not air tight, but they are fully seated. There’s water in the oil. even with the lid closed, it will eventually steam out. I didn’t fully dry the resin here, but same effect, and just as with cooking, it will hit the lid and condense and dribble back down for a while. when checking to see progress and without the temp being too high, I leave the lid off for a minute or two to let as much out as possible. To have the resin hot and liquid and dribble water off of the lid into it could be disastrous. Even tiny rain drops will cause little tiny bits of hot resin to shoot out and they will burn you even if they are the size of a grain of sand.

After some time working the way up temp-wise, we’re here. How long? I don’t know. i don’t dawdle the cook up to temperature, but it’s also not on “max” because it’s too easy to burn the outside of the resin and start a process of just smoking and turning the whole batch into carbon. This is a feel thing and it’s easier learned with more cooperative stuff.

Once Amber starts to run, it smells hellish. Like burned tires and dead animals. I chose a windy sunny day because the smoke would not linger and I keep the lid on both for purposes of maintaining heat and to be a better neighbor. On a windless day, one will make enemies in a hurry.

I’m not attendant while this is heating up – I know the setup pretty well and know what will get the resin to 500F or so, so this is at the second check. the oil is not getting up to break temperature (just below 600F) at this point because the run will take a while and I just don’t care to smell it or try to push it that far in prep. The way I make varnish in terms of how thick the varnish ends up is to get the two parts prepared and combine them, and then after that, choose how long to cook. It can be done other ways, but this is easiest for me.

You can see that the pot bottom is at 615F and the resin is not in any hurry to melt. I put the lid on at this point and walk away for a while. You cannot hurry here and fall into the trap of wanting to blast the amber resin with heat – it will just create a char layer on the bottom and you’ll be lucky if you don’t ruin the whole batch. I’m treating it like an exploratory activity, slowly climbing until there is some resin appearing around the sides. I’m paying little attention to the oil at this point, but I know it’s safe to take the lid off now.

in the rare case that it rains as a surprise – because this will take several hours – I lay plywood over the top.

As the temperature increases, I remove the lid tilting the far side up and wear long sleeves and gloves.

At this point, it’s a waiting game -the resin is testing patience and begging to be smoked into a batch of worthless char. All in, the resin isn’t horribly expensive – it’s about $50 a pound, but that and the time involved is enough to discourage ruining it for no good reason.

There is a strong breeze from behind on the day of this cook, so I don’t wear a half face respirator. Usually it is mandatory – the amount of smoke and stink at this point is pretty mild, but it’s also carried away on the wind. It’s not to be breathed.

The Myth of the Forged Iron

I’m still scraping planes lately, dragging my feet on my chisels, and making some plane irons where necessary for scraped planes. I guess not getting the chisels done is an attention deficit thing. When work is busy and there is deadline pressure, I tend to want to explore things because exploring and getting better quickly at something is engaging to my mind.

That said, I read things fairly often about steel. People talk about it a lot. Often it’s about preferences and then explanations. I feel like from experimenting, there are a lot of things that result in properties I like, but I don’t always know why they do. It’s more important that I can get a result than it is that I can explain it. Why? Because trying to explain the why instead of the what, or put differently, feeling an obligation to explain things when you know the what and have never tested that your “why” is true leads to a lot of false information.

There’s a discussion going on on SMC at this point that’s got several nuggets in it. One is attributing ability to plane certain woods to an alloy when the attribute making the difference is hardness. I’ve mentioned before that O1 and V11 both have similar toughness levels and both have a similar working hardness range. Toughness is an impact test – how much energy comes out when breaking things. In my experience, O1 has a third attribute that’s generally better – edge stability. Stability is a nuanced term used for knives that basically implies the ability to hold a fine edge. Not just any edge that will go through an abrasive laden machine sharpness testing card, but the kind of property that makes small chipping less likely in one steel vs. the next. At any rate, LV tempers their O1 soft, and XHP/V11 is tempered sometimes (at least in the irons and a single chisel that I had) at the upper range. Figure these are 59/60 respectively and 63. You probably would not recognize O1 as being the same steel if you used two irons, one at 60 hardness and the other at 63, and didn’t know what alloy they are.

That aside, all plane irons are forged

Clifton was the last maker of planes that I can remember advertising that irons were forged. I don’t know what they were doing, but I’m sure someone does. I suspect they were drawing steel to length mostly. I don’t see an advantage to doing this and there’s a non-zero chance that the results could be worse than using rolled material and an established process.

Things happen with steel when you’re forging. The grain direction is altered, but grain is also enlarged, and you have to grind, normalize and do whatever else needs to be done after that. But normalizing will be important because the distribution of carbides is not always ideal after forging. Maybe it never is, but at least sometimes it’s not. Why? Carbides can form at grain boundaries creating a layer rather than being neatly spherical or tubular sitting at grain boundaries, but not separating them.

I don’t know what happens industrially, but Clifton’s forged irons were well liked. I think the stamp was actually their biggest differentiator, but so was the price here. The last I saw them at highland, the price of an iron was about double that of any others.

Normalizing steel re-establishes grain. Annealing after normalizing or doing something else to adjust the structure before quenching changes more things – from the state (martensite, pearlite, etc) before subsequent steps, and you can refine grain smaller and adjust the shape of carbides (types of annealing can do that).

Rolling is Forging

If you buy rolled flat stock, the steel has already been elongated and widened by rolling. Rolling is a type of forging and if the steel is not spheroidized, it probably comes with carbides that are more tubular. It definitely has the benefit of continuous grain in steel, and grain is important in terms of edge orientation. Even though grain is established by normalizing, for reasons I don’t know, there is a bias for toughness based on rolling direction.

Nobody here has ever used a cast plane iron, or one that isn’t forged. Even PM products are rolled into bars. Forging at one point was important before modern rolling or die forming (rod) or drawing out because steel that’s as cast won’t have the same toughness or orientation. if you go back far enough to steel like wootz, it was necessary to get layers of toughness alternating with layers of carbides.

Brent Beach had an interesting page on edge life, but what it left behind was also comparative pictures of edges that provide other information. For example, the Clifton iron pictures are here:

https://brentbeach.ca/Sharpen/Cliftontest.html

The edge performed fine. If you want to see ugly results, you can go to the main page and look at the Shepherd irons. I had one of those from a plane kit and mine as equally horrible with surprise failures aplenty out of nowhere. Even looking back now, I have no clue how they made irons of such low quality unless they were really bargain hunting stock.

Back to the comparison – Steve Knight offered O1 irons that were cryogenically treated. I know that instantly brings some folks to suggest there’s no reason to do that because it’s for A2 or other highly alloyed steels. Larrin Thomas (Knife steel nerds) also addressed this well in discussion of various cold treatments. Cryogenic treatment mostly trades some toughness for additional hardness, and it’s true that it’s beneficial to A2 because the toughness is coming from retained austenite (something we don’t want too much of it) and liquid nitrogen converts that to martensite (something we want a lot of). If steel has enough toughness, we usually will like something that’s gotten cold treatment more than something that hasn’t.

Steve’s O1 iron pictures are here:

https://brentbeach.ca/Sharpen/Knighttest.html

Notice the fineness of the edge. The footage planed isn’t the same so it’s hard to make the call for sure that steve’s iron would also have planed longer than the Clifton iron – I’d bet on worse than even odds that it would’ve planed somewhat longer, though.

Steve said at the time “I don’t know what cryo does, but it makes it better” when anyone at the time insisted that it was only for A2. you may recall those days, when we generally didn’t talk about anything but “vintage steel, chrome vanadium, O1 and A2”. Ahh…the same days where folks insisted that chrome vanadium steel was gummy and cheap and less fine and full of stuff that’s not in “good old plain carbon steel”. What most of it was lacking was a good quality melt and roll and, especially, enough carbon to get into the low to mid 60s. It’s less alloyed than O1, though, not more.

Back to Steve’s irons – why were they better than Clifton’s in this test. Finer and probably long wearing? Because they are – the combination of the rolled material and then the process applied before heat treatment and then the cryo made for a better iron.

I had a couple of these irons, but no longer have any, or I’d give you an idea of their hardness. They were bonkers hard without being chippy. They were just good.

I have forged irons from rod (stanley replacement irons) and they are fine. I think the forging got more stuff in solution in my case and the result is the irons are a bit hard and hard tempered, but not faulty. Hard tempered meaning they are bitey and drop their wire edge quickly. Day to day, are they any better than the first good irons I made with starrett steel just by heating to nonmagnetic, a little further past that and then quenching and tempering? i don’t think so. They’re a little different, but I can’t say that perception of properties is more than a slight difference in hardness.

The quality of the stock and then the quality of the process applied after shaping is really what makes a difference. Just as terminal hardness and not alloying is almost always what makes a difference in perception about what can work in really hard woods and what can’t.