Part 1 of amber varnish making left off with 600F+ degree resin that wasn’t really doing much yet. This is unique to Amber, and probably some bits of other copal. In most cases, you’re going to see something that’s completely melted long long before this.
As the time is passing and the temperature is slowly creeping up, the thermocouple passes 700F. This is probably dicey territory and important to not get here fast and blow past this level. Reality is the varnish will turn into black char if you do, anyway, but it could catch on fire and that’s bad. Potentially bad for a maker, too, as in getting burned. 
I backed the heat off a little bit and stood by to make sure that was happening. The thermocouple is in the middle of the pot and close to the bottom to make sure I’m seeing the hottest temperature I can track. The resin sitting on top of the pile is certainly not this hot. At this point, it’s time to just let it go and see if it will melt.
And it does.

I’d prefer to never see 700F or above, but one has to experiment to find the point where you don’t have to go further and a couple of hours at 50F less and no progress is no good.
The resin look like it’s totally melted here, but it’s really more of a very viscous liquid and somewhat foamy. You can make other varnishes and allow the resin to settle, and maybe that’s possible with Amber, but I haven’t seen it. I have zero interest in seeing the resin start to solidify. You can see in the photo that the bottom temp is down a little bit and it’s back to letting it go for a while and looking and *just a little* getting a tiny whiff of it to make sure it doesn’t smell different – like burning. you can see a brownish hue to this. you can also see efforts at amber online where the resin is black – it’s burned in that case. Who knows? I’d rather not fully melt all of the resin and run with what i can than smoke the varnish and have something that’s no good.
The time between getting to 500F or so and then ending up here in the next picture where I’m satisfied things aren’t going to go much further without chancing burning the whole batch is probably about 2 hours. At this point, I’m stirring the resin every 15 or 20 minutes to make sure none of it is sitting in an unexpected cool spot.
What’s not shown in the pictures is that the oil is sitting in the pot around 560F, just hanging out there. In a lower temperature resin, it can be cooled some if desired, but in Amber, I just want to get resin and oil linked as fast as possible and everything liquid. This is from experience with copals – get a good varnish first, worry about trying to get something perfect some other time.
So, I back the temp of the Amber down to about 650F and pour in a little bit of oil and stir. I’m testing the waters to make sure nothing really strange or dangerous happens, and then I gradually introduce some more, and then just introduce the request quickly once I know it’s safe. And stir.

Holtzappfel talks about getting resin going, adding hot oil and “boiling” the mix. I don’t know what that means. it’s a little lively and I don’t want to make it any hotter. At this point, it’s 600+F and just holding it there forever is going to darken it, so I definitely don’t want to shoot the temperature higher.
You can see the lid of the pot – the dots on it are prior varnishes, tested to see if they are varnish. Just about every old book and every reference online talks about putting a drop on glass. I don’t bother with that – by this point, one lid is cool and I dribble a drop.
Three things can happen here: 1) the resin and oil aren’t linked, the drop is not clear and the feel is greasy, 2) the resin and oil are clear, linked, but don’t have much string, and 3) the long cook has left the components really ready and the varnish drop is clear and very sticky and strong in terms of stringing, almost like a glue.
If #3 is the thing, another quick stir for good luck and it’s time to get the varnish that’s made at this point off of the heat before the string gets too long and the varnish is a gel. Gel is no good – it’s a pain to handle, and my experience with the gelled stuff is it’s partially “spent”, as in when it dries, it doesn’t get as hard as wanted.
This stuff is pretty thick from the start, and the drop looks like this:
It’s a lot darker than the other varnishes on the lid because most of them are rosin or lighter copal varnishes. You can’t really tell, but the drop here is clear – it has no oily base, and it’s quite thick. The strings made by touching it are kind of fat and pull out to a long length that quickly looks like spider web.
It’s a candidate to come off of the heat right away to avoid ruin, and I do that by taking it off of the heat entirely and turning off the burner.
I’d love to let this get down to a really cool safe temperature before adding turpentine, but the first time was allowing the varnish to drop in temperature, it started to get thick enough that I wasn’t going to chance it.
I’m not going to tell you what temperature the turpentine goes in. It is much less than 600F – turpentine autoignites by various sources between 450F and 500F. Google says turpentine boils around 300F. From my experience, when it boils, it gasses off pretty quickly, so if you have to add it above 300F, there is a handy side effect that it will boil and somewhat self mix, but a less than handy side effect that it will also escape in some sizable fraction and you’ll have to add more.
This is one of the reasons why I use turpentine that’s $50-$60 a gallon rather than $40 a quart or more.
We have varnish now, that needs to cool to a temperature that won’t break a canning jar before being strained. I prefer the jar to metal cans just so I can see what’s in it. Jars are also a dollar each, roughly. Empty metal cans, definitely not. 
Expected somewhere around a quart with no loss, but we knew there would be loss. Amber would lose some of its mass in the run to just losing trash we don’t want to keep, and I ended up with about 2 ounces of unmelted amber, as well as the gooey mess of stuff that’s around it – maybe another ounce, and quite a bit of turpentine escaped. As far as the rosin goes, who knows. it definitely did not leave a uniform layer of melted rosin early on – maybe it disappears from the run temp.
Because there is a bunch of unfinished junk left in the bottom of the pot, when I pour it, I pour it through a dollar store sieve, into a funnel that’s lined either with a paint strainer or stainless screen that I found on the internet, with the idea there being if the stainless screen gets clogged, I can possibly burn out whatever is in it. Pouring this directly into a paint strainer is a no go – the trash and leftover stuff just plugs the screen and then the paper strainer seam will give way and it’ll just all go into the jar.
Once this cools, I take it inside and add turpentine in to mostly top it off. I generously labeled this as 2 parts amber to 3 parts oil, but it’s probably more like 2 to 4, respectively. Since this is batch 2 of the amber, I figure in the future if the desire is to get something really stupid hard, the solution is not chasing perfection – just start with more resin.
In reality, this varnish is still very hard despite being a little longer in oil, it’s super tough and you can’t begin to touch it with a fingernail.
It should be put aside according to holtzappfel (and probably everyone) and allowed to settle. Holtzappfel describes a month as a minimum and the longer it ages, the better.
Why do I keep referring to Holtzappfel so much when there are much more extensive tests? Because it’s relatively low information compared to a lot of stuff like the German American book that’s public domain digitally, and I can apply it more easily and refer to it. The focus in it is cabinetmaker’s varnish, carriage varnishes, Japanning and spirit varnishes (shellac and other varnishes that are basically resin or other ingredients dissolved in a solvent). There are certain things described such as photograph spirit varnishes with Sandarac, and other things of the like, as well as kind of complicated little french polish recipes, but I think if they were great, we’d still be talking about them. Sandarac spirit varnish probably is excellent for photos – it’s out of the scope here, though.
The last thing I do, almost always on the first day, is take some piece of wood and dab varnish on it. It doesn’t have to be anything nice, but I want to see that with sunlight or UV light, it will harden relatively quickly, and if water resistance is desirable, I will make sure the test piece is flat and after requisite time (an hour or so in direct sunlight for a thin film, or five or six times that exposed to UV light from UV bulbs), just pour water out on the varnished test piece and let it dry. This will occur over some fraction of a day. If the varnish is good, you can observe that the water has dried or is shrinking and see no visual change or feel in the wet area, or the area the water has escaped.
In this case, I just took a piece of chakte viga that’s waiting to be made into a handle later and slathered some on. There is no drier in this varnish, so without light, it would take a very long time for it to dry. Varnish can also be baked to a quick and very good cure, but on wood, not that practical here – most test drops that I’ve done end up spreading out in the bake and they get darker, anyway.
Darker on the left is the varnished cylinder, and on the right is just raw wood. 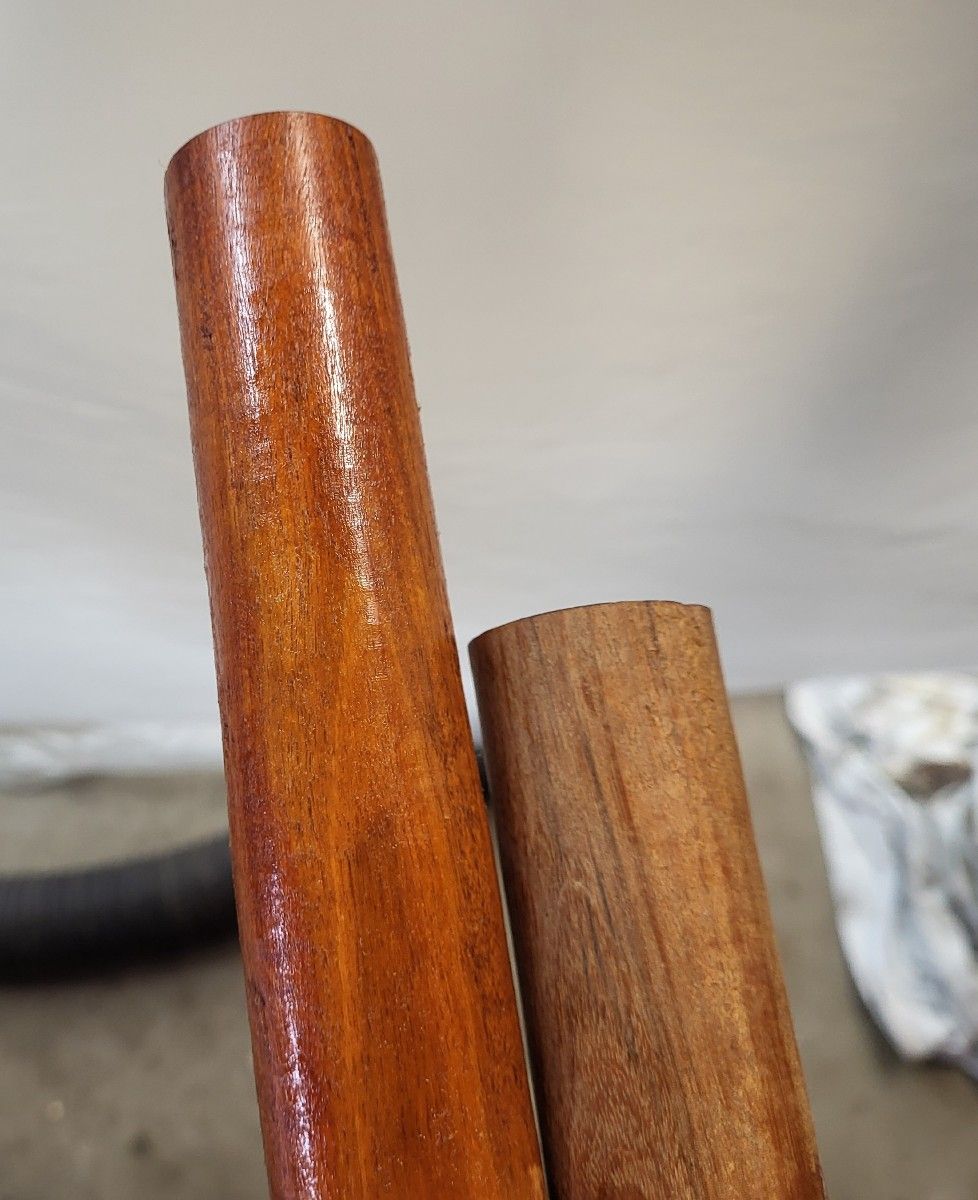 George Wilson tells me there’s all kinds of results you can get from Amber depending on the resin, and that he’s seen resin that has kind of an ugly grayish hue. The only place I’ve ever bought it is Wood Finishing Enterprises, and the result is the reddish brown color here. the little grains are all different colors. If you like sorting socks, you could actually separate them all and color match them. I’m satisfied with the mixed result. On dark woods like rosewood, you can’t see the reddish and on orangey red woods, I think the color is a strong enhancement of the base wood, and it’s in the varnish – not some faff-around experiment with dyes or stains. That’s a nice thing.
I’ve not had any luck with any of these varnishes being particularly good brushed without drier, and when I put them on chisel handles, even wiping, I want them to be dry in a day. To avoid bricking the whole batch, I only pour off about 2-4 ounces at a time and add 1-2% japan drier (nothing special, just hardware store stuff) estimated based on the total oil and resin. The old books talk about adding driers in the cook, and maybe the effect is better, but I’ll just mix it in to the poured-off amounts as I’ve seen no detriment to it, and it would be a shame to see this gel within any period of time in the jar.
With 2% drier, i’ve generally had good enough luck to be able to brush a coat of varnish on something once a day. That may sound stupid, but I’ve had trouble getting the coats to mate – even with drier, I think the varnish is still open for a little while, but it’s also hard enough to sand or wetsand. Another benefit of making the varnishes that are very tolerant of water – they wetsand well, and it’s easy to wipe off most of the unwanted stuff rather than having it rolling around in the next coat of varnish or contaminating the bursh. Cheap pine varnishes absorb the water quickly and the swarf and surface become a gooey bunch of pilling and nastiness.
You have to do a little math if you cook varnish, or I should say arithmetic and maybe some algebra here and there. The easiest thing for me in terms of getting the japan drier right is just using a measured syringe. you can use a lot less than 1 to 2 percent and still have some effect, but it goes back to the day thing above. I’m not afraid of the dryer and I want to be able to handle or recoat whatever is varnished the next day. Nothing is permanent – that’s just my preference right now. Having cooked amber twice, copal maybe 8 times and 22 or so total batches of varnish, there’s not much going on but just initial observation and a pleasant surprise of reasonable success.
