Just a little bit more.
I wanted to make a few carved bottom boxes just to get the experience. No big plans, but it’s hard to guess into carving stuff and I’m not going to start with some kind of sculpture and get lost.
you can do this a million ways, and a little flat combination ogee like this is quick. You can just mark it and chisel it off. Turns out, sanding is the shits on something like this (which is great!), so sawing a depth line to the center and then just carving in from the edges and across followed by draw filing. as these scrolls get deeper, it would make sense to saw some of them out, but not the way you might be thinking.
I don’t have a bandsaw and I know it’s tempting to want to saw a series of saw cuts all the way along the profile, but you have a great chance of sawing one or two through the lines and spoiling the whole thing.
No electricity and no sanding with any of these boxes – the scroll itself is just too much end grain and sanding would slow everything down.
A flat file and a triangle saw file both end up being really useful – the flat files will ride their edges in the concave parts and you can run them very slightly diagonally in areas – especially on the curved part of a bastard file at the top end. A fine saw file can do the same thing – not much for material removal for each, but you can get close enough with the gouges and a chisel to have not much work left.
The cherry boxes look like this: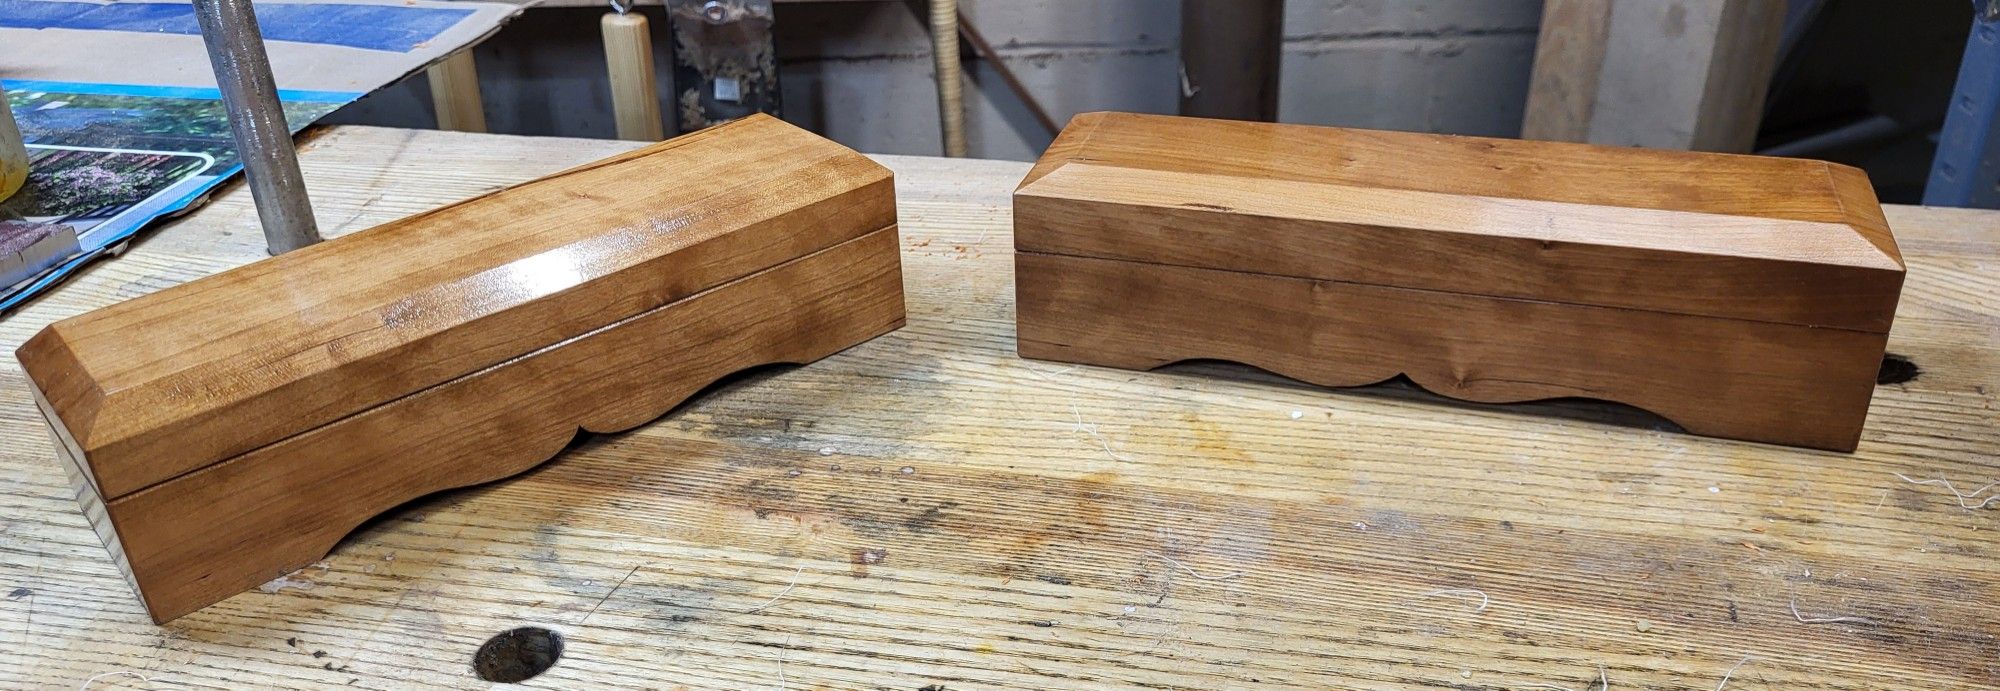
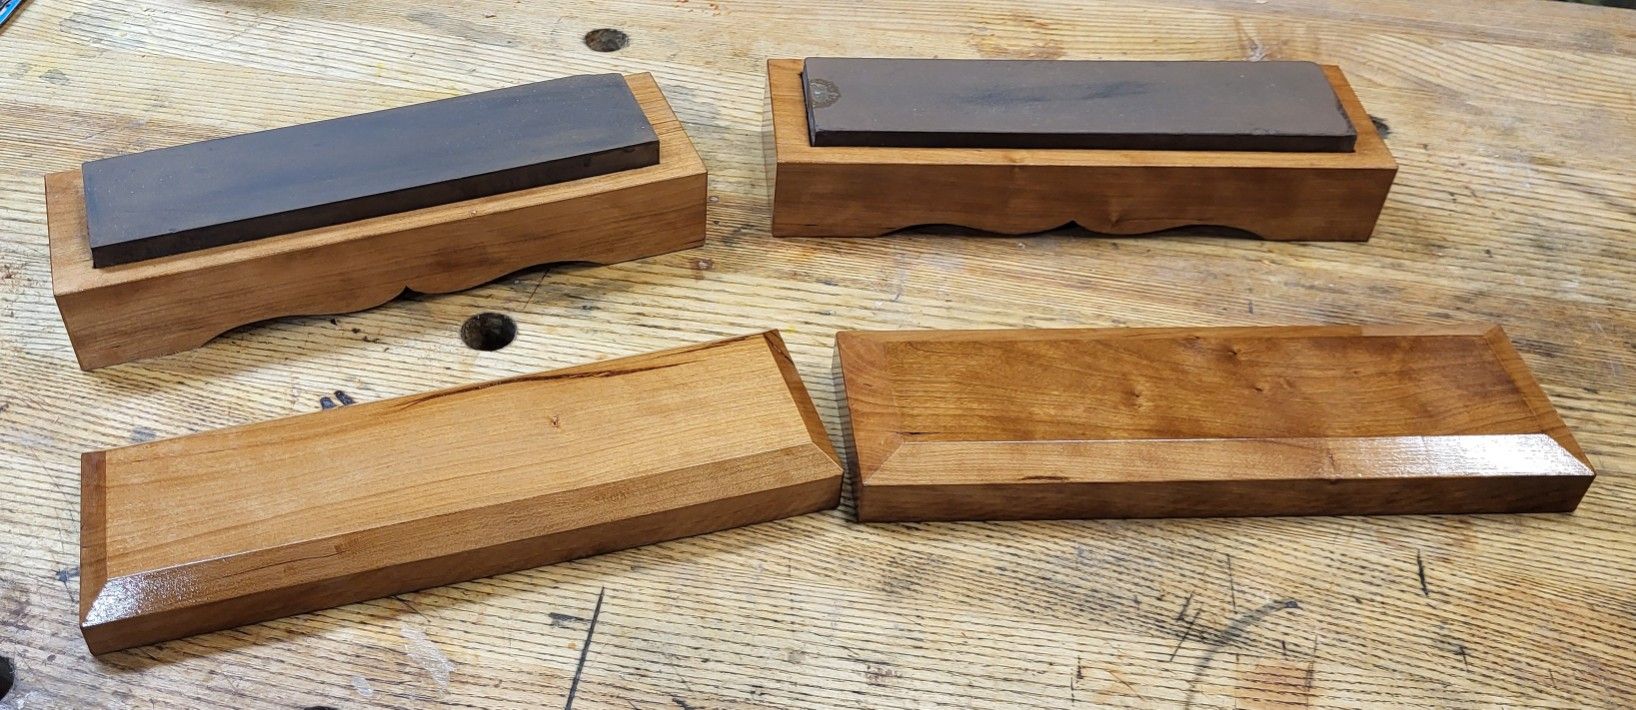
Each has an ultrafine India, and the reason for the shallow scroll is partly because the cherry stock I’m starting with isn’t thick enough to do anything more without leaving the inside of the box bottom thin.
These boxes are finished with varnish, and the dull one is steel wooled and waxed. This is a waste of time for finishing a box instead of just finishing with shellac or something, but it gives me a chance to experiment. I’ll use these stones (already am), or at least one of the two.

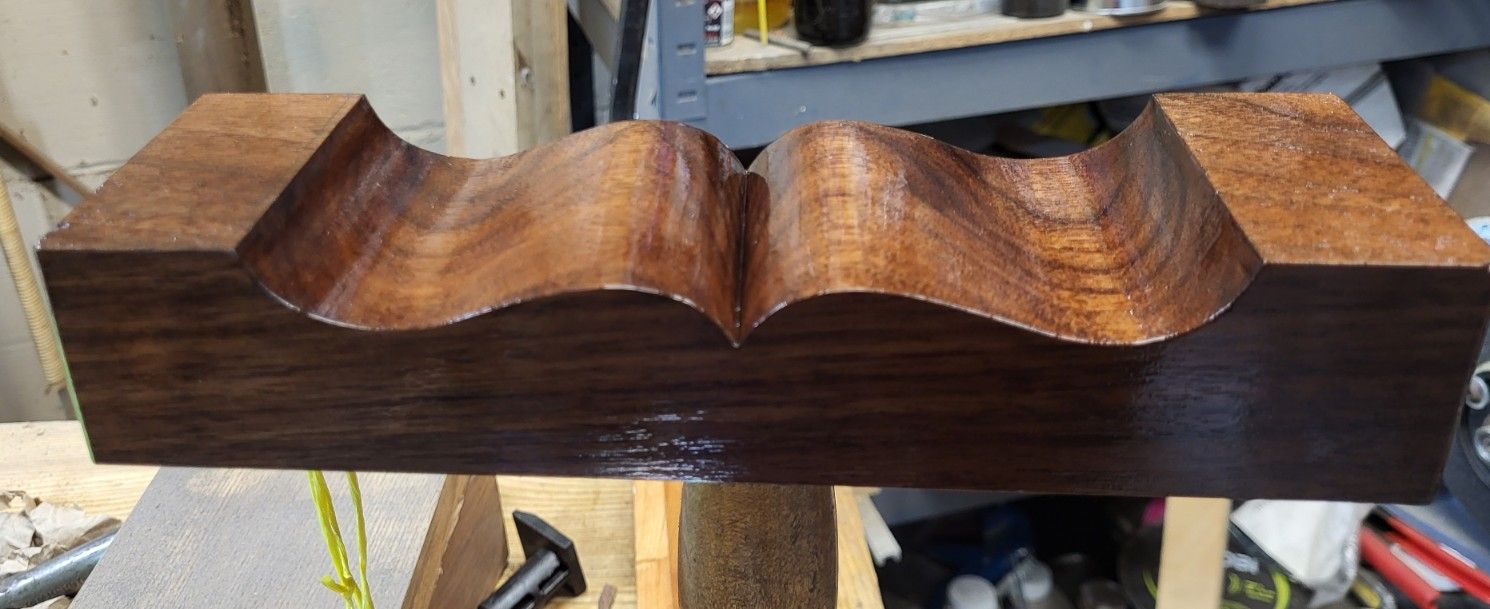
It seems like a bead would be nice, along with a deeper carve, so I tracked down some very dried out and long forgotten walnut – you can see it to the left in the picture above. 
Sawed in half with a rip saw, of course. The sawing seemed weird, but I marked this billet and sawed it accurately There’s no need to do that, but I think it’s a good idea if you’re going to work by hand – it takes little longer and makes you better at it when it counts.
Resawed with the same saw and then planed the wood, which immediately let me know the wood is full of silica. It’s straight on two corners and grain running diagonal on another. Must be stump wood or close to a stump.
Since the picture isn’t big enough in this format to see the silica, you can zoom in on this link.
This gave me big enough wood to make a deeper carve. How do I come up with the profiles? First of all, I don’t know anything and can’t draw that well, but there are four ogees in this – two on each side, and a business card is probably good enough for a pattern. I have some cheap plastic curve templates and snagging curves off of different parts of them allows me to make something that’s not just perfectly symmetrical, resulting in this. something a little more radical yet would be nice, and after making this box, I realize that it would look better with the bead either in the bottom (it’s in the lid) or with a taller lid. next time!
You always hope for each one to get a little nicer, and this box is still all kind of freehand, but it’s a little nicer than the others.
The bead is just planed in it, of course across the end grain, too, with a griffiths beading plane. it’s safe and easy and a router would probably do this OK, but I don’t get out of bed to use a power router.
I’m going to try a cheesy way of filling the pores on this one, which is to use pumice and 1000 grit sandpaper in thinned varnish to pack the pores. Shellac would work, but varnish is better at showing depth in wood.
I should be making tools – I can actually make things people want doing that, but this diversion was something I had trouble resisting, and I couldn’t explain why. Since woodworking is a hobby, I try to follow the scent like pepe lepew did rather than trying to justify what I like or come up with a reason that I should like pointless little ventures…..like making chisels, for example.
Edit to Add Later
In the process of varnishing this box. Pore filling was pretty mediocre and varnish is a finish that favors rough surfaces so it’s seemingly harder to get coats to level vs. something like lacquer. I can’t tolerate the stink of the brushing lacquers indoors, though, and they’re hard, but not tough, and would chip.
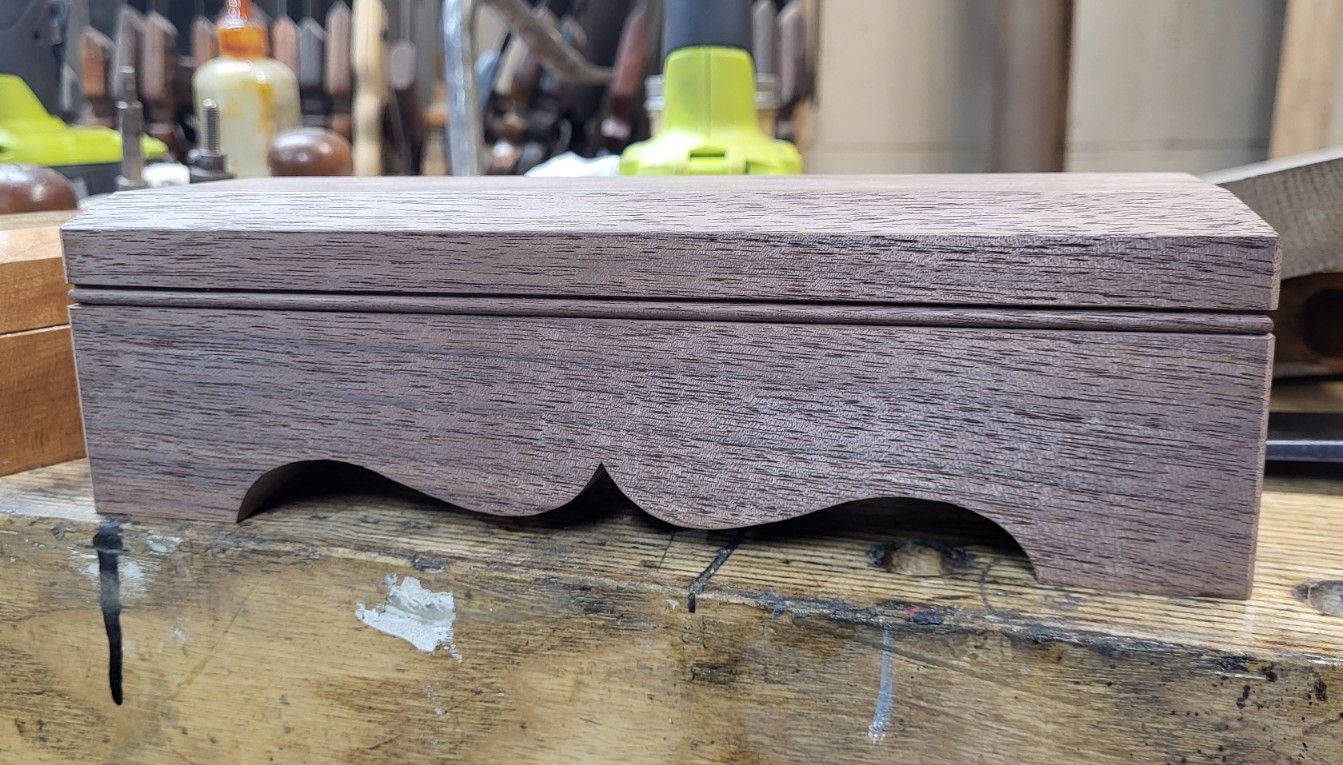
but when I turned this box over, it’s not like the scroll is ground breaking, but it’s probably the best feature of the box and will pretty much live a life of use hidden out of view.
Too, notice the color response of the wood when varnish is involved. Varnish and buttonlac are two finishes that I really like – both – based on the tone they impart. They make everything seem more colorful.

I’m a pretty big fan of that box style.
LikeLiked by 1 person
As am I – for the most part. things can always look better, even if they look good. The style is lifted from the English, though (not sure if that’s a strong enough way to say it…i *copied* stuff other people did for the most part). The box height is a nice way to elevate a stone and get your knuckles away from a surface, and in the case of the English types, often pinned on the bottom to stick in a bench. they’re a nice skill builder and style pondering thing and even a basis for testing finishes or pore filling. The only issue if there is one is they require you to have some dried and straight wood to make a stable box. With a router, maybe less good wood could be used, but it’s worth having straight wood for things and leaving the odd wandering wood for turning projects where the runout might be a feature.
still pondering on the feet, but coarse adhesive sandpaper may be the right thing. drawer liner would, too, but it’d be really hard to hide.
LikeLiked by 1 person
Handsome boxes! The walnut one especially has a low slung and sturdy (without looking clumsy) look that I like about it. I also think that the bead is in a pretty good spot. This of course means that I think you should try one with the bead in a different spot just to ser what a taller lid would do. Small projects like this is always a great way to test things and just go along and see where it takes you. It is usually very enjoyable.
Getting a reason to make pretty boxes is a good argument for oil stones in my book. Bought a bunch of stuff from buyee recently and couldn’t resist to get two NOS vintage Norton medium indias with cute blue and yellow boxes with bears on. I don’t even know how useful medium indias are but they were pretty cheap even after shipping them to Sweden. So they already havet pretty boxes even if they are cardboard. I havet to find another excuse to make an wood box. Because this post was good inspiration! It lade me think about how I would go about making a box for a sharpening stone!
LikeLiked by 1 person
Nice boxes! The dull one looks especially good. Not sure why you think pore filling is mediocre, if the finish is flat it’s good in my book. Perhaps the photos don’t show it, ‘cos it looks good to me. I like sharpening stones boxes a lot. Any boxes for that matter, but sharpening stones with a cupid bow look very.. idk, calming?
I tried putting the endgrain blocks an the end of the stone in a couple of my last boxes. It definitely works, maybe not for the stone wear, but you don’t suddenly jump off the stone (damaging a cutting edge usually). Perhaps I should re-do the previous ones. You’re absolutely right about making them by hand – using a router doesn’t produce a box faster, they’re small and re-clamping consumes all the time that is saved by a router excavating. Hogging out waste with an auger or a Forstner works, though, because you just need to make the opening square, absolute bottom flatness isn’t required. Also, when working by hand it’s really easy to have thin walls, 1/8″ is not a problem at all. I think it looks better than 1/4″ walls, that’s a bit too fat.
But boxes don’t solve storage problem, at least not for me. It would be curious to know what other people do for the stones storage. I just suffer through the mess on a table, but maybe one day I’ll do a dedicated sharpening table and like a hundred of pigeon holes to store the oilstones. You have hundreds of them, do you too use only a couple and the rest is in the storage? Every stone is fun to use in its own way, I sort of rotate through them, but wouldn’t it be nice to pull a particular stone for a particular chisel or a plane iron? If somebody has tools from various places, e.g. EU, vintage UK, American, etc. – steel composition varies enough to feel the difference on a stone. Idk, perhaps I’m deluding myself, but I have two stones I’m sharpening UlmiaECE irons on, there’s an arkansas stone that feels best for Sheffiled steel, etc. Perhaps there IS pairing between a steel and a stone, like Odate wrote (I always dismissed it, lol).
LikeLiked by 1 person
Drilling with forstner or auger is definitely faster. I have done that before and it leaves little – the shallow incannel gouge that I use for the sides just nips the triangles or whatever you’d call them right off without much effort. I wanted to exclude power tools in this case, and also a couple of the boxes have less material in the top than the auger screw. – though the boxes with the bottom detail probably all have enough on the tops to not have that issue. The ones resawn from an oak 2×4 are pretty anemic on either the top or the bottom or both.
Yes on the problem with the stones – they take up space and the boxes actually make it worse. I’ve had hundreds of stones, but I don’t think I have more than 50-75 bench stones at the moment. A lot are just sitting around, and most of the ones in the shop are in drawers. Of course that’s an absurd number of stones and I don’t use most. What ends up happening is the IM 313 is always on the top of my utility bench area, and then a few other stones are sitting out there and I use them until I clean something up and then maybe don’t get the same ones out the next time. There’s no functional reasoning behind it and some of the stones haven’t seen anything on the surface for probably near a decade. I will need to dump some at some point. Once in a while, I will intentionally get a stone out that will get diamond powder on the surface because of high speed steel or something, but it’s not common. I sharpen my turning tools (M2, about 65 hardness) on the im313 fine india and hard ark To use “the right abrasive” with those would be less good than having a long oil bath stone that does well enough.
Japanese sellers of natural stones convinced even some of the craftsmen that if you had blue steel or something, they could find a good natural stone to go with it, but the reality is a good set of finishing stones would handle white steel and the other stuff (blue and super blue) really offers no reward and once tungsten and chromium carbides are involved, no natural stone should be used. What I see prescribed quite often is a softer stone that will stay slurried, but the edge is supbar if that’s the case. Synthetic finishers for anything blue steel makes far more sense, and yields a finer edge. I guess the stone dealers didn’t want to give up and there were definitely cabinetmakers and carpenters who thought through superstrition that synthetic stones could destroy steel.
Anyway, the smartest thing I could do would be to sell 80% of my stones, or throw away a bunch of the pointless synthetic waterstones. They sell for little used. I dont’ always round over edges wtih the buffer, but it is true that it can kind of step up stones not good enough to be finishers to the point that just using it to buff strop the edge takes away a lot of the “uniqueness” of finsihing with other stones. But when the edge is better, that uniqueness is just curiosity. I made the last box with just the UF india and buffer other than a slip for incannel gouges, and while the edge is not quite as good even after buffing, it’s still really good. At least 8k waterstone good. I’m a little averse to using it as the last step on the back of a tool, but it works well enough if the edge is buff stropped.
LikeLike