Ill parent, kids at a busy age and an employer going through changes and more work than in the past. It all boils down to doing less discussion online or pondering, but I still get to the shop a little. And hopefully more in the next several months.
What I make when I’m busy tends to be smaller stuff and not full sets of chisels or guitars, etc, or a dozen batches of varnish.
Someone stopped by here a few weeks ago, and left behind nice things in what is, I guess, a de facto trade, though I don’t get involved in much trade of obligation, so it’s not really that. It’s just what happens if you don’t bind yourself into “I have to get even with everyone” or everyone has to pay something for lifted fingers.
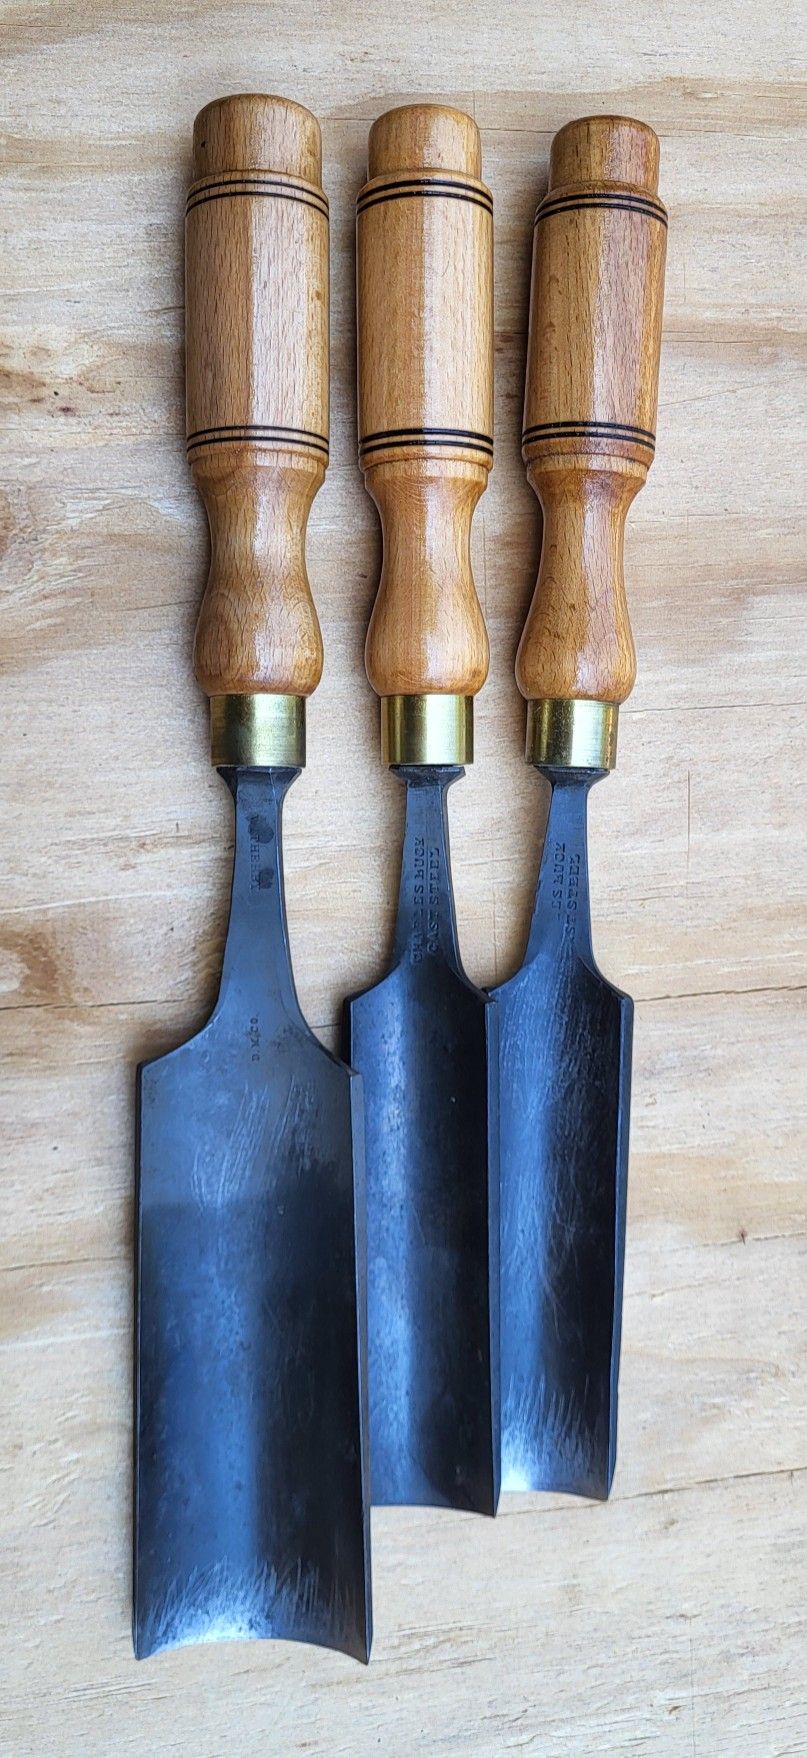
Some of the lot was three wonderful large gouges. I ended up turning handles for them, not because there is something special about the particular handles, but because I wanted to turn three slightly different versions so I could tell what looks nice. Even with limited shop time, it always seems better to gather information from something that just think you make it and nothing could be better, and all three should be the same. I always would like something nicer looking and see ways that all three of these slightly different handle profiles could be better.
But the gouges offer a great distraction because they look so nice. the largest of the three must be at least 2″ wide – these are stout. 
They look like this on the gouges. I should have found a finer wire, but didn’t have one at hand for the burs, so they are tubby and a little unsightly. Ignore the line of light and dark on each, that’s the shadow from a roof overhang above.
And as part of the pop’s pro cut thing, I mentioned the steel to someone I know, who promptly asked if I could make a santoku in the steel with a tanged handle rather than through tang. Through tang is easier to do nicely if you have limited means. Tang is probably easier to do not nicely, but that seems a waste of time. I came up with the idea of two cocobolo handles (one for me, one for the requester) with a satinwood gasket and ebony front cap:
These are getting varnish. Cocobolo’s oil is an antioxidant or something, and oxygen moving around in the varnish and attaching itself as double bonds is the way it cures/crosslinks. the varnish on these is madagascar copal, which is a little more exotic as varnishes go, I guess, but it has good hardness and should be durable without having to be thick.
The more red color handle here became a contest to see if the varnish just dries really slow as it fights the antioxidants, or if it never dries hard. It appears to be the former, but with 2% japan drier, the same varnish is on the chisel handle above – totally dry and will not be sticky or marked in a day. The reddish cocobolo here can spend a day in the sun, or could at the outset, which typically will get a varnish pretty far along in an hour or two… Anyway, the reddish cocobolo here will spend a solid day in direct sunlight over a chafing dish (to reflect the rays to the back side and not waste them), and still need more dry time.
A shellac seal will be susceptible if there is water, but I did a little, not enough, and decided the red handle, which I made for the knife to be sent, will just be mine. The brown handle stunts drying time by a factor of two, but it’s tolerable. Interestingly, varnish must soften into layers when it’s applied within days as even later coats do not dry quickly.
The knife with the brown handle is finished and I will ship it this week:
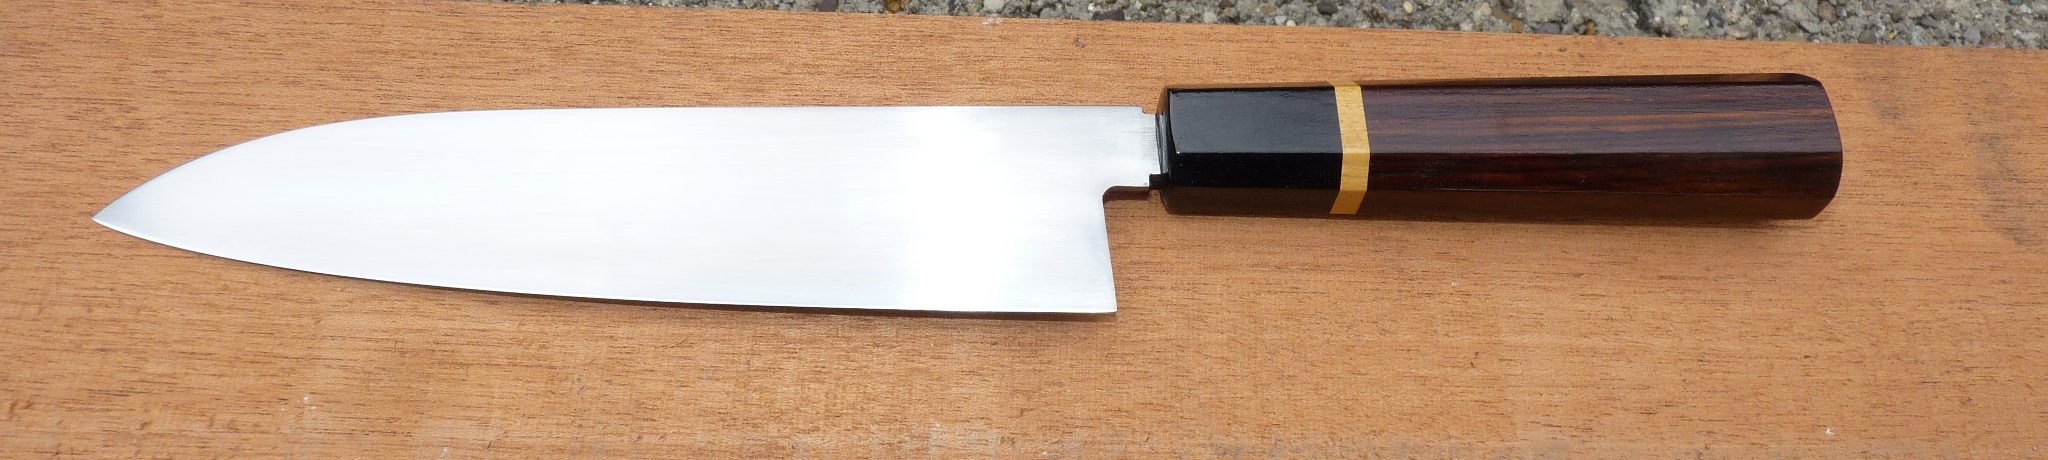
A true professional knife maker could come up with something nicer than this, but it’s about a five hour knife and not a five thousand dollar knife. I think the result is suitable.
The pro cut steel is a little different. It’s not stainless, so it’s not a gen-public type knife. The steel in this case is about 63 hardness after tempering, and it drops its burr really easily. I always buff knives, anyway – the edge is better off of the buffer. A larger picture can be viewed by clicking this text. The picture makes the blade look like it’s polished, but it’s linearly sanded at 400 grit. Why? I want whoever gets a knife like this to be able to refresh the surface simply without finding cleaning up a mark or stain suddenly makes it so the whole visual of the knife is spoiled.
Both knives, this and the other, are a little over 1/100th inch thick at the top of the cutting bevel, and then they taper out, of course. With a unicorn edge, despite the thinness, they can be used to carve, whittle wood without issue other than it’s a little unsafe, not for the knife, but for the user. The real end use for these is easier, though- meat and vegetables.

Those are some nice looking knives. Always wondered what the rationale is for octagonal vs rounded handles, more organic shapes seem to be more comfortable? Though I’ve never actually used an octagonal one.
LikeLike
Thanks.
As far as the handle shape goes, i don’t really know the history on tanged handles and in this case, I just looked around at santokus to find what I might like. The inexpensive light wood handles, not sure what their origin is, and there is a fair number of these in octagonal format. Some have equal sides at the butt all the way around, but I favor the sides being taller for what seems like obvious reasons to me. As long as the facets have some size and the handle isn’t undersized, they’re comfortable, enough so that I forget they’re faceted.
Part of the reason i did these, also, instead of making an oval shaped handle that’s otherwise similarly made is I think facets look nicer and one doesn’t have to have a smart eye to see them as more visually interesting.
LikeLike
Thank you for sharing. I always enjoy seeing your experiments.
LikeLiked by 1 person
Nice work with the handles, I like the one on the right with beveled stops the most. Have you blued them?
Also, I was looking for your older post about hardness testing modern plane irons from Aliexpress, but can’t recall where it was – on the forum, on YT or somewhere in the blog? I’m trying to recall which ones you have tested — laminated ones or the welded ones, and what were the results. Could you please point me to that post?
LikeLiked by 1 person
The one you like, I didn’t like at first. I made the ball at the bottom asymmetrical and didn’t like it, and I think in premise with the shape of a hand, it makes less sense, but I’m starting to see your way as I look at the picture more – the asymmetry doesn’t look as bad to me and you would like if you’re making these handles to have more room to make the ball and shaft above it more drastic, but a long tang hole goes up through that area and you really can’t get too piggish and leave it weak. So, it is what it is. the one on the left has the cap left too big. The one in the middle is the opposite, and the burn lines in it are enormous. The one on the right is decent – the bevels look better in this picture than they do in person – something between them and nothing, as they also can’t be left square, and if you leave only a gradual step there, they look bulky.
As far as the hardness, the imported iron bill tindall had tested before I got a hardness tester was 65.5 average of three strikes at the edge. That was an HSS iron with the braze joint, stanley #4 size. I have more of them now and could hardness test them. I know I’ve got some that were softer than that, and a couple that were overhard and unusable – they are insane, noticeably a step or two above 65.5. Something went awry as they are close to M2 in alloy and should be around the same hardness. M2 is happy at 64-66.
I don’t think I’d have luck finding the post on a forum. Hardness on that test Bill had done also a little lower closer to the braze – interestingly. But that’s far away from the edge on those irons and it would take forever to get to it. It was, to my recollection, more like 61/62 some fraction of an inch away from the braze.
LikeLike
I think the asymmetry is what makes it nice, kinda like a Windsor chair leg. Not sure whether it’s intentional, but that handle also gets wider towards the blade, very convenient when paring. It will probably still look nice if you make it a bit thicker.
Maybe I got lucky with the Chinese iron blades, mine feel really sweet on an India. Not rubbery and not glassy, just right. They took a good polish at the edge and they didn’t immediately chip like Ulmia. They’re way better than modern Stanley irons. Too bad the choice of widths is limited, or I’d replace every Ulmia iron right away.
I was wondering ‘cos many manufacturers tend to temper HSS quite hard. Can’t tell whether this particular steel has higher toughness or higher abrasion resistance just yet. What’s your experience, have you used them longer? A friend of mine read a label and helped to researched a manufacturer online for like 20 mins. The label says they’re a member of “Shanghai toolmaker guild” whatever that could mean, no definitive data on the steel itself, just the usual marketing blurb. These irons were recommended to me by Xin Quansheng – that Chinese joiner from YT people seem to go crazy about every once in a while. I’ve reached out (that was quite an experience on its own), bough a few things off him, also asked a few questions, he said he uses these when an iron needs a replacement. So there’s that. Maybe if they’re a small brand they have typical small brand’s QA issues — that could explain variations in hardness. I’m planning to buy a few more, will let you know if the new ones will be noticeably different.
LikeLike
Ahh, I probably misled by talking about the outliers for those blades. the only muji/brazed type blades that I got were problematic were two with black paint. But I used one of those scraping shellac off of the white oak floors in my house, so that brings the total number of “flawed” examples down to one, and that one and the other really hard one with black paint were $15-16 in total, including shipping. the others averaged about $11 each, so out of perhaps 8 total, we are way up on the net side positive. the rest were all usable. Even when they’re 65.5, they’re great.
in 2019 when i did the plane iron test, I put the 65.5 hardness iron in the rotation thinking it was 61. It had the same edge life as 3V at 59 hardness, or about 65% longer edge life than good O1 and 30-30% longer than A2 with out the basket case that A2 becomes in the last 20% of its edge cycle. A2 gets really miserable once the wear gets to about 80% of the way to the point that it won’t pick up a shaving at all.
These lower cost irons were not as uniform in carbide distribution as better M2, but they were decent, and you can grind them hot. What we don’t know is if the supposed 61 hardness target is an accurate one in the first place, or if it was just copied from another translated bit of ad copy.
For $11, they are super dandy.
I did have another one that had a tiny quarter BB sized void in the M2 bit part of the way up its length – again, for the price, no big deal. You’d just grind through it when you get to it.
LikeLike
By the way, the gouges came derusted by someone else, but really very little rust in them in the past – it may be oxide from cleaning them up as they had their bevels cut and then blunted. Fortunately, I’ve got plenty of gear to make getting the bevel cut back to crisp pretty trivial. it would be a bung with stones or a wheel grinder.
they look great, though (the gouges, that is) and really take a lot of pressure off of the handles needing to look that good on their own. One of them is witherby, too -the big one. I never cared that much for the witherby chisels that were always gushed over – they were good, but often described beyond that. We’ll see how this gouge is. I’d expect one as big as this to be a step softer than a small carving tool. It’s really nicely made, though. The other two are chas buck.
LikeLike
Thankyou for sharing this project with us. Good clean work on the Cocobolo handles. Whether a handle with flat surfaces is better than one which is turned is a nicely posed question and I think your answer is clear. Try both and choose which you prefer as there is clearly not an empirical answer.
Off topic but you answered a question I posed on UKWorkshop about rehardening laminated plane blades a while back. Thanks again. Your knowledge is far reaching!
It turned out that the reason I was looking to do such a thing is that I had softened the cutting edge of the irons by letting them get too hot when grinding but was unaware that the softening was only present at the tip of the iron so careful regrinding soon got me back to good useable steel.
You mentioned you have many of these old English laminated irons and may experiment with hardening and testing their hardness some time. I would be interested to hear how you get on if you ever try to do this.
LikeLike
Hi, peter – thanks for conveying the resolution of the issue with hardening. it’s a good one to relay, but probably on a forum, even on the UK, you’ll get 20 responses that aren’t very useful and will find out one more time how richard maguire sharpens. What you found is important, though – for all of garment rending that occurs over bluing an edge, and it’s something that doesn’t happen for long, the damage is not deep. Sometimes, it’s so superficial that a hone will get rid of the worst of it and on you go from there, or if on the corner of an iron, inconsequential. I burn something out of laziness once every several years, usually due to dwelling on a corner, and it doesn’t bring the terror it did in year 2 of woodworking. The idea of hand grinding a thick full hardness iron still brings the terror though!
I’ve tested some of the laminated english irons, and a few others from continential europe and some from the US.
https://docs.google.com/spreadsheets/d/1kAVLe_gU8rzojQmJD50vQnw84yx4-xUeGqHAzscie0g/edit?gid=0#gid=0
as is the case, I did get a little lazy in the middle and fail to take a picture of some of the irons, but you’ll get the idea.
I’d love to do this with all of them, but there’s a catch with my hardness tester, and really all of them. There are some minor undulations in the soft lamination on irons, and sometimes an improvement in surface finish needed on the hard side of the original grind is coarse. The actual testing to get two or three dents is a matter of a minute, maybe two, but the other prep work is kind of a pain. Little variations on the back side that sits on the anvil can lead to minor wobbles that completely spoil the result. Could create an error of four or six points on a hardness tester that really is good for a resolution of about 1/2 point in capable hands. We can tolerate the half point, of course.
LikeLike
You are very scientific in your approach which makes your information so valuable to me. All those hardness tests you did on all those irons and edge tools makes for a great data set. With the plane irons it appears that there is a narrow band of values they mostly fit in to so the steelmakers were ‘more or less’ all doing the same thing.
My approach is to try and make things work the best I can while trying to discard methods and habits that don’t work so well.
Sharpening is a case in point. There seems to be an inordinate amount of content devoted to the subject which for the most part never states that you have to devote your own time and energy into developing a quick and repeatable method of your own (mine is a variation of your two stones and a strop btw)
My level is beginner but at this stage of the game I would describe myself as an expert beginner as I have been trying to get rid of bad habits in the use of hand tools for the better part of 50 years.
LikeLike
You hit the nail on the head here. Whether it’s Schwarz or Maguire or worse than that among the stumpy nubs type, everyone is misdirected into a side room where they think they are getting inspired to build by coming up with a whole bunch of kit and things they have to memorize and acquire.
You’re also captive looking at work and style of someone who has limited ability in both. We all do. It’s a trap to find shaker easy to make and try to decide that’s the look you like, because you’ll want to make a guitar or whatever else at some point, not in shaker style, and the lack of a broader focus of what looks good will result in weird plain work when you’re (that is, we’re all) capable of more. the side room has more doors to side rooms and nobody ever goes back out into the hall. We get stuck trying to memorize all of the stuff that’s in the side room and the people trapped in the rooms don’t like if you ask if they’re staying in those rooms for 20 years because they like them, or because they believe the side room vendors are actually better than the wide open world of making that’s down the hall.
Walk into that room, and nobody really has a specific side room they learned from – they are their own biggest fan. I am my own biggest fan, you should be yours, everyone should be theirs. Not in a narcissistic way, but in that you can tell what you need to learn to make things and get more done in the shop in a satisfying way than anyone else does. Chris Schwarz can be his own fan. If he becomes the source of woodworking for someone by default, they’re limited and will convince themselves he’s written about sharpening again and talks about “O2 steel and A1 and old steel is all O1” or whatever else – and now he has something new about sharpening behind a paywall and it’s a “must buy”.
The folks who stayed in the alternate reality less realize they want to know what looks good, what works well when you make things so that you don’t get stuck making something that’s not good at either of those aspects or only one or the other, and God forbid, if you want to make something that’s a little more classic in design, you have to get away from the beginner’s rooms and just look at things that were made, and figure out how to make them by looking at them – not by getting 8 different in person classes or whatever where you get stuck like public school early on, waiting for the kids who aren’t good at reading, before you get split by ability later.
I guess the offshoot of this is we all want to build by feel and looks, something that looks nice and feels nice to make, but getting there has aspects of scientific experimentation and observation. which gives people sometimes the impression that if I go long or show microscope pictures, i’m in a side room near the entrance with that stuff and never got into the main hall (that I don’t make anything). To do this stuff that comes across as scientific because the nature of it is, doesn’t feel like science. it feels like trying to solve issues and the exploring curiosity when you learn more. It just happens naturally. Every good builder or maker I know has much deeper thoughts about things from experience than just “this method or that method and these steps” because they do the same thing. the folks who can give you the proper name for every method and every origin, etc, usually don’t do much.
LikeLike
Thanks David for such considered words. I started rooting around on the internet looking for specific information to help solve particular problems years ago and found the process inefficient but oddly compelling.Inefficient because there was no single resource that was analogous to a human with plenty of experience who could say to you ‘do it like this’ or ‘have you considered trying that?’ You have to dredge through masses of material with no guarantee that you will find what you are seeking until after the search.Compelling because most of what is out there is there because the people, broadly speaking have a shared interest in the subject at hand so the content can be a series of comfortable rabbit holes to go down. Ultimately, the inefficient greatly outweighs the compelling which is hugely frustrating.Your example of side rooms being used to the exclusion of the main hall is useful to explain why so much material is reiterations ad nauseam of the basics with no development to more advanced concepts.In utopia, I will manage to find the perfect master on whom I can rely for guidance if needed but until then I am very content with your philosophising and general approach
LikeLike
Hi David,
The comment above from freelybear002358010c was from me, Peter.
For an unknown reason my profile changed to the above.
LikeLike
no problem on the name – wordpress shows me the email address of the poster, so I knew who it was. Of course, if your email address was something generic, I’d be lost!
LikeLike